
What is Crossfading?
Crossfading is a technique used in audio mixing, where two songs blend seamlessly together by gradually decreasing the volume of one track while simultaneously increasing the volume of another. This creates a smooth transition between songs, eliminating any sudden or jarring silences that may occur when one track ends and the next begins.
With crossfading, you can create a more immersive and continuous listening experience. It is commonly used in DJ sets, where the goal is to maintain a seamless flow of music without any interruptions. However, crossfading is not limited to DJs – it can also be used by regular music listeners who want to enjoy a cohesive transition between their favorite tracks.
When crossfading is enabled, the ending of the first song and the beginning of the second song overlap, creating an overlapping section of audio. During this overlap, the volume of the first song gradually decreases while the volume of the second song gradually increases. This results in a smooth and seamless transition between the two songs.
Many digital music players and software applications, including iTunes, offer the option to enable crossfading. This allows you to enjoy a continuous stream of music without the interruption of abrupt pauses between songs. By incorporating crossfading into your listening experience, you can elevate the enjoyment of your favorite tracks and maintain an uninterrupted flow of music.
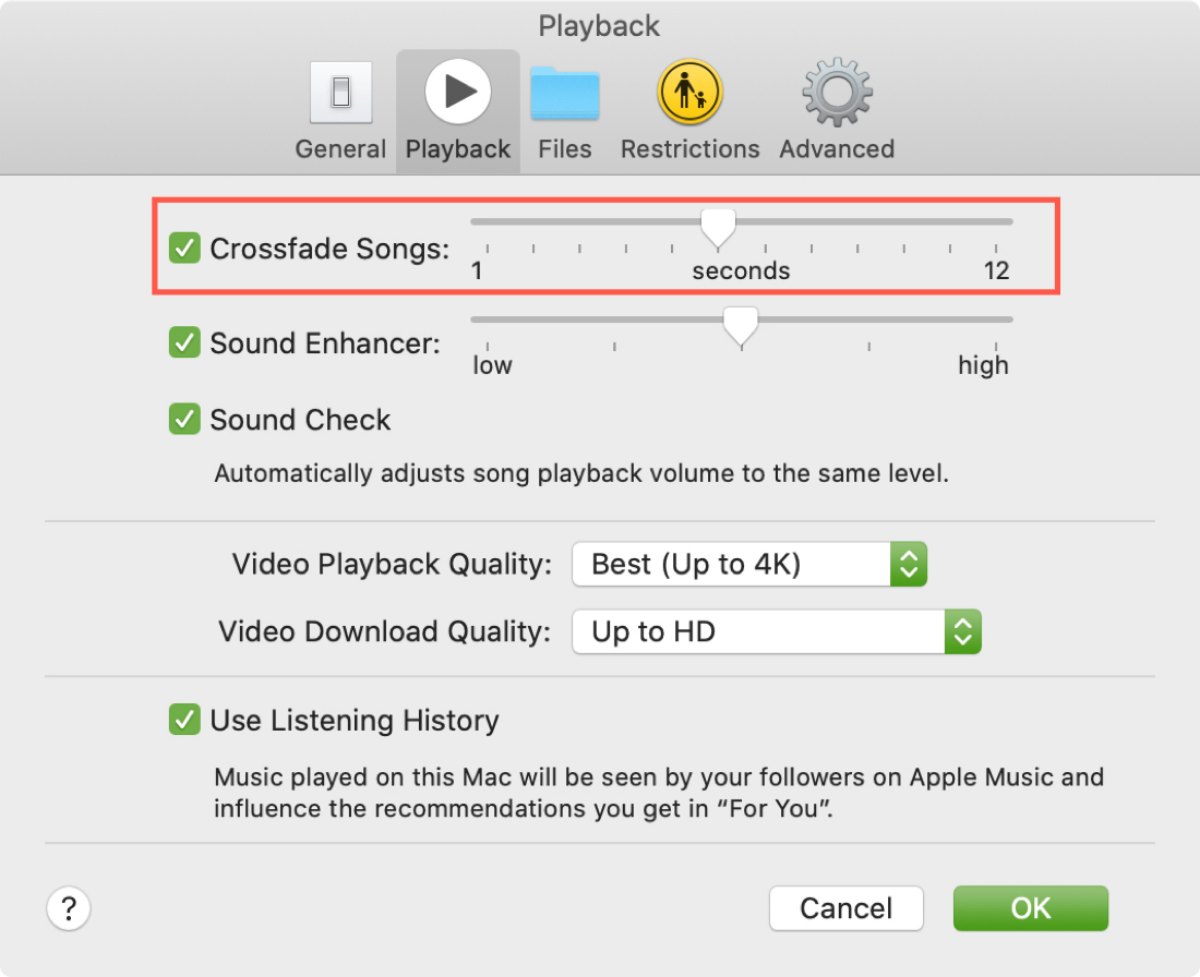
How to Enable Crossfading in iTunes
iTunes, the popular media player and library manager developed by Apple, allows you to enable crossfading to seamlessly blend songs together. To enable crossfading in iTunes, follow these steps:
- Open iTunes on your computer.
- Click on the “iTunes” menu at the top left corner of the screen.
- Select “Preferences” from the drop-down menu.
- In the Preferences window, click on the “Playback” tab.
- Check the box next to “Crossfade Songs” to enable crossfading.
- Adjust the crossfade duration by dragging the slider to your desired length. The default duration is set to 6 seconds, but you can increase or decrease it according to your preference.
- Click “OK” to save your changes.
Once you have enabled crossfading in iTunes, the software will automatically blend songs together during playback, creating a smooth transition between tracks.
Note that crossfading is only applied when playing songs from your iTunes library directly in the iTunes software. If you are syncing your music to an iPod or iPhone, crossfading will not be applied during playback on those devices. Crossfading is strictly an iTunes software feature.
It’s worth mentioning that enabling crossfading in iTunes does not affect the original tracks stored in your library. The crossfade effect is applied in real-time during playback, so your original music files remain untouched.
Now that you know how to enable crossfading in iTunes, you can enjoy a seamless and uninterrupted listening experience as your favorite songs blend together harmoniously.
Adjusting the Crossfade Settings
Once you have enabled crossfading in iTunes, you have the flexibility to adjust the crossfade settings to fit your preferences. Here’s how you can customize the crossfade settings in iTunes:
- Open iTunes on your computer.
- Click on the “iTunes” menu at the top left corner of the screen.
- Select “Preferences” from the drop-down menu.
- In the Preferences window, click on the “Playback” tab.
- Here, you will see the “Crossfade Songs” option and a slider to adjust the crossfade duration.
- Drag the slider to increase or decrease the crossfade duration. By default, it is set to 6 seconds, but you can choose a shorter or longer duration based on your preference.
- While adjusting the slider, play some songs to preview the crossfade effect and find the duration that best suits your listening experience.
- Click “OK” to save your changes.
By modifying the crossfade duration, you can fine-tune the transition between songs to achieve the desired effect. A shorter duration will result in a quicker transition, while a longer duration will create a more gradual blend between tracks.
Experimenting with different crossfade settings allows you to cater the crossfade effect to your personal taste and the genre of music you’re listening to. For example, you may find that a longer crossfade duration works well for smooth, downtempo tracks, while a shorter duration adds energy to fast-paced, upbeat songs.
Remember, the changes you make to the crossfade settings in iTunes apply globally to all tracks unless you change them again. So, feel free to explore different settings until you find the perfect balance and transition between your favorite songs.
Now that you know how to adjust the crossfade settings in iTunes, you can customize the crossfade duration to create a seamless and personalized listening experience.
Crossfading in Playlists
If you enjoy creating playlists in iTunes, you’ll be pleased to know that you can apply crossfading to playlists as well. This allows you to seamlessly transition between songs within a playlist, creating a continuous and cohesive listening experience.
To enable crossfading in playlists, follow these steps:
- Open iTunes on your computer.
- Create a playlist or select an existing playlist from your library.
- Click on the “Edit” tab at the top of the iTunes window.
- Select “Add To Up Next” or “Add to Playlist” to add songs to your playlist.
- Once you have added songs to the playlist, click on the “Playback” tab in the Preferences window.
- Check the box next to “Crossfade Songs” to enable crossfading in playlists.
- Adjust the crossfade duration using the slider. You can choose a shorter or longer duration based on your preference.
- Click “OK” to save your changes.
- Play the playlist, and you will notice the songs seamlessly blend together as the crossfade effect is applied during playback.
Crossfading in playlists allows you to create a mixtape-like experience where each song transitions smoothly into the next. Whether you’re creating a playlist for a party, a workout, or simply for your own enjoyment, crossfading adds an extra layer of continuity and flow to your music selection.
Additionally, you have the flexibility to customize the crossfade settings for each playlist individually. This means you can have different crossfade durations for different playlists, tailoring the transition between songs based on the specific mood or theme of each playlist.
With crossfading in playlists, your musical journey becomes even more immersive, as you can enjoy uninterrupted playback and a seamless transition between the tracks you’ve carefully curated.
Now that you know how to enable crossfading in playlists, take your playlist creation to the next level by adding a touch of smoothness and flow to the mix.
How to Crossfade Songs During Playback
In addition to enabling crossfading globally in iTunes and in playlists, you can also manually crossfade songs during playback. This gives you control over when and how the songs blend together, allowing for a more dynamic and personalized listening experience. Here’s how to crossfade songs during playback in iTunes:
- Open iTunes on your computer.
- Select the first song you would like to play.
- Start playing the song by double-clicking on it or clicking the play button.
- Once the song is playing, click on the “Next” button or use the keyboard shortcut (Command + Right Arrow) to move to the next song in the playlist.
- Before the second song begins to play, press and hold the Option key (Mac) or the Shift key (Windows).
- While holding the key, click on the “Play” button or use the keyboard shortcut (Command + Shift + Right Arrow) to start playing the second song.
- Release the Option key (Mac) or the Shift key (Windows) after the second song has started playing.
By following these steps, you can manually crossfade from one song to another during playback in iTunes. This gives you the flexibility to create unique transitions and experiment with the blending of different tracks.
It’s important to note that the crossfade duration applied during manual playback depends on the global crossfade settings you have previously configured in iTunes preferences. If you want to change the crossfade duration specifically for manual playback, you can adjust the global crossfade settings before following the steps mentioned above.
Manual crossfading during playback can be particularly useful when you want to create specific transitions or emphasize a particular musical moment. It allows you to have more control and creativity in the way your songs flow together, giving your listening experience a personal touch.
Now that you know how to crossfade songs during playback in iTunes, you can unleash your creativity and experiment with the blending of your favorite tracks.
Troubleshooting Common Issues
While crossfading in iTunes can enhance your listening experience, you may encounter a few common issues. Here are some troubleshooting tips to help resolve them:
1. Crossfade not working: If crossfading doesn’t seem to be working, ensure that you have enabled it in the iTunes Preferences. Go to Preferences > Playback and check the box next to “Crossfade Songs.” Also, make sure the crossfade duration is not set to 0 seconds.
2. Choppy or glitchy crossfading: If the crossfade transition between songs sounds choppy or glitchy, it could be due to low-quality audio files. Check if the songs in your library are of good quality and consider using higher bitrate audio files.
3. Silence between tracks: If you notice a moment of silence between tracks despite enabling crossfading, it may be because of the audio data at the start or end of the songs. Some songs may have silent or short intros/outros, resulting in brief pauses. Unfortunately, this is a limitation of the audio files themselves, and crossfading cannot eliminate those gaps entirely.
4. Crossfade duration too short or too long: If you find that the default crossfade duration of 6 seconds is too short or too long for your preference, you can adjust the duration in the iTunes Preferences. Go to Preferences > Playback and use the crossfade duration slider to set your desired length.
5. Crossfading not working on iPod or iPhone: Crossfading is a feature specific to iTunes and may not apply when syncing music to an iPod or iPhone. Crossfade effects are applied in real-time during iTunes playback only. Keep this in mind if you are experiencing issues with crossfading on your mobile devices.
If you have tried troubleshooting these common issues and still cannot resolve them, you may need to check for software updates or seek further assistance from iTunes support or online forums for more specific troubleshooting steps.
By troubleshooting these common issues, you can ensure a smooth and uninterrupted crossfading experience in iTunes, allowing you to enjoy your music seamlessly.
Benefits of Crossfading Songs in iTunes
Crossfading songs in iTunes offers several benefits that can enhance your overall listening experience. Here are some of the advantages of using crossfading:
1. Seamless transitions: Crossfading creates smooth and seamless transitions between songs, eliminating any abrupt pauses or silences that can interrupt the flow of your playlist. This allows for a more continuous and immersive listening experience.
2. DJ-like atmosphere: By enabling crossfading, you can mimic the transitions typically found in DJ sets. This adds a professional touch to your playlists and creates a vibrant, nightclub-like atmosphere, especially when listening to genres like electronic or dance music.
3. Enhanced listening enjoyment: Crossfading helps maintain the energy and momentum of your favorite tracks. The seamless blending of songs reduces disruptions and keeps you fully engaged in your music, enhancing overall listening enjoyment.
4. Improved mood and ambiance: With crossfading, you can curate playlists that create a specific mood or ambiance. Smooth transitions can evoke emotions and set the tone for your desired atmosphere, whether you want to create a relaxing environment or pump up the energy.
5. Continuous mix experience: Crossfading allows you to create continuous mixes of your favorite songs, similar to a DJ mix or a radio station. This is particularly beneficial for parties, workouts, or long journeys where you want a seamless blend of tracks without interruptions.
6. Personalization and creativity: Crossfading gives you the freedom to experiment with different crossfade durations and customize transitions between songs. This allows for a more personalized and creative touch to your playlists, showcasing your unique musical taste and style.
7. Smooth audio endings: Without crossfading, songs may end abruptly, cutting off any lingering reverb or fading effects. Crossfading helps avoid these abrupt endings, offering a more natural and pleasing audio experience.
By taking advantage of the benefits of crossfading songs in iTunes, you can elevate your music listening experience, create engaging playlists, and enjoy a seamless flow of your favorite tracks.