
Choosing a Design
When creating a Snapchat filter, the design plays a crucial role in catching users’ attention and conveying your message effectively. Here are some tips to help you choose the perfect design:
1. Consider your target audience: Think about the demographics and interests of the people you want to attract with your filter. Are they young and trendy? Tech-savvy professionals? Families with children? Tailor your design to match their preferences and aesthetic.
2. Keep it simple: Snapchat filters should be visually appealing but not overcrowded. Avoid cluttered designs that may confuse or distract users. Opt for clean lines, bold colors, and minimalistic elements that will stand out on the screen.
3. Reflect your brand: If you’re creating a filter for a business or event, make sure your design aligns with your brand identity. Incorporate your logo, brand colors, or any recognizable symbols associated with your business. This helps increase brand recognition and creates a cohesive visual experience.
4. Follow the guidelines: Snapchat has specific guidelines for designing filters to ensure they meet the platform’s requirements. Familiarize yourself with these guidelines to ensure your design is within the allowed dimensions, resolution, and file size. This will prevent any issues when submitting your filter for review.
5. Get inspired: Draw inspiration from other successful Snapchat filters or popular trends. Browse through the “Discover” section or check out filters used by influencers or brands in your niche. While you shouldn’t copy their designs, you can use them as a starting point and add your unique touch.
6. Test different variations: Don’t settle for the first design you create. Experiment with different layouts, colors, and styles to see which one resonates best with your audience. You can even conduct A/B testing with a small group of users to gather feedback and insights before launching your filter to a broader audience.
Remember, the design of your Snapchat filter will be a reflection of your brand or event, so take the time to create something visually appealing and memorable. Once you have chosen the design, it’s time to move on to planning your geofence.
Planning Your Geofence
When creating a Snapchat filter, it’s important to plan your geofence accurately. The geofence determines the area where your filter will be available to Snapchat users. Here are some steps to help you plan your geofence effectively:
1. Define your target location: Consider where your target audience is located or where you want your filter to be available. It could be a specific city, neighborhood, business location, or event venue. Understanding your target location will help you narrow down the area for your geofence.
2. Use the Snapchat Geofence Tool: Snapchat provides a user-friendly Geofence Tool that allows you to draw your desired location on a map. This tool helps you create a customized geofence by selecting specific areas or landmarks. Take advantage of this tool to accurately set the boundaries for your filter.
3. Consider the size of the geofence: Assess the size of your target location to determine the appropriate size for your geofence. If you’re creating a filter for a small event or a local business, a smaller geofence may be sufficient. However, for larger events or campaigns targeting a broader audience, you may want to expand your geofence to ensure maximum visibility.
4. Be mindful of the budget: Creating a geofence can have cost implications. The larger the geofence, the higher the cost. Keep your budget in mind when planning your geofence and consider the duration of time you want the filter to be active within that area. Snapchat charges based on the size and duration of your geofence, so be mindful of these factors as you plan.
5. Incorporate relevant landmarks: If your filter is specific to a particular event or location, consider incorporating relevant landmarks within your geofence. This adds context and helps users associate the filter with the location, increasing the overall engagement and impact of your filter.
6. Preview your geofence: Before finalizing your geofence, use Snapchat’s preview feature to see how your filter will appear within the selected area. This allows you to make any necessary adjustments or fine-tune the geofence to ensure it covers the desired area effectively.
By taking the time to plan your geofence carefully, you can ensure that your Snapchat filter is accessible to the right audience within the desired location. Once you have a solid geofence plan in place, it’s time to move on to selecting the right templates to bring your filter to life.
Selecting the Right Templates
When creating a Snapchat filter, selecting the right templates is essential to create a visually appealing and engaging filter. Snapchat offers a wide variety of templates that you can customize to suit your needs. Here are some tips to help you choose the right templates:
1. Explore the template options: Snapchat provides a range of templates, including themed templates for holidays, celebrations, and special events. Take some time to explore the available options and identify templates that align with your filter’s purpose or theme.
2. Consider your branding: If you’re creating a filter for a business or brand, it’s important to select templates that align with your brand’s visual identity. Look for templates that incorporate your brand colors or elements that represent your brand’s personality.
3. Customize for uniqueness: While templates offer a good starting point, customization is key to making your filter stand out. Modify the colors, graphics, and text within the template to give it a unique and personalized touch. This helps ensure that your filter captures attention and leaves a lasting impression.
4. Focus on readability: Keep in mind that Snapchat filters are often viewed on mobile devices, so it’s important to choose templates that are easily readable on a smaller screen. Opt for clear and legible fonts and consider the contrast between the text and background to ensure maximum readability.
5. Consider the filter type: Snapchat offers different types of filters, including static filters and animated lenses. Consider the type of filter that will best convey your message or enhance user experience. Animated lenses can add an interactive element and make your filter more engaging, but static filters can be just as effective, depending on your goals.
6. Use a combination of templates: If you’re finding it difficult to choose just one template, consider using a combination of templates to create a more dynamic and visually interesting filter. Utilize different templates for different elements of your filter, such as the frame, text, or stickers.
Remember, the templates you choose are the foundation of your Snapchat filter. Take the time to explore the options, customize as needed, and ensure that the end result reflects the purpose and aesthetics you have envisioned. Once you have selected the right templates, you can move on to customizing your filter to make it truly unique.
Customizing Your Filter
Customizing your Snapchat filter is crucial to make it unique and aligned with your brand or event. Here are some key steps to follow when customizing your filter:
1. Add your branding elements: Incorporate your brand’s logo, colors, or any other visual elements that are consistent with your brand identity. This helps in creating brand recognition and strengthening your overall brand presence.
2. Choose the right colors: Select colors that align with your brand or the theme of your event. Consider the psychology of colors and the emotions they evoke. Vibrant colors can create a sense of excitement, while subtle pastels can convey a more elegant or tranquil mood.
3. Use relevant graphics and icons: Include graphics or icons that are relevant to your content or event. For example, if you’re promoting a music festival, use musical notes or instruments. Choose visuals that resonate with your target audience and enhance the overall message of your filter.
4. Experiment with filters and effects: Snapchat offers a range of filters and effects that can enhance the appearance of your filter. Play around with different filters such as sepia tone, black and white, or even subtle animations. However, be cautious not to go overboard and make sure it enhances rather than distracts from the main message.
5. Balance text and visuals: If you’re including text in your filter, make sure it is clear and easy to read. Opt for bold typography and choose a font style that complements the overall design. Remember to keep the text concise and impactful, providing the necessary information without overwhelming the viewer.
6. Don’t forget about stickers: Snapchat offers an array of stickers that can add a playful and interactive element to your filter. Explore the sticker library and experiment with different stickers that fit your filter’s theme or message. Stickers can add personality and make your filter more engaging for users.
7. Preview and adjust: Always preview your customized filter before finalizing it. Check how it appears on different devices and screen sizes to ensure the elements are properly placed and easily visible. Make any necessary adjustments to ensure a visually appealing and user-friendly filter.
Remember, customizing your Snapchat filter allows you to create a unique and visually appealing experience for users. Take the time to tailor the filter to your brand or event, using colors, graphics, and effects that resonate with your target audience. Once you have customized your filter, you can move on to adding text and stickers to enhance its message and interactivity.
Adding Text and Stickers
When creating a Snapchat filter, adding text and stickers can enhance the message and interactivity of your filter. Here are some tips to effectively incorporate text and stickers into your filter:
1. Keep it concise: When adding text, keep the message brief and to the point. Snapchat filters are viewed for a short period, so it’s important to communicate your message quickly and effectively. Use catchy phrases, hashtags, or call-to-action statements that encourage users to engage with your filter.
2. Choose the right font style: Select a font that aligns with the overall design and theme of your filter. Consider the readability of the font, especially on smaller screens. Bold and legible fonts work best to ensure that the text is easily readable and catches the viewer’s attention.
3. Position text strategically: Place the text in a position where it doesn’t obstruct the main elements of your filter. Avoid covering important visuals or graphics that convey your message. Experiment with different positions until you find the one that balances visibility and aesthetics.
4. Utilize stickers: Stickers can add a fun and engaging touch to your Snapchat filter. Browse through the available sticker library and select stickers that fit the theme or purpose of your filter. You can use stickers to reinforce your message, promote an event, or add elements that encourage user interaction.
5. Experiment with layering: Layering text and stickers can create a visually dynamic filter. Play around with different combinations, positioning the stickers behind or in front of the text to achieve the desired effect. Be mindful of the balance and ensure that the text remains legible.
6. Consider interactivity: Snapchat offers interactive stickers that trigger specific actions when tapped by users. Explore these interactive options and incorporate stickers that allow users to swipe, tap, or engage in other ways to enhance user experience and make your filter more interactive and memorable.
7. Preview on different devices: Before finalizing your filter, preview it on various devices to ensure that the text and stickers appear as intended. Check that the sizing, positioning, and readability are consistent across different screen sizes and orientations.
Adding text and stickers can elevate the impact and engagement of your Snapchat filter. Be creative in your approach, using concise and impactful text, carefully selected stickers, and strategic positioning. Once you have added text and stickers, it’s time to test your filter before submitting it to Snapchat.
Testing Your Filter
Before submitting your Snapchat filter, it’s essential to thoroughly test it to ensure that it appears as intended and delivers the desired user experience. Here are some steps to effectively test your filter:
1. Test on different devices: Preview your filter on various devices, including different smartphone models and operating systems. Verify that all design elements, including text, stickers, and graphics, are visible and properly positioned. This helps ensure a consistent experience for all users.
2. Test in different lighting conditions: Snapchat filters can appear differently depending on the lighting conditions in which they are viewed. Test your filter in various lighting environments, such as natural daylight, indoor lighting, and low-light situations. This allows you to assess the visibility and legibility of your filter under different circumstances.
3. Seek feedback from others: Share your filter with a small group of individuals, preferably from your target audience, and gather their feedback. Ask for their impressions, whether they found the filter engaging, and if any improvements are needed. This valuable feedback can help you refine your filter before launching it to a wider audience.
4. Test the filter within the geofenced area: If possible, physically visit the area within your geofence and test the filter from different locations. Ensure that the filter is visible within the intended boundaries and that it accurately represents the location or event. Make any necessary adjustments to the geofence if needed.
5. Assess filter performance: Monitor how the filter performs in terms of loading time and responsiveness. A slow-loading filter or one that fails to respond quickly to user interactions can negatively affect the user experience. Ensure that your filter is optimized for optimal performance on various devices and network conditions.
6. Consider user feedback: If you have already deployed your filter to a broader audience, monitor user feedback and reviews. Take note of any issues or suggestions provided by users and address them promptly. This demonstrates your commitment to improving the user experience and ensures that your filter remains relevant and effective.
By thoroughly testing your Snapchat filter, you can identify any potential issues or areas for improvement before launching it to a wider audience. Testing not only helps ensure that the filter appears as intended but also enables you to enhance the overall user experience. Once you have successfully tested your filter, it’s time to submit it to Snapchat for approval.
Submitting Your Filter to Snapchat
After creating and testing your Snapchat filter, it’s time to submit it to Snapchat for approval and make it available to users. Follow these steps to successfully submit your filter:
1. Log in to your Snapchat account: Access your Snapchat account using the credentials associated with the filter you’ve created. If you don’t have a Snapchat account, create one to proceed with the submission process.
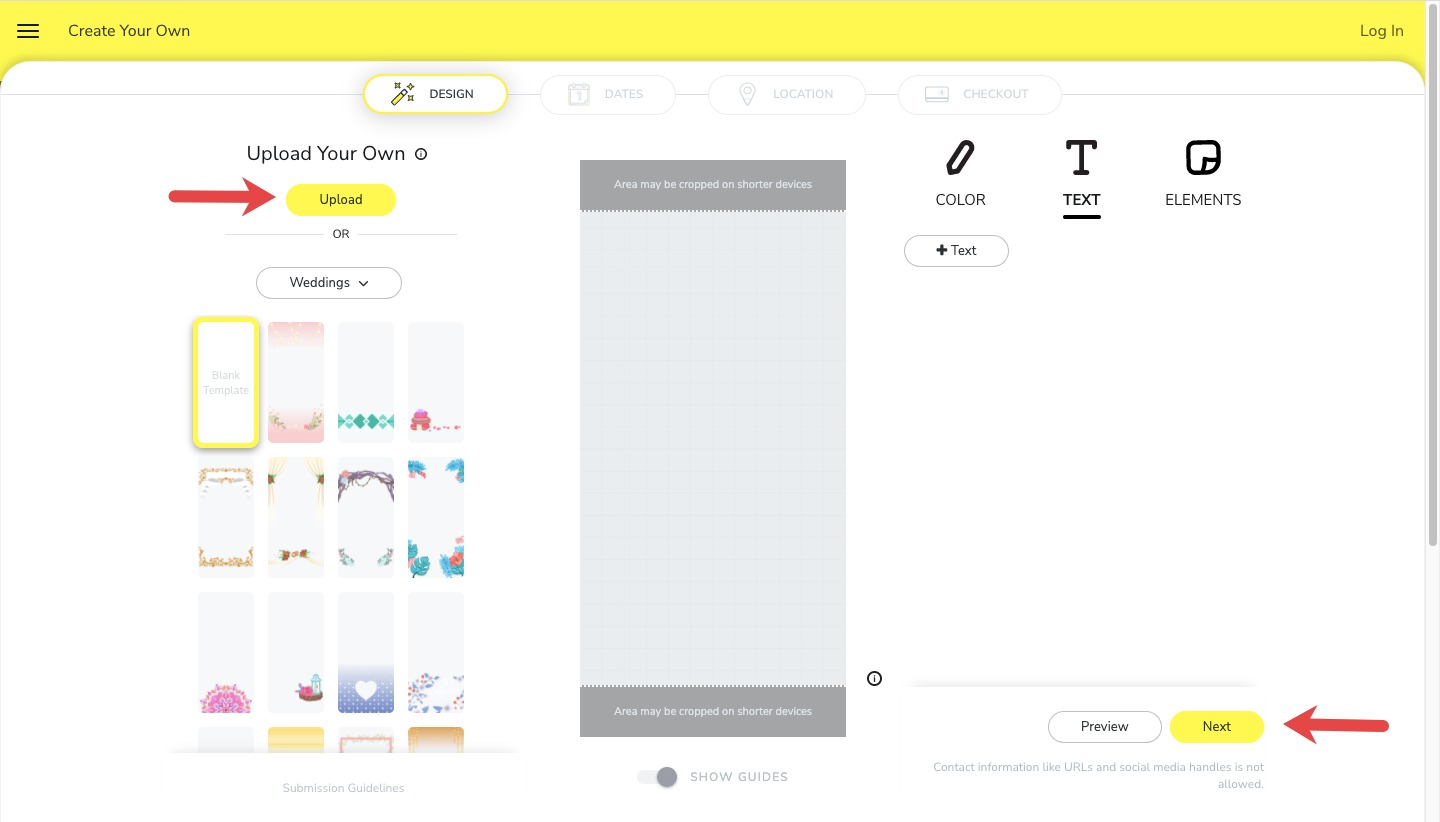
2. Access the Snapchat website: Visit the Snapchat website and navigate to the ‘Create’ section. Look for the option to create a filter and click on it. This will direct you to the Snapchat Filter submission page.
3. Select the filter type: Choose whether your filter is for a personal event (such as a wedding or party) or for a business or brand. This selection helps Snapchat categorize and review your filter accordingly.
4. Upload your filter: Upload the filter design you have created. Make sure it meets the required file format, dimensions, and file size specified by Snapchat. Double-check that the quality and resolution of the filter are optimal for a quality user experience.
5. Set the start and end date: Choose the dates when you want your filter to be active. This could be the day of an event or a specific time frame for a promotional campaign. Ensure that you select the appropriate time zone to avoid any confusion.
6. Define the geofence: Set the boundaries for the geofence where you want your filter to be available. Use the Geofence Tool provided by Snapchat to draw and adjust the desired area. Make sure the geofence covers the location or event you’re targeting accurately.
7. Provide additional information: Fill in any required information fields, such as your contact information and a brief description of your filter. Make sure to accurately describe the purpose, design, and key features of your filter to help Snapchat reviewers understand its intent.
8. Submit your filter: Once you’ve completed all the necessary fields, review the information you’ve provided and check for any errors or omissions. When you’re ready, click on the ‘Submit’ button to send your filter for review by the Snapchat team.
9. Wait for approval: After submitting your filter, it will undergo a review process by Snapchat. The duration of the review can vary, but typically, it takes a few business days. Be patient and await the approval notification from Snapchat.
10. Monitor filter analytics: Once your filter is approved and live, you can track its performance using Snapchat’s analytics tools. Monitor metrics such as views, usage, and engagement to assess the effectiveness of your filter and make any necessary adjustments for future filters.
By submitting your Snapchat filter for review, you’re one step closer to reaching your target audience and enhancing their Snapchat experience. Follow the submission process diligently, ensuring that you provide accurate information and meet all the requirements specified by Snapchat. Once your filter is approved, users within the geofence will be able to access and use it during the specified timeframe.
Setting a Start and End Date
When creating a Snapchat filter, it’s important to set a clear start and end date for its availability. By defining a specific timeframe, you can control when users can access and use your filter. Here are some factors to consider when setting the start and end dates:
1. Objective of your filter: Consider the purpose of your filter and align the start and end dates with your objective. For example, if you’re creating a filter for a one-day event, set the start and end dates to match the event’s duration. If it’s a promotional campaign, choose a timeframe that maximizes exposure and user engagement.
2. Duration of the event or campaign: If your filter is associated with a specific event or promotional campaign, ensure that the start and end dates encompass the entire duration. This allows users to access and use the filter throughout the event or campaign, maximizing its impact and reach.
3. Pre-event and post-event coverage: Consider setting the start date a few days in advance to build anticipation and generate excitement among users. Similarly, extending the end date after the event or campaign can provide additional visibility and allow users to continue engaging with the filter even after the main event has ended.
4. Timing of user engagement: Analyze when your target audience is most active on Snapchat to ensure optimal user engagement. Determine peak usage times and select aligned start and end times to maximize the visibility and usage of your filter among your desired audience.
5. Geographical considerations: If your filter is geographically limited, consider the local timezone when setting the start and end dates. Ensure that the filter is available throughout the intended timeframe in the respective location, taking into account any time differences if applicable.
6. Budget considerations: Keep in mind that the cost of a Snapchat filter varies based on the duration it is active. If you have budget constraints, consider a shorter duration that still allows for significant exposure and engagement. Strike a balance between the required visibility and the associated costs.
7. Flexibility for adjustments: While it’s essential to set a clear start and end date, ensure that you have room for adjustments if needed. Unforeseen circumstances, changes in event schedules, or unexpected popularity may require modifications to the original timing. Allow for flexibility within your planned timeframe.
By setting a start and end date for your Snapchat filter, you can control its availability and ensure that users can access and engage with it during the desired timeframe. Carefully consider your objectives, overall campaign duration, user engagement patterns, and any geographical or budget constraints when determining the ideal start and end dates. Once you have defined the timeframe, move forward confidently to submit your filter and captivate Snapchat users within the selected period.
Understanding the Pricing
When creating a Snapchat filter, it’s important to understand the pricing structure associated with it. Snapchat charges for filters based on various factors, including the geofence size, duration of availability, and demand. Here are key points to consider in understanding the pricing:
1. Geofence size: The size of your geofence, which determines the area where your filter is available, affects the cost. A larger geofence will typically require a larger budget. Consider the specific location and target audience when deciding on the appropriate geofence size.
2. Duration of availability: The length of time that your filter is active impacts the pricing. Snapchat offers both short-term and long-term availability options. Shorter durations generally cost less, while longer availability incurs additional charges. Evaluate your campaign or event timeline to determine the ideal duration that strikes a balance between cost and visibility.
3. Demand and peak times: Pricing can be influenced by the demand for filters during peak times, such as holidays, major events, or popular locations. During more popular times, prices may be higher due to increased competition for ad space. Consider adjusting your budget accordingly during these periods or exploring alternative dates if the pricing is prohibitive.
4. Budget flexibility: Snapchat provides flexibility in setting budgets, allowing you to define the maximum amount you are willing to spend on your filter. You can allocate your budget based on your marketing objectives and available resources. Additionally, Snapchat provides real-time pricing information, allowing you to monitor and adjust your budget as needed.
5. Cost optimization: To make the most of your budget, consider factors such as the geographical area you want to target, the specific times of day your audience is most active on Snapchat, and the duration that aligns with your campaign or event. By optimizing these factors, you can maximize the impact of your filter within your allocated budget.
6. Additional features: Snapchat offers additional features that can enhance the user experience, such as animated lenses or sponsored filters. These features may come at an extra cost but can provide increased engagement and visibility for your campaign. Evaluate the value they can bring to your filter and weigh the cost against the anticipated benefits.
7. Cost-performance analysis: Assess the performance of your filter in terms of views, usage, and engagement to evaluate the return on investment. Track the metrics provided by Snapchat’s analytics tools and compare them with your initial goals. This analysis will help refine your future filter strategies and optimize costs based on the effectiveness of previous campaigns.
Understanding the pricing structure of Snapchat filters is crucial for budget planning and maximizing the value of your marketing efforts. Consider the geofence size, duration of availability, demand during peak times, and available budget when setting up your filter. By optimizing these factors and tracking performance, you can achieve a cost-effective and successful Snapchat filter campaign.
Monitoring the Performance of Your Filter
Monitoring the performance of your Snapchat filter is crucial to gauge its effectiveness, make data-driven decisions, and refine your marketing strategies. Here are some key aspects to consider when monitoring the performance of your filter:
1. Views and usage: Keep track of the number of views your filter receives and how often it is used by Snapchat users. Monitoring views and usage metrics helps you understand the reach and engagement of your filter, providing insights into its popularity and impact.
2. Engagement metrics: Assess how users interact with your filter, such as how long they use it, how frequently they engage with it, and the actions they take within the filter. Consider metrics like interactions, swipes, taps, and shares to measure the level of user engagement. These metrics help you understand the effectiveness and appeal of your filter.
3. User feedback and reviews: Pay attention to any user feedback and reviews you receive regarding your filter. Users may provide valuable insights, suggestions, or even report any issues they encountered. Use this feedback to enhance the user experience and address any concerns or improvements needed.
4. Conversion tracking: If your filter is part of a larger marketing campaign, utilize conversion tracking mechanisms, such as unique URLs or promo codes, to measure the direct impact of your filter on desired conversions or actions. Analyze the conversion rates to evaluate the filter’s contribution to your marketing goals.
5. Comparisons with benchmarks: Compare the performance of your filter with industry benchmarks or previous campaigns to gain a relative understanding of its success. Assess how it fared in terms of views, usage, and engagement compared to similar filters or campaigns to identify areas of improvement or strengths to capitalize on.
6. Demographic insights: Utilize Snapchat’s built-in analytics tools to gain insights into the demographics of your filter’s audience. Understand the age, gender, location, and interests of the users engaging with your filter. This information can help you refine your targeting strategies and align future filters with your target audience’s preferences.
7. Iterative improvements: Continuously analyze the performance data and user insights to make iterative improvements to your filter strategy. Based on the learnings from the initial deployment, modify and optimize subsequent filters to deliver better results and enhance user engagement.
8. Return on investment (ROI) analysis: Assess the overall impact of your filter campaign by analyzing the ROI. Compare the cost of the filter with the achieved results, such as conversions, brand visibility, or engagement. This analysis enables you to refine your budget allocation, identify the most effective filters, and justify the investment to stakeholders.
Monitoring the performance of your Snapchat filter is an ongoing process that allows you to refine your strategies, improve user experience, and maximize the impact of future filters. Use the available performance metrics, user feedback, and demographic insights to gain a comprehensive understanding of the filter’s performance and make data-driven decisions moving forward.