
Understanding the Basics
Understanding the Basics
Welcome to the world of smart homes, where you can control your devices with just a few voice commands. With the help of Amazon’s Alexa, you can transform your home into a smart home hub. But before diving into the setup process, it’s important to understand the basics of how Alexa works as a smart home assistant.
Alexa is a voice-controlled virtual assistant developed by Amazon. It can perform a wide range of tasks, from answering questions and playing music to controlling your smart home devices. By using voice commands, you can interact with Alexa and control compatible smart devices in your home.
To start building your smart home hub with Alexa, you will need a few essential components:
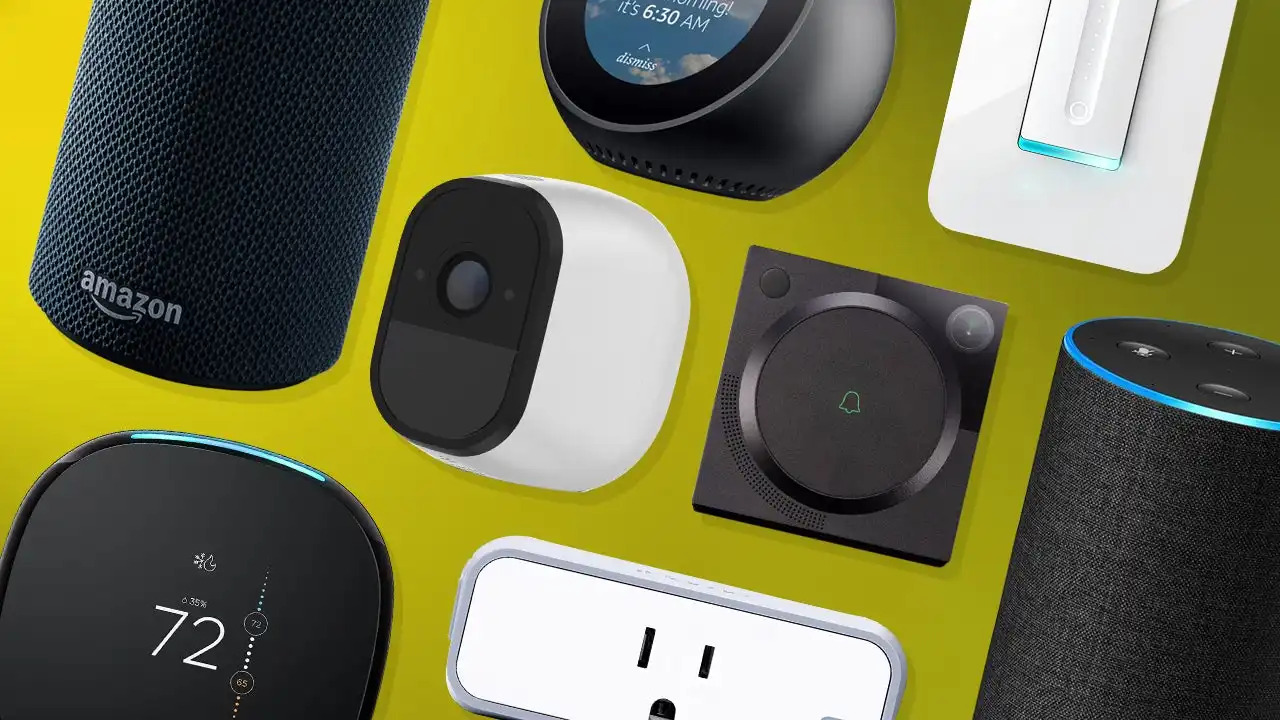
- Alexa-enabled device: This can be an Amazon Echo smart speaker, a Echo Dot, or even a smart display like the Echo Show. These devices act as the central hub for your smart home and allow you to interact with Alexa.
- Smart home devices: These are the devices that you want to control using Alexa, such as smart lights, thermostats, locks, and security cameras. Make sure these devices are compatible with Alexa.
- Wi-Fi network: A stable internet connection is crucial for your smart home hub to function properly. Connect your Alexa-enabled device and smart home devices to your home’s Wi-Fi network.
Once you have these components, you’re ready to set up your smart home hub with Alexa. But before you start, familiarize yourself with the manufacturer’s instructions for each device, as the setup process may vary slightly.
Setting up your smart home hub may seem overwhelming at first, but fear not. Amazon has made the process user-friendly and intuitive. In the following steps, we’ll guide you through the process of getting your smart home hub up and running with Alexa. So let’s get started on creating your very own smart home hub!
Step 1: Setting Up Your Alexa-enabled Devices
Step 1: Setting Up Your Alexa-enabled Devices
Before you can start controlling your smart home devices with Alexa, you need to set up your Alexa-enabled device, such as an Amazon Echo smart speaker or an Echo Dot. Here’s how to do it:
- Unpack and place your device: Remove your Alexa-enabled device from the packaging and find a suitable location for it in your home. It should be placed centrally to ensure optimal performance and voice recognition.
- Connect to power: Plug your device into a power outlet using the provided power cable. Once connected, your device will begin its startup sequence.
- Download and open the Alexa app: On your smartphone or tablet, download and install the Alexa app from the App Store or Google Play Store. Open the app once installation is complete.
- Create or sign in to your Amazon account: If you already have an Amazon account, sign in using your credentials. If you don’t have an account, create one by following the on-screen instructions.
- Add your device to the Alexa app: In the Alexa app, tap on the “Devices” tab at the bottom of the screen. Then tap on the “+” symbol in the top-right corner and select “Add Device”. Follow the on-screen instructions to select your device model and connect it to your Wi-Fi network.
- Wait for the setup process: Once connected, your device will go through a setup process. This may take a few minutes, during which your device’s LED lights will change colors. Wait until the setup process is complete.
- Name your device: After the setup process is done, you will be prompted to name your device. Choose a name that is easy to remember and relevant to the device’s location in your home, such as “Living Room Echo” or “Kitchen Dot”.
- Complete the setup: Follow any additional prompts that appear in the Alexa app to complete the setup process. This may include configuring privacy settings, linking music streaming services, and enabling features like voice calling and messaging.
Once your Alexa-enabled device is set up, you can start using voice commands to control your smart home devices. Remember to place your device in an area where it can hear you clearly, and don’t hesitate to refer to the device’s manual for specific setup instructions.
Step 2: Connecting to Your Home Wi-Fi Network
Step 2: Connecting to Your Home Wi-Fi Network
Once you have set up your Alexa-enabled device, the next step is connecting it to your home Wi-Fi network. This is essential for your device to communicate with Alexa and control your smart home devices. Follow these steps to connect your device to Wi-Fi:
- Open the Alexa app: Open the Alexa app on your smartphone or tablet.
- Select your device: From the home screen of the Alexa app, tap on the “Devices” tab at the bottom of the screen. Then, select the device you want to connect to Wi-Fi.
- Tap on “Change” under Wi-Fi: Under the device settings, you will find an option labeled “Wi-Fi”. Tap on “Change” next to it.
- Select your home Wi-Fi network: A list of available Wi-Fi networks will appear. Select your home Wi-Fi network from the list.
- Enter your Wi-Fi password: Once you have selected your home Wi-Fi network, you will be prompted to enter the password. Carefully enter your Wi-Fi password using the on-screen keyboard.
- Connect your device to Wi-Fi: After entering the Wi-Fi password, tap on “Connect” or “Join” to connect your device to your home Wi-Fi network.
It may take a few moments for your device to connect to the Wi-Fi network. During this time, the device’s LED lights may flash or change colors. Once the connection is established, you will see a confirmation message in the Alexa app.
It’s important to ensure that your Wi-Fi signal is strong in the area where your Alexa-enabled device is located. Weak Wi-Fi signals can disrupt communication between your device and Alexa, causing delays or connectivity issues. If you encounter any issues connecting to the Wi-Fi network, try moving your device closer to the Wi-Fi router or consider using a Wi-Fi extender to improve signal strength.
Now that your Alexa-enabled device is connected to your home Wi-Fi network, you’re ready to move on to the next step: installing smart home devices and skills in your Alexa app.
Step 3: Installing Smart Home Devices and Skills
Step 3: Installing Smart Home Devices and Skills
Now that you have set up your Alexa-enabled device and connected it to your Wi-Fi network, it’s time to install and configure your smart home devices and skills in the Alexa app. Here’s how you can do it:
- Open the Alexa app: Launch the Alexa app on your smartphone or tablet.
- Access the skills menu: Tap on the “Skills & Games” option in the menu located at the bottom of the screen. This will take you to the skills section of the app.
- Search for smart home skills: In the skills section, use the search bar to look for the specific skills that correspond to your smart home devices. For example, if you have smart lights, search for the skill associated with the brand of your lights.
- Enable the skill: Once you find the skill you need, tap on it to open its details page. Press the “Enable” button to enable the skill for use with your Alexa-enabled device.
- Link your accounts: In order for the skill to communicate with your smart home devices, you may need to link your accounts. Follow the on-screen prompts to log in and connect your accounts.
- Discover devices: After enabling the skill and linking your accounts, use the “Discover Devices” option in the Alexa app to search for and connect your smart home devices. This will allow Alexa to recognize and control the devices.
- Name your devices: Once your devices are discovered, you can assign them specific names that are easy to remember and relevant to their location in your home. For example, you could name a set of smart lights in the living room “Living Room Lights”.
By installing smart home devices and skills in the Alexa app, you are expanding the functionality of your smart home hub. Not only can you control these devices with Alexa’s voice commands, but you can also schedule routines, create scenes, and customize your smart home experience to suit your preferences.
Remember to follow the manufacturer’s instructions for each smart home device and skill, as the installation process may vary. If you have any issues during the installation process, consult the device’s manual or reach out to the manufacturer’s customer support for assistance.
Once you have successfully installed your smart home devices and skills, you can move on to the next step: creating Alexa routines to automate your smart home.
Step 4: Creating Alexa Routines
Step 4: Creating Alexa Routines
One of the key features of Alexa is the ability to create routines, which allow you to automate multiple actions with a single voice command or at certain times of the day. By creating routines, you can make your smart home hub even smarter and more efficient. Here’s how to create Alexa routines:
- Open the Alexa app: Launch the Alexa app on your smartphone or tablet.
- Access the routines menu: In the bottom menu of the app, tap on “Routines”. This will take you to the routines section.
- Create a new routine: Tap on the “+” symbol in the top right corner to create a new routine.
- Select the trigger: Choose the trigger for your routine. This can be a specific voice command, a specific time of day, or an action from a linked device or sensor.
- Choose the actions: Select the actions you want Alexa to perform when the routine is triggered. This can include turning on or off smart home devices, adjusting thermostats, playing music, sending notifications, and much more.
- Customize the routine: Customize your routine by editing the settings for each action. For example, you can specify the brightness level of your smart lights or the playlist for your music.
- Name and save the routine: Give your routine a name that is descriptive and easy to remember. Once you’re satisfied with the settings, tap on “Save” to create the routine.
- Test your routine: After creating the routine, test it out by either using the trigger command or waiting for the scheduled time. Make sure all the actions are working as intended.
Routines allow you to streamline your daily routines and effortlessly control multiple devices with a single command. For example, you can create a routine called “Good Morning” that turns on the lights, adjusts the thermostat, and plays your favorite news podcast when you say “Alexa, good morning”. Similarly, you can create a routine called “Goodnight” that turns off the lights, locks the doors, and sets the security system when you say “Alexa, goodnight”.
Be creative and experiment with different routines that suit your lifestyle and needs. You can create routines for specific occasions, daily tasks, or even based on specific sensor triggers. With Alexa routines, you have the power to customize your smart home hub and make it work for you.
Once you have created your routines, it’s time to explore the next step: integrating with third-party services to enhance your smart home experience.
Step 5: Integrating with Third-Party Services
Step 5: Integrating with Third-Party Services
Alexa offers seamless integration with a wide range of third-party services, allowing you to expand the capabilities of your smart home hub. By connecting your Alexa-enabled device with these services, you can control additional devices and access new features. Here’s how to integrate with third-party services:
- Open the Alexa app: Launch the Alexa app on your smartphone or tablet.
- Access the skills menu: Tap on the “Skills & Games” option in the bottom menu of the app. This will take you to the skills section.
- Explore third-party skills: Browse through the list of available skills or search for specific skills using the search bar. Look for skills that are compatible with the devices or services you want to integrate with Alexa.
- Enable the skill: Once you find a skill you want to integrate, tap on it to open its details page. Press the “Enable” button to enable the skill.
- Link your accounts: Some third-party skills may require you to link your accounts. Follow the on-screen prompts to log in and connect your accounts.
- Configure the skill: After enabling the skill and linking your accounts, you may need to configure the settings for the skill. This can include providing access permissions, setting preferences, or adding specific devices.
- Discover devices: Once the skill is configured, you can use the “Discover Devices” option in the Alexa app to search for and connect your newly integrated devices. This will allow Alexa to recognize and control these devices.
By integrating with third-party services, you can control a wide range of devices and access additional features. For example, you can integrate with smart thermostats to control your home’s temperature, connect with smart security systems to arm or disarm your home, or link with smart kitchen appliances to automate cooking tasks.
Make sure to check if there are any specific setup or compatibility requirements for the third-party service you want to integrate with. Following the manufacturer’s instructions and guidelines will ensure a smooth integration process.
With third-party service integration, you can truly personalize your smart home hub and enhance its functionality. Explore the available skills and discover new ways to make your everyday life easier and more efficient.
Now that you’ve integrated third-party services, it’s time to move on to the next step: automating your home with Alexa.
Step 6: Automating Your Home with Alexa
Step 6: Automating Your Home with Alexa
One of the greatest advantages of having a smart home hub with Alexa is the ability to automate various tasks and routines. By automating your home, you can save time and energy while enjoying a more convenient and efficient living experience. Here’s how you can automate your home with Alexa:
- Explore automation options: Start by identifying the tasks or routines that you want to automate. This can include turning lights on/off at specific times, adjusting thermostat settings based on your schedule, playing music when you arrive home, or even unlocking the door when you say a specific command.
- Utilize routines: Building on the routines you created earlier, customize the actions and triggers to suit your automation needs. For example, create a routine that turns on the lights and plays relaxing music when you say “Alexa, I’m home”.
- Make use of device grouping: Grouping devices together can simplify automation. For example, you can group all the lights in your living room and create a routine that turns them on or off together with a single command.
- Explore advanced automation options: Certain advanced automation features may require smart home devices with built-in automation capabilities, such as motion sensors or door/window sensors. By connecting these devices to your Alexa-enabled hub, you can create more complex automation scenarios.
- Experiment and refine: Automation may require some trial and error to perfect. Experiment with different setups and refine your routines and automation rules until they work seamlessly and effortlessly in your day-to-day life.
Automating your home not only adds convenience but can also help save energy and enhance security. For example, you can create a routine that turns off all lights and appliances when you leave home, or set up a routine that notifies you if a door or window is left open for an extended period.
Remember to regularly review and update your automation settings as your needs change. Whether you’re looking to streamline your morning routine or create a more secure home environment, automation with Alexa can transform your smart home into a well-connected and intuitive space.
With your home now fully automated, it’s time to dive into the next step: managing and customizing your smart home hub.
Step 7: Managing and Customizing Your Smart Home Hub
Step 7: Managing and Customizing Your Smart Home Hub
Once you have set up your smart home hub with Alexa and automated various tasks, it’s important to know how to manage and customize your setup to suit your preferences. Here are some essential steps for managing and customizing your smart home hub:
- Organize your devices: As you add more smart home devices to your hub, it’s important to keep them organized. Use the Alexa app to group devices into rooms or create custom device groups to make it easier to control and manage them.
- Personalize device names: Customize the names of your devices to make them easily recognizable and align them with their locations in your home. This will help you give more accurate commands and control devices more efficiently.
- Configure device settings: Adjust the settings of your smart devices as needed. This can include setting up timers for lights, changing temperature thresholds for thermostats, or adjusting sensitivity levels for motion sensors.
- Manage routines: Regularly review and update your routines to ensure they meet your changing needs. Modify the actions, triggers, and conditions as necessary to make your routines more effective and efficient.
- Explore additional features: Take the time to explore the additional features offered by Alexa and your smart home devices. This can include features like voice announcements, energy usage tracking, voice profiles, and more.
- Stay informed: Keep up with the latest updates and improvements to Alexa and your smart home devices. Regularly check for software updates and new features, and stay informed about any security or compatibility issues.
Managing and customizing your smart home hub allows you to have better control over your devices and tailor your smart home experience to meet your unique needs. Whether it’s adjusting settings for energy savings, personalizing voice commands, or exploring advanced features, taking the time to manage and customize your smart home hub enhances the overall functionality and satisfaction of your smart home ecosystem.
Remember to regularly review and refine your setup to ensure it continues to meet your needs as technology and your lifestyle evolve. By staying proactive in managing and customizing your smart home hub, you can maximize the benefits of your smart home and enjoy a truly connected and convenient living experience.
Now that you have successfully managed and customized your smart home hub, you are well-equipped to enjoy the full benefits of your Alexa-enabled devices and smart home devices. Congratulations on creating a smart home hub that is tailored to your needs!Troubleshooting Tips and Common Issues
Troubleshooting Tips and Common Issues
While setting up and managing your smart home hub with Alexa, you may encounter some common issues or face challenges. Here are some troubleshooting tips to help you resolve these issues:
- Internet connectivity: Ensure that your home Wi-Fi network is stable and that your Alexa-enabled device is connected to the network properly. Check other devices on the same network to verify internet connectivity.
- Device detection: If Alexa is having trouble detecting a smart device, make sure the device and Alexa are connected to the same Wi-Fi network. Also, check if the device is compatible with Alexa and follow any specific setup instructions provided by the manufacturer.
- Device unresponsive: If a smart device is unresponsive to Alexa’s voice commands, check if it’s properly connected to power and if it has a stable internet connection. Restarting the device or checking for any firmware updates can also help resolve the issue.
- Routine issues: If a routine isn’t working as expected, review the triggers and actions you’ve set up. Make sure all devices and skills involved are properly configured and connected. Consider modifying the routine or recreating it to address any issues.
- Device naming conflicts: If multiple devices have similar or identical names, it can result in confusion and incorrect commands. Ensure that each device has a unique name to avoid naming conflicts and improve Alexa’s accuracy in recognizing your commands.
- Wi-Fi coverage: If you experience weak Wi-Fi signals in certain areas of your home, consider using Wi-Fi extenders or mesh systems to improve coverage. This will ensure that your Alexa-enabled devices can communicate with your smart home devices reliably.
- Privacy concerns: If you have privacy concerns about your smart home hub, review the security and privacy settings within the Alexa app. You can adjust permissions, disable certain features, or set up voice profiles to enhance privacy and control over your data.
If you encounter persistent issues that cannot be resolved through troubleshooting, refer to the manufacturer’s support documentation or reach out to their customer support for further assistance. They will be able to provide more specific guidance and troubleshooting tips for their respective devices.
Remember that technology and devices can occasionally have their glitches, but with patience and persistence, you can overcome most issues and enjoy a smooth and seamless smart home experience.
By following these troubleshooting tips and taking advantage of the resources available to you, you can overcome common issues and ensure that your smart home hub with Alexa operates effectively and efficiently.