
Step 1: Turn on the Mobile Hotspot
To connect your PC to your mobile hotspot, you first need to turn on the mobile hotspot feature on your smartphone or other device. This feature allows your device to act as a Wi-Fi hotspot, enabling other devices, like your PC, to connect to the internet through it.
The steps to turn on the mobile hotspot may vary slightly depending on the device and operating system you are using. In general, you can follow these instructions:
- Go to the settings menu on your smartphone or device.
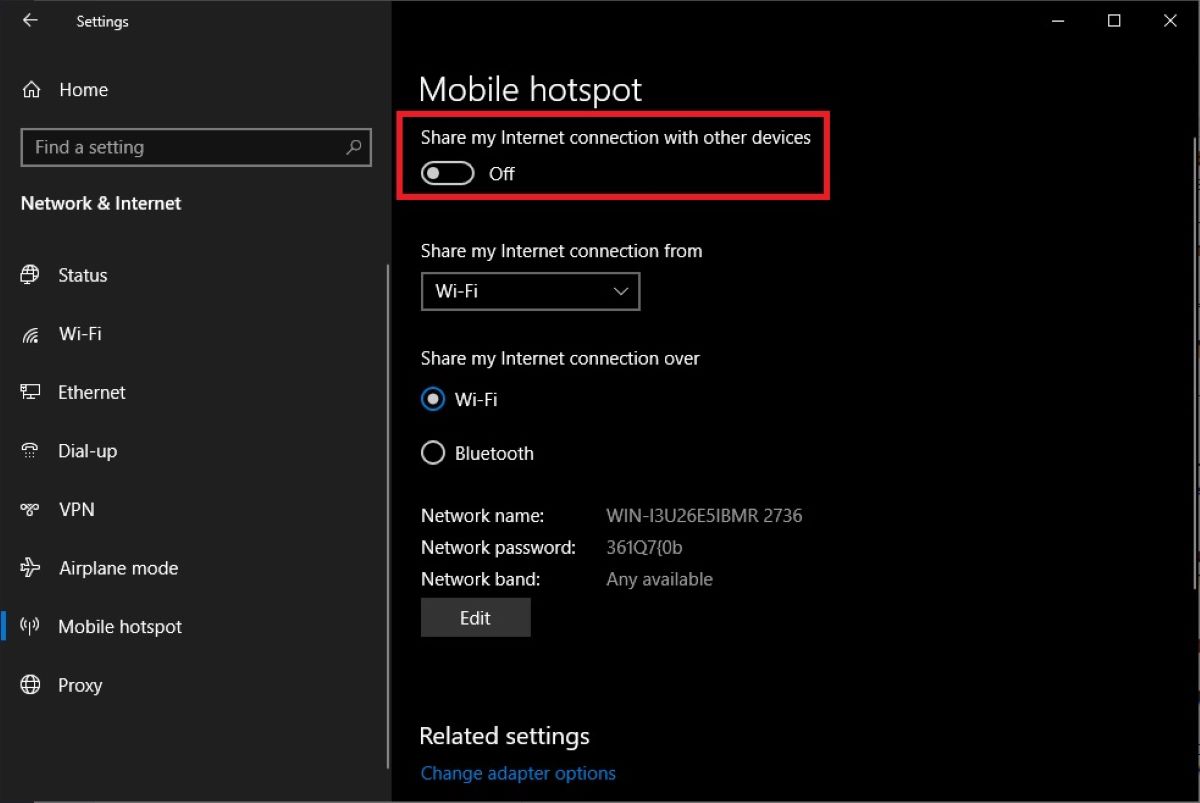
- Look for the “Mobile Hotspot” or “Personal Hotspot” option. This is usually found under the “Network & Internet” or “Connections” section.
- Tap on the option to enable it.
- You may be asked to customize the hotspot settings, like naming your hotspot and setting a password. You can either choose the default settings or customize them as per your preference.
- Once you have enabled the mobile hotspot, it should now be broadcasting a Wi-Fi signal that your PC can detect.
It’s important to note that some mobile service providers may charge for using the mobile hotspot feature or have data usage limitations. Make sure to check your data plan or contact your service provider for any additional charges or restrictions.
Once you have successfully turned on the mobile hotspot, you’re now ready to proceed to the next step of connecting your PC to the hotspot network.
Step 2: Enable Wi-Fi on your PC
To connect your PC to the mobile hotspot, you need to enable Wi-Fi on your computer. Here’s how you can do it:
- Go to the Start menu on your PC and click on the “Settings” cog icon.
- In the settings menu, select the “Network & Internet” option.
- In the left-hand sidebar, click on “Wi-Fi” to access the wireless network settings.
- Toggle the Wi-Fi switch to the “On” position if it’s not already enabled. You should see a list of available Wi-Fi networks appear.
- Wait for a moment while your PC detects the nearby Wi-Fi networks. Once the list populates, you should see the name of your mobile hotspot network listed.
Enabling Wi-Fi on your PC allows it to scan for available networks, including your mobile hotspot. Once Wi-Fi is enabled, your PC will be able to detect and connect to the hotspot network.
If you don’t see your mobile hotspot network in the list, make sure that the mobile hotspot feature is turned on and broadcasting on your smartphone or device. You may need to move closer to your device or refresh the network list on your PC to see the hotspot network.
Once you have enabled Wi-Fi on your PC and the mobile hotspot network is visible, you’re now ready to move on to the next step of connecting to the hotspot network.
Step 3: Find the Mobile Hotspot Network on your PC
After enabling Wi-Fi on your PC, you need to find the mobile hotspot network in the list of available Wi-Fi networks. Here’s how you can do it:
- Open the Wi-Fi settings on your PC. This can usually be done by clicking on the Wi-Fi symbol in the taskbar, usually located in the bottom right corner of the screen.
- A list of available Wi-Fi networks will appear. Look for the network name you previously set for your mobile hotspot.
- The mobile hotspot network name might be something generic like “AndroidAP” or “iPhone”, or it may have a customized name that you set during the setup process of your mobile hotspot.
- Depending on your PC’s Wi-Fi settings, you may need to click on a refresh or search button to update the available network list.
- If you still can’t find the mobile hotspot network in the list, double-check that the mobile hotspot is turned on and broadcasting. You may also need to move closer to your smartphone or device to ensure a strong signal.
Locating the mobile hotspot network on your PC is crucial to establishing a connection. Once you have identified the correct network, you can now proceed to the next step of connecting to the mobile hotspot network.
Step 4: Connect to the Mobile Hotspot Network on your PC
Once you have found the mobile hotspot network in the list of available Wi-Fi networks on your PC, it’s time to connect to it. Here’s what you need to do:
- Click on the name of the mobile hotspot network in the list. This will initiate the connection process.
- Your PC will attempt to establish a connection with the mobile hotspot.
- Depending on your PC’s settings, you may be prompted to enter a password for the mobile hotspot network. If you set a password during the mobile hotspot setup process, enter it in the provided field. Otherwise, leave the field empty.
- Once you have entered the password (if required), click on the “Connect” button or similar option.
Your PC will now attempt to establish a connection to the mobile hotspot network. This may take a few seconds. During this time, you may see a loading or connecting icon next to the network name in the Wi-Fi settings.
If the connection is successful, your PC will be connected to the mobile hotspot network and you should see the network name listed as “Connected” or a similar status indication in the Wi-Fi settings. At this point, you should have internet access through the mobile hotspot on your PC.
If the connection fails, double-check that you have entered the correct password (if applicable) and that the mobile hotspot is still turned on and within range of your PC. Additionally, make sure no other devices are connected to the hotspot, as some devices have limitations on the number of connections allowed at a time.
Once you have successfully connected to the mobile hotspot network, you’re now ready to proceed with using the internet on your PC through the hotspot connection.
Step 5: Enter the Password for the Mobile Hotspot Network
If you have set a password for your mobile hotspot network, you will need to enter it on your PC to establish a connection. Follow these steps to enter the password:
- When you click on the mobile hotspot network name in the Wi-Fi settings, a prompt will appear asking for the password.
- Type in the password for your mobile hotspot network in the provided field. Make sure to enter it accurately, as passwords are case-sensitive.
- If you are unsure of the password, you may find it in the settings of your smartphone or device under the “Mobile Hotspot” or “Personal Hotspot” section.
- Once you have entered the password, click on the “Connect” button or similar option to proceed with the connection process.
After entering the password, your PC will attempt to establish a secure connection with the mobile hotspot network. If the password is correct, the connection should be successful, and you will be able to access the internet on your PC through the mobile hotspot.
If you have not set a password for your mobile hotspot network, you can leave the password field blank during the connection process. However, it is highly recommended to set a secure password to prevent unauthorized access to your hotspot and protect the privacy of your data.
Remember to keep your password confidential and avoid sharing it with others unless necessary. Regularly changing your password can also add an extra layer of security to your mobile hotspot network.
Once you have successfully entered the password and established a connection with the mobile hotspot network on your PC, you can proceed to use the internet through the hotspot connection.
Step 6: Confirm the Connection on your PC
After entering the password and initiating the connection process, it’s important to confirm that your PC has successfully connected to the mobile hotspot. Follow these steps to verify the connection:
- Once you have entered the password and clicked on the “Connect” button, your PC will attempt to establish a connection with the mobile hotspot network.
- Wait for a few moments while your PC establishes the connection. During this time, you may see a loading or connecting icon next to the network name in the Wi-Fi settings.
- If the connection is successful, the network name should now display “Connected” or a similar status indication in the Wi-Fi settings, indicating that your PC is connected to the mobile hotspot network.
- You can also confirm the connection by opening a web browser or any application that requires internet access, and checking if you can access websites or online services.
If you are unable to access the internet or encounter any connectivity issues, you can try the following troubleshooting steps:
- Restart your PC and try connecting to the mobile hotspot network again.
- Double-check that you have entered the correct password for the mobile hotspot network.
- Ensure that your smartphone or device is within range and the mobile hotspot is still turned on.
- Disconnect any other devices that may be connected to the mobile hotspot, as some devices have limitations on the number of connections allowed at a time.
- If the issue persists, you may need to contact your mobile service provider for further assistance.
Once you have confirmed a successful connection, you can start enjoying the internet on your PC through the mobile hotspot network.
Step 7: Customize Mobile Hotspot Settings (Optional)
Customizing your mobile hotspot settings can give you more control over your hotspot network and enhance your overall experience. While this step is optional, it allows you to tailor the hotspot settings to your specific needs. Here are some settings you can consider customizing:
- Network Name (SSID): By default, your mobile hotspot may have a generic network name like “AndroidAP” or “iPhone”. You can change the network name to something more personalized and easy to identify in the Wi-Fi settings of your smartphone or device.
- Password: Setting a strong, secure password is essential to prevent unauthorized access to your mobile hotspot. You can change or update the password in the hotspot settings menu. Avoid using common or easily guessable passwords.
- Data Limit: Some mobile hotspot features allow you to set a data limit, which can be helpful to manage your data usage. You can set the limit based on your data plan or preferences to avoid exceeding your data allowance.
- Security Mode: Most modern mobile hotspots support different security modes, such as WPA2-PSK (AES) or WPA3-PSK, which provide encryption to protect your hotspot network. You can choose the appropriate security mode in the hotspot settings.
- Connected Devices: In the hotspot settings, you may find a list of devices connected to your hotspot. This can be useful to monitor and manage the devices accessing your hotspot network. You can typically block or remove any unwanted devices from the list.
- Timeout Settings: Some mobile hotspots have timeout settings that automatically turn off the hotspot when there’s no activity for a certain period. You can adjust the timeout settings based on your preferences to conserve battery life.
To customize your mobile hotspot settings, follow these general steps:
- Go to the settings menu on your smartphone or device.
- Look for the “Mobile Hotspot” or “Personal Hotspot” option.
- Select the option to access the hotspot settings.
- Explore the available settings and make any desired changes or adjustments.
- Save or apply the settings to update your mobile hotspot configuration.
Keep in mind that the specific steps and options for customizing your mobile hotspot settings may vary depending on your device and operating system. Consult your device’s user manual or contact the manufacturer for detailed instructions if needed.
Customizing the mobile hotspot settings can help optimize your hotspot network for your specific needs and preferences. It’s worth exploring these options to make the most out of your mobile hotspot experience.