
Checking Wi-Fi Availability
Before you can connect your Android device to a Wi-Fi network, it is important to check if Wi-Fi is available and enabled on your device. Follow these steps to ensure that you can establish a Wi-Fi connection:
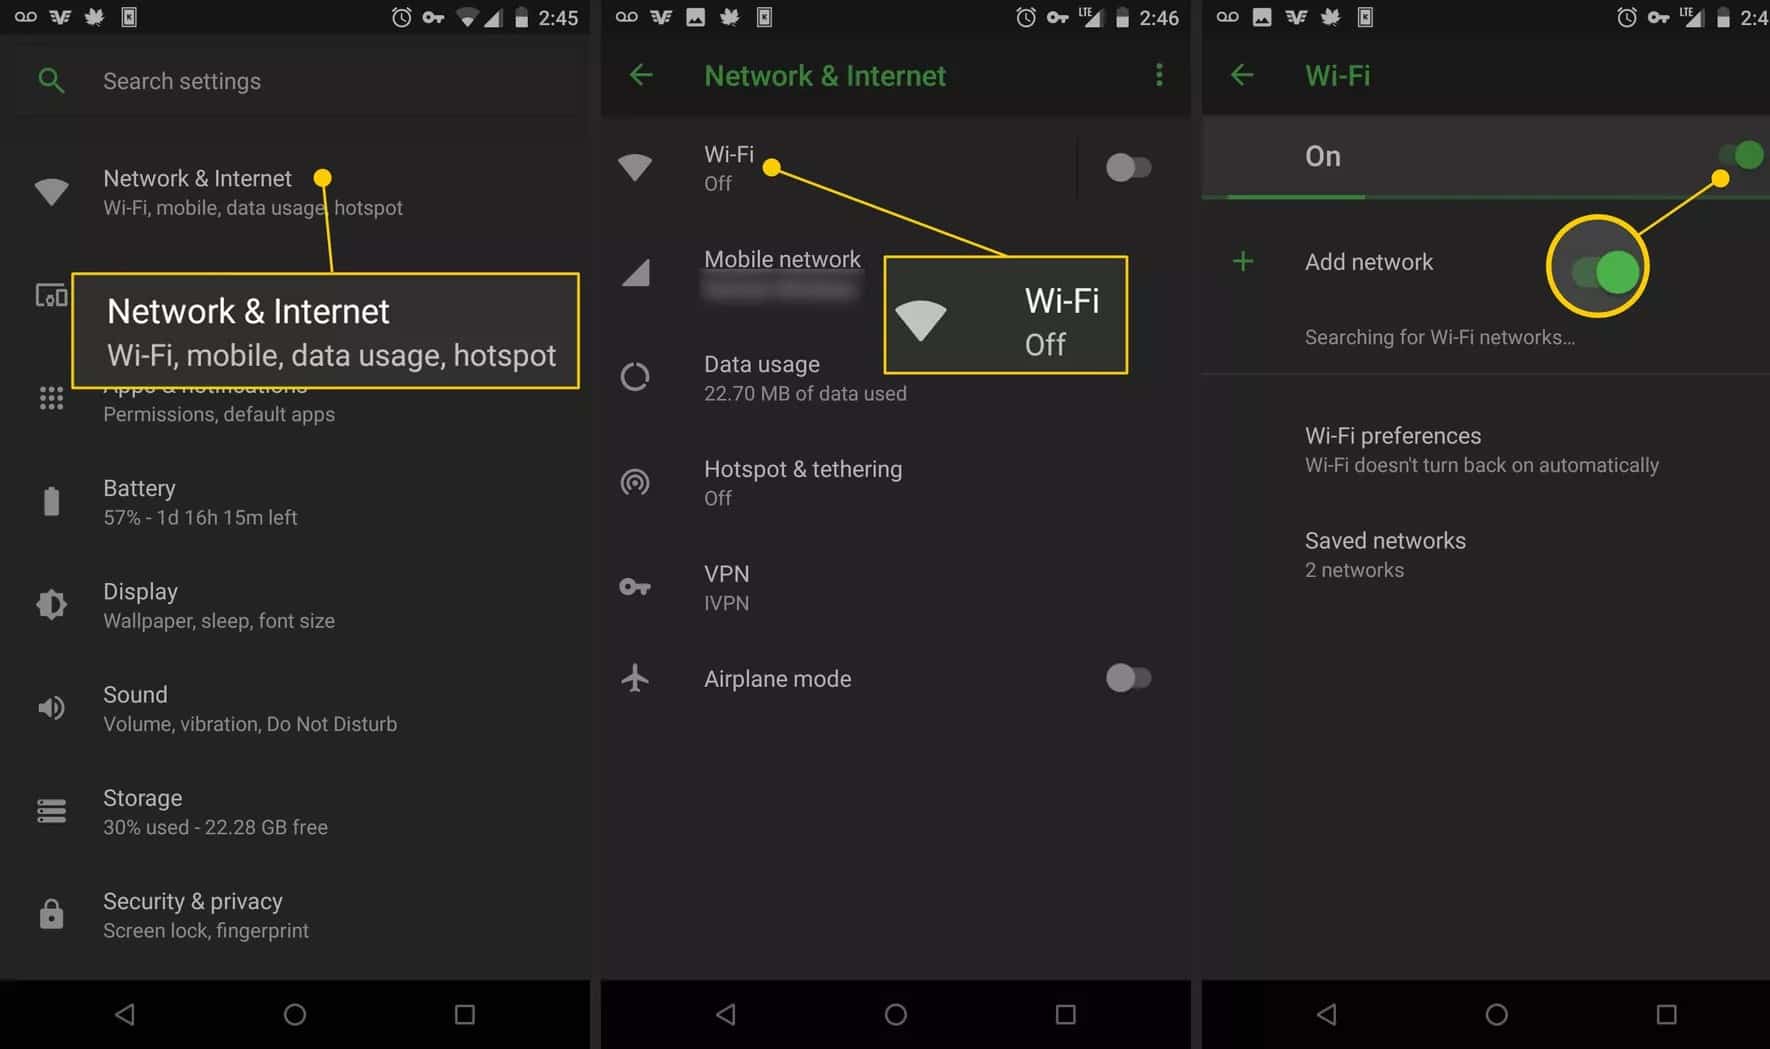
- Go to the Settings menu on your Android device. You can usually find this in the app drawer or by swiping down and tapping the gear icon.
- Scroll down and look for the “Wi-Fi” option. Tap on it to access the Wi-Fi settings.
- Make sure that the Wi-Fi toggle switch is turned on. If it is already turned on, the switch will be green or blue, indicating that Wi-Fi is enabled.
- Wait for a few seconds while your device scans for available Wi-Fi networks. The device will display a list of nearby networks.
If you see a list of available Wi-Fi networks, it means that Wi-Fi is available in your vicinity. The names of the networks will be displayed, along with their signal strength.
Note: If you don’t see any networks or if the Wi-Fi toggle switch is grayed out, it may indicate that Wi-Fi is not available on your Android device. In such cases, you may need to check if your device supports Wi-Fi connectivity or if there is a hardware or software issue preventing the Wi-Fi functionality.
Once you have confirmed that Wi-Fi is available and enabled on your Android device, you can proceed to connect to a specific Wi-Fi network. This will allow you to enjoy a faster and more stable internet connection on your device.
Turning on Wi-Fi on your Android Device
In order to connect your Android device to a Wi-Fi network, you need to ensure that Wi-Fi is turned on. Follow these steps to turn on Wi-Fi on your Android device:
- Open the Settings app on your Android device. You can find it in the app drawer or by swiping down and tapping the gear icon.
- Scroll down and look for the “Wi-Fi” option. Tap on it to access the Wi-Fi settings.
- Make sure the Wi-Fi toggle switch is in the “On” position. If it’s already turned on, the switch will be green or blue.
Once you have turned on Wi-Fi, your Android device will start scanning for available networks. This process may take a few seconds. You will then see a list of available Wi-Fi networks. The names of the networks will be displayed, along with their signal strength.
If your device is unable to find any networks, make sure you are in an area where Wi-Fi is available. Also, remember that the range of Wi-Fi signals can vary, so you might need to move closer to the router or access point to detect the networks.
Once Wi-Fi is turned on and networks are detected, you will be ready to connect to a specific Wi-Fi network. This will allow you to access the internet and enjoy a faster and more stable connection on your Android device.
Connecting to a Wi-Fi Network
Once you have turned on Wi-Fi on your Android device, you can proceed to connect to a Wi-Fi network. Follow these steps to connect to a specific Wi-Fi network:
- Open the Settings app on your Android device.
- Tap on the “Wi-Fi” option to access the Wi-Fi settings.
- You will see a list of available Wi-Fi networks. Tap on the network you want to connect to.
- If the selected network is open (without a lock icon), your device will automatically connect to it. You will see a “Connected” status next to the network name.
- If the selected network is secured (with a lock icon), you will need to enter a password.
- Tap on the network name and a password field will appear. Enter the password for the Wi-Fi network.
- After entering the password, tap on the “Connect” button.
- Your Android device will attempt to connect to the network using the provided password. If the password is correct, your device will connect successfully. If the password is incorrect, you will need to re-enter the correct password.
Once your Android device is connected to the Wi-Fi network, you will be able to access the internet and enjoy a faster and more stable connection. Your device will automatically connect to this network whenever it is in range.
Note: If the Wi-Fi network you want to connect to is hidden (not broadcasted), you will need to manually enter the network name (SSID) and password. Consult the network administrator or check the router’s documentation for the exact details in such cases.
Entering Password for a Secure Wi-Fi Network
When connecting to a secure Wi-Fi network on your Android device, you will need to enter the correct password to establish a connection. Follow these steps to enter the password for a secure Wi-Fi network:
- Open the Settings app on your Android device.
- Tap on the “Wi-Fi” option to access the Wi-Fi settings.
- You will see a list of available Wi-Fi networks. Tap on the network you want to connect to.
- If the selected network is secured (with a lock icon), you will be prompted to enter a password.
- Tap on the network name and a password field will appear.
- Using the on-screen keyboard, enter the password for the Wi-Fi network.
- Double-check the password to ensure it is accurate, as Wi-Fi passwords are case-sensitive.
- After entering the password, tap on the “Connect” button.
- Your Android device will attempt to connect to the network using the provided password. If the password is correct, your device will connect successfully. If the password is incorrect, you will need to re-enter the correct password.
It is important to note that if you enter the wrong password multiple times, you may be temporarily locked out from attempting to connect to the network. In such cases, you might need to contact the network administrator or reset the router password if you have access to it.
Once you have successfully entered the password for the secure Wi-Fi network, your Android device will connect to the network, and you will be able to access the internet and enjoy a faster and more stable connection.
Troubleshooting Wi-Fi Connection Problems
Sometimes, you may encounter issues when trying to connect your Android device to a Wi-Fi network. Here are some troubleshooting steps you can try to resolve common Wi-Fi connection problems:
- Restart your device: Sometimes, a simple restart can fix minor software glitches. Turn off your Android device, wait for a few seconds, and then turn it back on.
- Check your Wi-Fi signal: Ensure that you are within the range of the Wi-Fi network you are trying to connect to and that the signal strength is strong enough. Move closer to the router or access point to improve the signal.
- Forget the network: In the Wi-Fi settings menu, tap and hold the network you are having trouble with, then select “Forget” or “Forget network.” After that, reconnect to the network by entering the password again.
- Reset network settings: If you are still experiencing issues, you can try resetting the network settings on your Android device. To do this, go to the Settings app, select “System” or “General Management,” then find and tap “Reset” or “Reset Network Settings.” Confirm the action, and your device will reset the network settings to default.
- Update your device: Outdated software can sometimes cause connectivity problems. Check for any available system updates and install them on your Android device to ensure you have the latest bug fixes and improvements.
- Restart your router: Power off your router, wait for a minute, and then turn it back on. Sometimes, a simple router restart can resolve network connectivity issues.
- Contact your network administrator or internet service provider: If you have exhausted all troubleshooting options and are still unable to connect to the Wi-Fi network, it may be an issue with the network itself. Reach out to your network administrator or internet service provider for further assistance.
By following these troubleshooting steps, you can often resolve common Wi-Fi connection problems. However, if the issue persists, it may be a more complex technical problem, and it may be necessary to seek professional assistance to resolve the issue.
Disabling Wi-Fi on your Android Device
If you want to disconnect from a Wi-Fi network or if you do not currently need a Wi-Fi connection on your Android device, you can disable Wi-Fi temporarily or turn it off completely. Here are the steps to disable Wi-Fi on your Android device:
- Open the Settings app on your Android device.
- Tap on the “Wi-Fi” option to access the Wi-Fi settings.
- You will see a toggle switch at the top of the screen. If the switch is turned on and shows green or blue, it means that Wi-Fi is currently enabled.
- Tap on the switch to turn it off. The switch will no longer be green or blue, indicating that Wi-Fi is now disabled on your device.
By disabling Wi-Fi, your Android device will no longer attempt to connect to any available Wi-Fi networks. This can be useful in situations where you want to conserve battery life or avoid connecting to public or unsecured networks.
If you want to enable Wi-Fi again in the future, you can follow the same steps and toggle the switch back on. Your device will start scanning for available networks, and you can connect to a Wi-Fi network as needed.
It is important to note that disabling Wi-Fi does not affect other wireless connections, such as Bluetooth or mobile data. Those connections can still remain active even when Wi-Fi is disabled.
By knowing how to disable and enable Wi-Fi on your Android device, you have control over when and how you connect to Wi-Fi networks. This allows you to optimize your device’s connectivity and conserve battery when Wi-Fi is not necessary.