
What is Philips Hue Switch?
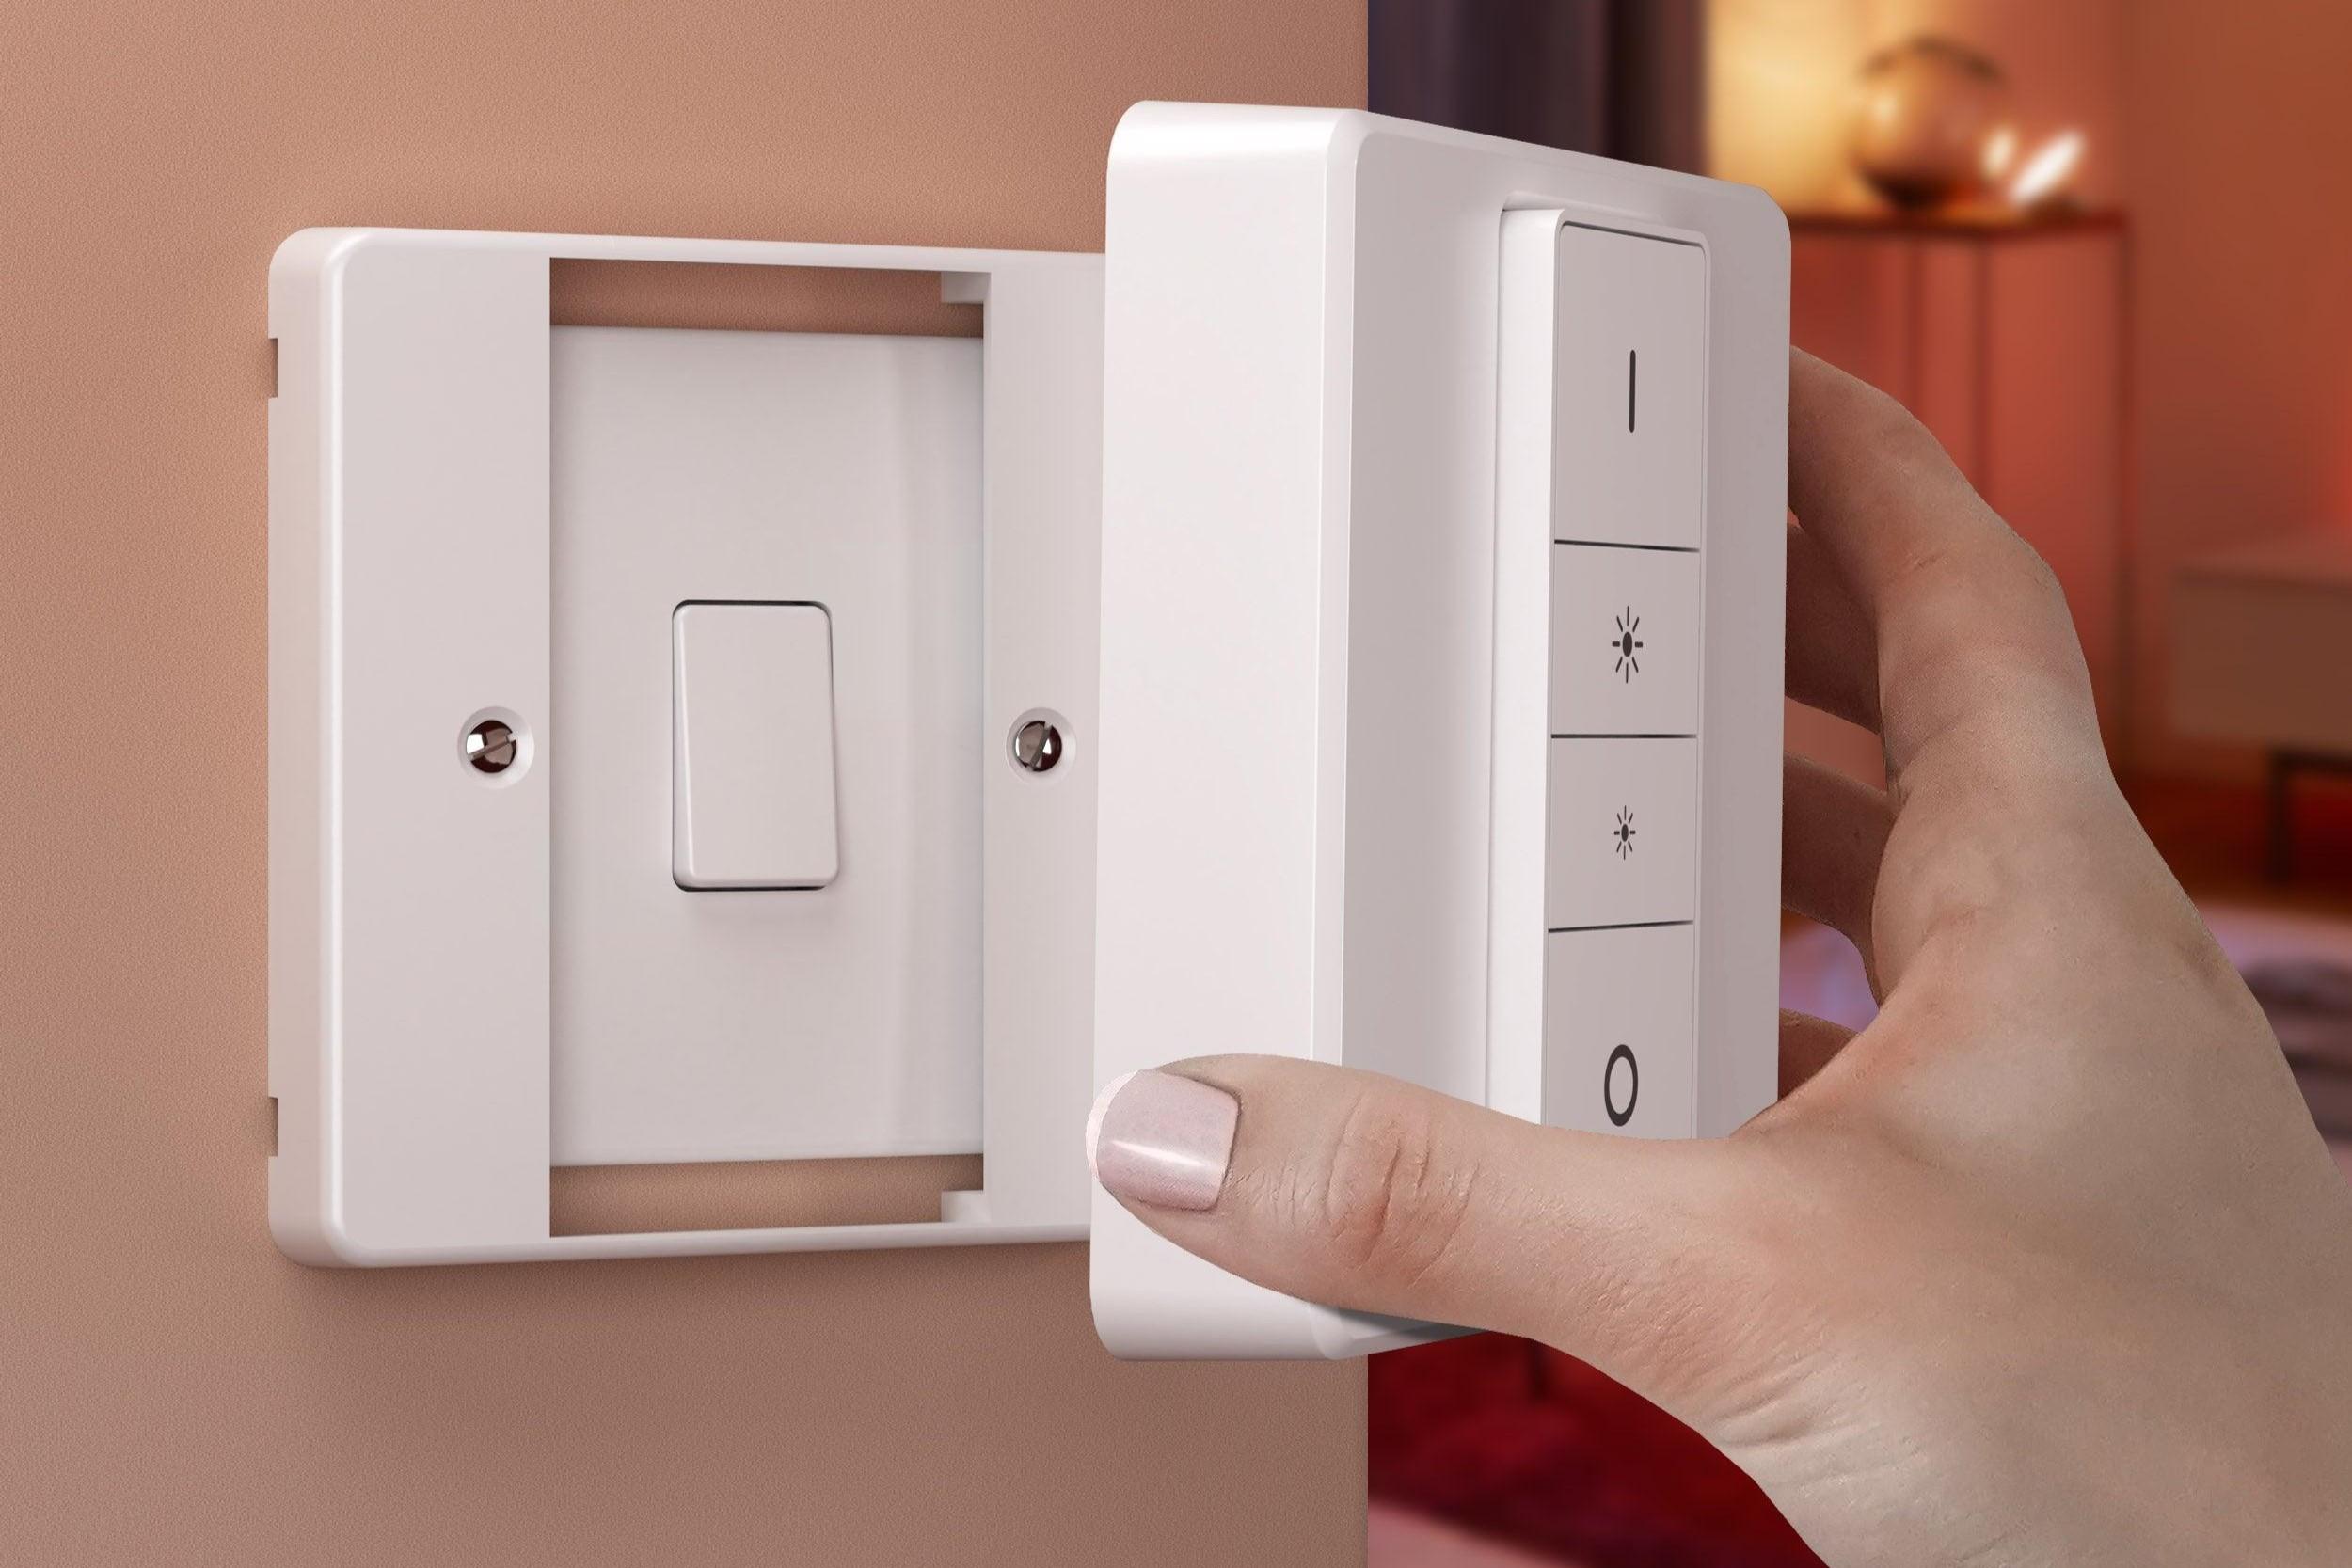
The Philips Hue Switch is a smart wireless remote control that allows you to easily control your Philips Hue lights. It is a compact device that can be mounted on a wall or used as a handheld remote. With the Philips Hue Switch, you can turn your lights on and off, adjust the brightness, and even change the colors of your Hue lights, all with just a few taps.
This switch is designed to work seamlessly with the Philips Hue ecosystem, which includes smart bulbs, light strips, and other lighting devices. The switch pairs directly with your Hue Bridge, which serves as the central hub for your smart lighting system. This means that you can control your lights even when you don’t have your smartphone or tablet nearby.
The Philips Hue Switch is a versatile device that offers different ways to control your lights. It has physical buttons that provide a tactile experience, making it easy to use for all ages. You can program the buttons to perform different actions, such as turning a specific scene on or off, dimming the lights to a specific level, or activating a specific color scheme.
Additionally, the Philips Hue Switch can be removed from its wall mount to function as a portable remote. This allows you to control your lights from anywhere in your home without the need for a smartphone or tablet. It is a convenient option for those moments when you want to quickly adjust the lighting without having to rely on your smart devices.
Overall, the Philips Hue Switch is a user-friendly device that enhances the functionality of your Philips Hue lights. It provides a physical and convenient way to control your lights, adding flexibility and ease to your smart lighting system.
What lights can you connect with Philips Hue Switch?
The Philips Hue Switch is compatible with a wide range of lights from the Philips Hue ecosystem. These include Philips Hue smart bulbs, Philips Hue light strips, and even Philips Hue lamps. With the switch, you have the ability to control both white and color ambiance lights, allowing you to create the perfect lighting environment for any occasion.
One of the main advantages of using the Philips Hue Switch is the flexibility it offers in terms of controlling multiple lights at once. You can connect multiple bulbs or light strips to a single switch, enabling you to control them simultaneously with a single button press. This is particularly convenient for setting up lighting scenes or activating preset color schemes.
If you have a combination of white and color ambiance lights in your setup, the Philips Hue Switch can handle them seamlessly. You can easily switch between different white light tones, varying from warm to cool, to suit your preference. When it comes to color ambiance lights, the switch allows you to select from a wide spectrum of colors, making it easy to create vibrant and engaging lighting effects.
Whether you want to illuminate your living room, create a soothing ambiance in your bedroom, or set up dynamic lighting for a party, the Philips Hue Switch grants you full control over your connected lights. It brings convenience to your fingertips, allowing you to easily adjust the brightness, switch between different scenes, and create the perfect lighting atmosphere with just a few taps of a button.
With the Philips Hue Switch, you can take full advantage of the extensive range of lights available in the Philips Hue ecosystem. From individual bulbs to entire lighting setups, the switch provides a seamless and intuitive way to control all your Philips Hue lights, adding a new level of convenience and enjoyment to your smart lighting experience.
Step 1: Check compatibility
Before getting started with connecting your Philips Hue Switch, it is important to ensure compatibility between the switch and your existing lights. Here are a few key points to consider:
1. Compatibility with Philips Hue Bridge: The Philips Hue Switch is designed to work with the Philips Hue Bridge, which serves as the central hub for your smart lighting system. Ensure that you have a Philips Hue Bridge set up and connected to your home Wi-Fi network before proceeding.
2. Compatibility with Philips Hue lights: Confirm that the lights you intend to control with the Philips Hue Switch are compatible with the switch. Most Philips Hue smart bulbs, light strips, and lamps are compatible, but it is always a good idea to double-check the specifications to ensure compatibility.
3. Firmware updates: Ensure that both your Philips Hue Bridge and lights are running the latest firmware updates. Firmware updates often include bug fixes and improvements, ensuring optimal compatibility and performance with the Philips Hue Switch.
4. Distance and coverage: Take into consideration the physical distance between your Philips Hue Switch and the lights you wish to control. The switch operates via a wireless connection, so ensure that the lights are within the range of the switch for seamless communication. Additionally, consider any physical obstructions that may interfere with the signal between the switch and the lights.
By checking compatibility upfront, you can avoid any potential issues during the setup process and ensure that your Philips Hue Switch integrates seamlessly with your existing lights. Take the time to review the compatibility requirements and make any necessary adjustments or upgrades to guarantee a smooth and enjoyable smart lighting experience.
Step 2: Set up your Philips Hue bridge
Setting up your Philips Hue Bridge is an essential step in connecting your Philips Hue Switch to your existing lights. Follow these steps to ensure a successful bridge setup:
1. Connect the bridge: Start by plugging in the power adapter into an electrical outlet. Then, connect the included Ethernet cable from your Wi-Fi router to the Ethernet port on the bridge. Once connected, the bridge will power on and start initializing.
2. Download the Philips Hue app: On your smartphone or tablet, download the Philips Hue app from the App Store or Google Play Store. The app will serve as your control center for managing your Philips Hue lights and bridge.
3. Launch the app and follow the prompts: Open the Philips Hue app and follow the on-screen instructions to set up your bridge. The app will guide you through the process of connecting to the bridge and configuring your settings.
4. Press the bridge button: During the setup process, you will be prompted to press the button on the bridge. Locate the bridge and press the button as instructed. This allows the bridge to connect with the app and establish a secure connection.
5. Create a Philips Hue account: If you don’t already have a Philips Hue account, the app will prompt you to create one. This account is essential for accessing your lights remotely and managing your settings across multiple devices.
6. Assign lights to rooms: Once the bridge is connected and your account is set up, you can start assigning your lights to specific rooms or areas within the app. This will allow you to control groups of lights collectively using the Philips Hue Switch.
7. Test your setup: Once the bridge setup is complete, it’s a good idea to test your setup by turning the lights on and off using the app. This ensures that the bridge is properly connected and communicating with your lights.
By following these steps to set up your Philips Hue bridge, you’re laying the foundation for connecting and controlling your lights with the Philips Hue Switch. It’s an important step that establishes the communication infrastructure for your smart lighting system and unlocks the full potential of your Philips Hue experience.
Step 3: Install the Philips Hue app
Installing the Philips Hue app is an essential part of the setup process for connecting your Philips Hue Switch to your existing lights. Follow these steps to install the app on your smart device:
1. Open your app store: Depending on your device, open either the App Store (for iOS) or Google Play Store (for Android) on your smartphone or tablet.
2. Search for the Philips Hue app: In the search bar of the app store, type “Philips Hue” and look for the official Philips Hue app developed by Signify.
3. Download and install the app: Tap on the Philips Hue app in the search results, then tap the download or install button to begin the installation process. The app will then start downloading and installing onto your device.
4. Open the Philips Hue app: Once the installation is complete, locate the Philips Hue app on your device’s home screen or in your app drawer, and tap on it to open the app.
5. Allow app permissions: When you launch the Philips Hue app for the first time, you may be prompted to grant certain permissions, such as access to your device’s location or notifications. It is recommended to allow these permissions to enable full functionality of the app.
6. Create or log in to your Philips Hue account: If you already have a Philips Hue account, you can log in using your existing credentials. If not, you will need to create a new account to access the app’s features and connect your devices. Follow the on-screen prompts to either log in or create a new account.
7. Follow the in-app instructions: Once you have logged in or created an account, the Philips Hue app will guide you through the setup process. This will involve connecting to your Philips Hue bridge and configuring your lighting settings.
By installing the Philips Hue app, you gain full control over your smart lights and can easily manage them using your smart device. The app provides a user-friendly interface to adjust your lights, create schedules, and set up automation rules. It serves as your central command center for your Philips Hue lighting system, and works seamlessly with the Philips Hue Switch to enhance your lighting experience.
Step 4: Pair your Philips Hue switch with your existing lights
Once you have set up your Philips Hue bridge and installed the Philips Hue app, the next step is to pair your Philips Hue switch with your existing lights. Follow these steps to complete the pairing process:
1. Open the Philips Hue app: Launch the Philips Hue app on your smart device and ensure that you are logged in to your Philips Hue account.
2. Access the settings menu: In the app, navigate to the settings menu. This can usually be done by tapping on the icon that resembles three horizontal lines or by locating the settings tab at the bottom of the screen.
3. Select “Accessory setup”: Once in the settings menu, look for an option labeled “Accessory setup” or something similar. Tap on it to access the accessory setup screen.
4. Put your Philips Hue switch into pairing mode: On your Philips Hue switch, locate the pairing button. It is usually located on the front or the back of the switch. Press and hold the pairing button until the light on the switch starts blinking.
5. Add the Philips Hue switch to the app: On the accessory setup screen in the app, tap on the “Add accessory” or “+” button. The app will then search for available Philips Hue devices, including the switch. Once it detects the switch, it will prompt you to confirm the pairing.
6. Confirm the pairing: Follow the in-app instructions to confirm the pairing between the app and the Philips Hue switch. This may involve pressing specific buttons on the switch or completing a verification process. Once confirmed, the switch will be added to your app and ready for use.
7. Assign lights to the switch: After pairing, you can assign specific lights or lighting scenes to your Philips Hue switch. Open the Philips Hue app, navigate to the switch settings, and select the lights you want to control with the switch. You can assign multiple lights to a single switch or customize different buttons to control different lights or scenes.
By pairing your Philips Hue switch with your existing lights, you gain the ability to control your lights directly from the switch. This provides a convenient and physical way to adjust the lighting in your home without relying on your smart device. It adds another layer of control and accessibility to your Philips Hue lighting system.
Step 5: Customize your Philips Hue switch
After pairing your Philips Hue switch with your existing lights, you have the opportunity to customize its settings and configuration. Follow these steps to personalize and make the most out of your Philips Hue switch:
1. Open the Philips Hue app: Launch the Philips Hue app on your smart device and ensure that you are logged in to your Philips Hue account.
2. Access the switch settings: In the app, navigate to the settings menu or select the specific room or area where your Philips Hue switch is assigned. Locate the switch in the list of devices or within the room’s settings.
3. Customize button functions: Within the switch settings, you can customize the functions of each button on the Philips Hue switch. Common options include turning specific lights on or off, adjusting the brightness, activating preset scenes, or changing the color scheme. Experiment with different button configurations to create a personalized and convenient control experience.
4. Create lighting scenes or routines: Take advantage of the app’s features to create customized lighting scenes or routines. A lighting scene is a predefined lighting configuration that you can activate with a single button press on the switch. For example, you can create a scene called “Movie Night” that dims the lights and sets a cozy ambiance. Routines allow you to automate specific lighting changes throughout the day, such as gradually brightening the lights in the morning to wake you up gently.
5. Explore third-party integrations: The Philips Hue ecosystem offers compatibility with various third-party devices and platforms, such as voice assistants like Alexa or Google Assistant, as well as smart home ecosystems like Apple HomeKit or Samsung SmartThings. Consider integrating your Philips Hue switch with these platforms to expand its functionality and streamline your smart home setup.
6. Test and fine-tune your setup: Once you have customized your Philips Hue switch settings, it’s important to test and fine-tune your setup. Ensure that each button performs the desired functions and that the assigned lights respond as expected. Make any necessary adjustments to optimize your control experience.
By customizing your Philips Hue switch, you can tailor its functionality to meet your specific needs and preferences. Whether it’s creating personalized lighting scenes, setting up automation routines, or integrating with other smart devices, customization allows you to unlock the full potential of your Philips Hue switch and enhance your smart lighting experience.
Troubleshooting common issues with connecting the Philips Hue switch
While connecting your Philips Hue switch to your existing lights is generally a smooth process, you may encounter some common issues along the way. Here are a few troubleshooting tips for resolving these issues:
1. Ensure proper power supply: Make sure that your Philips Hue bridge is powered on and connected to a stable power source. Also, ensure that your lights are receiving power and are functioning correctly. Check for any loose connections or tripped circuit breakers that may be causing the issue.
2. Verify wireless connectivity: Confirm that your Philips Hue switch, bridge, and lights are all connected to the same Wi-Fi network. If your switch or lights are unable to connect to the network, try restarting the devices or resetting their network settings within the Philips Hue app.
3. Check for firmware updates: Make sure that your Philips Hue bridge, switch, and lights are running the latest firmware updates. Outdated firmware can sometimes lead to compatibility issues. Check for updates within the Philips Hue app and follow the on-screen instructions to update your devices.
4. Reset and reconnect devices: If you’re experiencing persistent connection issues, try resetting your Philips Hue switch and bridge. Follow the manufacturer’s instructions to reset each device, and then pair them again using the app. This can often resolve any underlying communication problems.
5. Position devices for optimal signal strength: Ensure that the Philips Hue switch, bridge, and lights are within a reasonable range of each other. Avoid placing them in areas with significant physical obstructions or interference, as this can weaken the signal. If necessary, consider relocating the devices or using Wi-Fi extenders to improve signal coverage.
6. Check compatibility: Double-check the compatibility of your Philips Hue switch with your existing lights. Although most Philips Hue lights are compatible, there may be certain models or generations that are not supported. Visit the Philips Hue website or consult the user manuals for your devices to ensure compatibility.
7. Contact customer support: If you have tried the above troubleshooting steps and are still experiencing issues, reach out to the Philips Hue customer support team. They can provide specific guidance and assistance tailored to your situation.
Remember, troubleshooting can vary depending on the specific issue and device setup. It’s always a good idea to consult the official Philips Hue documentation and user guides for further assistance. With a little patience and troubleshooting, you can successfully connect your Philips Hue switch to your lights and enjoy the convenience of smart lighting control.