
Choosing the Right Connection
When connecting a stereo system or speakers to a TV, it’s essential to choose the right connection method to ensure optimal audio quality. There are several options available, depending on the TV and stereo system inputs and outputs. Here are some of the most common connection types:
- HDMI cables: HDMI cables are the most popular choice for connecting audio and video devices. They support high-definition audio and video signals and provide a digital connection for crystal-clear sound. Most modern TVs and stereo systems have HDMI ports, making it convenient to connect them using an HDMI cable.
- RCA cables: RCA cables, also known as composite cables, are the red, white, and yellow cables commonly used for audio and video connections. They offer a standard analog connection and are compatible with most TVs and stereo systems. However, RCA cables may not provide the same level of audio quality as HDMI cables.
- Optical cable: Optical cables, also known as TOSLINK or SPDIF cables, transmit digital audio signals using light. They are capable of delivering high-quality audio and are commonly found on modern TVs and stereo systems. An optical cable is a good option if both your TV and stereo system have optical ports.
- 3.5mm Aux cable: The 3.5mm auxiliary cable, also known as a headphone jack cable, is a versatile option for connecting audio devices. It features a small plug that fits into the headphone jack on your TV and stereo system. While this connection method is convenient and widely compatible, it may not offer the same audio quality as digital connections like HDMI or optical cables.
When selecting the right connection for your TV and stereo system, consider the audio capabilities of both devices and choose the option that offers the best audio quality and compatibility. It’s also important to ensure that you have the necessary cables for the chosen connection method.
Using HDMI Cables
HDMI (High-Definition Multimedia Interface) cables are the go-to choice for connecting audio and video devices. They provide a seamless digital connection, allowing for high-quality audio and video transmission between your TV and stereo system.
Here are the steps to connect your TV and stereo system using HDMI cables:
- Check the ports: Ensure that both your TV and stereo system have HDMI ports. These ports are usually labeled as “HDMI” and come in different sizes (e.g., HDMI, HDMI Mini, or HDMI Micro). Make sure you have the correct HDMI cable to match the ports on your devices.
- Connect the HDMI cable: Take one end of the HDMI cable and insert it into the HDMI output port on your stereo system. Then, insert the other end of the cable into an available HDMI input port on your TV.
- Select the HDMI input: On your TV remote, select the corresponding HDMI input source that you connected the cable to. This step may vary depending on your TV model. You might find an “Input” or “Source” button that allows you to cycle through different inputs until you find the HDMI source.
- Adjust the audio settings: Once the HDMI connection is established, your TV should automatically detect the audio signal from your stereo system. However, you may need to adjust the audio settings on your TV to ensure that the sound is routed through the external speakers.
- Test the audio: Play some audio or video content on your TV to test the audio output. If you can hear the sound coming from your stereo system, then the HDMI connection is successful. Adjust the volume levels on both the TV and stereo system to your desired preference.
HDMI cables offer a convenient and high-quality audio connection method between your TV and stereo system. They support various audio formats, including Dolby Digital and DTS, providing an immersive audio experience.
Keep in mind that some TVs may have specific HDMI ports labeled as “ARC” (Audio Return Channel). These ports allow for two-way audio transmission between the TV and the stereo system, simplifying the setup process. If your devices have ARC compatibility, connect the HDMI cable to the ARC-enabled HDMI port on your TV for enhanced audio convenience.
Using RCA Cables
RCA cables, also known as composite cables, are a popular choice for connecting audio and video devices. While they may not provide the same level of audio quality as digital connections like HDMI, RCA cables offer a straightforward analog connection method that is compatible with most TVs and stereo systems.
Here’s how to connect your TV and stereo system using RCA cables:
- Check the ports: Make sure that both your TV and stereo system have RCA ports. RCA ports are usually color-coded with red and white for audio and yellow for video. Ensure that you have enough available ports on both devices to make the necessary connections.
- Connect the RCA cables: Take one end of the RCA cable and insert the red and white plugs into the corresponding audio output ports on your stereo system. Then, insert the yellow plug into the video output port. Next, connect the other end of the RCA cable to the corresponding audio and video input ports on your TV.
- Select the input source: On your TV remote, select the input source that you connected the RCA cables to. This step may vary depending on your TV model, but it’s usually labeled as “Input” or “Source.” Cycle through the available inputs until you see the video signal from your stereo system.
- Adjust the audio settings: Once the RCA connection is established, you may need to adjust the audio settings on your TV to route the sound through the external speakers. Check your TV’s audio settings and select the appropriate output option to ensure that the audio is played through your stereo system.
- Test the audio: Play some audio or video content on your TV to test the audio output. If you can hear the sound coming from your stereo system, then the RCA connection is successful. Adjust the volume levels on both the TV and stereo system as needed.
RCA cables provide a simple and widely compatible connection method for audio and video devices. However, keep in mind that they may not support high-definition audio and video signals like HDMI or other digital connections. If you require higher audio quality, consider using a different connection method like HDMI or optical cables.
Using an Optical Cable
An optical cable, also known as a TOSLINK or SPDIF cable, is an excellent choice for connecting audio devices that support digital audio transmission. It allows for high-quality audio transfer between your TV and stereo system by using light signals to transmit the audio data.
Follow these steps to connect your TV and stereo system using an optical cable:
- Check the ports: Verify that both your TV and stereo system have optical ports. These ports are typically square-shaped with a removable plastic cover. Ensure that you have an available optical port on both devices.
- Remove the covers: Remove the protective plastic covers from the optical ports on your TV and stereo system. This will expose the optical connectors, allowing you to make a secure connection.
- Connect the optical cable: Take one end of the optical cable and insert it firmly into the optical output port on your TV. Align the connector with the port and push it in until it clicks into place. Then, connect the other end of the cable to the optical input port on your stereo system.
- Select the optical input source: Using your TV remote, navigate to the input source menu and select the optical input option. This step may vary depending on your TV model, but it is often labeled as “Input” or “Source.” Choose the correct optical input channel that corresponds to the connection you made.
- Adjust the audio settings: Once the optical connection is established, check your TV’s audio settings. Ensure that the audio output is set to the optical connection, directing the sound to your stereo system. You may need to navigate through the TV’s settings menu or audio options to find the appropriate setting.
- Test the audio: Play some audio or video content on your TV to test the audio output. If you can hear the sound coming from your stereo system, then the optical connection is successful. Adjust the volume levels on both the TV and stereo system as needed.
An optical cable offers reliable and high-quality digital audio transmission, making it an ideal choice for connecting your TV and stereo system. It is particularly useful for devices that support surround sound or other advanced audio formats.
Ensure that your TV and stereo system are compatible with the optical cable connection, as not all devices may have optical ports. If your devices do not support optical connections, consider using alternative methods such as HDMI or RCA cables for audio transmission.
Using a 3.5mm Aux Cable
A 3.5mm auxiliary cable, also known as a headphone jack cable, is a versatile and widely used option for connecting audio devices, including your TV and stereo system. This cable features a small 3.5mm plug on both ends, allowing you to connect devices with a headphone jack.
Here’s how you can connect your TV and stereo system using a 3.5mm aux cable:
- Check for a headphone jack: Start by confirming whether your TV and stereo system have a 3.5mm headphone jack. This is typically a small circular port located on the side or front panel of the device. Ensure that both devices have a headphone jack available for connection.
- Insert the 3.5mm plugs: Take one end of the aux cable and insert the 3.5mm plug into the headphone jack on your TV. Then, insert the other end of the cable’s plug into the headphone jack on your stereo system. Make sure that the plugs are fully inserted for a secure connection.
- Select the input source: Use your TV’s remote control to access the input or source menu. Look for the option that allows you to select the input source for the audio. Choose the appropriate input source that corresponds to the aux cable connection.
- Adjust the audio settings: Once connected, you may need to adjust the audio settings on your TV. Navigate to the audio settings menu to ensure that the sound is routed through the connected aux cable. Select the appropriate output option to ensure that the audio is played through your stereo system.
- Test the audio: Play some audio or video content on your TV to test the audio output. If you can hear the sound coming from your stereo system, then the aux cable connection is successful. Adjust the volume levels on both the TV and stereo system to your desired preference.
The 3.5mm aux cable provides a simple and convenient way to connect your TV and stereo system. It is widely compatible and widely available, making it a practical choice for many audio setups.
Keep in mind that while the 3.5mm aux cable is suitable for basic audio connectivity, it may not support advanced audio formats or deliver the same level of audio quality as digital connections like HDMI or optical cables. Therefore, consider these factors and your specific audio needs when choosing the appropriate connection method for your TV and stereo system.
Connecting the Stereo System
Once you have chosen the appropriate connection method for your TV and stereo system, it’s time to connect the stereo system itself. The following steps will guide you through the process:
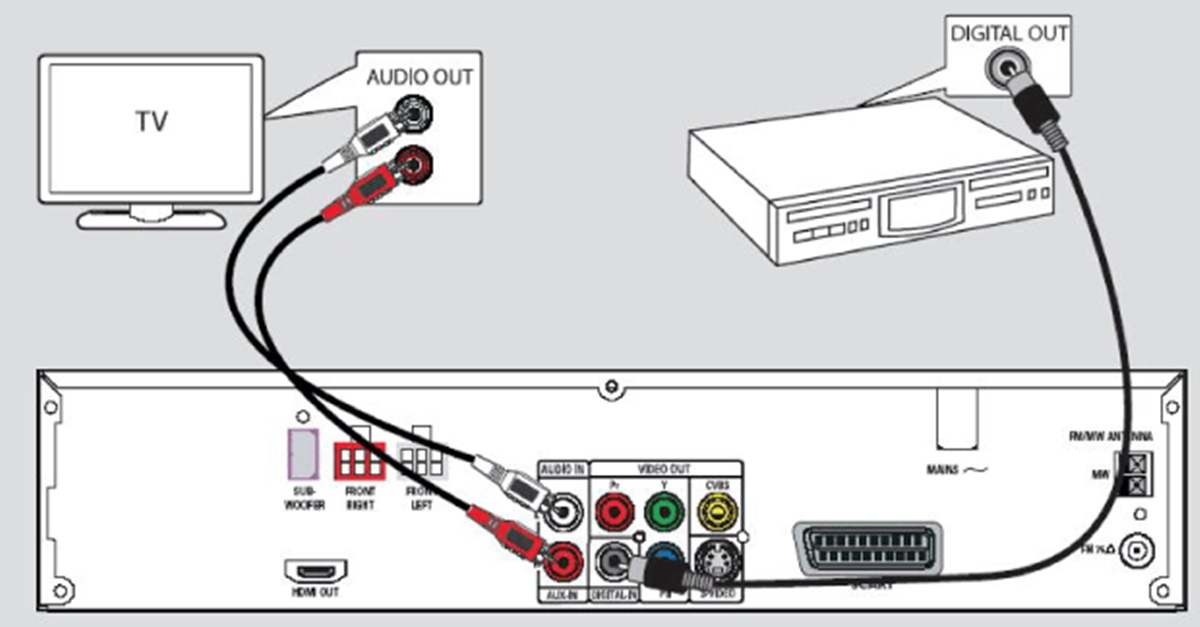
- Locate the audio outputs: Identify the audio output ports on your TV. These are usually labeled as “Audio Out” or “Line Out” and can be found on the back or side of the TV. Make a note of the type of audio output connector (e.g., RCA, optical, 3.5mm) used by your TV.
- Locate the audio input ports: Identify the corresponding audio input ports on your stereo system. These ports are typically labeled as “Audio In” or “Line In” and can be found on the back or front panel of your stereo receiver or amplifier. Make sure that the input ports match the type of output connector from your TV.
- Connect the audio cables: Take the appropriate audio cables (e.g., RCA, optical, 3.5mm) and connect one end to the audio output ports on your TV. Then, connect the other end of the cable to the corresponding audio input ports on your stereo system. Ensure that the connections are secure and that you match the left and right channels correctly.
- Power on the stereo system: Plug in the power cord of your stereo system and turn it on. Ensure that the input source on your stereo system is set to the connected audio input ports from the TV.
- Select the audio input: On your stereo system, use the source or input selector to choose the input corresponding to the connected TV. This setting may be labeled as “TV” or “AUX.”
- Adjust the volume: Start by setting the volume on the stereo system to a low level and gradually increase it until you achieve the desired volume. You can use the volume controls on both the TV and the stereo system to adjust the audio level.
Once you have successfully connected the stereo system to your TV, you should be able to enjoy enhanced audio output through your speakers. Make sure to consult the user manuals of your TV and stereo system for any specific instructions or settings that may be required for optimal performance.
Connecting the Speakers
After connecting your stereo system to the TV, the next step is to connect the speakers to the stereo system. Follow these steps for a successful speaker setup:
- Verify speaker compatibility: Before connecting the speakers, ensure they are compatible with your stereo system. Check the speaker impedance and power handling specifications to ensure they match the capabilities of your amplifier or receiver.
- Identify the speaker connectors: Locate the speaker output terminals on your stereo system. They are often labeled or color-coded for easy identification. Each speaker output terminal is usually marked with a positive (+) and negative (-) sign, or as “red” and “black” terminals.
- Prepare the speaker wires: Cut the speaker wires to the desired length, leaving some extra length for flexiblity. Strip a small portion of the insulation from each wire end to expose the bare wire for connection.
- Connect the wires to the speakers: Take the stripped end of the speaker wire and insert it into the corresponding speaker terminal. Typically, the positive (+) wire goes into the red or marked terminal, and the negative (-) wire goes into the black or unmarked terminal. Ensure a secure connection by tightening any screws or clamping mechanisms that hold the wire in place.
- Connect the wires to the stereo system: Match the positive (+) and negative (-) terminals of each speaker with the corresponding speaker output terminals on your stereo system. Insert the wire ends into the appropriate terminals, ensuring a secure connection. Again, tighten any screws or clamps to hold the wires in place.
- Repeat for each speaker: Repeat steps 3-5 for each additional speaker you have, following the same procedure of matching positive and negative terminals to ensure correct polarity and maintain a consistent soundstage across your system.
- Test the speakers: Once all the speakers are connected, play some audio content through your stereo system to test the speaker connections. Make sure each speaker produces sound and that the audio is balanced between the channels. Adjust the position and angle of the speakers if needed for optimal sound quality and imaging.
Properly connecting the speakers to your stereo system is crucial for enjoying a true surround sound experience. Ensure that all connections are secure and that the speaker wires are not touching each other to prevent any interference or short circuits.
Refer to the user manual of your stereo system for any specific instructions or recommendations regarding speaker connections and setup. Additionally, consider utilizing speaker stands or wall mounts for optimal placement to enhance the overall audio performance in your room.
Adjusting the Audio Settings on the TV
Once you have connected your stereo system or speakers to your TV, it is important to properly adjust the audio settings to ensure optimal sound quality. Here are some steps to adjust the audio settings on your TV:
- Access the audio settings menu: Using your TV remote, navigate to the settings menu. Look for an option like “Audio,” “Sound,” or “Audio Settings.” This may vary depending on the brand and model of your TV.
- Select the audio output: Within the audio settings menu, look for an option related to audio output or speaker selection. Choose the appropriate option that corresponds to your connected audio source, such as “External Speakers” or “Audio Out.”
- Choose the audio format: If your TV offers different audio format options, such as stereo, surround sound, or Dolby Digital, select the format that matches the capabilities of your stereo system or speakers. This ensures that the audio is properly outputted and decoded by your audio setup.
- Adjust volume and equalization: Use the volume control settings on your TV to adjust the overall sound level. If available, you can also adjust the equalization settings to fine-tune the audio frequencies according to your preference. Some TVs offer preset sound modes, such as “Music,” “Movie,” or “Sports,” which you can choose based on your audio content.
- Enable audio enhancements: Depending on your TV model, there may be additional audio settings or enhancements available. This could include features like virtual surround sound, dialogue enhancement, or sound presets. Experiment with these settings to find the configuration that suits your audio preferences.
- Test the audio: Play different types of audio content, such as music, movies, or TV shows, to ensure that the audio settings on your TV are properly adjusted. Listen for the clarity, balance, and overall sound quality coming from your connected stereo system or speakers. Make any necessary adjustments to the audio settings based on your personal preferences.
Take into consideration that the available audio settings and options may vary depending on your TV model. Refer to the user manual or online support resources specific to your TV brand and model for detailed instructions on adjusting the audio settings.
By properly adjusting the audio settings on your TV, you can optimize the sound output for a more immersive and enjoyable audio experience when watching your favorite movies, TV shows, or listening to music.
Adjusting the Audio Settings on the Stereo System
After connecting your TV to the stereo system, it’s crucial to adjust the audio settings on the stereo system itself to optimize the sound quality. Here are the steps to adjust the audio settings on your stereo system:
- Access the audio settings: Locate the audio settings on your stereo system. This is typically done through the receiver or amplifier’s setup menu. Look for options like “Audio,” “Sound,” or “Setup.”
- Select the input source: In the audio settings menu, select the input source that corresponds to the connected TV or the input source where you connected the audio cables. If you connected the TV to one of the HDMI inputs or the audio input, choose the corresponding input source in the audio settings.
- Adjust the speaker configuration: In the audio settings menu, you may find options to configure the speaker setup. This includes setting the number of speakers connected (e.g., stereo, 5.1, 7.1), adjusting the speaker size, and setting the crossover frequencies. Follow the instructions in the setup menu to properly configure the speaker system for optimal audio performance.
- Set the listening mode: Many stereo systems offer various listening modes or presets to enhance the audio experience for different types of content, such as music, movies, or gaming. Select the appropriate listening mode based on your audio preferences and the content you are enjoying.
- Adjust the EQ and tone controls: Depending on your stereo system, you may have equalizer settings or tone controls that allow you to fine-tune the audio frequencies. Use these controls to adjust bass, treble, or other audio frequencies to match your personal preferences.
- Enable surround sound processing: If your stereo system supports surround sound, check the audio settings to enable surround sound processing. This enhances the spatial audio experience, providing an immersive soundstage when watching movies or playing games.
- Test and calibrate the audio: Play audio content through your stereo system to test the audio settings. Listen for the balance and clarity of the sound, making any necessary adjustments to the audio settings. Some stereo systems have built-in audio calibration tools that can assist in optimizing the audio output based on your room’s acoustics.
Adjusting the audio settings on your stereo system ensures that you get the best possible sound quality from your connected speakers. Experiment with different settings to find the audio configuration that suits your preferences and enhances your overall listening experience.
Refer to the user manual of your stereo system for specific instructions and guidelines on adjusting the audio settings. Each stereo system may have unique features and settings, so it’s essential to familiarize yourself with the specific controls and options available.
Testing and Troubleshooting
After connecting your stereo system or speakers to your TV and adjusting the audio settings, it’s important to test the setup and troubleshoot any potential issues. Here are some steps for testing and troubleshooting your audio setup:
- Play audio content: Start by playing various types of audio content through your TV. This could include movies, music, or TV shows. Verify that the audio is being played through your stereo system or speakers and that the sound quality meets your expectations.
- Check all connections: Ensure that all the cables are securely connected at both ends. Any loose connections can result in audio dropouts or poor sound quality. Double-check that the cables are plugged into the correct ports on both the TV and stereo system.
- Adjust volume levels: Balance the volume levels between your TV and stereo system to achieve a consistent sound level. If you notice any distortion or uneven sound, it may indicate a misconfiguration or issue with the settings.
- Verify speaker placement: Ensure that your speakers are positioned correctly and are placed at an optimal distance from your listening area. Adjust their placement if necessary to improve the soundstage and imaging.
- Check audio sources: If you are experiencing audio issues with specific sources (e.g., cable TV, DVD player), test other sources to determine if the problem lies with a particular device or input. This helps to isolate the issue and narrow down troubleshooting efforts.
- Update firmware: Check if there are any firmware updates available for your TV, stereo system, or other audio devices. Sometimes, firmware updates can address compatibility issues or improve performance. Follow the manufacturer’s instructions to update the firmware.
- Reset settings: As a last resort, if you continue to encounter audio issues, consider performing a factory reset on your TV or stereo system. This will revert all settings to their default values. Note that this should only be done after all other troubleshooting steps have been exhausted.
- Consult technical support: If you are unable to resolve the audio issues on your own, reach out to the technical support of your TV, stereo system, or other audio devices. They can provide further guidance, troubleshooting steps, or insights specific to your equipment.
Remember that troubleshooting audio issues can vary depending on the specific setup and equipment you are using. Refer to the user manuals or support documentation for your TV and stereo system for more detailed troubleshooting steps specific to your devices.
By testing and troubleshooting your audio setup, you can ensure that you are getting the best possible audio experience from your connected stereo system or speakers.