
Benefits of Connecting Phone to Chromebook
Connecting your phone to your Chromebook can bring a range of benefits and enhance your overall computing experience. Whether you want to seamlessly sync your devices or access phone features directly from your Chromebook, here are some of the advantages of connecting your phone:
-
Convenient Device Integration:
By connecting your phone to your Chromebook, you can enjoy effortless device integration. This allows you to access and manage your phone’s content, notifications, and features directly from your Chromebook, eliminating the need to switch between devices constantly.
-
Text and Call from Chromebook:
With your phone connected to your Chromebook, you can send and receive text messages, as well as make and receive calls directly from your Chromebook. This feature is especially useful when your phone is not nearby or is charging.
-
Shared Clipboard:
When your phone is connected to your Chromebook, you can easily share text and images between both devices using the shared clipboard feature. This means you can copy something on your phone and paste it directly on your Chromebook without any manual transfer.
-
Seamless File Transfer:
Connecting your phone to your Chromebook allows for seamless file transfer between the two devices. You can quickly and effortlessly transfer files, such as photos, documents, and videos, between your phone and Chromebook, enhancing productivity and saving valuable time.
-
Synced Notifications:
With phone-to-Chromebook connectivity, you can receive and manage your phone’s notifications directly on your Chromebook. This means you won’t have to constantly check your phone for updates, as everything will be conveniently displayed on your Chromebook’s screen.
By connecting your phone to your Chromebook, you can enjoy seamless device integration, enhanced productivity, and a more streamlined user experience. Whether it’s accessing your phone’s features, transferring files, or managing notifications, the connectivity between your phone and Chromebook can make your digital life more convenient and efficient.
Step-by-Step Guide to Connecting Your Phone to Chromebook
Connecting your phone to your Chromebook is a straightforward process that allows you to seamlessly integrate and access your phone’s features from your Chromebook. Here is a step-by-step guide to help you through the process:
-
Enable Phone Hub on Your Chromebook:
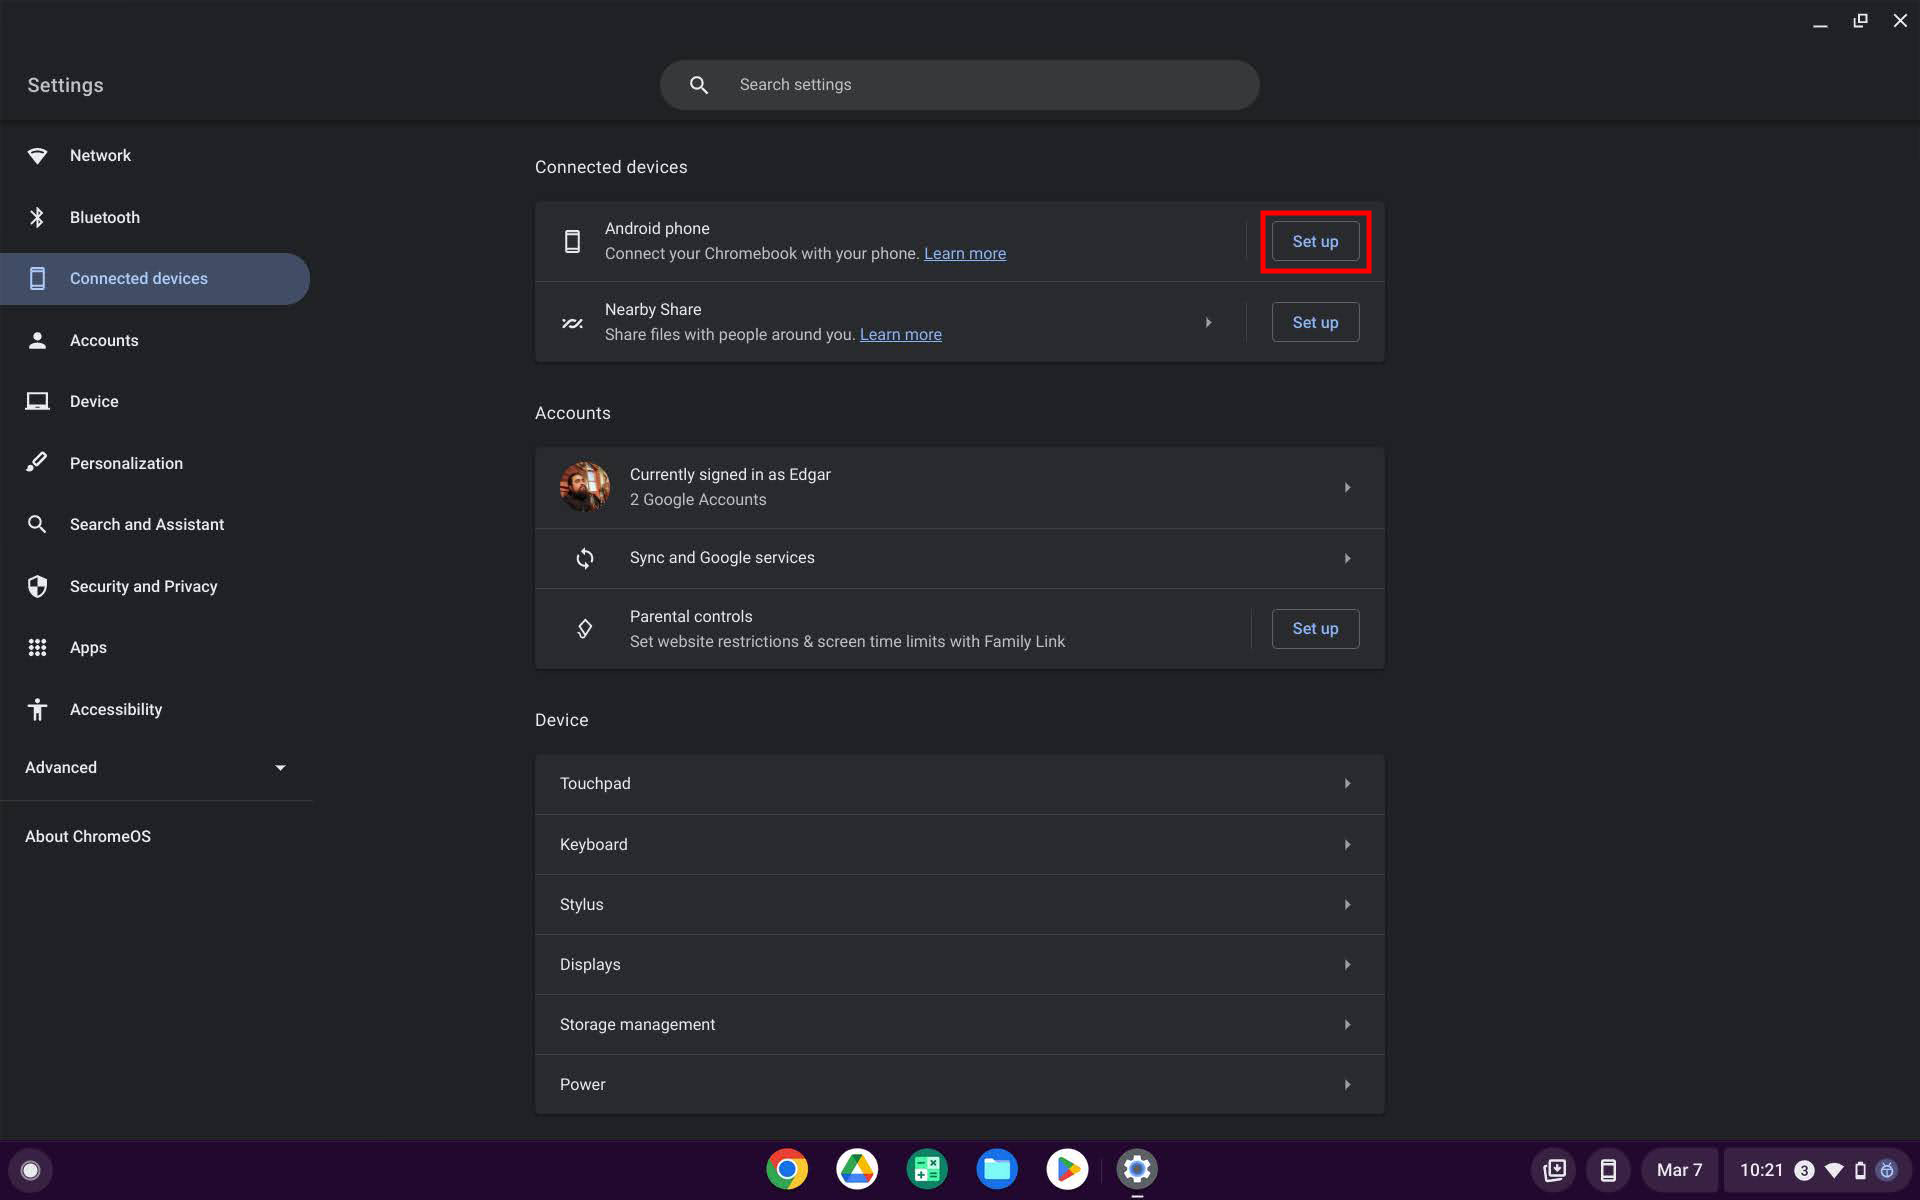
Start by ensuring that you have the latest version of Chrome OS on your Chromebook. Then, open the settings menu by clicking on the clock in the bottom-right corner of the screen, followed by the gear icon. In the settings menu, navigate to the “Connected devices” section and toggle on the “Phone Hub” option.
-
Set Up Phone Hub on Your Phone:
On your phone, open the Google Play Store and search for the “Phone Hub” app. Install the app and open it. Sign in with the same Google account you use on your Chromebook. Follow the on-screen instructions to grant necessary permissions and enable Phone Hub on your phone.
-
Connect Your Phone to Chromebook:
Once you have enabled Phone Hub on both your Chromebook and phone, an icon for Phone Hub will appear in the system tray on your Chromebook. Click on the icon to open Phone Hub. On your phone, you may need to confirm the connection by tapping on a notification or opening the Phone Hub app.
-
Manage Phone Notifications on Chromebook:
With your phone connected, you can choose to receive notifications from your phone on your Chromebook. To manage this, go to Chromebook settings, navigate to the “Connected devices” section, and select “Phone Hub”. Here, you can toggle on or off the “Show phone notifications” option.
-
View Recent Chrome Tabs on Your Phone:
If you want to view and access recent Chrome tabs from your phone, make sure you have Chrome browser version 89 or higher on both devices. Open the Chrome browser on your phone and go to the “Other devices” section in the tab switcher to see your recently visited tabs on your Chromebook.
-
Access Recently Accessed Images and Links on Phone Hub:
Phone Hub also allows you to quickly access recently accessed images and links on your Chromebook. Simply click on the Phone Hub icon in the system tray and select the “Recent images” or “Recent links” option to view and open them.
-
Use Smart Lock with Phone Hub:
If you want to unlock your Chromebook using your phone, make sure you have set up Smart Lock on your phone. In the Chromebook settings, navigate to the “Connected devices” section, select “Phone Hub”, and toggle on the “Smart Lock” option. Follow the on-screen instructions to complete the setup.
-
Troubleshooting Common Issues with Phone Hub:
If you encounter any issues with Phone Hub connectivity, ensure that both your Chromebook and phone are connected to the internet and running the latest software updates. You can also try restarting both devices and re-enabling Phone Hub.
-
Disconnect Your Phone from Chromebook through Phone Hub:
To disconnect your phone from your Chromebook, simply click on the Phone Hub icon in the system tray on your Chromebook and select the “Disconnect” option. You can also disable Phone Hub in the Chromebook settings under the “Connected devices” section.
By following these step-by-step instructions, you can easily connect your phone to your Chromebook and enjoy the seamless integration and convenience offered by Phone Hub. Enhance your productivity and streamline your digital experience by accessing your phone’s features directly from your Chromebook.
Enabling Phone Hub on Your Chromebook
Phone Hub is a feature on Chromebooks that allows you to connect and integrate your phone with your Chromebook, enabling easy access to your phone’s features and notifications. Enabling Phone Hub on your Chromebook is a simple process that can be done in a few easy steps:
-
Update Chrome OS:
Before enabling Phone Hub, ensure that your Chromebook is running the latest version of Chrome OS. To update your Chromebook, click on the clock in the bottom-right corner of the screen, followed by the gear icon to open the settings menu. From there, navigate to the “About Chrome OS” section and click on “Check for updates”. Allow your Chromebook to install any available updates.
-
Open Chromebook Settings:
Once your Chromebook is up to date, open the settings menu by clicking on the clock in the bottom-right corner of the screen, followed by the gear icon.
-
Navigate to Connected Devices:
In the settings menu, scroll down and click on the “Connected devices” option. This will open the settings related to device connectivity.
-
Enable Phone Hub:
In the “Connected devices” settings, locate the option for “Phone Hub” and toggle it on. By enabling Phone Hub, you are allowing your Chromebook to connect and integrate with your phone.
-
Grant Permissions:
After enabling Phone Hub, you may be prompted to grant certain permissions for the feature to function properly. Follow the on-screen prompts and allow the necessary permissions for a seamless connection between your phone and Chromebook.
Once you have successfully enabled Phone Hub on your Chromebook, you will see an icon for Phone Hub in the system tray of your Chromebook. Clicking on this icon will give you access to various phone-related features and settings on your Chromebook.
Note that some features of Phone Hub may require additional setup on your phone. Make sure to follow the instructions provided by Phone Hub on your Chromebook screen to complete the setup process on your phone.
Enabling Phone Hub on your Chromebook opens up a world of convenience and integration between your phone and Chromebook. Seamlessly manage your phone’s notifications, calls, text messages, and more right from your Chromebook, enhancing productivity and simplifying your digital workflow.
Setting Up Phone Hub on Your Phone
In order to fully integrate your phone with your Chromebook using Phone Hub, you will need to set up the Phone Hub app on your phone. The setup process is simple and can be completed in a few steps:
-
Open the Google Play Store:
Unlock your phone and locate the Google Play Store app. Tap on the icon to open the Play Store.
-
Search for Phone Hub:
In the Play Store, use the search bar at the top of the screen to search for “Phone Hub”. Look for the official Phone Hub app by Google and tap on it to open the app page.
-
Install Phone Hub:
On the Phone Hub app page, tap on the “Install” button to download and install the app on your phone. Wait for the installation process to complete.
-
Open Phone Hub:
Once the app is installed, tap on the “Open” button to launch the Phone Hub app on your phone.
-
Sign in with Your Google Account:
Upon opening the Phone Hub app, you will be prompted to sign in with your Google account. Use the same Google account that you use on your Chromebook. This ensures that your phone and Chromebook are connected to the same Google account for seamless integration.
-
Grant Necessary Permissions:
After signing in, you may be asked to grant certain permissions to Phone Hub in order for it to function properly. These permissions may include accessing notifications, contacts, and other phone-related features. Follow the on-screen prompts to grant the necessary permissions.
-
Complete the Setup:
Once you have granted the required permissions, the setup process for Phone Hub on your phone is complete. Your phone is now ready to be connected to your Chromebook.
Setting up Phone Hub on your phone is crucial to establishing a seamless connection and integration with your Chromebook. After completing the setup process, ensure that both your phone and Chromebook have an active internet connection and are signed in to the same Google account to experience the full range of Phone Hub features.
With Phone Hub set up on your phone, you can now easily access and manage your phone’s notifications, calls, text messages, and other features directly from your Chromebook, creating a unified user experience across your devices.
Connecting Your Phone to Chromebook via Phone Hub
Once you have enabled Phone Hub on your Chromebook and set up the Phone Hub app on your phone, you are ready to connect your phone to your Chromebook. The connection process is quick and simple:
-
Open Phone Hub on Your Chromebook:
On your Chromebook, locate the Phone Hub icon in the system tray, which looks like a phone with signal bars. Click on the Phone Hub icon to open the Phone Hub interface.
-
Confirm Connection on Your Phone:
When you open Phone Hub on your Chromebook, a prompt will be sent to your phone to confirm the connection. Depending on your phone’s settings, you may receive a notification or an alert from the Phone Hub app. Tap on the notification or open the Phone Hub app on your phone to confirm the connection.
-
Establish Connection:
After confirming the connection on your phone, your Chromebook and phone will establish a connection through Phone Hub. This will enable seamless integration and allow you to access various phone features and notifications directly from your Chromebook.
Once the connection is established, you can begin enjoying the benefits of having your phone connected to your Chromebook:
-
Manage Phone Notifications:
Phone Hub allows you to receive and manage your phone’s notifications directly from your Chromebook. You can see incoming calls, text messages, and other app notifications on your Chromebook screen, eliminating the need to check your phone constantly.
-
Make Calls and Send Messages:
With your phone connected to your Chromebook through Phone Hub, you can make phone calls and send text messages directly from your Chromebook. This is especially useful when your phone is not easily accessible or if you prefer typing on a full-sized keyboard.
-
Access Phone Features:
Phone Hub enables you to access various phone features on your Chromebook. You can browse recent Chrome tabs, view recently accessed images and links, and even use Smart Lock to unlock your Chromebook using your phone.
The connection between your phone and Chromebook via Phone Hub allows for seamless integration and enhances your overall user experience. You can access and manage phone features directly from your Chromebook, simplifying multitasking and improving productivity.
Ensure that both your phone and Chromebook are connected to the internet and signed in to the same Google account to maintain a stable connection between the two devices through Phone Hub.
Managing Phone Notifications on Chromebook
One of the key benefits of connecting your phone to your Chromebook via Phone Hub is the ability to manage your phone’s notifications directly from your Chromebook. This integration allows you to stay updated and easily respond to incoming calls, messages, and other app notifications without having to unlock your phone. Here’s how you can manage your phone notifications on your Chromebook:
-
Notification Display:
Once your phone is connected to your Chromebook via Phone Hub, you will start receiving your phone’s notifications directly on your Chromebook. These notifications will appear in the bottom-right corner of your Chromebook screen, similar to how regular Chromebook notifications are displayed.
-
Expand and Interact:
Clicking on a phone notification on your Chromebook displays an expanded view of the notification. From here, you can interact with the notification just as you would on your phone. For example, you can reply to a message, dismiss a notification, or take any necessary action directly from your Chromebook.
-
Notification Sync:
Phone Hub keeps your phone and Chromebook notifications in sync. When you dismiss a notification on your Chromebook, it will also be dismissed on your phone, ensuring that you don’t see duplicate notifications on both devices.
-
Notification Settings:
You can customize how phone notifications are displayed and managed on your Chromebook. To access the Phone Hub notification settings, click on the clock in the bottom-right corner of the screen, followed by the gear icon to open the settings menu. Navigate to the “Connected devices” section and select “Phone Hub”. Here, you can toggle the “Show phone notifications” option on or off, depending on your preference.
-
Phone Ringer Control:
In addition to notifications, Phone Hub on Chromebook also provides control over your phone’s ringer. You can toggle between silent, vibrate, and sound modes directly from the Phone Hub interface on your Chromebook. This is especially useful when your phone is not easily accessible.
Managing your phone notifications on your Chromebook via Phone Hub enhances your productivity and streamlines your workflow. You can stay updated with your phone’s notifications without constantly reaching for your phone, allowing you to focus on your work or activities on your Chromebook.
Ensure that your phone and Chromebook are connected to the internet and signed in to the same Google account for a seamless notification experience through Phone Hub.
Viewing Recent Chrome Tabs on Your Phone
With Phone Hub, you can easily access and view recent Chrome tabs from your Chromebook directly on your phone. This allows for seamless browsing between devices and ensures that you can pick up where you left off, regardless of the device you’re using. Here’s how you can view your recent Chrome tabs on your phone:
-
Ensure Chrome Browser Compatibility:
Before accessing your recent Chrome tabs on your phone, make sure that you’re using Chrome browser version 89 or higher on both your phone and Chromebook. This ensures compatibility and synchronization between the devices.
-
Open the Chrome Browser on Your Phone:
Unlock your phone and locate the Chrome browser icon on your home screen or app drawer. Tap on the icon to open the Chrome browser.
-
Access the Tab Switcher:
In the Chrome browser on your phone, tap on the square icon in the top or bottom toolbar. This will open the tab switcher, displaying your currently open tabs.
-
View Recent Tabs from Other Devices:
In the tab switcher, scroll down to the “Other devices” section. Here, you will find a list of your recently accessed Chrome tabs from your other devices, including your Chromebook. Tap on any of the tabs to open it on your phone.
By accessing your recent Chrome tabs on your phone, you can seamlessly continue browsing on a smaller screen without any interruption. This is particularly useful when you need to step away from your Chromebook or when you prefer the convenience of using your phone.
Note that your recent Chrome tabs will only be displayed on your phone if you’re signed in to the same Google account on both devices and have Chrome browser version 89 or higher installed.
Whether you’re researching, reading, or working, the ability to view recent Chrome tabs on your phone via Phone Hub provides a seamless and uninterrupted browsing experience across your devices.
Accessing Recently Accessed Images and Links on Phone Hub
Phone Hub on Chromebook offers the convenience of accessing recently accessed images and links directly from your phone. This feature allows you to effortlessly continue browsing, viewing, and interacting with content across your devices. Here’s how you can access these recent images and links through Phone Hub:
-
Open Phone Hub:
On your Chromebook, click on the Phone Hub icon in the system tray to open the Phone Hub interface.
-
Recent Images:
In the Phone Hub interface, you will find the option to access “Recent images”. Click on this option to view a collection of recently accessed images from your Chromebook.
-
Browsing Recent Images:
When viewing the recent images, you can swipe or scroll through the thumbnails to browse through the images that you have accessed on your Chromebook. Tap on any image to open it in a larger view.
-
Recent Links:
Phone Hub also allows you to access “Recent links”. Click on this option in the Phone Hub interface to view a list of recently accessed links from your Chromebook.
-
Opening Recent Links:
In the list of recent links, tap on any link to open it in the default browser on your phone. This allows you to quickly access websites, articles, or any other content you were browsing on your Chromebook.
The ability to access recently accessed images and links through Phone Hub makes it easy to continue your browsing experience seamlessly across your devices. Whether you want to view a photo or revisit a web page, Phone Hub ensures that you can effortlessly access your most recent content from your phone.
Keep in mind that the recent images and links available in Phone Hub are specific to your Chromebook and are synced through your Google account. Ensure that both your phone and Chromebook are connected to the internet and signed in to the same Google account for a seamless experience.
Make the most of Phone Hub’s capability to access your recently accessed images and links, allowing you to conveniently browse and revisit your favorite content across your Chromebook and phone.
Using Smart Lock with Phone Hub
Smart Lock is a feature that allows you to unlock your Chromebook using your phone. When Phone Hub is enabled, you can take advantage of Smart Lock to enhance the security and convenience of accessing your Chromebook. Here’s how you can use Smart Lock with Phone Hub:
-
Ensure Phone Hub is Enabled:
Make sure that Phone Hub is enabled on your Chromebook and that your phone is connected to your Chromebook through the Phone Hub feature.
-
Open Chromebook Settings:
Click on the clock in the bottom-right corner of the screen on your Chromebook, followed by the gear icon to open the settings menu.
-
Navigate to Connected Devices:
In the settings menu, scroll down and click on the “Connected devices” option to access the settings related to device connectivity.
-
Select Phone Hub:
In the “Connected devices” settings, locate and select “Phone Hub”. This will open the Phone Hub settings on your Chromebook.
-
Enable Smart Lock:
In the Phone Hub settings, toggle on the “Smart Lock” option to enable this feature.
-
Follow the On-Screen Prompts:
Once you enable Smart Lock, your Chromebook will guide you through the necessary steps to complete the setup. Follow the on-screen prompts to pair your phone with your Chromebook for Smart Lock functionality.
-
Unlock Your Chromebook with Your Phone:
With Smart Lock enabled, you’ll be able to unlock your Chromebook by simply having your connected phone nearby. When you wake up your Chromebook, it will automatically detect your phone’s proximity and unlock without requiring you to enter a password or PIN.
Using Smart Lock with Phone Hub makes it more convenient to access your Chromebook while maintaining security. You no longer need to type a password or use your fingerprint to unlock your Chromebook when your phone is nearby. This feature saves time and simplifies the login process.
It’s important to note that Smart Lock requires a trusted connection between your phone and Chromebook, established through the Phone Hub feature. Keep your phone and Chromebook connected to the internet and ensure that Bluetooth is enabled on both devices for Smart Lock to work seamlessly.
By utilizing Smart Lock with Phone Hub, you can enjoy a seamless and secure login experience, making it easier to access your Chromebook whenever you need it.
Troubleshooting Common Issues with Phone Hub
While Phone Hub is designed to provide a seamless integration between your phone and Chromebook, you may encounter some common issues along the way. Here are some troubleshooting steps that can help you resolve these issues and ensure a smooth experience with Phone Hub:
-
Check Internet Connection:
Ensure that both your phone and Chromebook have a stable internet connection. Phone Hub requires an active internet connection to establish and maintain the connection between the devices.
-
Update Software:
Make sure that your Chromebook and phone are running on the latest software updates. Outdated software can sometimes cause compatibility issues with Phone Hub. Check for available updates and install them if needed.
-
Restart Devices:
If you’re encountering connectivity or syncing issues, try restarting both your Chromebook and phone. Sometimes, a simple restart can resolve temporary glitches and restore a stable connection.
-
Re-enable Phone Hub:
If you’re experiencing issues with Phone Hub, you can try disabling and re-enabling the feature on both your Chromebook and phone. This can help establish a fresh connection and resolve any connectivity issues.
-
Ensure Same Google Account:
Confirm that you’re signed in to the same Google account on both your Chromebook and phone. Phone Hub relies on a consistent Google account to establish a connection and synchronize information between devices.
-
Check Bluetooth Connectivity (for Smart Lock):
If you’re having trouble using Smart Lock with Phone Hub, check that Bluetooth is enabled and working properly on both your Chromebook and phone. A stable Bluetooth connection is essential for Smart Lock to function correctly.
-
Reset Phone Hub Settings:
If all else fails, you can try resetting the Phone Hub settings on both your Chromebook and phone. This will clear any stored settings or configurations and allow you to start fresh. Remember to re-enable Phone Hub and follow the setup process again.
If these troubleshooting steps do not resolve your issues with Phone Hub, it may be helpful to consult the official support documentation for your specific Chromebook model and phone. The manufacturer’s support resources may provide additional troubleshooting steps or solutions tailored to your devices.
By troubleshooting common issues with Phone Hub, you can ensure a smooth and seamless integration between your phone and Chromebook, enabling you to make the most of the features and functionality provided by Phone Hub.
Disconnecting Your Phone from Chromebook through Phone Hub
If you want to disconnect your phone from your Chromebook, the Phone Hub feature provides an easy way to do so. Whether you want to temporarily disconnect or permanently disable the connection, here is how you can disconnect your phone from your Chromebook through Phone Hub:
-
Open Phone Hub on Your Chromebook:
Click on the Phone Hub icon in the system tray on your Chromebook to open the Phone Hub interface.
-
Access Phone Hub Settings:
In the Phone Hub interface, click on the settings icon (usually represented by three dots or lines) to access the Phone Hub settings.
-
Disconnect Your Phone:
In the Phone Hub settings, locate the option to disconnect your phone. This option may be labeled as “Disconnect phone”, “Disable connection”, or similar. Click on this option to initiate the disconnection process.
-
Confirm Disconnection:
A confirmation prompt will appear on your Chromebook screen, asking you to confirm the disconnection. Review the prompt and click on the appropriate button (e.g., “Disconnect” or “Disable”) to confirm.
Once you have confirmed the disconnection, your phone will be disconnected from your Chromebook through Phone Hub. The devices will no longer be synced, and the features and functionality provided by Phone Hub will no longer be available.
If you want to reconnect your phone to your Chromebook later, you can simply follow the steps to enable Phone Hub and establish the connection again.
Disconnecting your phone from your Chromebook through Phone Hub gives you control over the connection between the devices. Whether you need to temporarily disconnect for privacy or permanently disable the connection, Phone Hub provides a straightforward method to disconnect your phone from your Chromebook.