
Check the Ports
Before connecting your laptop to a projector, it is important to check the available ports on both devices. Most modern laptops and projectors have various ports that can be used for video output. The most common ports found on laptops are HDMI, VGA, and DisplayPort, while projectors typically have VGA and HDMI ports.
To determine which ports are available on your laptop, look for the port symbols on the sides or back of the device. HDMI ports have a rectangular shape with rounded edges, VGA ports have a trapezoid shape with several pins, and DisplayPort have a smaller rectangular shape with a diagonal corner cut off.
Similarly, look for the port symbols on the projector. VGA ports on projectors are usually blue, while HDMI ports are typically black. Some projectors may also have other video input options, such as DVI or mini DisplayPort.
Once you have identified the available ports on both devices, make a note of the types of ports you have. This will help you determine which cables or adapters you will need to connect your laptop to the projector.
If your laptop and projector have matching ports, such as HDMI to HDMI or VGA to VGA, you can proceed with connecting the devices directly. However, if the ports do not match, you may need to use an adapter or converter to bridge the connection between the laptop and the projector.
It is essential to ensure that all the necessary ports and cables are in good condition and not damaged. Damaged ports or cables can affect the quality of the video signal and lead to connection issues. If you notice any signs of damage, such as bent pins in the VGA port or frayed cables, it is recommended to replace them before attempting to connect your laptop to the projector.
Once you have verified the available ports and prepared the necessary cables and adapters, you are ready to proceed with the connection process. The next step is gathering the required cables and adapters, which we will discuss in the next section.
Gather the Necessary Cables and Adapters
Once you have checked the available ports on your laptop and projector, the next step is to gather the necessary cables and adapters to connect them. Depending on the types of ports available on your devices, you may need different cables and adapters to establish the connection.
If both your laptop and projector have HDMI ports, you will need an HDMI cable to make the connection. HDMI cables are widely used and provide high-definition video and audio transmission. Make sure to choose a cable that is long enough to reach from your laptop to the projector without causing any strain.
If your laptop has an HDMI port but the projector only has a VGA port, you will need an HDMI to VGA adapter. This adapter converts the HDMI signal from your laptop into a VGA signal that can be accepted by the projector. Additionally, you will also need a VGA cable to connect the adapter to the projector.
On the other hand, if your laptop has a VGA port and the projector has an HDMI port, you will need a VGA to HDMI adapter. This adapter converts the VGA signal from your laptop into an HDMI signal that can be recognized by the projector. In this case, you will need an HDMI cable to connect the adapter to the projector.
In some cases, you may encounter projectors with different ports, such as DisplayPort or DVI. If your laptop has a different port, you can find adapters or converters for these connections as well. Just make sure to choose the appropriate cables and adapters based on the ports available on your laptop and projector.
It is important to note that the quality of the cables and adapters can affect the overall performance of the connection. Cheap or low-quality cables and adapters may result in poor video quality or unstable connections. It is advisable to invest in high-quality cables and adapters to ensure a reliable and smooth connection between your laptop and projector.
Once you have gathered all the necessary cables and adapters, you are ready to move on to the next step, which involves powering off the laptop and projector. We will discuss this in the following section.
Power Off the Laptop and Projector
Before connecting your laptop to a projector, it is crucial to ensure that both devices are powered off. This step is important to prevent any potential damage to the devices and ensure a safe connection process.
Start by shutting down your laptop properly. Save any open files or documents and close all running applications. Click on the “Start” button (Windows) or the Apple menu (Mac) and select the “Shut Down” option. Wait for the laptop to completely power off before proceeding to the next step.
Next, locate the power button on the projector and press it to turn off the device. Most projectors have a dedicated power button, usually located on the top or side of the unit. If the projector has been recently used and is still warm, allow it to cool down for a few minutes before proceeding to the next step.
By ensuring that both the laptop and projector are powered off, you minimize the risk of any electrical damage during the connection process. It also allows for a fresh start when powering on the devices, ensuring a smoother connection and proper recognition of the connected devices.
Once both devices are powered off, you are ready to move on to the next step, which involves connecting the cables between the laptop and the projector. We will discuss this in detail in the following section.
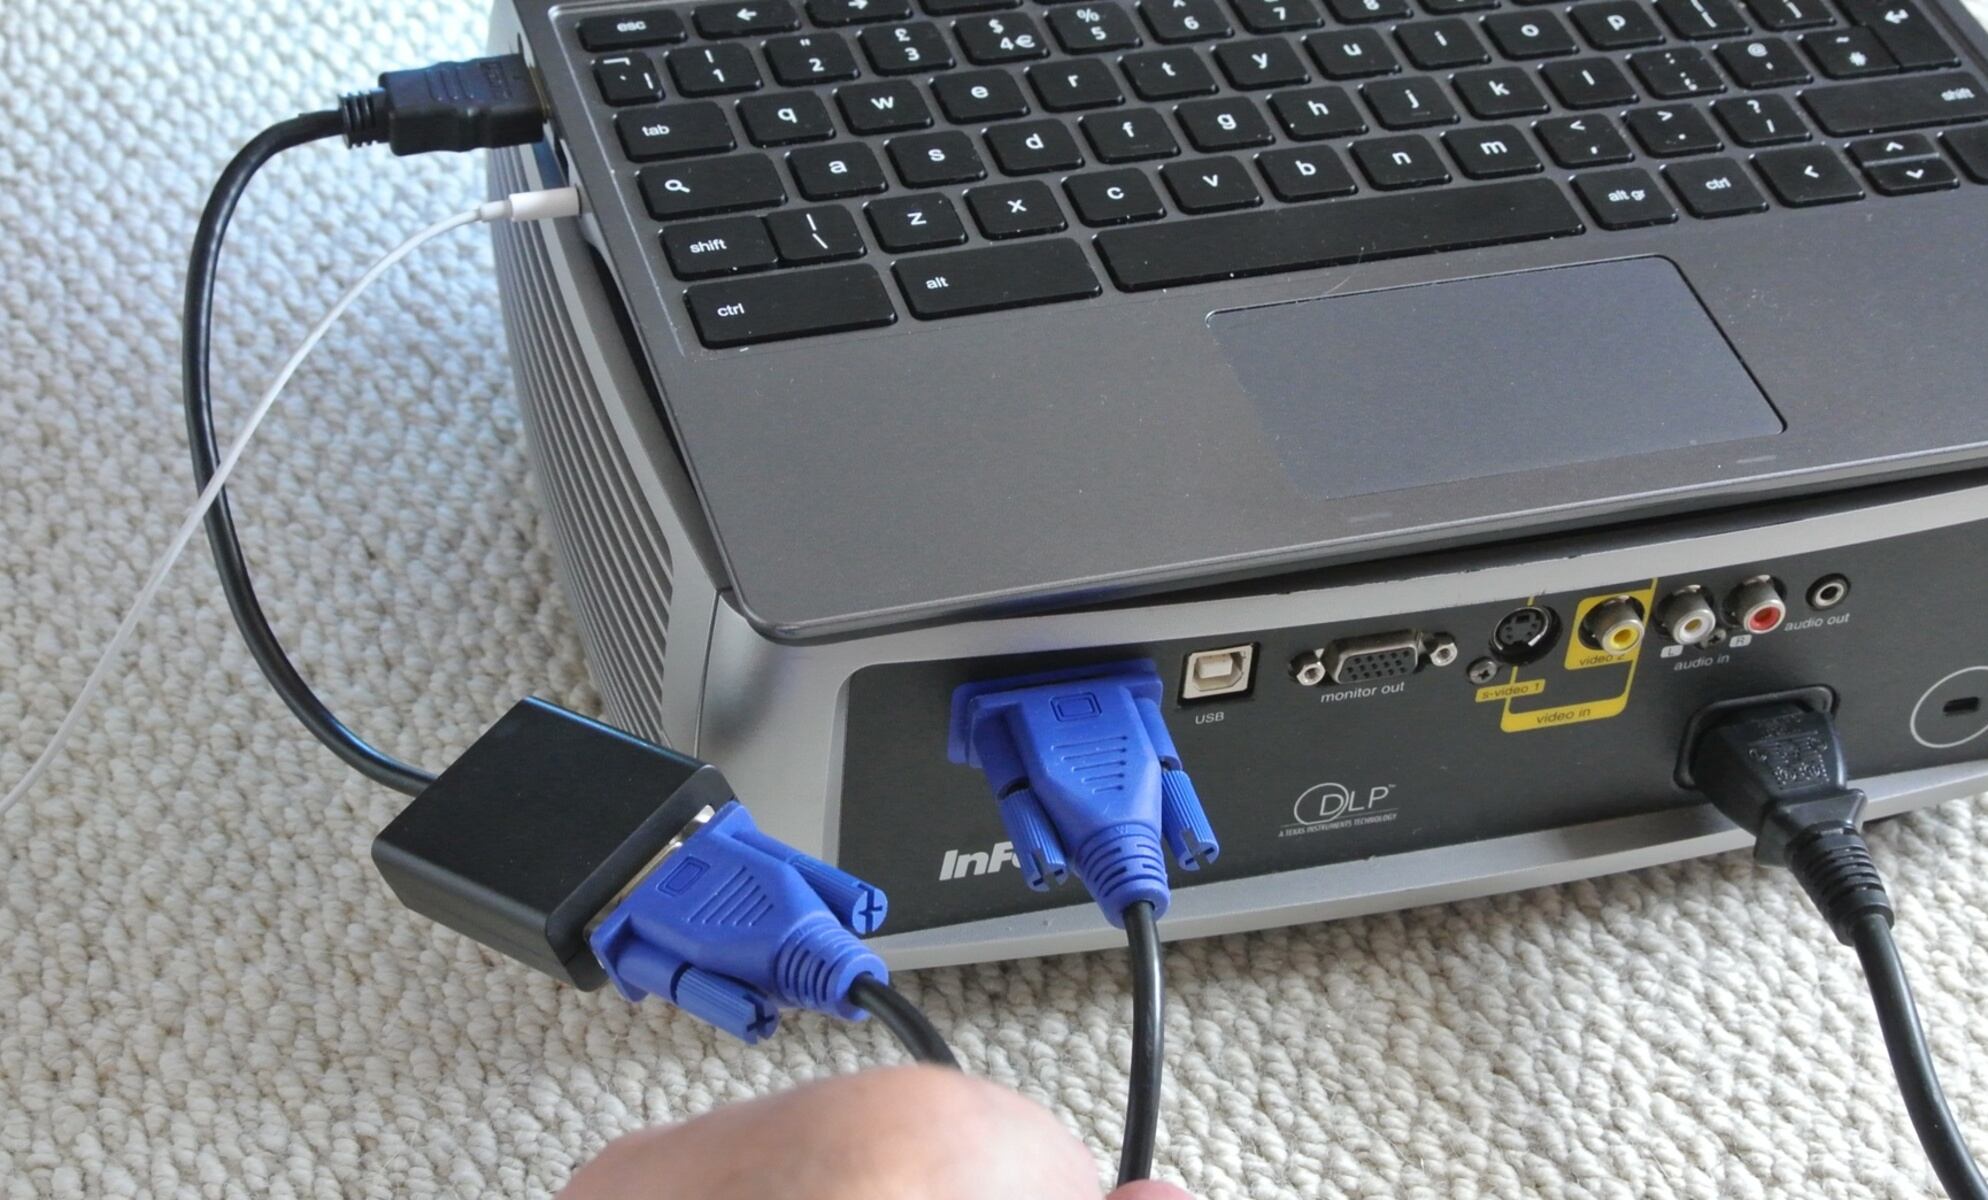
Connect the Cables
Now that you have powered off your laptop and projector, it’s time to connect the cables between the two devices. The type of cables and adapters you need will depend on the available ports on your laptop and projector.
If both your laptop and projector have HDMI ports, connecting them is quite simple. Take one end of the HDMI cable and plug it into the HDMI port on your laptop. Make sure the cable is inserted firmly but gently, being careful not to force it. Take the other end of the HDMI cable and plug it into the HDMI port on the projector. Once again, ensure a secure connection without applying excessive pressure.
However, if your laptop has an HDMI port and the projector has a VGA port, you will need an HDMI to VGA adapter. First, connect the HDMI end of the adapter to the HDMI port on your laptop, just like you would with a regular HDMI cable. Then, connect one end of the VGA cable to the VGA port of the adapter. Lastly, connect the other end of the VGA cable to the VGA port on the projector. Make sure all connections are secure and properly positioned.
Similarly, if your laptop has a VGA port and the projector has an HDMI port, you will need a VGA to HDMI adapter. Start by connecting the VGA end of the adapter to the VGA port on your laptop. Next, connect one end of the HDMI cable to the HDMI port of the adapter. Finally, connect the other end of the HDMI cable to the HDMI port on the projector. Ensure all connections are snug and secure.
If you encounter different ports, such as DisplayPort or DVI, follow a similar process using the appropriate adapters and cables. Remember to handle the cables and adapters with care to avoid any damage or misalignment.
Once you have connected all the necessary cables between your laptop and projector, it’s time to move on to the next step – powering on the devices. This will be discussed in detail in the following section.
Power On the Laptop and Projector
Now that you have successfully connected the cables between your laptop and projector, it’s time to power on both devices. Following the correct sequence will ensure a smooth and successful connection.
Start by powering on your laptop. Press the power button on your laptop and wait for it to boot up. Depending on your laptop’s operating system, it may take a few seconds or a couple of minutes to fully start up. Once your laptop has booted up, it will recognize the connection to the projector and may automatically adjust the display settings.
Next, locate the power button on the projector and press it to turn on the device. Some projectors may have a power switch on the back or side, so make sure to find the appropriate button. Wait for the projector to go through its startup process. This usually involves the projector lamp warming up and the device initializing the input sources.
It’s important to note that the projector may take a few moments to detect the laptop’s signal and display the image. Be patient and allow the devices to establish a connection before expecting any visual output on the projector screen or wall.
While the laptop and projector are powering on, it’s a good idea to double-check the input settings on the projector. Most projectors have a dedicated button or menu option to select the input source. Press the input/source button on the projector remote or use the projector’s control panel to ensure that the correct input source is selected (e.g., HDMI, VGA).
If both devices have powered on successfully, and the input settings have been adjusted correctly, you should now see the laptop’s display being projected onto the screen or wall. If you encounter any issues or the projection does not appear, don’t worry. We will cover some troubleshooting tips in the next section to help you resolve common connection problems.
Now that your laptop and projector are powered on and connected, it’s time to proceed with adjusting the display settings on your laptop to optimize the projected image. We will explore this topic in the following section.
Adjust Display Settings on the Laptop
Once you have powered on the laptop and projector and established a connection, it’s important to adjust the display settings on your laptop to optimize the projected image. By adjusting these settings, you can ensure the best possible viewing experience for your audience.
The exact steps for adjusting display settings may vary slightly depending on the operating system of your laptop. However, the general process remains the same. Here are the steps to adjust display settings on Windows and Mac laptops:
Windows:
- Right-click on the desktop and select “Display settings” from the context menu.
- In the “Display settings” window, you will see multiple options to adjust the display. You can change the resolution, orientation, and scale of the display. It is recommended to set the resolution to match the native resolution of the projector for the best image quality.
- You can also choose to extend or duplicate the display. Extending the display will allow you to use your laptop screen as well as the projected screen, while duplicating the display will mirror the laptop screen on the projector.
- Make any necessary adjustments and click “Apply” to save the changes. Test the projection to ensure the image is properly displayed.
Mac:
- Click on the Apple menu and select “System Preferences.”
- In the “System Preferences” window, click on “Displays.”
- You will see multiple tabs with display settings. Click on the “Arrangement” tab.
- Check the “Mirror Displays” option if you want to duplicate the laptop screen on the projector. Uncheck it if you want to extend the display.
- Adjust the resolution and other settings as needed. It is recommended to set the resolution to match the native resolution of the projector.
- Close the “Displays” window and test the projection to ensure the image is properly displayed.
Remember to experiment with the display settings to find the optimal configuration for your needs. You may need to make some adjustments based on the lighting conditions of the room and the desired screen size.
Once you have adjusted the display settings, it’s time to move on to the next step – testing the connection between the laptop and the projector. We will cover this in the following section.
Test the Connection
After adjusting the display settings on your laptop, it is essential to test the connection between your laptop and the projector. Testing the connection ensures that the projected image is clear, properly aligned, and visible to your audience.
To test the connection, follow these steps:
- Play a video or open a presentation on your laptop.
- Ensure that the projector is set to the correct input source (e.g., HDMI or VGA).
- In some cases, you may need to manually configure the laptop’s display settings to “Extend” or “Duplicate” the screen onto the projector.
- As the video or presentation plays, verify that the projected image displays properly on the screen or wall. Check for clarity, color accuracy, and overall visibility.
- Test the audio by adjusting the volume settings on both the laptop and the projector. Make sure that sound is transmitted through the projector’s speakers or external audio system, if connected.
- Ensure that the projected image is centered and properly aligned. Make any necessary adjustments to the position, focus, and keystone correction of the projector.
- Check for any visual artifacts, flickering, or distortion in the projected image. If you encounter any issues, ensure that the cables are securely connected and try adjusting the display settings on your laptop.
- Engage in thorough testing by navigating through different content types (videos, slides, images) to evaluate the quality of the projected image and audio.
If you encounter any issues during the testing process, refer to the troubleshooting tips in the next section. These tips can help you diagnose and resolve common connection problems.
By thoroughly testing the connection, you can verify that the laptop and projector are working together effectively, and that the projected image and audio meet your expectations. Once you are satisfied with the test results, you are ready to proceed with your presentation, movie night, or any other activities that require the laptop and projector connection.
In case you encounter any difficulties during the testing phase, the next section will provide you with some troubleshooting tips to help you resolve common connection issues.
Troubleshooting Tips
While connecting a laptop to a projector is usually a straightforward process, there may be instances when you encounter some issues. Here are some troubleshooting tips to help you resolve common connection problems:
- Check the cables and adapters: Ensure that all cables and adapters are securely connected to both the laptop and the projector. Sometimes, loosely connected cables can result in a poor or no signal.
- Restart both devices: Try restarting your laptop and projector. Powering off and then turning them back on can help reset the connection and resolve any temporary issues.
- Try different ports or cables: If you have multiple ports or cables available, try connecting through different ones to see if the issue is with a specific port or cable.
- Update display drivers: Check for any available updates for your laptop’s display drivers. Outdated or incompatible drivers can sometimes cause issues with the connection and image quality.
- Adjust display resolution: Experiment with different display resolutions on your laptop, ensuring that you choose a resolution supported by both your laptop and the projector.
- Verify input source: Double-check that the projector is set to the correct input source (e.g., HDMI or VGA) that matches the cable you are using. You may need to cycle through the input sources to find the correct one.
- Check power supply: Ensure that both the laptop and the projector are receiving proper power. Faulty power connections or inadequate power supply can disrupt the connection.
- Try a different projector or laptop: If possible, test the laptop and projector with different devices to determine if the issue is specific to one device or if it persists across different devices.
- Consult the user manuals: Refer to the user manuals provided with your laptop and projector for specific troubleshooting steps and guidance.
- Seek technical support: If the troubleshooting tips don’t resolve the issue, consider reaching out to technical support for your laptop or projector manufacturer for further assistance.
Remember, troubleshooting connection issues may require a bit of patience and trial-and-error. By following these tips, you can identify and resolve common issues that may arise when connecting your laptop to a projector.
Now that you have gone through the troubleshooting tips, you should be well-equipped to troubleshoot any connection problems that may arise. Enjoy your presentation or movie screening with a seamless laptop-to-projector connection!