
Why Clone HDD to SSD?
Upgrading from a traditional Hard Disk Drive (HDD) to a Solid State Drive (SSD) can significantly enhance your computer’s performance. While both types of storage have their benefits, SSDs offer faster data access, improved multitasking capabilities, and reduced boot times. So, why should you clone your HDD to an SSD instead of starting from scratch?
First and foremost, cloning allows you to transfer all your data, including the operating system, applications, files, and settings, from your old HDD to the new SSD. This means you don’t have to reinstall your operating system or spend time reconfiguring all your applications and settings. It saves you valuable time and ensures a seamless transition to the new drive.
Additionally, cloning preserves your personal files and settings, such as documents, photos, videos, and preferences, exactly as they were on your old HDD. This eliminates the need to manually transfer and organize your files on the new SSD, minimizing the risk of unintended data loss or disorganization during the process.
Furthermore, by cloning your HDD to an SSD, you can retain your existing software licenses, settings, and configurations. This is especially advantageous if you have specialized software or intricate settings that may be time-consuming or challenging to replicate if starting from scratch.
Another crucial advantage of cloning is that it allows you to maintain the same folder structure and file paths on the new SSD as on your old HDD. This ensures that all your shortcuts, bookmarks, and file references remain intact, avoiding the inconvenience of broken links or having to reorganize your digital workspace.
Lastly, cloning provides a smooth and convenient upgrade path without disrupting your workflow. Once you’ve successfully cloned your HDD to an SSD, you can simply replace the old drive with the new one and continue using your computer as normal, instantly benefiting from the enhanced performance and improved user experience offered by SSD technology.
Preparations before Cloning
Before you begin the process of cloning your HDD to an SSD, it’s important to make a few preparations to ensure a smooth and successful migration. Taking the time to complete these steps will help minimize any potential issues and maximize the chances of a seamless transition.
1. Backup your data: Before you start cloning, it’s crucial to create a backup of all your important data. While the cloning process is designed to be safe, unexpected errors or issues can occur. Having a backup ensures that your data is protected in case anything goes wrong.
2. Check your SSD compatibility: Ensure that the SSD you plan to clone your HDD onto is compatible with your system. Check the specifications and requirements of your computer’s motherboard to ensure that it supports the SSD’s form factor and interface (such as SATA or NVMe).
3. Calculate space requirements: Make sure that the capacity of the SSD is large enough to accommodate all the data from your HDD. Calculate the total space required by your current data and applications, and choose an SSD with sufficient capacity.
4. Perform a thorough system cleanup: Before initiating the cloning process, it’s a good idea to clean up your HDD by removing unnecessary files and applications. This will help reduce the amount of data that needs to be cloned and ensure optimal performance on the new SSD.
5. Verify the health of your HDD: Run a diagnostic tool to check the health and performance of your HDD. Identifying any potential issues beforehand will help you address them and ensure a smoother cloning process.
6. Gather necessary tools: Ensure that you have all the required tools and accessories for the cloning process. This may include an external enclosure or adapter to connect the new SSD, screwdrivers to open the computer case, and any software or installation media that may be necessary.
7. Familiarize yourself with the cloning method: Understand the specific method you will be using to clone your HDD to the SSD. Whether you are using built-in Windows tools or third-party software, read the documentation and familiarize yourself with the step-by-step process to avoid any confusion during the actual cloning.
By taking these preparations into account, you will be well-prepared for the cloning process and minimize the chances of encountering any unexpected issues. Remember to carefully follow the instructions provided by the cloning method you choose and proceed with caution to ensure a successful migration to your new SSD.
Method 1: Using Built-in Windows Tools
If you’re running a Windows operating system, you have the advantage of built-in tools that can help you clone your HDD to an SSD without the need for additional third-party software. Here’s a step-by-step guide on how to use these tools:
Step 1: Connect your new SSD to your computer. You can do this by using an external enclosure or adapter, or by installing the SSD directly into an available drive bay on your computer.
Step 2: Open the Disk Management tool. You can do this by right-clicking on the Start menu and selecting “Disk Management” from the menu.
Step 3: Locate your HDD in the list of drives and note its disk number. It will typically be labeled as “Disk 0” or have a similar designation.
Step 4: Right-click on your HDD and select “Shrink Volume.” This will allow you to shrink the existing partition on your HDD to a size that will fit on your new SSD. Follow the prompts and choose the desired size for the new partition.
Step 5: Once the shrink process is complete, you will see unallocated space on the drive. Right-click on the unallocated space and select “New Simple Volume” to create a new partition.
Step 6: Format the new partition with the NTFS file system, and assign it a drive letter.
Step 7: Open File Explorer and copy all the files and folders from your HDD to the new partition on your SSD.
Step 8: After copying the files, shut down your computer.
Step 9: Disconnect the HDD from your computer and connect the SSD in its place. Make sure to connect the SSD to the same cables and ports that the HDD was previously connected to.
Step 10: Power on your computer and enter the BIOS settings. Verify that the SSD is detected correctly by the system.
Step 11: Save the changes and exit the BIOS. Your computer will now boot from the SSD.
Step 12: Once your computer has booted successfully from the SSD, you can safely reformat the old HDD for additional storage or backup purposes if desired.
Using the built-in Windows tools to clone your HDD to an SSD provides a convenient option without the need for third-party software. However, it may not offer some advanced features and customization options that dedicated cloning software may provide. If you require more control over the cloning process or encounter any issues, you may want to consider using third-party software as an alternative.
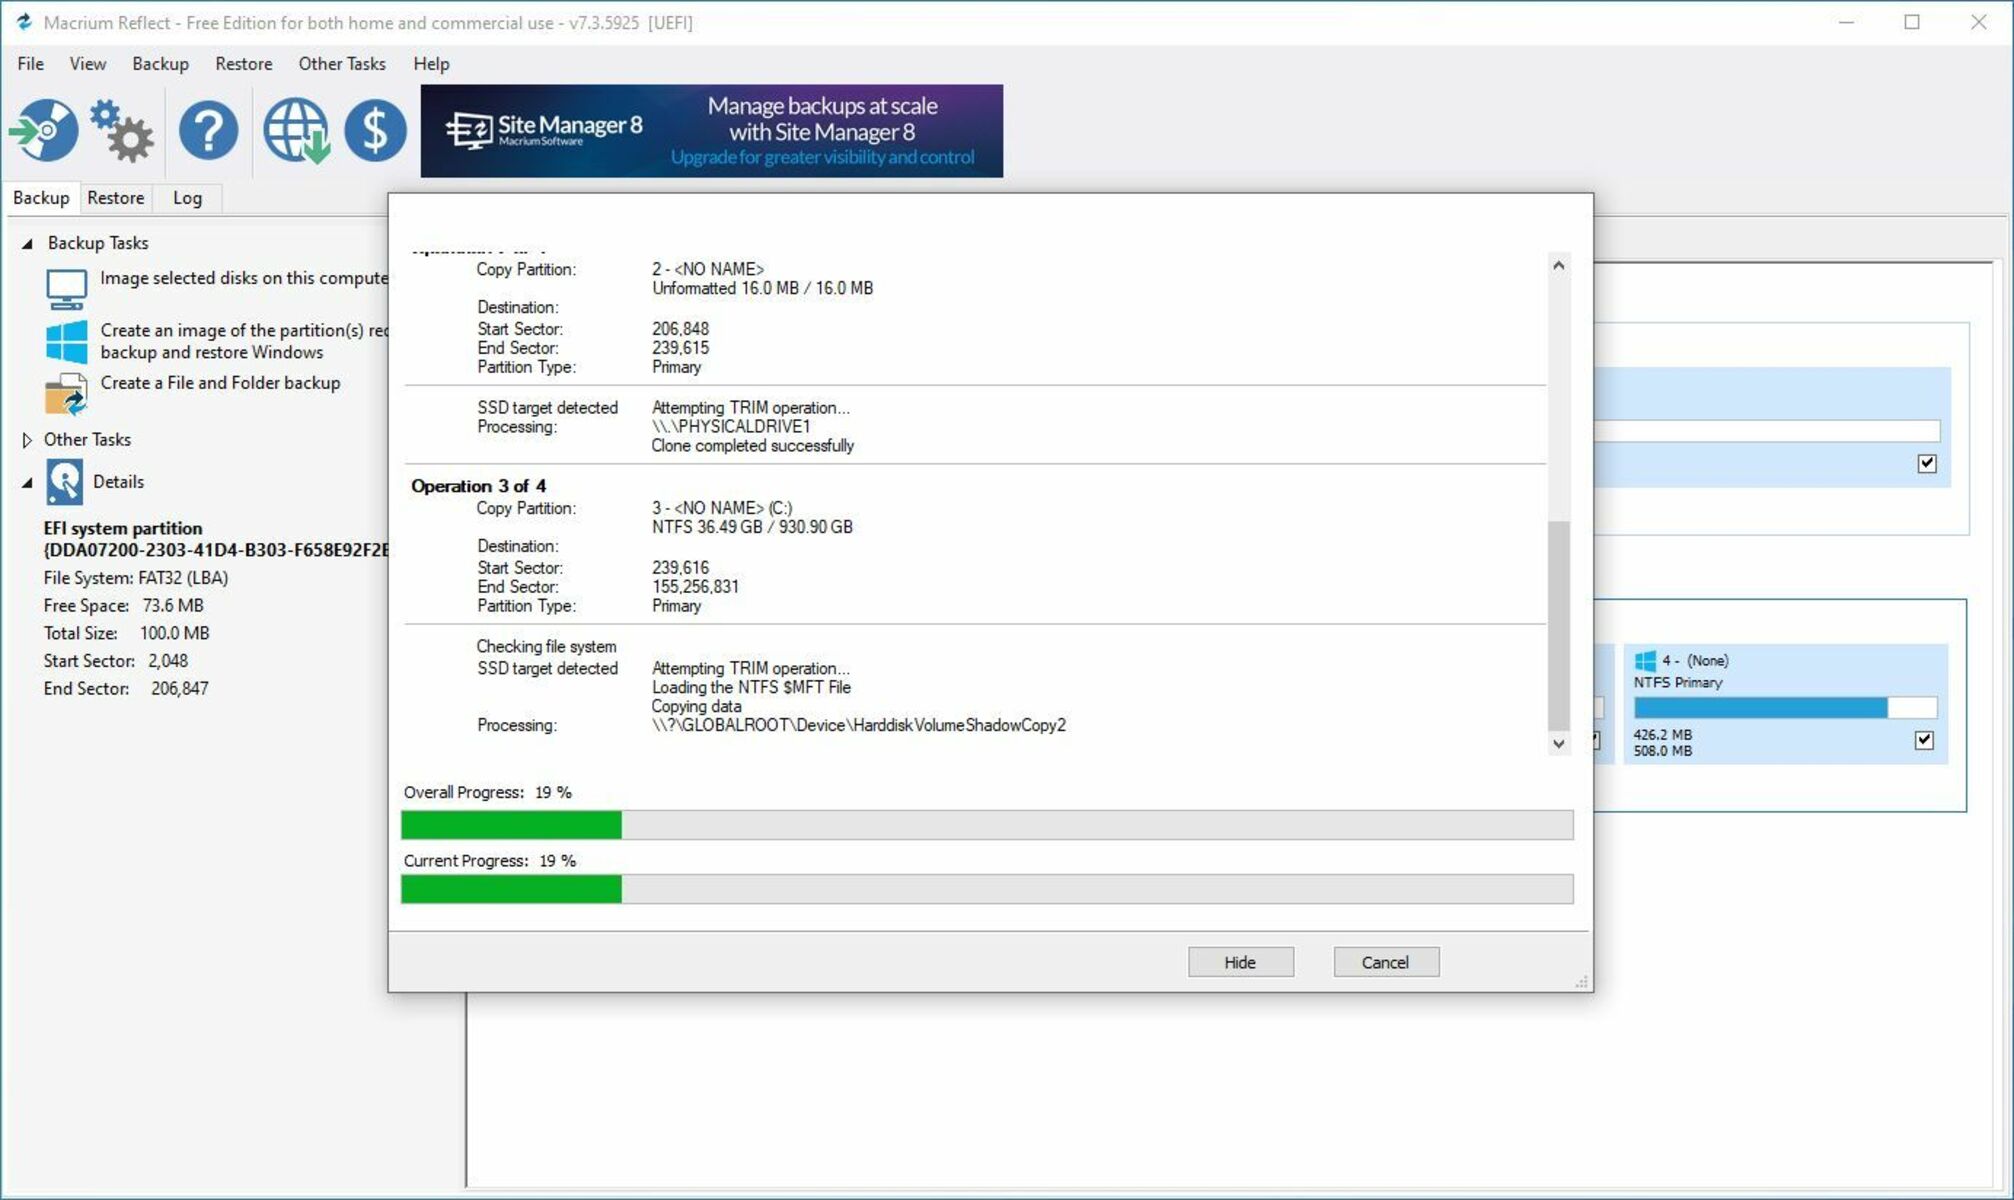
Method 2: Using Third-Party Software
If you prefer a more comprehensive and user-friendly approach to cloning your HDD to an SSD, using third-party software can provide you with additional features and customization options. Here’s a step-by-step guide on how to use third-party software for the cloning process:
Step 1: Choose a reputable third-party software for cloning. Some popular options include Acronis True Image, EaseUS Todo Backup, and Macrium Reflect.
Step 2: Install the chosen software on your computer and launch it.
Step 3: Connect your new SSD to your computer using an external enclosure or adapter, or by installing it directly into an available drive bay.
Step 4: Open the third-party software and select the cloning option. This may be labeled as “Disk Clone,” “Drive Clone,” or similar terminology depending on the software you are using.
Step 5: Choose your HDD as the source disk and select the SSD as the destination disk.
Step 6: Review the disk layout and partition information. Ensure that the partitions on the SSD are aligned and properly sized to accommodate the data from your HDD.
Step 7: Select any additional options or settings offered by the software. This may include resizing partitions, optimizing for SSD performance, or enabling TRIM support.
Step 8: Start the cloning process and wait for it to complete. The time required for the process to finish will depend on the size of your HDD and the speed of your computer.
Step 9: Once the cloning process is finished, shut down your computer.
Step 10: Disconnect the HDD from your computer and replace it with the SSD. Connect the SSD to the same cables and ports that the HDD was previously connected to.
Step 11: Power on your computer and enter the BIOS settings. Verify that the SSD is detected correctly by the system.
Step 12: Save the changes and exit the BIOS. Your computer will now boot from the SSD.
Step 13: Once your computer has booted successfully from the SSD, you can reformat the old HDD for additional storage or keep it as a backup if desired.
Using third-party software for cloning provides you with more flexibility and control over the cloning process. It often comes with additional features such as disk imaging, incremental backups, and scheduling options. Make sure to follow the instructions provided by the software and consult their documentation or support if you encounter any issues during the process.
Step-by-Step Guide for Method 1
Method 1 involves using built-in Windows tools to clone your HDD to an SSD. Follow these step-by-step instructions to successfully complete the cloning process:
Step 1: Connect your new SSD to your computer using an external enclosure or adapter.
Step 2: Right-click on the Start menu and select “Disk Management” from the menu that appears.
Step 3: In Disk Management, locate your HDD in the list of drives and take note of its disk number (e.g., “Disk 0”).
Step 4: Right-click on your HDD and select “Shrink Volume.” Choose a size that will fit on your new SSD and click “Shrink”.
Step 5: After the shrink process is complete, you will see unallocated space on the drive. Right-click on it and select “New Simple Volume.”
Step 6: Follow the prompted steps to create a new partition in the unallocated space. Format it with the NTFS file system and assign a drive letter.
Step 7: Open File Explorer and copy all the files and folders from your HDD to the new partition on the SSD.
Step 8: Shut down your computer and disconnect the HDD.
Step 9: Connect the SSD in place of the HDD, using the same cables and ports.
Step 10: Power on your computer, enter the BIOS settings, and verify that the SSD is correctly detected.
Step 11: Save the changes and exit the BIOS. Your computer will now boot from the SSD.
Step 12: Once your computer has successfully booted from the SSD, you can reformat the old HDD for additional storage or keep it as a backup.
Following these steps will ensure a smooth migration from your HDD to the SSD using built-in Windows tools. Remember to carefully follow each step and consult the documentation or support for your specific version of Windows if you encounter any difficulties along the way.
Step-by-Step Guide for Method 2
Method 2 involves using third-party software to clone your HDD to an SSD. Here is a step-by-step guide to help you through the process:
Step 1: Choose a reliable third-party software for cloning your HDD to an SSD and install it on your computer.
Step 2: Connect your new SSD to your computer using an external enclosure or adapter.
Step 3: Launch the third-party software and select the cloning option or feature.
Step 4: Choose your HDD as the source disk and select the SSD as the destination disk for the cloning process.
Step 5: Review the disk layout and partition information to ensure everything is set up correctly for the cloning process.
Step 6: Take note of any additional options or settings provided by the software, such as partition resizing or performance optimizations, and configure them according to your preferences.
Step 7: Initiate the cloning process and wait for the software to copy all the data from your HDD to the SSD. The duration of the process may vary depending on the size of your HDD and the speed of your computer.
Step 8: Once the cloning process is completed, shut down your computer.
Step 9: Remove the HDD from your computer and replace it with the new SSD. Ensure the SSD is connected using the same cables and ports previously used by the HDD.
Step 10: Power on your computer and enter the BIOS settings to verify that the SSD is properly detected by the system.
Step 11: Save the changes made in the BIOS settings and exit. Your computer will now boot from the SSD.
Step 12: Once your computer successfully boots from the SSD, you can reformat the old HDD for additional storage or repurpose it as needed.
By following these step-by-step instructions and using a reputable third-party software, you can efficiently clone your HDD to an SSD. Remember to consult the software’s documentation or support if you encounter any issues or have specific questions about the process.
Troubleshooting Common Issues
While cloning your HDD to an SSD is usually a straightforward process, you may encounter certain issues along the way. Here are some common problems that might arise and possible solutions to troubleshoot them:
Issue 1: SSD not detected: If your SSD is not being recognized by your computer or the cloning software, try the following steps:
- Ensure that the SSD is securely connected to the appropriate cables and ports.
- Check the BIOS settings to verify if the SSD is enabled and detected. Adjust the settings if necessary.
- Confirm that the SSD is compatible with your system’s interface (SATA or NVMe) and that it meets the requirements of your motherboard.
- Remove unnecessary files and applications from your HDD before cloning.
- If possible, relocate some data to an external storage device or another HDD.
- Consider upgrading to a larger SSD that can accommodate all your data.
- Ensure that both your HDD and SSD are in good health by running diagnostic tools to detect any potential issues.
- Update your cloning software to the latest version, as new updates often include bug fixes and improved compatibility.
- Check if there are any incompatible or conflicting software or drivers that could interfere with the cloning process. Update or uninstall them as necessary.
- Verify that your SSD is properly configured for optimal performance. Some SSDs may require enabling features like TRIM or adjusting power settings.
- Update your SSD’s firmware to the latest version, as firmware updates often address performance issues.
- Check if there are any outdated drivers or software that may be causing performance issues. Update or reinstall them as needed.
- Backup your data: Before starting the cloning process, it is essential to create a backup of all your important data. This will protect your files in case of any unexpected issues during the cloning process.
- Choose reliable hardware and software: Invest in a high-quality and compatible SSD for the best performance and longevity. Additionally, select reputable and trusted cloning software to ensure a reliable and efficient cloning process.
- Perform a clean-up: Prior to cloning, remove any unnecessary files and applications from your HDD to reduce the amount of data that needs to be transferred. This can help enhance the efficiency of the cloning process.
- Ensure compatibility: Verify that your computer’s motherboard supports the SSD’s interface (SATA or NVMe) and check for any specific guidelines or requirements provided by the manufacturer.
- Allocate sufficient time: The cloning process can take some time, especially for larger HDDs. Allocate ample time to ensure that the process is completed without rushing or interruptions.
- Verify partitions and alignment: Before cloning, double-check the partition sizes and alignment on both your HDD and SSD. Ensure that the SSD partitions are correctly aligned and properly sized to avoid any potential issues.
- Keep your system updated: Ensure that your operating system, drivers, and firmware are up to date before starting the cloning process. This can help improve compatibility and stability during the migration.
- Test the cloned SSD: After the cloning process is complete, thoroughly test the SSD to ensure that it boots correctly, all files are accessible, and the performance meets your expectations.
- Do not delete the original data: Keep the original HDD intact until you have confirmed the success of the cloning process. Only after you are confident that everything is working correctly on the SSD should you consider reformatting or repurposing the HDD.
Issue 2: Insufficient space on the SSD: If the data on your HDD exceeds the capacity of the SSD, you will need to free up space or choose a larger SSD. Here’s what you can do:
Issue 3: Cloning process failure: Sometimes, the cloning process may fail or encounter errors. Here are a few steps to troubleshoot this problem:
Issue 4: Slow performance after cloning: If your computer experiences sluggish performance after the cloning process, try the following solutions:
If you encounter any other specific issues during the cloning process, consult the documentation or support resources provided by the cloning software or seek assistance from technical forums or professionals for personalized help and guidance.
Tips and Best Practices
When cloning your HDD to an SSD, following these tips and best practices can help ensure a smooth and successful migration:
By following these tips and best practices, you can minimize the chances of encountering issues and ensure a successful and smooth transition from your HDD to the SSD.
Frequently Asked Questions
Here are some common questions that users often have when cloning their HDD to an SSD:
Q1: Can I clone my HDD to a smaller SSD?
Yes, you can clone your HDD to a smaller SSD as long as the used data on the HDD is less than or equal to the capacity of the SSD. However, you will need to ensure that the data can fit within the available space on the SSD.
Q2: Do I need to reinstall the operating system after cloning to an SSD?
No, if you successfully clone your HDD to an SSD, the operating system will be transferred along with all the data and settings. You should be able to boot from the SSD without the need for a fresh installation.
Q3: Can I clone a failing HDD to an SSD?
It is generally not recommended to clone a failing HDD to an SSD, as the cloning process may transfer damaged or corrupted data. It is better to repair or replace the failing HDD before attempting to clone it.
Q4: Can I continue using my HDD after cloning to an SSD?
Yes, you can still use your HDD after cloning to an SSD. You can reformat it for additional storage or repurpose it as a backup drive. Just make sure not to delete any important data until you are certain that the cloning process was successful.
Q5: Will cloning my HDD to an SSD void my warranty?
No, cloning your HDD to an SSD should not void the warranty of either the HDD or the SSD. However, it is always recommended to check the warranty policies of the manufacturers involved to confirm their specific terms and conditions.
Q6: Can I clone a dual-boot system to an SSD?
Yes, it is possible to clone a dual-boot system to an SSD. However, it is important to ensure that you clone all the partitions associated with both operating systems to the SSD and update your boot loader configuration accordingly.
Q7: Can I clone encrypted HDD to an SSD?
Yes, it is possible to clone an encrypted HDD to an SSD. However, you will need to ensure that the cloning software supports decrypting and transferring the encrypted data. Additionally, you may need to enter the encryption key or password during the cloning process.
Q8: Do I need to activate Windows again after cloning to an SSD?
In most cases, you will not need to reactivate Windows after cloning to an SSD, as the cloned copy retains your original Windows license. However, if you encounter any activation issues, you can contact Microsoft support for assistance.
These frequently asked questions should provide some clarity regarding the cloning process from HDD to SSD. If you have any additional questions or concerns, it is recommended to consult the documentation or support resources provided by the cloning software or seek guidance from technical forums or professionals.