
Importance of Cleaning Printer Ink Cartridge
Regular maintenance and cleaning of your printer ink cartridge is essential for maintaining the quality of your prints and prolonging the life of your printer. Over time, ink residue and dust can accumulate on the cartridge, leading to clogged nozzles and poor print quality. By cleaning the ink cartridge, you can ensure that your printer operates smoothly and produces crisp, vibrant prints every time.
One of the major benefits of cleaning your printer ink cartridge is the prevention of clogged nozzles. Clogs can occur when dried ink or debris obstructs the tiny nozzles that spray ink onto the paper. When the nozzles are clogged, the ink may not flow properly, resulting in faded or streaky prints. Regularly cleaning the cartridge helps to remove any residue or particles that could potentially cause clogs, ensuring that your prints are flawless.
In addition to maintaining print quality, cleaning the ink cartridge can also help to extend its lifespan. When the cartridge is dirty, the printer may have to work harder to deliver ink, leading to increased wear and tear on the cartridge and the printer mechanism. By keeping the cartridge clean, you can ensure smoother ink flow, reducing strain on the cartridge and prolonging its overall lifespan.
Another reason why cleaning the ink cartridge is important is to prevent ink smudging or smearing on prints. Ink residue or dust on the exterior of the cartridge can transfer to the paper, resulting in unwanted smudges or smears. By regularly cleaning the cartridge, you can remove any external contaminants and maintain the integrity of your prints.
Furthermore, a clean ink cartridge can also contribute to cost savings. When the cartridge is clean, the printer can efficiently deliver ink onto the paper, reducing wastage. This can help to minimize the frequency of cartridge replacements and save you money in the long run.
Overall, taking the time to clean your printer ink cartridge on a regular basis is crucial for optimal print quality, prolonging the life of your printer, and saving on printing costs. By incorporating this simple maintenance task into your routine, you can ensure that your prints always look professional and vibrant.
Materials Needed for Cleaning Printer Ink Cartridge
Before you begin cleaning your printer ink cartridge, it’s important to gather the necessary materials. Having the right tools will make the cleaning process easier and more effective. Here are the materials you’ll need:
- Clean, lint-free cloth or non-abrasive wipes
- Distilled water
- Isopropyl alcohol
- Cotton swabs
- Disposable gloves (optional)
A clean, lint-free cloth or non-abrasive wipes are essential for wiping down the exterior and contacts of the ink cartridge. Avoid using paper towels or tissues, as they can leave residue or fibers behind that may interfere with the printing process.
Distilled water is recommended for preparing the cleaning solution, as it does not contain impurities or minerals that could potentially harm the printer or cartridge. Isopropyl alcohol is used for more stubborn ink stains or residue on the cartridge.
Cotton swabs are useful for reaching small and delicate areas, such as the nozzles or contacts, that may require more precise cleaning. They allow you to apply the cleaning solution to specific areas and remove any stubborn residue.
Disposable gloves are optional but can be helpful if you prefer to protect your hands from coming into direct contact with the cleaning solution or ink residue. They can also prevent fingerprints and oils from transferring to the cartridge during the cleaning process.
By having these materials prepared and within reach, you’ll be well-equipped to clean your printer ink cartridge effectively and efficiently. It’s always a good idea to double-check that you have all the necessary materials before getting started to ensure a seamless cleaning experience.
Step-by-Step Guide: Cleaning Printer Ink Cartridge
Cleaning your printer ink cartridge is a straightforward process that can be done at home with just a few simple steps. Follow this step-by-step guide to ensure a thorough and successful cleaning:
- Start by turning off your printer and unplugging it from the power source. This will prevent any accidents and ensure your safety during the cleaning process.
- Refer to your printer’s manual or manufacturer’s instructions to locate the ink cartridge. Different printer models may have different cartridge placement, so it’s important to identify the correct cartridge.
- Gently remove the ink cartridge from the printer. Be cautious not to touch the electrical contacts or the print head to avoid damaging them.
- Prepare a cleaning solution by mixing equal parts distilled water and isopropyl alcohol in a small container. This solution will help dissolve ink residue and clean the cartridge effectively.
- Dip a clean, lint-free cloth or non-abrasive wipes into the cleaning solution. Wring out any excess liquid, ensuring that the cloth is damp but not dripping.
- Wipe down the exterior of the ink cartridge to remove any dust, ink smudges, or stains. Use gentle, circular motions to clean the entire surface of the cartridge. Pay extra attention to areas with visible residue.
- If there are clogged nozzles on the ink cartridge, wet a cotton swab with the cleaning solution and carefully clean the nozzles. Gently rub the swab against the nozzle to dislodge any dried ink or debris.
- Next, clean the electrical contacts on the ink cartridge. Use a clean portion of the cloth or a fresh cotton swab moistened with the cleaning solution. Wipe the contacts gently to remove any ink or dirt buildup.
- Allow the ink cartridge to air dry for a few minutes. Ensure that it is completely dry before reinstalling it to prevent damage to the printer.
- Carefully reinsert the ink cartridge back into the printer, ensuring that it is properly aligned and securely in place.
- Plug in the printer and turn it on. Run a test print to check the quality of the prints. If the prints still have issues, repeat the cleaning process or consider consulting a professional technician.
By following these step-by-step instructions, you’ll be able to clean your printer ink cartridge effectively and maintain optimal print quality. Remember to handle the cartridge with care and refer to your printer’s manual for any specific cleaning guidelines.
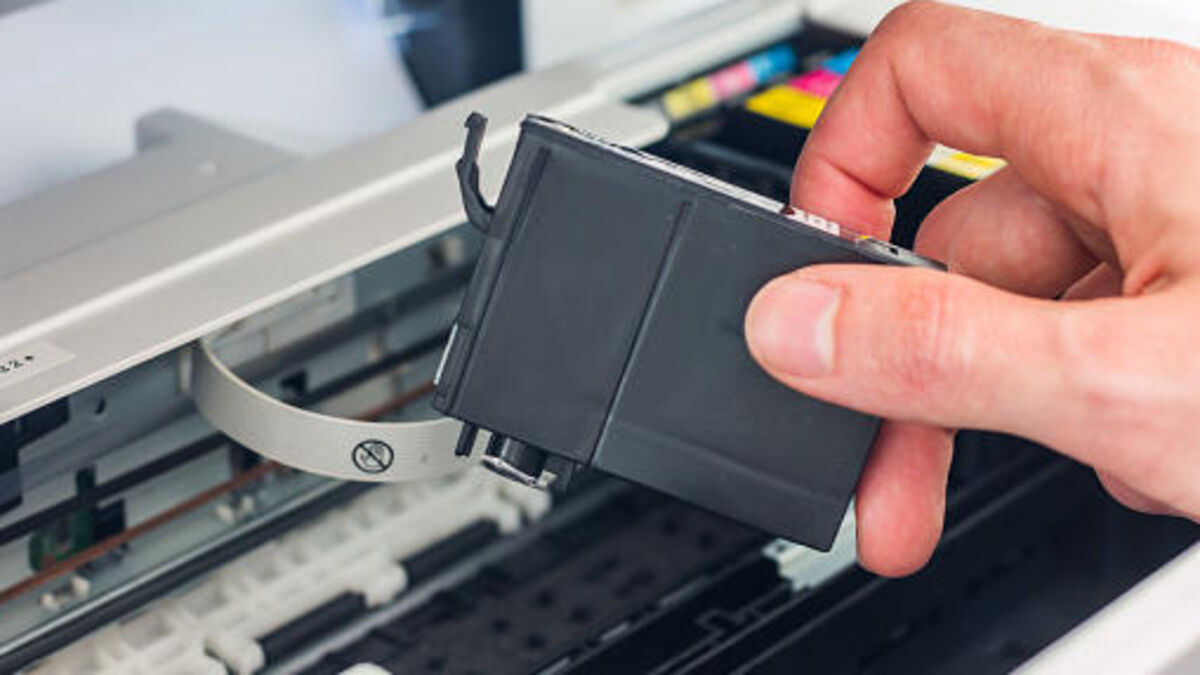
Removing the Ink Cartridge from the Printer
Before you can clean your printer ink cartridge, you’ll need to remove it from the printer. Follow these steps to safely remove the cartridge:
- Turn off your printer and unplug it from the power source. This will prevent any accidental damage or injury during the cartridge removal process.
- Open the printer cover or access panel to reveal the ink cartridges. Consult your printer’s manual if you’re unsure about the location of the cartridges, as it may vary depending on the printer model.
- Take a moment to identify the ink cartridge that needs to be cleaned. Look for identifying labels or markings that correspond to the specific cartridge you wish to remove.
- Once you’ve identified the cartridge, gently press down on it to release it from its holding position. Some printers may have a release lever or button that needs to be pressed to unlock the cartridge.
- With a firm but gentle grip, carefully pull the ink cartridge out of its slot. Be cautious not to touch the electrical contacts or the print head, as this can cause damage or affect print quality.
- If you encounter any resistance while removing the cartridge, double-check that you have properly released any latches or levers holding it in place. Avoid forcing the cartridge out, as this can cause breakage or damage to the printer.
- Place the removed ink cartridge on a clean, flat surface. It’s a good practice to place it on a disposable cloth or paper towel to catch any ink that may drip during the cleaning process.
By following these steps, you will be able to safely and correctly remove the ink cartridge from your printer. Remember to handle the cartridge with care and avoid touching sensitive areas to maintain its integrity and ensure optimal printing performance.
Preparing the Cleaning Solution
Before you begin cleaning your printer ink cartridge, it’s important to prepare the cleaning solution. The cleaning solution helps to dissolve ink residue and effectively clean the cartridge. Follow these steps to prepare the solution:
- Start by gathering the necessary materials, including distilled water and isopropyl alcohol.
- Fill a small container with equal parts distilled water and isopropyl alcohol. The amount of solution you prepare will depend on the size and number of cartridges you plan to clean.
- Using a clean stirrer or spoon, gently mix the distilled water and isopropyl alcohol together. This will ensure that the two liquids are well combined.
- Double-check that the container is securely sealed to prevent any contamination or evaporation of the solution.
Remember, distilled water is preferred for the cleaning solution due to its purity, as it doesn’t contain impurities or minerals that could potentially harm the printer or cartridge. Isopropyl alcohol is used for its cleaning properties and ability to dissolve ink residue effectively.
It’s important to note that the cleaning solution should be prepared fresh each time you clean your ink cartridge. This ensures that you’re using a clean and effective solution to maintain the best possible print quality.
By following these steps, you’ll be able to prepare a suitable cleaning solution for your ink cartridge. This solution will aid in effectively removing ink residue and ensuring that your cartridge is thoroughly cleaned for optimal printing performance.
Cleaning the Ink Cartridge Exterior
One important step in cleaning your printer ink cartridge is to clean the exterior surface. Dust, ink smudges, and stains can accumulate on the cartridge’s exterior, affecting its appearance and potentially causing print quality issues. Follow these steps to clean the ink cartridge exterior:
- Start by gathering the necessary materials, including a clean, lint-free cloth or non-abrasive wipes and the cleaning solution prepared in the previous step.
- Dip the cloth or non-abrasive wipes into the cleaning solution. Wring out any excess liquid, ensuring that the cloth is damp but not dripping.
- Gently wipe down the exterior of the ink cartridge using the damp cloth or wipes. Apply gentle pressure and use circular motions to clean the entire surface of the cartridge.
- Pay extra attention to areas with visible ink smudges, stains, or residue. Apply more pressure and continue wiping until the marks are removed.
- Be cautious not to apply excessive force or scrub too vigorously, as this may damage the cartridge or affect the print quality.
- If necessary, repeat the process using a clean portion of the cloth or a fresh non-abrasive wipe soaked with the cleaning solution. This will ensure thorough cleaning of the cartridge’s exterior.
- Once you have finished cleaning the exterior, allow the ink cartridge to air dry for a few minutes. It should be completely dry before reinstalling it into the printer.
By regularly cleaning the exterior of your ink cartridge, you can improve its appearance and prevent any external contaminants from affecting your prints. Remember to handle the cartridge with care and avoid touching sensitive areas, such as the electrical contacts or the print head, during the cleaning process.
With the exterior of the ink cartridge now clean, you’re ready to proceed to the next step, which is cleaning the ink cartridge nozzles.
Cleaning the Ink Cartridge Nozzles
Cleaning the ink cartridge nozzles is an essential step in maintaining optimal print quality. Over time, the nozzles can become clogged with dried ink or debris, resulting in smudged or streaky prints. Follow these steps to effectively clean the ink cartridge nozzles:
- Gather the necessary materials, including the cleaning solution prepared earlier and cotton swabs.
- Moisten a cotton swab with the cleaning solution. Ensure that the swab is damp but not dripping.
- Locate the nozzles on the ink cartridge. These are typically small holes located on the underside or bottom of the cartridge.
- Gently rub the moistened cotton swab against the nozzles. Apply light pressure and use gentle, circular motions to dislodge any dried ink or debris.
- Continue rubbing the cotton swab against the nozzles until you no longer see any residue on the swab.
- If necessary, use a fresh cotton swab and repeat the process to ensure thorough cleaning.
- Be careful not to damage the nozzles or apply excessive force while cleaning, as this can lead to permanent damage to the cartridge.
- Once you have finished cleaning the nozzles, allow the ink cartridge to air dry for a few minutes before proceeding to the next step.
Regularly cleaning the ink cartridge nozzles helps to ensure optimal ink flow and prevent clogs that may impact print quality. By keeping the nozzles clean, you can maintain sharp, clear prints without streaks or smudges.
Once you have completed the cleaning of the ink cartridge nozzles, you’re ready to move on to the next step, which is cleaning the ink cartridge contacts.
Cleaning the Ink Cartridge Contacts
Cleaning the ink cartridge contacts is an important step in maintaining the performance and longevity of your printer ink cartridge. The electrical contacts on the cartridge can gather dirt, ink residue, or dust over time, which can hinder proper communication between the cartridge and the printer. Follow these steps to effectively clean the ink cartridge contacts:
- Gather the necessary materials, including the cleaning solution prepared earlier and a clean portion of the cloth or a fresh cotton swab.
- Moisten the cloth or cotton swab with the cleaning solution. Ensure that it is damp but not dripping.
- Locate the gold or copper-colored contacts on the ink cartridge. These contacts are typically small metallic squares or pins.
- Gently wipe the moistened cloth or swab over the contacts, applying light pressure. Use gentle, back-and-forth or circular motions to clean the contacts thoroughly.
- Pay close attention to any areas with visible dirt or ink buildup, ensuring that you clean them carefully.
- If necessary, use a fresh cloth or another clean portion of the cloth to continue cleaning until the contacts appear clean and shiny.
- Be cautious not to touch the contacts with your fingers, as oils and residues from your hands can transfer and hinder performance.
- Allow the ink cartridge contacts to air dry for a few minutes before reinstallation.
By regularly cleaning the ink cartridge contacts, you can maintain proper electrical communication between the cartridge and the printer, ensuring optimal performance and print quality. Clean contacts help to establish a strong connection and enable efficient ink flow during the printing process.
With the ink cartridge contacts now clean, you’re ready to move on to the final step: reinstalling the ink cartridge into your printer.
Reinstalling the Ink Cartridge
Once you have finished cleaning your printer ink cartridge, it is essential to reinstall it correctly to ensure proper functioning and optimal print results. Follow these steps to reinstall the ink cartridge into your printer:
- Make sure your printer is still turned off and unplugged from the power source for your safety.
- Retrieve the cleaned ink cartridge from the flat surface where it was placed to dry.
- Check for any visible residue or moisture on the cartridge. If needed, use a clean, dry cloth to wipe off any excess solution or moisture before proceeding.
- Look for the corresponding slot or compartment in the printer where the ink cartridge needs to be inserted. Refer to your printer’s manual if you are uncertain about the exact location or orientation.
- Hold the ink cartridge carefully by its sides, avoiding contact with the electrical contacts or print head.
- Gently insert the cartridge into the designated slot, ensuring it is properly aligned with the labeled or color-coded markings on the cartridge and the slot.
- Apply light pressure to the top of the cartridge, pushing it gently until you feel or hear a click, indicating that the cartridge is securely in place.
- Close the printer cover or access panel that provides access to the ink cartridge compartment.
- Plug in your printer and turn it on.
- Allow the printer to go through its initialization process and recognize the newly installed ink cartridge. This may take a few moments.
By following these steps, you will reinstall the ink cartridge correctly, ensuring that it is securely in place and ready for use. Proper installation ensures optimal ink flow and communication with the printer, resulting in high-quality prints.
Once you have completed the reinstallation process, you’re ready to move on to the final step: testing the print quality to ensure that cleaning the ink cartridge has successfully improved the printing performance.
Testing the Print Quality after Cleaning
After cleaning your printer ink cartridge, it is crucial to test the print quality to ensure that the cleaning process has been successful in improving the overall output. Follow these steps to test the print quality:
- Ensure that your printer is turned on and connected to your computer or device.
- Open any document or image that you typically print and want to use for the test.
- Select the print option from the software application you are using.
- Choose the necessary print settings, such as paper size, orientation, and quality, according to your preferences.
- Initiate the print job and allow the printer to complete the printing process.
- Examine the printed document or image for any improvements in print quality.
- Check for any visible issues, such as streaks, smudges, faded text, or blurred images that may have been present before cleaning the ink cartridge.
- Compare the printout to your desired print quality standards. If there are still issues, you may need to repeat the cleaning process or consider seeking professional assistance.
- Take note of any changes in print quality and whether the cleaning has successfully resolved any previous printing problems.
Testing the print quality after cleaning the ink cartridge allows you to assess the effectiveness of the cleaning process and ensure that it has improved the overall output. You should notice a significant improvement in print clarity, sharpness, and color vibrancy if the cartridge has been cleaned successfully.
If you still encounter issues with print quality after cleaning the ink cartridge, it might indicate other underlying problems or the need for additional maintenance. In such cases, it is recommended to consult the printer manufacturer’s support or consider seeking professional assistance to diagnose and address the problem.
By performing this print quality test, you can verify the success of the ink cartridge cleaning and enjoy optimal print results for your documents and images.
Tips for Maintaining a Clean Printer Ink Cartridge
Regular maintenance and care can greatly extend the life and performance of your printer ink cartridge. Here are some helpful tips for maintaining a clean ink cartridge:
- Keep your printer in a clean, dust-free environment. Dust and debris can easily accumulate on the ink cartridge and affect print quality.
- Handle the ink cartridge with care. Avoid touching the electrical contacts or the print head to prevent damage or interference with ink flow.
- Run a print job at least once a week. This helps to prevent the ink from drying out and keeps the cartridge functioning optimally.
- Use your printer regularly. Periods of prolonged inactivity can lead to ink drying and clogged nozzles. Regular usage helps to keep the ink flowing smoothly.
- Avoid removing an ink cartridge from the printer unless it is necessary. Frequent removals can disrupt the ink flow and lead to potential leaks.
- When replacing an ink cartridge, follow the manufacturer’s instructions carefully to ensure a proper and secure installation.
- Perform regular cleaning of the printer, including the ink cartridge compartment, to prevent dust or debris from affecting the cartridge’s performance.
- Use high-quality ink cartridges. Inferior or third-party cartridges may clog more easily, leading to poor print quality and more frequent cleaning.
- Avoid using expired ink cartridges. Over time, ink can become less effective and may cause issues with print quality or clogged nozzles.
- Consider using a printer maintenance utility or program recommended by the manufacturer. These tools can help with automatic cleaning cycles and maintenance tasks.
- If you notice persistent print quality issues or require extensive cleaning, consider contacting a professional technician or the printer manufacturer for assistance.
By following these tips, you can maintain a clean printer ink cartridge and enjoy high-quality prints consistently. Regular care and maintenance will ensure that your printer operates at its best, extending the life of your cartridge and providing you with the best possible printing experience.