
Using the Charging Cable
Charging your Fitbit is a simple and straightforward process. One of the most common methods is to use the charging cable that comes with your Fitbit. Here is a step-by-step guide on how to charge your Fitbit using the charging cable:
- Locate the charging cable that came with your Fitbit. It should have a USB connector on one end and a small connector that fits into the charging port on your Fitbit device on the other end.
- Plug the USB connector of the charging cable into a USB port on your computer or a USB wall adapter. Make sure the USB port or adapter is in good working condition.
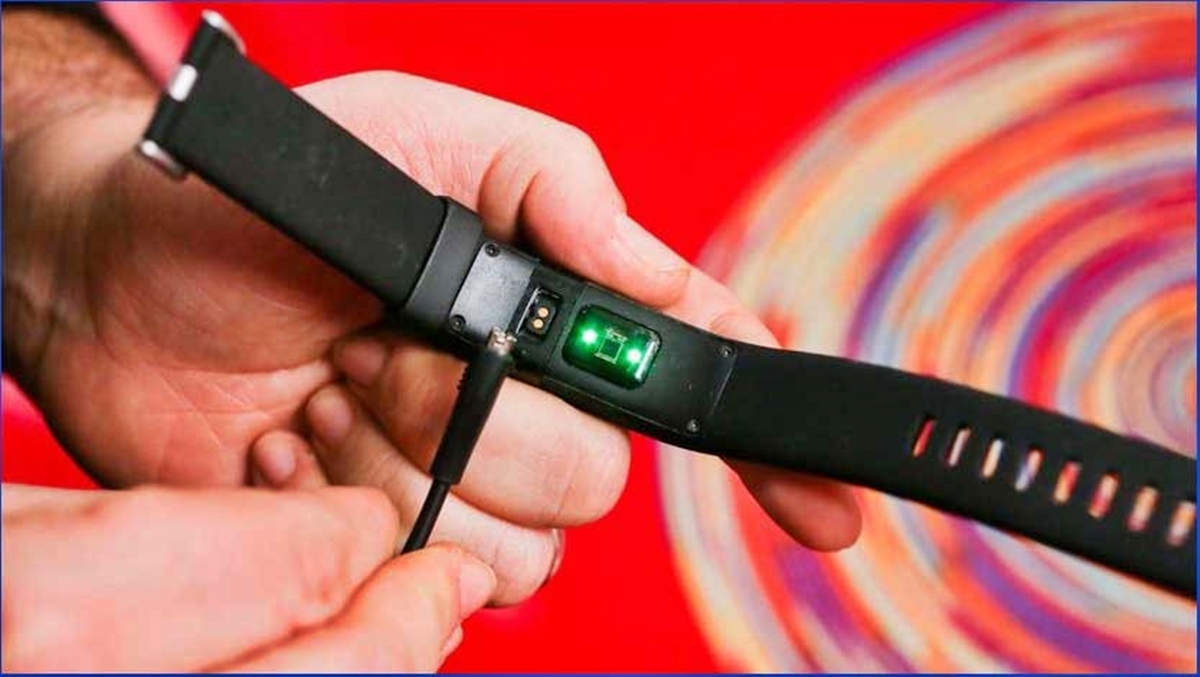
- Once the USB connector is securely plugged in, locate the charging port on your Fitbit. It is usually located on the back or the side of the device.
- Attach the small connector of the charging cable into the charging port on your Fitbit. Ensure it is plugged in snugly to establish a proper connection.
- Once the charging cable is securely connected, you should see a battery icon or a charging symbol on the screen of your Fitbit, indicating that it is charging.
- Leave your Fitbit to charge for a few hours. The charging time may vary depending on the model and the battery level.
- After the Fitbit is fully charged, disconnect the charging cable by gently pulling it out of the charging port.
It is recommended to charge your Fitbit device to at least 50% or until it reaches a full charge before using it. This ensures optimal battery performance and longevity.
By following these simple steps, you can easily charge your Fitbit using the provided charging cable. Remember, it is important to use the original charging cable that came with your Fitbit to ensure compatibility and safe charging.
Plugging the Charging Cable into a USB Port
When it’s time to charge your Fitbit, one of the most convenient methods is to plug the charging cable into a USB port. Here’s how you can do it:
1. Locate a USB port on your computer or a USB wall adapter. USB ports are commonly found on laptops, desktop computers, and charging stations.
2. Check that the USB port is in good working condition. If you’re using a computer, ensure that it is powered on and the port is functioning properly.
3. Take the cable that came with your Fitbit and plug the USB connector into the USB port. Make sure it is inserted securely and fits snugly.
4. If you’re using a USB wall adapter, connect the charging cable to the adapter and then plug the adapter into a wall outlet. Make sure the wall outlet is functioning correctly.
5. Once the charging cable is plugged in, locate the other end of the cable with the small connector that fits into the charging port on your Fitbit.
6. Carefully insert the small connector into the charging port on your Fitbit. Ensure it is inserted correctly and securely.
7. Once the charging cable is properly connected, you should see a battery icon or a charging symbol on the screen of your Fitbit, indicating that it is charging.
8. Leave your Fitbit connected to the charging cable for a few hours to allow it to charge fully. The charging time may vary based on your Fitbit model and current battery level.
Remember to use a reliable USB port or wall adapter to ensure a stable power source for your Fitbit. Avoid using damaged or faulty cables or adapters, as they may affect the charging process.
That’s it! By following these steps, you can easily plug the charging cable into a USB port to charge your Fitbit. It’s a convenient and hassle-free way to keep your Fitbit powered up and ready to use.
Attaching the Charging Cable to Your Fitbit
Once you have the charging cable and a USB port or adapter ready, it’s time to attach the cable to your Fitbit. Follow these steps to ensure a secure connection:
- Locate the charging port on your Fitbit. The location of the charging port may vary depending on the model of your device. It is typically located on the back or side of the Fitbit.
- Take the small connector end of the charging cable and align it with the charging port on your Fitbit. Ensure that the connector is inserted in the correct direction to avoid any damage to the port.
- Gently insert the small connector into the charging port. Apply light pressure until it clicks into place. You should feel a secure and snug fit.
- Once the charging cable is attached, check the Fitbit display or screen. You should see a battery icon or a charging symbol, indicating that the device is connected and charging.
- Make sure the connection is secure by lightly tugging on the cable. It should not come loose easily. However, be careful not to pull too hard to avoid damaging the cable or the Fitbit.
- Ensure that the Fitbit and the cable are not twisted or bent at an unnatural angle. This can strain the cable and potentially damage it over time.
It is important to be gentle when attaching the charging cable to your Fitbit to prevent any damage to the charging port or the cable itself. Taking proper care during this process will ensure a reliable connection and efficient charging.
Remember, always use the charging cable that came with your Fitbit to ensure compatibility and safety. Using third-party cables may cause charging issues or damage to your Fitbit device.
Now that you have successfully attached the charging cable to your Fitbit, you can proceed to the next steps to confirm the connection and monitor the charging progress.
Confirming the Connection
After attaching the charging cable to your Fitbit, it’s important to confirm that the connection between the device and the cable is established and secure. Here’s how you can verify the connection:
- Check the display or screen of your Fitbit. You should see a battery icon, a charging symbol, or a percentage indicating the battery level. This confirms that the Fitbit is receiving power through the charging cable.
- If the battery icon or charging symbol is not displayed, gently disconnect the charging cable from the Fitbit and reattach it, ensuring a snug fit. Sometimes, a loose connection might prevent the charging process.
- Inspect the charging port on your Fitbit and the connectors on the charging cable. Look for any dirt, debris, or corrosion that could impede the connection. If necessary, use a soft, dry cloth or a cotton swab to gently clean both the charging port and the connectors.
- Verify that the USB port or wall adapter you are using to power the charging cable is functional. Plug in another device or use a different cable to rule out any issues with the power source.
- Leave your Fitbit connected to the charging cable for a few minutes and check if the battery icon or charging symbol appears on the screen. Sometimes, it takes a few moments for the Fitbit to detect the charging connection.
- If you have access to a computer, launch the Fitbit app or visit the Fitbit website to check the device’s battery status. This can help confirm if the Fitbit is receiving a charge and the connection is established.
If you have followed these steps and confirmed the connection, you can be confident that your Fitbit is now charging. Keep in mind that different Fitbit models may have varying ways to display the charging information, so refer to your device’s manual or the Fitbit website for specific instructions.
Remember, it is recommended to periodically check the charging connection to ensure it remains secure throughout the charging process. This will help prevent any interruption or loss of power to your Fitbit.
Now that you have confirmed the connection, you can leave your Fitbit to charge and monitor the progress until it reaches a full charge.
Charging a Fitbit with a Charging Dock
If you prefer a more convenient and stylish way to charge your Fitbit, using a charging dock can be a great option. Here’s how you can charge your Fitbit with a charging dock:
- Start by setting up the charging dock. Some Fitbit models come with a dedicated charging dock, while others may require a separate dock that you can purchase.
- Place the charging dock on a stable surface near an electrical outlet. Ideally, choose a location that is easily accessible for charging and offers a clear view of the dock’s LED indicators.
- Plug the charging dock’s cable into an electrical outlet. Make sure the cable is securely connected and that the outlet is functioning correctly.
- Next, locate the charging port on your Fitbit device. It is usually located on the back or the side, depending on the model.
- Align the charging pins on the dock with the charging port on your Fitbit. Match the pins on the dock to the corresponding slots on your Fitbit and ensure a proper fit.
- Gently place your Fitbit onto the charging dock. The pins should make direct contact with the charging port on your device.
- Once the Fitbit is on the dock, you should see the LED indicators light up. These lights indicate that the charging process has begun and provide information about the charging status.
- Leave your Fitbit on the charging dock for a few hours to allow it to charge fully. The charging time may vary depending on the model and the current battery level.
- If your Fitbit has a battery percentage display, check it periodically to monitor the charging progress.
- Once your Fitbit is fully charged, lift it off the charging dock and disconnect it from the charging pins.
Charging docks offer a convenient way to charge your Fitbit while also serving as an attractive display stand for your device. They provide a stable and secure charging connection, minimizing the risk of accidental disconnection during the charging process.
Remember to use the charging dock specifically designed for your Fitbit model or a compatible third-party dock to ensure proper charging and compatibility with your device.
Now that you know how to charge your Fitbit with a charging dock, you can enjoy the convenience and style it brings to your daily charging routine.
Setting up the Charging Dock
Before you can start charging your Fitbit with a charging dock, you need to properly set it up. Here’s how you can get your charging dock ready for use:
- Unbox the charging dock and ensure that all the components are included. Depending on the model or brand, the charging dock may consist of a base, a cable, and sometimes additional accessories.
- Identify the cable that came with the charging dock. It typically has a USB connector on one end and a specific connector on the other end that connects to the dock itself.
- Locate an electrical outlet near a suitable location where you plan to place the charging dock. Ensure that the outlet is easily accessible and provides an unobstructed path for the cable.
- Connect the cable to the charging dock by plugging the specific connector into the port on the dock. Make sure the connection is secure and the cable is not twisted or bent.
- Position the charging dock on a stable surface near the electrical outlet. Ensure that the dock is level and won’t be easily knocked off or moved.
- Adjust the angle or position of the charging dock to optimize the visibility of the display while your Fitbit is charging. This will allow you to easily check the charging status or other information provided by your Fitbit.
- Optional: If your charging dock has LED indicators, familiarize yourself with their meanings. These indicators communicate the charging status, battery level, or other relevant information about your Fitbit.
- Plug the USB connector of the charging dock’s cable into the electrical outlet. Confirm that the dock is receiving power by checking for any lighting indicators or displays on the dock itself.
- Ensure that the charging dock’s cable is neatly routed and does not pose a tripping hazard or strain on the cable.
- Your charging dock is now set up and ready for use. You can proceed to charge your Fitbit by placing it on the dock according to the instructions provided in the user manual.
By following these steps, you can set up the charging dock for your Fitbit and enjoy a convenient and stylish way to charge your device. Always refer to the manufacturer’s instructions or the user manual specific to your charging dock for any additional setup requirements or guidelines.
Now that you have set up your charging dock, you can effortlessly charge your Fitbit and keep it conveniently accessible while it charges.
Plugging in the Charging Dock
Once you have set up the charging dock for your Fitbit, the next step is to properly plug it in to ensure a reliable power source. Here’s how you can do it:
- Locate an electrical outlet near the area where you have positioned the charging dock. Ensure that the outlet is easily accessible and functioning properly.
- Take the cable that is connected to the charging dock and plug the other end into the electrical outlet. Make sure the plug is inserted fully and securely.
- Check for any indicators on the charging dock that confirm it is receiving power. This may include LED lights or a display screen that shows the dock is active.
- Ensure that the cable is not twisted or bent at an unnatural angle. If necessary, adjust the position of the charging dock or the cable to maintain a smooth and unobstructed connection.
- Confirm that the electrical outlet is working by checking for any power indicators, or by plugging in another device to ensure a proper power supply.
- Double-check that the cable connection is secure and that no part of the cable is loose or disconnected. A loose connection can interrupt the charging process.
- Make sure the charging dock is placed in a stable position and will not be easily moved or knocked over. This helps to prevent any accidental disconnection of the charging dock or damage to your Fitbit.
- Familiarize yourself with any charging status indicators specific to your Fitbit model or the charging dock. These indicators will provide information about the charging progress or battery level.
- Your charging dock is now successfully plugged in and ready to charge your Fitbit. Proceed to place your Fitbit on the charging dock following the instructions provided in the user manual.
By following these steps, you can ensure that your charging dock is properly connected to a reliable power source. This will allow your Fitbit to charge efficiently and provide you with accurate charging status information.
Always refer to the manufacturer’s instructions or the user manual specific to your charging dock and Fitbit model for any additional guidelines or specific charging requirements.
Now that your charging dock is plugged in, you can confidently charge your Fitbit and enjoy its convenient features and functionalities.
Docking Your Fitbit
Once you have set up the charging dock and plugged it in, it’s time to dock your Fitbit and initiate the charging process. Here’s how you can properly dock your Fitbit:
- Position the charging dock in a convenient and easily accessible location. Ensure that it is stable and will securely hold your Fitbit during the charging process.
- Locate the charging port on your Fitbit. The location of the port may vary depending on your Fitbit model, but it is typically located on the back or bottom of the device.
- Take the Fitbit in your hand and gently align the charging pins on the charging dock with the charging port on your Fitbit.
- Slowly lower your Fitbit onto the charging dock, ensuring that the charging pins make direct contact with the charging port. The Fitbit should fit snugly into the dock.
- Check that your Fitbit is securely docked by giving it a gentle push to ensure it doesn’t move or become dislodged.
- Once your Fitbit is in place on the dock, check for any charging indicators on the Fitbit’s display. Depending on your Fitbit model, you may see a battery icon, a charging symbol, or a percentage indicating the battery level.
- Leave your Fitbit on the charging dock for a few hours, or as recommended by the manufacturer, to allow it to fully charge. The specific charging time may vary depending on your Fitbit model and the current battery level.
- Monitor the charging progress by periodically checking the Fitbit’s display or app to see if the battery level is increasing.
- Once your Fitbit is fully charged, gently lift it off the charging dock, being careful not to apply excessive force that could potentially damage the device or the charging port.
It’s important to follow these steps to ensure that your Fitbit is properly docked and securely charging. A secure docking connection is crucial for efficient and safe charging of your Fitbit.
Remember to refer to your Fitbit’s user manual or the manufacturer’s instructions for any specific guidelines or precautions related to docking your particular Fitbit model.
Now that your Fitbit is properly docked, you can enjoy the convenience of having it charge while being securely held by the charging dock.
Charging a Fitbit Using an Outlet Adapter
If you prefer to charge your Fitbit using a wall outlet instead of a computer, you can do so by using an outlet adapter. Here’s how you can charge your Fitbit using an outlet adapter:
- Obtain an outlet adapter that is compatible with your Fitbit charging cable. The adapter should have a USB port or the specific connector required to connect your Fitbit cable.
- Ensure that the outlet adapter is in good working condition and is compatible with the electrical outlets in your region.
- Plug the outlet adapter into a wall outlet that is easily accessible.
- Take your Fitbit charging cable and connect it to the USB port of the outlet adapter.
- Locate the charging port on your Fitbit device. The location may vary depending on your Fitbit model, but it is typically located on the back or the side of the device.
- Insert the other end of the charging cable into the charging port on your Fitbit, ensuring a secure and snug fit.
- Verify that the connection is established by checking for a battery icon, a charging symbol, or a percentage indicator on the Fitbit’s display. This indicates that your Fitbit is now charging.
- Leave your Fitbit connected to the outlet adapter for a few hours, or as recommended by the manufacturer, to allow it to charge fully. The charging time may vary depending on your Fitbit model and the current battery level.
- Monitor the charging progress by periodically checking the Fitbit’s display to see if the battery level is increasing.
- Once your Fitbit is fully charged, disconnect the charging cable from both your Fitbit and the outlet adapter.
It’s important to use a reliable outlet adapter that matches the specifications of your Fitbit charging cable. Using an incompatible or faulty adapter may affect the charging process or potentially damage your Fitbit.
Always refer to the user manual or the manufacturer’s instructions specific to your Fitbit model for any additional guidelines or precautions related to charging with an outlet adapter.
Now that you know how to charge your Fitbit using an outlet adapter, you can easily keep your Fitbit powered up and ready to use, even when you don’t have access to a computer.
Getting an Outlet Adapter
If you want to charge your Fitbit using a wall outlet, you’ll need to get an outlet adapter that is compatible with your Fitbit charging cable. Here’s how you can obtain an outlet adapter:
- Determine the type of outlet adapter you need based on the specifications of your Fitbit charging cable. Check the charging cable’s connector type and any specific requirements mentioned in your Fitbit’s user manual or on the manufacturer’s website.
- Visit an electronics store or an online retailer that sells outlet adapters. Make sure to choose a reputable seller to ensure the quality and compatibility of the adapter.
- Search for outlet adapters that are suitable for your Fitbit charging cable. Look for adapters that match your Fitbit model and are compatible with the electrical outlets in your region.
- Read the product description and specifications of the outlet adapters to verify that they meet your requirements. Pay attention to details such as USB ports, connector types, voltage compatibility, and any additional features.
- Consider reading customer reviews and ratings to gauge the reliability and performance of different outlet adapters. Look for adapters that have positive feedback and high ratings.
- Select the outlet adapter that best matches your Fitbit’s charging cable requirements and meets your needs. Add it to your cart and proceed with the purchase.
- Follow the instructions provided by the seller to complete the purchase. Provide the necessary shipping and payment information to have the outlet adapter delivered to your location.
- Once you receive the outlet adapter, inspect it to ensure that it is in good condition and matches the product description. Check that it has the appropriate connector and features required for your Fitbit charging cable.
- Plug the outlet adapter into a wall outlet in a location that is easily accessible for charging your Fitbit. Ensure that the outlet is functioning properly and is compatible with the adapter.
- Connect your Fitbit charging cable to the USB port or specific connector on the outlet adapter.
Remember to choose an outlet adapter that is from a reliable source and is compatible with your Fitbit charging cable to ensure safe and efficient charging of your Fitbit.
It’s always a good idea to refer to the user manual or consult the manufacturer’s website for any specific guidelines or recommendations regarding the use of an outlet adapter with your Fitbit device.
Now that you have obtained an outlet adapter, you can conveniently charge your Fitbit using a wall outlet, even when you don’t have access to a computer.
Finding the Charging Port on Your Fitbit
Before you can charge your Fitbit device, it’s important to familiarize yourself with the location of the charging port. The specific location of the charging port may vary depending on the model of your Fitbit. Here’s how you can find the charging port on your Fitbit:
- Inspect the sides, bottom, or back of your Fitbit device. The charging port is typically small and discreetly placed.
- Refer to the user manual or the manufacturer’s website for your Fitbit model if you are unsure about the precise location of the charging port.
- If your Fitbit has a touchscreen display, look for a small flap or cover that hides the charging port. Lift or slide the flap to reveal the charging port.
- If your Fitbit has physical buttons, the charging port may be located alongside the buttons or somewhere on the back or bottom of the device.
- Inspect your Fitbit carefully for any markings or icons near the charging port that may indicate its location or function.
- If you still can’t locate the charging port, consider doing an online search for your specific Fitbit model and “charging port location” to find helpful visuals or tutorials.
- It’s important to handle your Fitbit device gently and avoid applying excessive force when searching for the charging port.
When you find the charging port, take note of its position and familiarize yourself with its appearance. This will allow you to quickly and accurately connect the charging cable when it’s time to charge your Fitbit.
Remember to refer to the user manual or consult the manufacturer’s website for any specific guidelines or precautions related to the charging port of your Fitbit model.
Now that you have located the charging port on your Fitbit, you can proceed to plug in the charging cable and charge your device to ensure it stays powered and ready for use.
Plugging in the Fitbit to the Outlet Adapter
Once you have obtained a suitable outlet adapter, you can plug in your Fitbit and start charging it using a wall outlet. Here’s how you can do it:
- Take the outlet adapter and ensure that it is compatible with your Fitbit charging cable and the electrical outlets in your region.
- Plug the outlet adapter into a wall outlet that is easily accessible and functioning properly. Make sure to insert it fully and securely.
- Locate the charging port on your Fitbit device. The location of the port may vary depending on your Fitbit model, but it is typically located on the back or the side of the device.
- Take the charging cable and connect it to the USB port or specific connector on the outlet adapter. Ensure a secure and snug fit.
- Insert the other end of the charging cable into the charging port on your Fitbit, making sure it is inserted correctly and firmly.
- Check the Fitbit’s display for any charging indicators, such as a battery icon, a charging symbol, or a percentage indicating the battery level. This confirms that your Fitbit is now connected to the outlet adapter and is charging.
- Leave your Fitbit connected to the outlet adapter for a few hours, or as recommended by the manufacturer, to allow it to charge fully. The charging time may vary depending on your Fitbit model and the current battery level.
- Monitor the charging progress by periodically checking the Fitbit’s display or app to see if the battery level is increasing.
- Once your Fitbit is fully charged, gently disconnect the charging cable from both your Fitbit and the outlet adapter.
Be sure to use a reliable and compatible outlet adapter to ensure safe and efficient charging of your Fitbit. Using an incompatible or faulty adapter may affect the charging process or potentially damage your Fitbit.
Always refer to the user manual or consult the manufacturer’s instructions specific to your Fitbit model for any additional guidelines or precautions related to using an outlet adapter to charge your Fitbit.
Now that your Fitbit is plugged in to the outlet adapter, you can easily charge your device using a wall outlet, ensuring it stays powered and ready for use.
Monitoring the Charging Progress
While your Fitbit is charging, it’s important to keep an eye on the charging progress to ensure that it reaches a full charge and is ready for use. Here’s how you can monitor the charging progress of your Fitbit:
- Check the Fitbit’s display for any charging indicators, such as a battery icon, a charging symbol, or a percentage indicating the battery level. These indicators will provide you with information about the charging status.
- Depending on your Fitbit model, you may be able to access more detailed charging information through the Fitbit app on your smartphone or the Fitbit website.
- Periodically glance at the Fitbit’s display to see if the battery level is increasing. This can give you a general idea of how much longer it will take to reach a full charge.
- If your Fitbit has a battery percentage display, you can accurately track the charging progress by watching the percentage increase over time.
- Some Fitbit models may also have LED indicators on the charging cable or charging dock that display the charging progress. Check the user manual or consult the manufacturer’s instructions to understand the meaning of these indicators.
- Avoid frequently disconnecting and reconnecting the charging cable, as this can disrupt the charging process and potentially delay the time it takes to reach a full charge.
- Keep in mind that the charging time may vary depending on your Fitbit model and the current battery level. It’s a good idea to refer to the user manual or the manufacturer’s website for estimated charging times specific to your Fitbit.
- Once you notice that your Fitbit has reached a full charge, gently disconnect the charging cable from both your Fitbit and the power source.
By regularly monitoring the charging progress, you can ensure that your Fitbit is fully charged and ready to accompany you on your daily activities. Remember to keep the charging port and the charging cable clean and free from any obstructions to ensure a smooth and efficient charging process.
Now that you know how to monitor the charging progress of your Fitbit, you can easily keep an eye on the battery level and plan your usage accordingly.
Tips for Maintaining Battery Life
Proper battery management is essential to ensure that your Fitbit remains powered throughout the day. By following these tips, you can extend the battery life of your Fitbit and optimize its performance:
- Regularly Update Fitbit Firmware: Keep your Fitbit’s firmware up to date by installing the latest software updates. These updates often include bug fixes and optimizations that can improve battery life.
- Restart or Reset Your Fitbit Device: Occasionally restarting or resetting your Fitbit can help resolve any software issues or glitches that may be affecting battery performance. Consult the user manual or the manufacturer’s website for instructions on how to restart or reset your specific Fitbit model.
- Reduce Brightness and Disable Features: Lowering the brightness level of the display and disabling unnecessary features, such as continuous heart rate monitoring or automatic sleep tracking, can significantly extend battery life.
- Close Unused Apps on Your Smartphone: If you have a Fitbit that syncs with a smartphone app, make sure to close any unused apps running in the background. These apps can drain both your Fitbit’s battery and your smartphone’s battery.
- Use a Lower Power Charging Source: When charging your Fitbit, consider using a lower power source, such as a USB port on a computer or a lower amp wall adapter. This can help prevent overcharging and prolong the battery’s lifespan.
- Use a Portable Power Bank: If you’re on the go and need to charge your Fitbit, carry a portable power bank with you. This way, you can recharge your Fitbit anytime, anywhere, without relying on a wall outlet.
- Understand Battery Life Notifications: Familiarize yourself with the battery life notifications provided by your Fitbit. Some models may alert you when the battery level is low, enabling you to plan your charging accordingly.
Remember, battery life can vary depending on factors such as usage, settings, and environmental conditions. It’s important to note that older Fitbit models may have shorter battery life compared to newer ones that are equipped with more advanced power-saving technologies.
By implementing these tips into your routine, you can maximize the battery life of your Fitbit and ensure that it remains powered throughout your daily activities.
Regularly Update Fitbit Firmware
Keeping your Fitbit’s firmware up to date is crucial for optimal performance and battery life. Firmware updates often include bug fixes, performance enhancements, and new features that can significantly improve the functionality of your Fitbit device. Here’s why and how you should regularly update your Fitbit’s firmware:
Benefits of Firmware Updates:
1. Bug Fixes: Firmware updates address any known issues or bugs that may affect your Fitbit’s performance or battery drain. By installing updates, you can ensure a smoother and more stable operation of your device.
2. Improvements and Optimizations: Fitbit regularly releases firmware updates to optimize battery life, introduce power-saving features, and enhance overall performance. These updates can help extend the battery life and enhance the user experience.
3. New Features: Firmware updates often bring new features and functionalities to your Fitbit, such as new tracking modes, improved heart rate monitoring, or enhanced sleep tracking. By updating the firmware, you can take advantage of these advancements.
How to Update Fitbit Firmware:
1. Install the Fitbit App: Ensure that you have the Fitbit app installed on your smartphone or tablet. The Fitbit app is the primary platform for managing your Fitbit device and receiving firmware updates.
2. Keep the Fitbit App Updated: Make sure that you regularly update the Fitbit app to access the latest features and improvements. Check your device’s app store for any available updates.
3. Synchronize Your Fitbit: Open the Fitbit app and ensure that your Fitbit device is connected and synced. This allows the app to detect any available firmware updates for your device.
4. Check for Updates: In the Fitbit app, go to the device settings or preferences section and look for an option to check for firmware updates. Follow the prompts to allow the app to search for and download any available updates.
5. Install the Firmware Update: Once the update is downloaded, follow the on-screen instructions to install the firmware update on your Fitbit device. Keep your Fitbit and smartphone nearby during the installation process.
6. Stay Connected: Ensure that your Fitbit and smartphone are connected during the firmware update process. Stay in proximity to a stable Wi-Fi or cellular connection to prevent any interruptions or issues during the update.
7. Restart Your Fitbit: After the firmware update is installed, consider restarting your Fitbit device. This can help ensure that the new firmware is fully applied and any necessary settings changes take effect.
By regularly updating your Fitbit’s firmware, you can take advantage of the latest improvements and optimizations, resulting in better battery life, enhanced performance, and access to exciting new features. Keep an eye out for firmware update notifications and remember to always keep your Fitbit app up to date.
Restart or Reset Your Fitbit Device
Restarting or resetting your Fitbit device can be beneficial in resolving software issues, optimizing performance, and potentially improving battery life. If you encounter any problems with your Fitbit, such as unresponsiveness or unusual battery drain, here’s how you can restart or reset your device:
Restarting Your Fitbit:
1. Straightforward Restart: For most Fitbit devices, a simple restart can often resolve minor issues. To restart your Fitbit, follow these steps:
- Press and hold the side button or the main button on your Fitbit for about 10-15 seconds.
- Release the button once you see the Fitbit logo or feel a vibration, indicating that the device has restarted.
- Your Fitbit will now go through its startup process and should be ready to use.
Note: The button and restart method may differ depending on your Fitbit model. Consult your Fitbit’s user manual or the manufacturer’s website for specific instructions.
Resetting Your Fitbit:
If a restart doesn’t resolve the issue, you may need to perform a factory reset to troubleshoot more persistent problems. Before performing a reset, keep in mind that this will erase all data and settings on your Fitbit. To reset your Fitbit:
- For Most Fitbit Devices:
- Open the Fitbit app on your smartphone or tablet, and navigate to the “Account” or “Profile” section.
- Select and tap on your Fitbit device listed in the app.
- Look for the option to “Factory Reset” or “Reset Device” and follow the on-screen prompts to confirm the reset.
- For Fitbit Charge 2:
- Swipe to the Settings menu on your Fitbit Charge 2.
- Scroll down and select “About”.
- Tap on “Factory Reset” and follow the instructions to reset your device.
- For Fitbit Versa or Ionic:
- Swipe to the Settings menu on your Fitbit Versa or Ionic.
- Select “About” and tap on “Factory Reset”.
- Follow the instructions on the screen to reset your device.
After the reset, you will need to set up your Fitbit device again using the Fitbit app and your Fitbit account credentials.
Restarting or resetting your Fitbit can help resolve various issues, optimize performance, and potentially improve battery life. Before performing a reset, consider contacting Fitbit support or referring to the manufacturer’s website for troubleshooting guidance specific to your Fitbit model.
Now that you know how to restart or reset your Fitbit device, you can troubleshoot any software-related issues and enhance the performance of your device.
Reduce Brightness and Disable Features
To extend the battery life of your Fitbit, it’s important to conserve power by adjusting settings that may be draining the battery unnecessarily. One way to achieve this is by reducing screen brightness and disabling certain features. Here’s how:
Reducing Screen Brightness:
1. Access the Settings: Depending on your Fitbit model, swipe down from the top of the screen or press the side button to access the settings menu.
2. Find Display or Brightness: Look for the “Display” or “Brightness” option in the settings menu. Select it to adjust the screen brightness.
3. Lower the Brightness: Slide the brightness slider or select a lower brightness level to reduce the screen brightness. Experiment with different brightness levels to find a balance between visibility and battery conservation.
4. Save the Settings: Once you have adjusted the brightness to your desired level, save the settings and exit the menu. The new brightness setting will be applied immediately.
Disabling Features:
1. Access the Settings: Again, depending on your Fitbit model, access the settings menu following the appropriate method, such as swiping down or pressing the side button.
2. Look for Features or Apps: Explore the settings menu to find options related to features or apps that you can disable to save battery life.
3. Select Features to Disable: Consider disabling features that you don’t frequently use, such as continuous heart rate monitoring or automatic sleep tracking.
4. Disable the Features: Toggle the switch or select the option to disable the features you have chosen. Save the settings and exit the menu.
By reducing screen brightness and disabling certain features, you can significantly extend the battery life of your Fitbit. This is particularly useful during times when you need your Fitbit to last longer between charges, such as when you are on a hike or unable to access a power source.
Remember to strike a balance between conserving battery life and maintaining the functionality that is important to you. Experiment with different brightness levels and feature settings to find what works best for your needs.
Refer to your Fitbit’s user manual or the manufacturer’s website for detailed instructions specific to your Fitbit model and its settings options.
Now that you know how to reduce brightness and disable features on your Fitbit, you can optimize battery performance and ensure your device lasts longer throughout the day.
Close Unused Apps on Your Smartphone
If you have a Fitbit that syncs with a smartphone app, closing unused apps on your phone can help conserve battery life on both your smartphone and your Fitbit. Here’s how you can do it:
1. Access the App Switcher:
On most smartphones, double-click the home button or swipe up from the bottom to access the app switcher. The method may vary slightly depending on your device.
2. Close Apps on iOS:
In the app switcher, swipe left or right to view the recently used apps. To close an app, swipe up on it or swipe it off the screen. Repeat this process to close any other unused apps.
3. Close Apps on Android:
In the app switcher, swipe left or right or tap the square or recent apps button to view the recently used apps. To close an app, swipe it left or right or tap the X or close button. Close any other unused apps in the same way.
4. System Settings:
Some Android devices have additional ways to close apps through the system settings menu. Look for options like “App Manager” or “Application Settings” to force stop or close individual apps.
By closing unused apps on your smartphone, you can free up system resources and reduce battery usage. This indirectly helps conserve battery life on your Fitbit, as the two devices are interconnected through the syncing process.
Keep in mind that certain apps may need to remain open in the background to provide notifications or data updates for your Fitbit. It’s important to strike a balance between closing unnecessary apps and keeping essential ones active for optimal Fitbit functionality.
Regularly closing unused apps on your smartphone can help improve overall system performance, extend battery life, and ensure a seamless Fitbit experience.
Note: The process of closing apps may differ slightly depending on your smartphone model and operating system version. Refer to your device’s user manual or consult the manufacturer’s website for specific instructions.
Now that you know how to close unused apps on your smartphone, you can maximize battery life on both your smartphone and Fitbit, ensuring they last longer throughout the day.
Use a Lower Power Charging Source
When it comes to charging your Fitbit, using a lower power charging source can help optimize the battery life and overall performance of your device. Here’s what you need to know about utilizing a lower power charging source:
Why Use a Lower Power Charging Source?
1. Prevents Overcharging: A lower power charging source, such as a USB port on a computer or a lower amp wall adapter, can help prevent overcharging. Overcharging can lead to unnecessary strain on the battery and potentially degrade its lifespan over time.
2. Preserves Battery Health: Using a lower power charging source can help regulate the charging speed, allowing for a gentler and healthier charge cycle. This can help maintain the long-term health and capacity of the battery on your Fitbit device.
3. Enhances Safety: Lower power charging sources tend to generate less heat during the charging process. This reduces the risk of overheating and other related safety concerns associated with using higher power charging sources.
How to Use a Lower Power Charging Source:
1. Identify Lower Power Sources: Look for USB ports on a computer, a USB hub, or a wall adapter with a lower amp rating (e.g., 1A instead of 2A). These sources provide a lower electrical current, resulting in a slower and more controlled charging process.
2. Connect the Charging Cable: Take your Fitbit charging cable and plug it into the lower power source. Ensure a secure and proper connection between the cable and the USB port or wall adapter.
3. Leave it to Charge: Once connected, leave your Fitbit to charge for the recommended duration. Note that charging times may be marginally longer when using a lower power source compared to higher power sources.
It’s worth noting that while a lower power charging source can help optimize battery life, it may take slightly longer to achieve a full charge. However, this trade-off ensures a more controlled and gentle charging process for your Fitbit.
Remember to always use a reliable charging cable and ensure compatibility between the cable and the charging source. Devices like power banks or portable chargers can also provide a lower power charging option when you’re on the go.
Consult your Fitbit’s user manual or the manufacturer’s website for any specific recommendations or considerations regarding the use of lower power charging sources for your Fitbit model.
By incorporating a lower power charging source into your charging routine, you can promote better battery health, prolong the lifespan of your Fitbit’s battery, and ensure a safe and efficient charging experience.
Using a Portable Power Bank
If you’re on the go and need to charge your Fitbit, using a portable power bank can be a convenient solution. A power bank allows you to recharge your Fitbit anytime, anywhere, without relying on a wall outlet. Here’s how you can use a portable power bank:
1. Choose a Portable Power Bank:
Select a portable power bank with sufficient capacity and the necessary charging features to support your Fitbit device. Consider factors such as capacity, size, weight, and convenience of use when making your selection.
2. Charge the Power Bank:
Charge the power bank using its provided charging cable and a power source such as a computer or wall adapter. Ensure the power bank is fully charged before using it to charge your Fitbit.
3. Connect Your Fitbit:
Take the Fitbit charging cable and plug it into the power bank’s USB port. Confirm the connection is secure.
4. Start the Charging:
Once your Fitbit is connected to the power bank, the charging process will begin automatically. Some power banks may have an additional button that needs to be pressed to initiate charging.
5. Monitor the Charging:
Keep an eye on your Fitbit’s display to monitor the charging progress. Depending on the power bank’s capacity and your Fitbit’s battery level, the charging time can vary. Check your Fitbit’s user manual for estimated charging times.
6. Disconnect and Store:
Once your Fitbit is fully charged, disconnect it from the power bank. Unplug the charging cable from both the power bank and your Fitbit, and store the power bank in a safe place for future use.
Using a portable power bank provides you with the flexibility to charge your Fitbit whenever you’re on the move, ensuring that you never run out of battery during your activities.
When purchasing a power bank, consider its charging capacity, build quality, and compatibility with your Fitbit model. Opt for power banks from reputable manufacturers to ensure safety and reliable performance.
Remember to refer to your Fitbit’s user manual or contact the manufacturer for any specific guidelines or precautions related to using a portable power bank to charge your Fitbit.
With a portable power bank at hand, you can stay connected and keep your Fitbit charged while on the go or in situations where a wall outlet is not readily available.
Understanding Battery Life Notifications
Battery life notifications on your Fitbit are designed to provide you with information about the battery level of your device, enabling you to manage its use and plan for charging as needed. Here’s what you need to know about understanding battery life notifications:
Low Battery Notifications:
When your Fitbit’s battery level is low, you may receive a low battery notification, usually in the form of a notification or an indicator on the display. These notifications serve as a reminder for you to charge your Fitbit to ensure it stays operational.
Battery Percentage Notifications:
Some Fitbit devices have the ability to display the remaining battery percentage. This provides a more accurate representation of your Fitbit’s battery level rather than relying solely on symbols or icons. You can check the battery percentage directly on the Fitbit’s display or through the Fitbit app on your smartphone.
Regular Battery Status Check:
You can manually check the battery status of your Fitbit at any time to get an idea of the remaining charge. Access the battery status through the Fitbit app or by checking the battery indicator on the Fitbit’s display. This allows you to proactively manage the battery life and plan for charging when necessary.
Charging Reminders:
Some Fitbit devices offer the option to receive charging reminders. These reminders notify you when it’s time to charge your Fitbit based on the battery level. They can be helpful for ensuring that your Fitbit is regularly charged and ready for use throughout the day.
Optimizing Battery Life:
To maximize battery life and reduce the frequency of battery life notifications, you can take steps such as reducing screen brightness, disabling unnecessary features, and keeping your Fitbit’s firmware up to date. Additionally, using a lower power charging source and closing unused apps on your smartphone can help conserve battery life on both your Fitbit and your phone.
Remember to refer to your Fitbit’s user manual or consult the manufacturer’s website for specific details about the battery life notifications available on your Fitbit model.
By understanding battery life notifications and taking actions to optimize battery performance, you can ensure that your Fitbit remains charged and ready to accompany you throughout your daily activities.