
Why would you want to change your IP address?
In today’s digital age, the internet plays a crucial role in our lives. From browsing websites to accessing online services, we rely heavily on our internet connections. However, there may be times when changing your IP address becomes necessary. Let’s take a look at some common scenarios where changing your IP address can be beneficial.
1. Privacy Protection: One of the primary reasons why people opt to change their IP address is to safeguard their online privacy. Your IP address is like a digital fingerprint, revealing information about your location and online activities. By changing your IP address, you can prevent third-party entities, such as advertisers, from tracking your online behavior and gathering personal data.
2. Circumvent Geo-restrictions: Some websites and online services restrict access based on geographic location. By changing your IP address to one in a different region, you can bypass these restrictions and gain access to content that might otherwise be unavailable in your location. This is particularly helpful when trying to access streaming platforms or websites offering region-specific content.
3. Enhanced Security: Changing your IP address can provide an additional layer of security. By frequently changing your IP, you make it more difficult for potential hackers or cybercriminals to identify and target your devices. This helps protect your sensitive information, such as passwords, financial data, and personal details.
4. Avoid IP-based Bans: Online communities and forums may impose bans based on IP addresses to prevent spammers or users engaging in malicious activities. If your IP address has been banned, changing it allows you to regain access to these platforms and participate in the community once again.
5. Troubleshooting Connectivity Issues: Certain network issues, such as conflicts or blacklisting, can cause problems with your internet connection. Changing your IP address can be a potential solution to resolve these connectivity issues, allowing you to regain a stable and functioning internet connection.
Overall, changing your IP address can provide numerous benefits, including privacy protection, access to restricted content, enhanced security, and troubleshooting network issues. However, it’s essential to understand the different methods available to change your IP address and choose the one that best suits your needs.
Different methods to change your IP address
If you’ve decided to change your IP address, there are several methods you can use to accomplish this task. Let’s explore some of the most common methods available:
1. Using a VPN (Virtual Private Network): A VPN is a popular and effective method to change your IP address. It creates a secure connection between your device and a remote server, allowing you to browse the internet with a different IP address. By connecting to a VPN server located in a different country, you can effectively change your IP address to that location. There are many VPN services available, both free and paid, offering varying levels of security and different server locations to choose from.
2. Utilizing a Proxy Server: A proxy server acts as an intermediary between your device and the website or service you’re accessing. When you connect through a proxy server, it assigns you a different IP address, effectively masking your original one. Proxy servers come in different types, including HTTP, HTTPS, SOCKS, and public or private proxies. It’s important to note that not all proxies provide the same level of anonymity or security, so choose carefully.
3. Restarting your Router: In some cases, simply restarting your router can result in a new IP address being assigned to your device. Most routers obtain IP addresses dynamically from your Internet Service Provider (ISP). By powering off your router for a few minutes and then turning it back on, it will likely establish a new connection and assign a new IP address.
4. Changing the IP address manually on your device: Depending on your operating system, you may have the option to change your IP address manually. This method involves accessing your network settings and modifying the IP address settings. Keep in mind that modifying these settings without proper knowledge can lead to network connectivity issues, so proceed with caution and follow online guides specific to your operating system.
5. Contacting your Internet Service Provider: If you’re unable to change your IP address using the above methods or need a specific IP address for a particular purpose, you can contact your Internet Service Provider (ISP) and request a new IP address. They may assign you a new IP or provide instructions on how to obtain one.
Each method has its own advantages and considerations, so choose the one that aligns with your needs. It’s important to ensure the method you choose prioritizes your privacy and security while effectively changing your IP address.
Method 1: Using a VPN (Virtual Private Network)
When it comes to changing your IP address, using a VPN (Virtual Private Network) is one of the most popular and reliable methods available. A VPN creates a secure and encrypted connection between your device and a remote server, effectively masking your IP address and providing you with a new one from the server’s location.
How does a VPN work?
When you connect to a VPN, all your internet traffic is routed through the VPN server before reaching the intended destination. This process encrypts your data and assigns you an IP address associated with the server’s location. So, if you connect to a VPN server located in the United States, you will appear to have a US IP address, regardless of your physical location.
The benefits of using a VPN:
1. Anonymity: By using a VPN, you can browse the internet with anonymity. Your real IP address is hidden, making it difficult for websites, advertisers, or even your ISP to track your online activities.
2. Geo-unblocking: One of the significant advantages of a VPN is the ability to access geo-restricted content. By connecting to a VPN server in a different country, you can bypass region-based restrictions and access content that may not be available in your location.
3. Security: VPNs encrypt your internet traffic, ensuring that your data remains secure and protected from potential hackers or eavesdroppers. This is especially important when using public Wi-Fi networks, where your information is vulnerable to interception.
4. Privacy: VPNs help safeguard your privacy by preventing your Internet Service Provider (ISP) from monitoring your online activity. They can’t see the websites you visit, your downloads, or streaming habits as all the data is encrypted within the VPN tunnel.
Choosing the right VPN:
When selecting a VPN service, there are a few factors to consider:
– Security and Encryption: Look for a VPN that offers robust encryption protocols, such as OpenVPN or IKEv2, to ensure that your data is encrypted and protected.
– Server Locations: Choose a VPN provider that offers server locations in the regions you wish to have IP addresses from. The more server options available, the more flexibility you’ll have in changing your IP address.
– Speed and Performance: To maintain a smooth and fast browsing experience, opt for a VPN that doesn’t significantly impact your internet speed.
Remember to follow the instructions provided by your chosen VPN service to connect to their servers and change your IP address. With the right VPN, you can enjoy enhanced privacy, security, and access to a global network of servers, allowing you to change your IP address and browse the internet with freedom and anonymity.
Method 2: Utilizing a Proxy Server
Another method to change your IP address is by utilizing a proxy server. A proxy acts as an intermediary between your device and the websites or online services you access. It masks your IP address and assigns you a new one associated with the proxy server’s location.
How does a proxy server work?
When you connect to a website through a proxy server, your request passes through the proxy server first. The proxy server then forwards your request to the website, acting as a middleman. From the website’s perspective, it appears that the request is coming from the proxy server’s IP address instead of your actual IP address.
The benefits of using a proxy server:
1. IP Address Masking: A proxy server masks your original IP address, providing you with an alternative IP address. This can be useful when you want to appear as if you are browsing from a different location or if you need to bypass geo-restrictions.
2. Access Blocked Content: Some websites or services may block access based on your IP address. By using a proxy server with a different IP address, you can bypass these restrictions and access the content or service that would otherwise be unavailable to you.
3. Anonymity: Proxy servers offer varying levels of anonymity. While they may hide your IP address, keep in mind that not all proxy servers provide the same level of security and privacy. It’s important to choose a reputable proxy service that prioritizes your anonymity and protects your data.
Choosing the right proxy server:
There are several types of proxy servers available:
1. HTTP Proxies: These proxies are designed for web browsing and support HTTP connections. They are suitable for accessing websites but not recommended for other online activities such as torrenting.
2. HTTPS Proxies: Similar to HTTP proxies, HTTPS proxies are specifically designed for secure browsing, encrypting the connection between your device and the proxy server.
3. SOCKS Proxies: SOCKS proxies operate at a lower level and can handle various types of internet traffic, including email, FTP, and other protocols. They offer more versatility and are often used for more advanced networking needs.
4. Public vs. Private Proxies: Public proxies are accessible to anyone and are generally free of charge. However, they may be less reliable and slower due to the high volume of users. Private proxies, on the other hand, offer higher reliability and better performance but come at a cost.
When using a proxy server, it’s important to configure your device or web browser to route the internet traffic through the proxy server. Follow the instructions provided by your chosen proxy service to set up and use the proxy effectively.
While proxy servers can provide a means to change your IP address, it’s crucial to choose a reputable and secure proxy service. Ensure that the proxy provider prioritizes anonymity, protects your data, and offers reliable connections to ensure a smooth browsing experience.
Method 3: Restarting your Router
If you’re looking for a simple and straightforward method to change your IP address, restarting your router can be an effective solution. Most routers obtain IP addresses dynamically from your Internet Service Provider (ISP), and by restarting the router, you can prompt it to request a new IP address.
How does restarting your router change your IP address?
When you restart your router, it breaks the connection between your device and your ISP. As a result, the ISP assigns a new IP address to your router when it establishes a fresh connection. This means that when you reconnect your devices to the router, they will be assigned a new IP address as well.
The benefits of restarting your router to change your IP address:
1. Simplicity: Restarting your router is a simple and hassle-free method. It doesn’t require any technical skills or knowledge, making it accessible to anyone who wants to change their IP address.
2. Dynamic IP Address Change: If your ISP assigns dynamic IP addresses, restarting your router can result in the automatic allocation of a new IP address. This allows you to change your IP without any complicated configuration processes.
3. Troubleshooting Connectivity Issues: In addition to changing your IP address, restarting your router can help resolve network connectivity issues. It clears any temporary glitches or conflicts that may be affecting your internet connection, providing a fresh start and potential resolution to the problem.
Important considerations:
While restarting your router is a simple method, there are a few points to keep in mind:
– Power off your router: To restart your router, you should power it off completely. Unplug the power cable from the router and wait for a few minutes to ensure it fully disconnects from your ISP.
– Power on your router: After a few minutes, plug the power cable back into the router and turn it on. Wait for it to establish a connection with your ISP and for the lights on the router to stabilize.
– Confirm the IP Change: Once your router is back online, check your IP address to confirm that it has changed. You can use online IP lookup tools or check the network settings of your device to verify the new IP address.
Keep in mind that restarting your router might not always result in a new IP address. Some ISPs may assign static IP addresses that do not change unless specifically requested. Additionally, if you’re part of a network with multiple routers or behind a modem/router combination, you may need to restart the main device or both devices to change the IP address effectively.
Restarting your router is a straightforward and sometimes effective method to change your IP address. If you’re facing connectivity issues or in need of a new IP, give this method a try to potentially obtain a fresh IP address and improve your internet experience.
Method 4: Changing the IP address manually on your device
If you prefer a more hands-on approach to changing your IP address, you can do so by manually modifying the network settings on your device. This method requires a bit of technical knowledge and should be approached with caution to avoid potential connectivity issues. Here’s how you can change the IP address manually:
For Windows:
- Open the Network and Sharing Center by right-clicking on the network icon in the system tray and selecting “Open Network and Sharing Center”.
- Click on “Change adapter settings” on the left-hand side of the window.
- Right-click on the network connection you want to change the IP address for and select “Properties”.
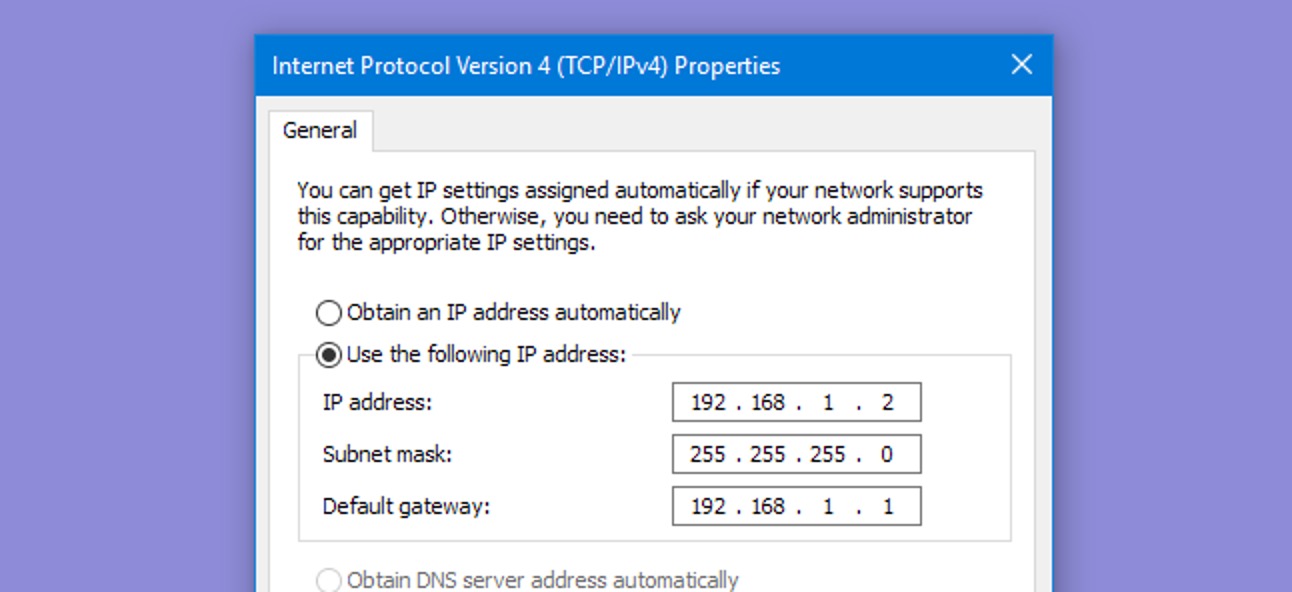
- In the Properties window, select “Internet Protocol Version 4 (TCP/IPv4)” and click on the “Properties” button.
- Select the option “Use the following IP address” and enter the new IP address, subnet mask, default gateway, and DNS server addresses.
- Click “OK” to save the changes.
For Mac:
- Go to “System Preferences” and open the “Network” panel.
- Select the network connection you want to modify (e.g., Ethernet or Wi-Fi) from the list on the left-hand side.
- Click on the “Advanced” button in the bottom right corner.
- Go to the “TCP/IP” tab.
- Choose the “Manually” option under the “Configure IPv4” dropdown menu.
- Enter the new IP address, subnet mask, router address, and DNS server addresses in the respective fields.
- Click on “OK” to save the changes.
It’s important to note that changing the IP address manually can lead to network connectivity issues if not done correctly. Ensure that you have the necessary information, such as the desired IP address, subnet mask, default gateway, and DNS server addresses, before making any changes. If you are unsure, consult your network administrator or refer to the documentation provided by your ISP.
Please keep in mind that the method described above may vary depending on your operating system version. It’s always recommended to follow official documentation or online guides specific to your operating system to ensure the accuracy of the steps.
Changing the IP address manually on your device provides you with more control over the new IP address. However, proceed with caution and make sure you have a clear understanding of the network settings before attempting to modify them.
Method 5: Contacting your Internet Service Provider
If you require a specific IP address or are unable to change your IP address using other methods, contacting your Internet Service Provider (ISP) is an option worth considering. Your ISP is responsible for assigning your IP address, and they have the ability to change it upon request.
How to contact your Internet Service Provider:
- Locate the contact information for your ISP. This can usually be found on their website, billing statements, or customer support documentation.
- Reach out to your ISP through their designated communication channels. This may include phone calls, live chats, or submitting a support ticket.
- Explain your request to change your IP address and provide any relevant information or reasons for the change.
- Follow the instructions provided by the ISP. They may require you to provide additional verification or follow certain procedures to complete the IP address change.
- Wait for confirmation from your ISP regarding the IP address change. This may take some time, as the process will depend on your ISP’s policies and procedures.
Important considerations:
Keep in mind the following points when contacting your ISP for an IP address change:
– Static vs. Dynamic IP Address: If you currently have a static IP address, changing it may not be as straightforward. Static IP addresses are typically assigned to businesses or individuals who require a consistent, unchanging IP. In this case, you will need to discuss the need for a new IP address with your ISP and be prepared for any associated costs or limitations.
– Potential Additional Charges: Some ISPs may charge a fee for changing your IP address or provide the option as part of a premium service. Be aware of any potential charges and confirm with your ISP beforehand.
– Reason for IP Change: It may be helpful to explain the reason for your IP address change to your ISP. Whether it’s for privacy, security, or specific requirements, providing a clear explanation can expedite the process and ensure your request is understood.
Remember that contacting your ISP for an IP address change should be done when other methods are not feasible or when you require a specific IP address for a particular purpose. Be prepared to follow any guidelines or requirements set forth by your ISP to complete the request successfully.
Changing your IP address through your ISP allows for a more direct and reliable method, ensuring that your new IP address is allocated by the service provider itself. However, be aware of any potential limitations, costs, or additional considerations involved in the process.
The importance of maintaining online privacy and security
In an increasingly connected world, maintaining online privacy and security is of paramount importance. With the proliferation of digital threats and the vast amounts of personal information shared online, taking steps to protect your privacy and enhance your cybersecurity measures is crucial. Here are a few reasons why maintaining online privacy and security should be a top priority:
1. Protection of Personal Information: The internet has become a treasure trove of personal data. From social media profiles to online financial transactions, we constantly share sensitive information online. Safeguarding this data is essential to prevent identity theft, financial fraud, and potential harm to your reputation.
2. Prevention of Data Breaches: Data breaches have become increasingly prevalent, with cybercriminals targeting organizations to gain unauthorized access to user data. By maintaining strong privacy and security practices, you can help reduce the risk of your personal information being exposed in a data breach.
3. Online Tracking and Profiling: Internet tracking and profiling technologies are widely used to collect information about individuals’ online activities. This data is then used for targeted advertising, personalized content delivery, and even influencing user behavior. By prioritizing online privacy, you can limit the amount of data collected about you and mitigate the potential impact of targeted advertising and profiling.
4. Protection against Cyber Threats: The internet is rife with various cyber threats, including malware, phishing attacks, and ransomware. Having robust privacy and security measures in place, such as strong passwords, up-to-date antivirus software, and regular software updates, can help protect you from falling victim to these threats.
5. Preserving Online Freedom: Privacy and security are not just about protecting yourself; they are also crucial for preserving online freedom. By having control over your personal information, you can maintain your autonomy and exercise your rights to privacy, free expression, and anonymity on the internet.
6. Confidence in Digital Transactions: With the growth of e-commerce and online banking, it is essential to have confidence in the security of digital transactions. Maintaining online privacy and security instills trust in the digital ecosystem, allowing you to engage in online transactions with peace of mind.
7. Protection against Government Surveillance: While governments have a legitimate need to monitor certain activities for security purposes, mass surveillance can infringe upon privacy rights. By maintaining online privacy, you can mitigate the reach of excessive government surveillance and maintain a sense of autonomy in your digital life.
To maintain online privacy and security, it is recommended to use strong, unique passwords, enable two-factor authentication, regularly update software and apps, be cautious with sharing personal information online, and utilize privacy-enhancing tools such as virtual private networks (VPNs) and encrypted messaging apps.
By prioritizing online privacy and security, you can protect yourself from potential risks, exercise your rights, and enjoy a safer and more secure online experience.
Tips to protect your IP address and online activities
In today’s digital landscape, safeguarding your IP address and online activities is vital to protect your privacy and maintain security. Here are several tips to help you protect your IP address and enhance your online security:
1. Use a Virtual Private Network (VPN): A VPN encrypts your internet traffic and routes it through a secure server, masking your IP address and making it difficult for anyone to track your online activities. Choose a reputable VPN service that prioritizes privacy and security.
2. Keep your software up to date: Regularly update your operating system, web browser, antivirus software, and other applications. Software updates often include important security patches that protect against known vulnerabilities.
3. Enable a firewall: Activate the firewall on your computer or router to monitor and filter incoming and outgoing network traffic. This adds an additional layer of protection against unauthorized access and potential threats.
4. Utilize strong and unique passwords: Use complex passwords that include a combination of uppercase and lowercase letters, numbers, and symbols. Avoid using common or easily guessable passwords and ensure that each account has a unique password.
5. Enable two-factor authentication (2FA): Enable 2FA whenever possible. It adds an extra layer of security by requiring a secondary verification method, such as a code sent to your phone, in addition to your password.
6. Be cautious with public Wi-Fi: Public Wi-Fi networks are often unsecured and can expose your data to potential threats. Avoid accessing sensitive information or making financial transactions on public networks unless using a VPN or other secure connection.
7. Regularly back up your data: Maintain regular backups of your important files and data. In the event of a security breach or data loss, having backups ensures you can recover your information.
8. Be mindful of phishing attacks: Be cautious of suspicious emails, links, or attachments. Phishing attacks often aim to trick you into revealing personal information or login credentials. Verify the legitimacy of emails and websites before providing any sensitive information.
9. Limit information shared on social media: Be mindful of the personal information you share on social media platforms. Oversharing can potentially provide valuable information to cybercriminals or be used for social engineering attacks.
10. Regularly monitor your online accounts: Keep a close eye on your online accounts for any suspicious activity. Report any unauthorized access or suspicious behavior to the respective service provider immediately.
11. Use a secure DNS service: Consider using a secure DNS (Domain Name System) service, such as Google Public DNS or Cloudflare DNS, to enhance your browsing security and privacy.
12. Educate yourself about online threats: Stay informed about the latest online threats and security best practices. By keeping up-to-date with current trends, you can make informed decisions to protect your IP address and safeguard your online activities.
By implementing these tips, you can significantly enhance your online security and protect your IP address from potential threats. Remember, maintaining a proactive and diligent approach to your online security is key to a safe and secure internet experience.