Step 1: Open Microsoft Teams
Changing your background on Microsoft Teams can help add a personal touch to your video calls and make your virtual meetings more interesting. Whether you want to hide a messy room or simply add some visual flair, customizing your background is a great way to do it. Follow these simple steps to change your background on Microsoft Teams.
The first step is to open the Microsoft Teams application. If you haven’t already installed Teams, you can download it for free from the official Microsoft website or your device’s app store.
Once you have installed and launched Microsoft Teams, sign in to your account using your email address and password. If you don’t have an account, you can create one by following the on-screen instructions. Teams is available for Windows, Mac, iOS, and Android, so you can use it on your preferred device.
If you are using the desktop version of Teams, you will find the application’s icon on your computer’s taskbar or in the list of installed apps. Click on the icon to open the app. On mobile devices, you can find the Teams app on your home screen or in the app drawer.
After launching Microsoft Teams, you will be prompted to sign in with your credentials. Enter your email address and password, and then click on the “Sign In” or “Login” button to continue.
Once you are signed in and the application is open, you will be greeted with the main Teams interface. This is where you can access your chats, meetings, and various other features. Now that you are ready to change your background, proceed to the next step.
Step 2: Go to Settings
Once you have opened Microsoft Teams, the next step is to navigate to the settings menu where you can customize your background. The settings menu is where you can access various options and preferences to personalize your Teams experience.
To access the settings menu, look for the “Settings” icon in the top-right corner of the Teams interface. The icon usually looks like a gear or a cogwheel. Click on this icon to open the settings menu.
Alternatively, if you are using the desktop version of Teams, you can access the settings by clicking on your profile picture in the top-right corner and selecting the “Settings” option from the drop-down menu that appears.
On mobile devices, the settings icon can usually be found by tapping on the hamburger menu icon (three horizontal lines) in the top-left or top-right corner of the interface. This will expand a side menu where you can find the settings option.
Once you have located the settings icon and clicked on it, a new window or panel will open, displaying various options and preferences. This is where you can adjust your Teams settings, including the background settings.
Scroll through the settings menu until you find the “Backgrounds” or “Background effects” option. Click on this option to access the background customization feature.
Note that the location and appearance of the settings menu may vary slightly depending on the version of Teams you are using and any recent updates. If you can’t find the settings icon or the background customization option, refer to the Teams documentation or visit the Microsoft support website for further guidance.
Now that you have accessed the settings menu, you are ready to proceed to the next step and choose your desired background for Microsoft Teams.
Step 3: Choose Background Effects
Once you have accessed the settings menu in Microsoft Teams, it’s time to explore the background effects feature. This feature allows you to choose from a variety of pre-loaded background images or use your own custom images as your background during video calls.
In the settings menu, look for the “Backgrounds” or “Background effects” option. Click on it to open the background customization panel.
Depending on the version of Teams you are using, you may be presented with different options for background effects. Commonly, you will find a selection of pre-loaded background images that you can choose from. These images can range from professional-looking office settings to fun and creative designs.
To preview and select a background image, simply click on the thumbnail of the image. This will give you a real-time preview of how the background will appear during your video calls. You can browse through the available options and choose the one that best suits your style and environment.
If you prefer to use your own image as your background, look for the “Add new” or “Upload” button. Click on it to browse and select an image file from your device’s storage. After selecting the image, Teams will automatically apply it as your background.
Once you have chosen your desired background image, click on the “Apply” or “Save” button to confirm your selection. Teams will now use the selected background during your video calls.
Keep in mind that background effects may not be available or supported on all devices or platforms. Ensure that you are using an updated version of Teams and that your device meets the system requirements for this feature.
Now that you have selected your background image, it’s time to move on to the next step and preview the new background in action before applying it to your video calls.
Step 4: Select a Background Image
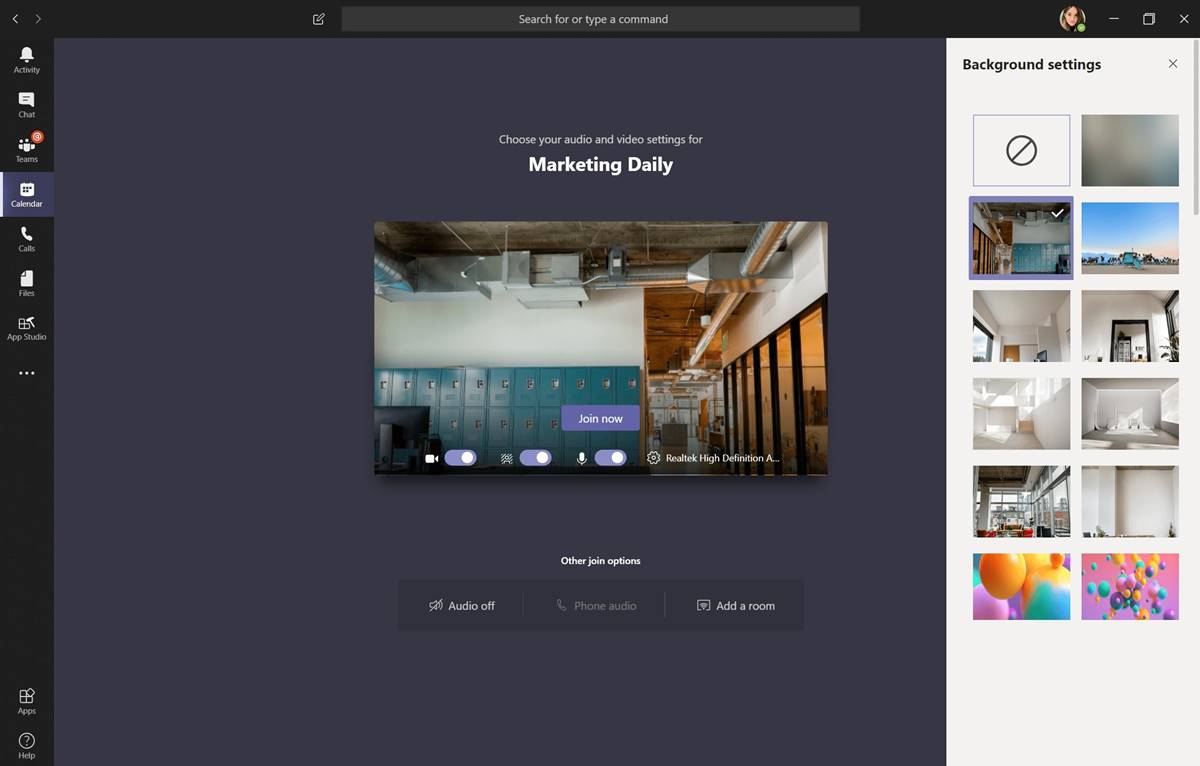
After accessing the background effects feature in Microsoft Teams, it’s time to choose a background image that will enhance your video calls. With a wide range of options available, you can select a background that suits your preference and adds a touch of personalization to your virtual meetings.
In the background effects panel, you will find a collection of pre-loaded background images to choose from. These images are designed to suit various settings and moods, from professional office environments to relaxed nature scenes and quirky patterns.
To select a background image, simply browse through the options provided. You can scroll through the thumbnail images or use the search bar to find specific themes or styles. Click on the thumbnail of the image you want to preview and apply it as your background.
As you click on each thumbnail, Teams will instantly display a real-time preview of how the background will appear during your video calls. This allows you to evaluate the visual impact and make sure it aligns with your desired aesthetic.
Remember that the background you choose should be appropriate for the purpose of your video calls. If you’re using Teams for work-related meetings, opt for more professional backgrounds. On the other hand, if you’re connecting with friends or participating in casual conversations, feel free to explore fun and creative options.
In addition to the pre-loaded images, you also have the option to use your own custom background. Look for the “Add new” or “Upload” button in the background effects panel. Click on it to select an image file from your device’s storage. Teams will then apply this custom image as your background.
Take some time to experiment with different background images and find the one that suits your style and needs. Remember that a well-chosen background can create a positive impression and enhance the overall video calling experience.
Once you have selected your desired background image, click on the “Apply” or “Save” button to confirm your choice. Teams will now use the selected background during your video calls, adding a personalized touch to your virtual meetings.
Now that you have chosen a background image, let’s move on to the next step to preview and apply the new background to your video calls.
Step 5: Preview and Apply the New Background
Once you have selected a background image in Microsoft Teams, it’s time to preview and apply the new background to your video calls. This step allows you to see how the chosen background will look before using it in your virtual meetings.
After selecting the desired background image, you will notice a preview window in the background effects panel. This preview window will display a real-time view of how the background will appear behind you during video calls.
Take a moment to observe the preview, ensuring that the background aligns with your expectations in terms of appearance, visibility, and overall aesthetic. If you’re satisfied with the preview, proceed to apply the new background to your video calls.
In the background effects panel, click on the “Apply” or “Save” button to confirm your selection. Microsoft Teams will now use the chosen background image as the backdrop for your video calls.
It’s important to note that the applied background will only be visible to others during your video calls. When you’re not in a call or when your camera is turned off, the background will not be visible on your end.
You can also adjust the strength or intensity of the chosen background effect. Teams provides a slider or a toggle option that allows you to control the opacity or transparency of the background. Move the slider to adjust the background’s visibility according to your preference.
During video calls, if you decide that you no longer want to use a background effect, Microsoft Teams provides an option to turn off the background altogether. In the background effects panel, look for the “None” or “Turn off background” option. Click on it to revert back to a normal, non-customized background.
Remember that background effects may not be available on all devices or platforms. If you encounter any issues or limitations with the background preview or application, refer to Microsoft’s support documentation or resources for further assistance.
Now that you have successfully previewed and applied the new background, let’s move on to the next step and explore additional background settings in Microsoft Teams.
Step 6: Adjust Background Settings
After you have chosen and applied a background image in Microsoft Teams, you may want to make further adjustments to ensure the best video calling experience. Teams provides additional background settings that allow you to fine-tune the appearance and functionality of your selected background.
To access the background settings, navigate back to the settings menu in Microsoft Teams. Look for the “Backgrounds” or “Background effects” option, which you used earlier to choose your background image. Click on it to open the background customization panel.
Within the background effects panel, you will find various options to adjust the settings related to your background image. These settings may vary depending on the version of Teams you are using and any recent updates.
One common setting is the ability to blur the background. Enabling this option will apply a soft blur effect to your background, which can be useful for adding a touch of professionalism or privacy during video calls. The blur effect helps to keep the focus on you while minimizing distractions from your surroundings.
In addition to blur, you may find other settings like background rotation or background styles. These settings allow you to customize the appearance and behavior of your background image further.
Take some time to explore and experiment with these settings to find the configuration that best suits your preferences and needs. You can adjust the settings according to the specific video call or event to create the desired ambiance or maintain a consistent visual theme.
It’s important to note that not all background settings may be available or supported on all devices or platforms. Ensure that you are using an updated version of Teams and that your device meets the system requirements for these settings.
Once you have made the desired adjustments in the background settings, click on the “Apply” or “Save” button to confirm the changes. Microsoft Teams will then apply the updated background settings to your video calls.
Remember that these background settings are optional, and you can choose to leave them as default if you prefer a simple and straightforward background experience.
Now that you have adjusted the background settings, let’s move on to the next step and explore how to upload your own custom backgrounds in Microsoft Teams.
Step 7: Upload Custom Backgrounds
If you want to add a personal touch to your video calls in Microsoft Teams, you have the option to upload your own custom backgrounds. This allows you to use images that reflect your personality, brand, or preferred environment as your backdrop during virtual meetings.
To upload custom backgrounds in Microsoft Teams, follow these steps:
- Go to the settings menu in Teams by clicking on the “Settings” icon, usually located in the top-right corner of the interface.
- In the settings menu, look for the “Backgrounds” or “Background effects” option and click on it to open the background customization panel.
- Within the background effects panel, you should see an option to “Add new” or “Upload” your own background image. Click on this option.
- A file browser window will open, allowing you to browse and select an image file from your device’s storage. Choose the image file you want to use as your custom background.
- After selecting the image file, Teams will automatically upload and apply it as your new background. You will be able to see a real-time preview of how the background will appear during your video calls.
- If you want to remove a custom background and go back to using the default or pre-loaded backgrounds, simply select the “None” or “Turn off background” option in the background effects panel.
When uploading custom backgrounds, it’s important to use images that are appropriate for the situation, maintain professionalism (if applicable), and are not distracting or offensive. Consider using images that are in line with the purpose of your video calls and create a visually appealing backdrop without overshadowing your presence.
Keep in mind that the ability to upload custom backgrounds may depend on the version of Teams you are using, as well as any specific policies or restrictions set by your organization. If you encounter any issues or limitations with uploading custom backgrounds, consult with your IT department or refer to Microsoft’s documentation for further guidance.
Now that you know how to upload custom backgrounds, let’s move on to the final step and explore some troubleshooting tips for background customization in Microsoft Teams.
Step 8: Troubleshooting Tips
While changing your background in Microsoft Teams can enhance your video calling experience, you may encounter some issues or challenges along the way. Here are a few troubleshooting tips to help you overcome common problems and ensure a smooth background customization process:
- Check for software updates: Ensure that you are using the latest version of Microsoft Teams. Updates often include bug fixes and improvements that can address background-related issues.
- Verify system requirements: Confirm that your device meets the minimum system requirements for using background effects in Teams. Different versions and platforms may have specific requirements for this feature.
- Clear cache and cookies: If you are experiencing glitches or unexpected behavior, try clearing your browser cache and cookies. This can help resolve issues related to stored data and temporary files.
- Restart the application: Sometimes, restarting Microsoft Teams can resolve temporary technical issues that could be affecting the background customization feature.
- Disable virtual background in other applications: If you have other video conferencing tools running simultaneously, ensure that the virtual background feature is turned off in those applications. Conflicts between multiple applications using virtual backgrounds can lead to unexpected behavior.
- Check camera settings: Make sure that your camera is properly connected, enabled, and functioning correctly. Issues with the camera hardware or drivers can affect the background customization feature.
- Switch to a different background: If you are experiencing issues with a specific background image, try selecting a different one to see if the problem persists. This can help determine if the issue is specific to the image or a more general problem.
- Contact IT support: If you have exhausted all troubleshooting options and are still experiencing issues, reach out to your organization’s IT support team. They can provide further assistance and guidance tailored to your specific setup and requirements.
By following these troubleshooting tips, you can overcome common challenges and ensure a seamless background customization experience in Microsoft Teams. Remember to explore the available resources and support documentation provided by Microsoft for additional guidance.
Now that you’re armed with these troubleshooting tips, you’re all set to enjoy a customized background in your Microsoft Teams video calls!