
Why Change Video Quality on Netflix
Netflix is a popular streaming platform that offers a vast library of movies and TV shows. One of the great features of Netflix is the ability to adjust the video quality according to your preferences and internet connection. So why would you want to change the video quality on Netflix? Here are a few reasons:
- Internet Connection Speed: Depending on your internet connection, you may experience buffering or a slow loading time when streaming high-quality video. Adjusting the video quality can help ensure a smooth viewing experience without interruptions.
- Data Usage: Streaming high-quality video consumes more data, which can be a concern if you have a limited data plan or want to conserve your bandwidth. By lowering the video quality, you can reduce your data usage while streaming on Netflix.
- Device Compatibility: Some older devices may not be able to handle high-quality video playback smoothly. Adjusting the video quality to a lower setting can improve compatibility and prevent performance issues.
- Personal Preference: Lastly, some viewers may prefer a certain video quality for various reasons. Whether you enjoy a crisper image or prefer a faster streaming experience, changing the video quality allows you to customize your Netflix viewing experience.
Now that you understand the reasons to change the video quality on Netflix, let’s explore how to do it across different devices and platforms.
Steps to Change Video Quality on Netflix
Changing the video quality on Netflix is a simple process, and it can be done on various devices such as the Netflix website, mobile app, and smart TVs. Here are the steps to change the video quality on Netflix:
Method 1: Changing Video Quality on Netflix Website
- Open your preferred web browser and go to the Netflix website.
- Login to your Netflix account if you haven’t already.
- Click on your profile icon in the top-right corner and select “Account” from the dropdown menu.
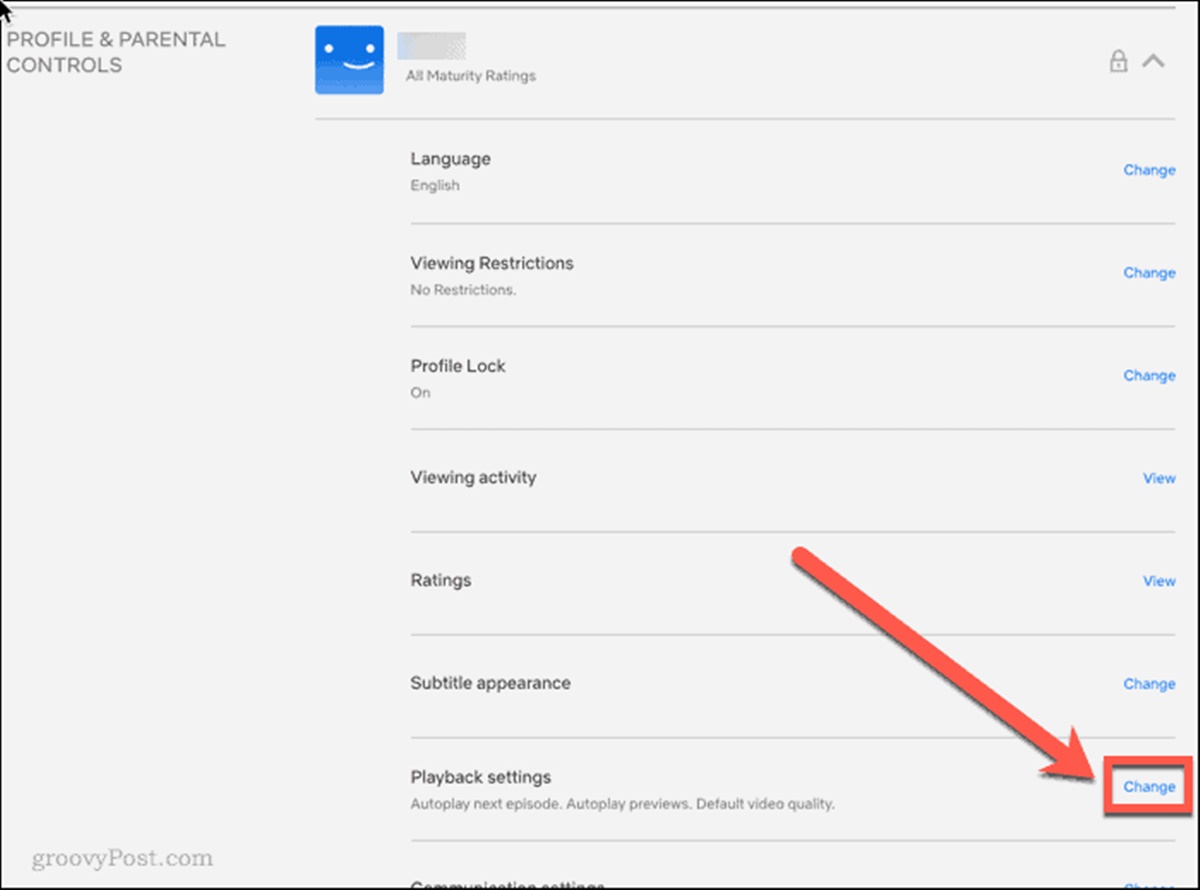
- Scroll down to the “Profile & Parental Controls” section and click on the profile you want to change the video quality for.
- Under the “Playback settings” section, click on “Change” next to “Data usage per screen”.
- Select the desired video quality option from the available settings: “Auto”, “Low”, “Medium”, or “High”.
- Click “Save” to apply the changes.
Method 2: Changing Video Quality on Netflix Mobile App
- Open the Netflix app on your mobile device.
- Tap on the menu icon (three horizontal lines) in the top-left corner.
- Scroll down and select “App Settings”.
- Tap on “Video Quality”.
- Choose the video quality setting that suits your preference: “Automatic”, “Low”, “Medium”, or “High”.
- Exit the settings menu, and the changes will be applied immediately.
Method 3: Changing Video Quality on Smart TVs and Streaming Devices
- Using your TV remote or streaming device remote, navigate to the Netflix app.
- Once inside the Netflix app, select your profile if prompted.
- Press the “Menu” or “Settings” button on your remote.
- Look for the “Playback Settings” or “Video Quality” option.
- Choose the video quality option that suits your preferences: “Auto”, “Low”, “Medium”, or “High”.
- Save the changes or exit the settings menu, and the new video quality will be applied.
Now that you know the steps to change the video quality on Netflix, you can customize your viewing experience to suit your needs and preferences. It’s worth noting that changing the video quality may impact the streaming experience and the amount of data consumed, so choose the optimal setting based on your device and internet connection.
Method 1: Changing Video Quality on Netflix Website
If you prefer streaming Netflix on your computer through the website, you can easily change the video quality through the following steps:
- Open your preferred web browser and go to the Netflix website.
- Log in to your Netflix account if you haven’t already.
- In the top-right corner, click on your profile icon to open a dropdown menu, then select “Account”.
- Scroll down to the “Profile & Parental Controls” section and click on the profile you wish to change the video quality for.
- Under the “Playback settings” section, you will see an option called “Data usage per screen” with a “Change” link next to it. Click on “Change”.
- A new window will open, displaying different video quality options:
- “Auto”: Netflix will automatically adjust the video quality based on your internet connection and device capabilities.
- “Low”: This option limits video quality to the lowest setting, suitable for slower connections or to save data.
- “Medium”: This provides a moderate video quality, balancing reasonable data consumption and good video resolution.
- “High”: This enables the highest video quality available for your internet connection and device.
- Select the video quality option that suits your preferences by clicking on the checkbox next to it.
- Click on “Save” to apply the changes to your profile.
Once you’ve saved the settings, the updated video quality preferences will be in effect the next time you stream content on Netflix using your web browser. It’s worth noting that the video quality changes made on the website will be applicable to all devices you use to access Netflix, unless you specifically adjust the settings on those devices. This means that the same video quality preference will be applied across different platforms.
By following these steps, you can easily change the video quality on Netflix through the website and enjoy a customized streaming experience that suits your internet connection and personal preferences.
Method 2: Changing Video Quality on Netflix Mobile App
If you frequently stream Netflix on your mobile device, changing the video quality can be done through the Netflix mobile app. Follow these steps to adjust the video quality settings:
- Open the Netflix app on your mobile device. Make sure you are logged in to your Netflix account.
- In the top-left corner, you will find a menu icon, usually represented by three horizontal lines. Tap on the menu icon to open the side menu.
- Scroll through the menu and locate the “App Settings” option. Tap on it to access the app settings.
- In the settings menu, look for the “Video Quality” option. Tap on it.
- Now, you will see a list of available video quality options:
- “Automatic”: This setting allows Netflix to automatically adjust the video quality based on your internet connection and device capabilities.
- “Low”: Selecting this option limits the video quality to the lowest setting, which is suitable for slower connections or conserving data.
- “Medium”: This option provides moderate video quality, balancing data consumption and video resolution.
- “High”: By choosing this option, you will experience the highest video quality available for your internet connection and device.
- Select the video quality option that you prefer by tapping on it.
- Exit the settings menu, and the changes will be applied immediately to your Netflix app.
It’s important to note that the video quality changes made through the mobile app will only apply to the app on your mobile device. If you use other devices to stream Netflix, such as a smart TV or computer, the video quality settings will remain the same unless you adjust them individually on those devices.
With these simple steps, you can easily change the video quality on the Netflix mobile app to ensure an optimal streaming experience on your mobile device. Adjusting the video quality can help address slow loading times, reduce data usage, and provide a smoother viewing experience overall.
Method 3: Changing Video Quality on Smart TVs and Streaming Devices
If you stream Netflix on a smart TV or a streaming device like Roku, Apple TV, or Chromecast, you can easily change the video quality settings through the Netflix app on your device. Here’s how to do it:
- Using your TV remote or streaming device remote, navigate to the Netflix app.
- If prompted, select your profile on the Netflix app.
- Once you’re inside the app, look for the “Menu” or “Settings” button on your remote. The location of this button may vary depending on your device.
- Using the remote, navigate through the settings menu until you find the option for “Playback Settings” or “Video Quality”.
- Upon selecting the “Playback Settings” or “Video Quality” option, you will see a list of available video quality options:
- “Auto”: This setting allows Netflix to automatically adjust the video quality based on your internet connection and the capabilities of your device.
- “Low”: Selecting this option limits the video quality to the lowest setting, which is suitable for slower connections or if you want to save data.
- “Medium”: This option provides a moderate video quality, balancing data consumption and video resolution.
- “High”: By choosing this option, you will experience the highest video quality available for your internet connection and device.
- Select the video quality option that suits your preference by using the remote to navigate and highlight your choice.
- Save the changes or exit the settings menu, and the new video quality setting will be applied to your Netflix app on your smart TV or streaming device.
It’s important to note that changing the video quality on your smart TV or streaming device will only apply to the Netflix app on that particular device. If you use other devices, such as a mobile phone or computer, to stream Netflix, the video quality settings will remain the same unless you adjust them individually.
With these simple steps, you can easily change the video quality settings on your smart TV or streaming device. By adjusting the video quality, you can ensure a smoother and more enjoyable viewing experience, particularly if you have a slow internet connection or if you want to conserve data usage.
Video Quality Options on Netflix
Netflix offers a range of video quality options to cater to different internet connection speeds and device capabilities. These options allow you to customize your streaming experience based on your preferences and ensure optimal playback. Here are the video quality options available on Netflix:
- Auto: The “Auto” option is the default setting on Netflix. When set to Auto, Netflix will automatically adjust the video quality based on your internet connection and the capabilities of your streaming device. It aims to deliver the best possible quality without buffering or interruptions.
- Low: Selecting the “Low” option limits the video quality to the lowest setting. This option reduces the amount of data used and is suitable for slower internet connections or if you want to conserve data. The video resolution may be lower, but it still allows for a smooth streaming experience.
- Medium: The “Medium” setting provides a balance between video quality and data usage. It offers a moderate video quality that is suitable for most users. This option is ideal for those who want a good balance between image clarity and data consumption.
- High: Choosing the “High” option enables the highest video quality available on Netflix. It delivers the best possible resolution and picture quality for your internet connection and streaming device capabilities. This setting is recommended for users with fast internet speeds and who prioritize high-definition viewing.
It’s important to note that the availability of video quality options may vary depending on the content you’re watching and the device you’re using to stream Netflix. Some older devices may not support the highest video quality settings, while newer devices may offer additional options like HDR (High Dynamic Range) or 4K Ultra HD.
Remember that selecting a higher video quality setting may result in a larger amount of data being consumed, so it’s important to consider your internet plan and data limits when choosing the video quality option. If you’re experiencing buffering or playback issues, you may want to try adjusting the video quality to a lower setting to ensure a smooth streaming experience.
By understanding the different video quality options on Netflix, you can choose the setting that best suits your needs and preferences, ensuring an optimal viewing experience every time you stream your favorite movies and TV shows.
Troubleshooting Tips for Video Quality Issues on Netflix
If you are experiencing video quality issues while streaming Netflix, there are several troubleshooting steps you can take to improve your viewing experience. Here are some tips to help you resolve common video quality issues:
- Check Your Internet Connection: Ensure that your internet connection is stable and capable of handling high-quality video streaming. You can run a speed test to determine your internet speed and consider upgrading your plan if necessary.
- Close Unnecessary Apps or Programs: Close any other apps or programs running in the background on your device that may be using up bandwidth. This will free up resources and improve internet speed and video playback.
- Restart Your Device: Sometimes, a simple device restart can resolve temporary glitches and improve video quality. Turn off your device, wait a few seconds, and then turn it back on.
- Clear Cache and Cookies: Clearing cache and cookies from your web browser or the Netflix app can help eliminate any stored data that might be causing video quality issues. Refer to your device’s settings or browser settings for instructions on how to clear cache and cookies.
- Update Your Streaming Device or App: Ensure that your streaming device or the Netflix app is running on the latest version. Outdated software can sometimes cause video quality problems. Check for any updates and install them if available.
- Adjust Video Quality Settings: If you are experiencing buffering or low-quality video, consider adjusting the video quality settings on your Netflix account. Lowering the video quality to a moderate setting may help improve playback on slower internet connections.
- Connect to a Wired Network: If possible, connect your streaming device directly to your router using an Ethernet cable. Wired connections generally provide a more stable and faster internet connection compared to Wi-Fi.
- Move Closer to the Router: If you are using Wi-Fi, try moving closer to your wireless router to improve signal strength and internet speed.
- Check Hardware and Cabling: Ensure that all cables connecting your device to the TV or monitor are secure and undamaged. Faulty cables can result in poor video quality.
By following these troubleshooting tips, you should be able to resolve most video quality issues while streaming Netflix. However, if the problem persists, you may want to reach out to Netflix support for further assistance or check their Help Center for specific troubleshooting steps related to your device.
Remember, having a reliable and fast internet connection is crucial for a smooth streaming experience, so investing in a good internet plan and ensuring proper network setup can go a long way in optimizing video quality on Netflix.
Final Thoughts
Changing the video quality on Netflix gives you the flexibility to customize your streaming experience based on your preferences, internet connection, and device capabilities. Whether you want to conserve data, improve playback on a slower connection, or enjoy the highest video quality, Netflix provides options to cater to your needs.
By following the methods outlined in this guide, you can easily adjust the video quality on different platforms, including the Netflix website, mobile app, and smart TVs. Take advantage of these settings to ensure a smooth and enjoyable viewing experience.
Remember that the video quality options available may vary depending on the device and content you’re streaming. Older devices may not support the highest settings, while newer ones may offer additional features like HDR or 4K Ultra HD.
If you ever encounter video quality issues while streaming on Netflix, don’t fret. Troubleshooting steps such as checking your internet connection, closing unnecessary apps, and clearing cache or cookies can help resolve common problems. Additionally, keeping your streaming device and Netflix app up to date can minimize any potential issues.
Ultimately, finding the right video quality setting is a personal choice. Consider your internet plan, device capabilities, and personal preferences when selecting the best video quality option for your streaming needs. Balancing video quality with data usage ensures an optimal viewing experience without exceeding data limits.
Now that you’re equipped with the knowledge of how to change video quality on Netflix and troubleshoot any potential issues, you can enjoy uninterrupted streaming of your favorite movies and TV shows. Sit back, relax, and immerse yourself in the world of entertainment that Netflix has to offer.