
Importance of Refresh Rate
The refresh rate of a monitor refers to the number of times the display refreshes per second. It is measured in hertz (Hz). The refresh rate plays a crucial role in the overall visual experience, especially in fast-paced activities such as gaming and video playback.
A higher refresh rate offers several benefits, including smoother motion, reduced motion blur, and improved clarity. When the refresh rate is low, the screen may appear to lag, leading to a jittery and less immersive experience. On the other hand, a high refresh rate provides a more fluid and responsive display, enhancing both gaming performance and productivity.
For gamers, a higher refresh rate can reduce input lag and provide a more accurate representation of fast-moving objects. This allows for quicker reactions and improved precision, which can be a game-changer in competitive gaming scenarios. Additionally, a higher refresh rate can make motion-intensive games feel more lifelike and immersive, creating a more enjoyable gaming experience.
Video playback also benefits from a higher refresh rate. When watching movies or videos with fast-paced action sequences, a higher refresh rate can minimize motion blur and provide smoother playback. This means that every frame is displayed more accurately, allowing for a more engaging and cinematic viewing experience.
Moreover, a high refresh rate can significantly reduce eye strain and fatigue. When the display refreshes at a low rate, some individuals may experience eye discomfort, headaches, and eye strain. By increasing the refresh rate, the screen becomes more stable and less flickering occurs, reducing the potential for visual discomfort during prolonged use.
It’s worth noting that the importance of the refresh rate varies depending on the individual’s needs and preferences. While a high refresh rate is essential for gamers and multimedia enthusiasts, those using their monitors primarily for web browsing or word processing may not notice a significant difference with a higher refresh rate.
Understanding Refresh Rate
The refresh rate of a monitor is a measure of how often it updates the image on the screen. It is typically measured in Hertz (Hz), which represents the number of times the screen refreshes per second. A higher refresh rate means that the screen refreshes more frequently, resulting in a smoother and more responsive display.
Refresh rate is closely related to the concept of frames per second (FPS) in gaming and video content. FPS refers to the number of frames that are rendered and displayed on the screen per second. Ideally, the refresh rate should match or exceed the FPS of the content being displayed for the optimal viewing experience.
For example, if you’re playing a game that runs at 60 FPS, having a monitor with a refresh rate of 60Hz or higher will ensure that each frame is displayed without any skipping or tearing. On the other hand, if you have a low refresh rate compared to the FPS, you may experience screen tearing, where the monitor displays parts of two different frames simultaneously, resulting in a fragmented and less smooth image.
It’s important to note that the refresh rate is not the same as the response time of a monitor. Response time refers to how quickly the display can change from one color to another. While response time is important for reducing motion blur, it is different from the refresh rate, which affects the overall smoothness and fluidity of the displayed content.
When shopping for a new monitor, it’s useful to understand the difference between native refresh rate and overclocked refresh rate. The native refresh rate is the default refresh rate supported by the monitor, while the overclocked refresh rate is a higher refresh rate achieved by overriding the default settings. Overclocking a monitor can potentially improve the smoothness of fast-paced content, but it may also introduce stability issues or require a more powerful graphics card.
Overall, understanding refresh rate is essential for optimizing your visual experience, whether you’re gaming, watching videos, or performing day-to-day tasks. Choosing a monitor with a suitable refresh rate for your specific needs and ensuring that it matches or exceeds the FPS of your content will help create a more immersive and smooth viewing experience.
Identifying Supported Refresh Rate
Before adjusting or changing the refresh rate of your monitor, it’s crucial to determine the supported refresh rate to avoid potential compatibility issues or incorrect settings. Here are a few methods to identify the supported refresh rate of your monitor:
- Check the manufacturer’s specifications: The easiest way to find the supported refresh rate is by referring to the monitor’s user manual or the manufacturer’s website. Look for the specifications section, where you will likely find the native or maximum supported refresh rate.
- Monitor settings menu: Most monitors have an on-screen display (OSD) menu accessible through physical buttons on the monitor. Navigate through the menu options to find the display settings or information section. Within this menu, you should be able to find the current refresh rate and any available options for adjustment.
- Operating system settings: Both Windows and macOS provide settings to view and change the refresh rate. In Windows, right-click on the desktop and select “Display settings.” Scroll down and click on “Advanced display settings,” then select the monitor you want to adjust. Here you can see the current refresh rate and available options. On macOS, go to “System Preferences” and click on “Displays.” From the “Display” tab, hold the Option key and click on the “Scaled” radio button to reveal the refresh rate options.
- Graphics card control panel: Graphics card manufacturers often provide control panel software with additional settings for display customization. NVIDIA users can access the NVIDIA Control Panel, while AMD users can access the AMD Radeon Settings software. Within these control panels, you can find options to adjust the refresh rate.
- Third-party software: There are several third-party software applications available that can provide detailed information about your monitor’s specifications, including the supported refresh rate. Some popular choices include HWiNFO, GPU-Z, and AIDA64. These programs can provide comprehensive information about your system’s hardware, including the monitor’s refresh rate capabilities.
Once you have identified the supported refresh rate of your monitor, you can confidently make adjustments to improve your visual experience. However, always ensure that the chosen refresh rate is compatible with your hardware and that you have the necessary graphics card capabilities to handle higher refresh rates.
Changing Refresh Rate on Windows
If you’re using a Windows computer, adjusting the refresh rate of your monitor is a straightforward process. Follow these steps to change the refresh rate in Windows:
- Right-click on an empty area of your desktop and select “Display settings” from the context menu.
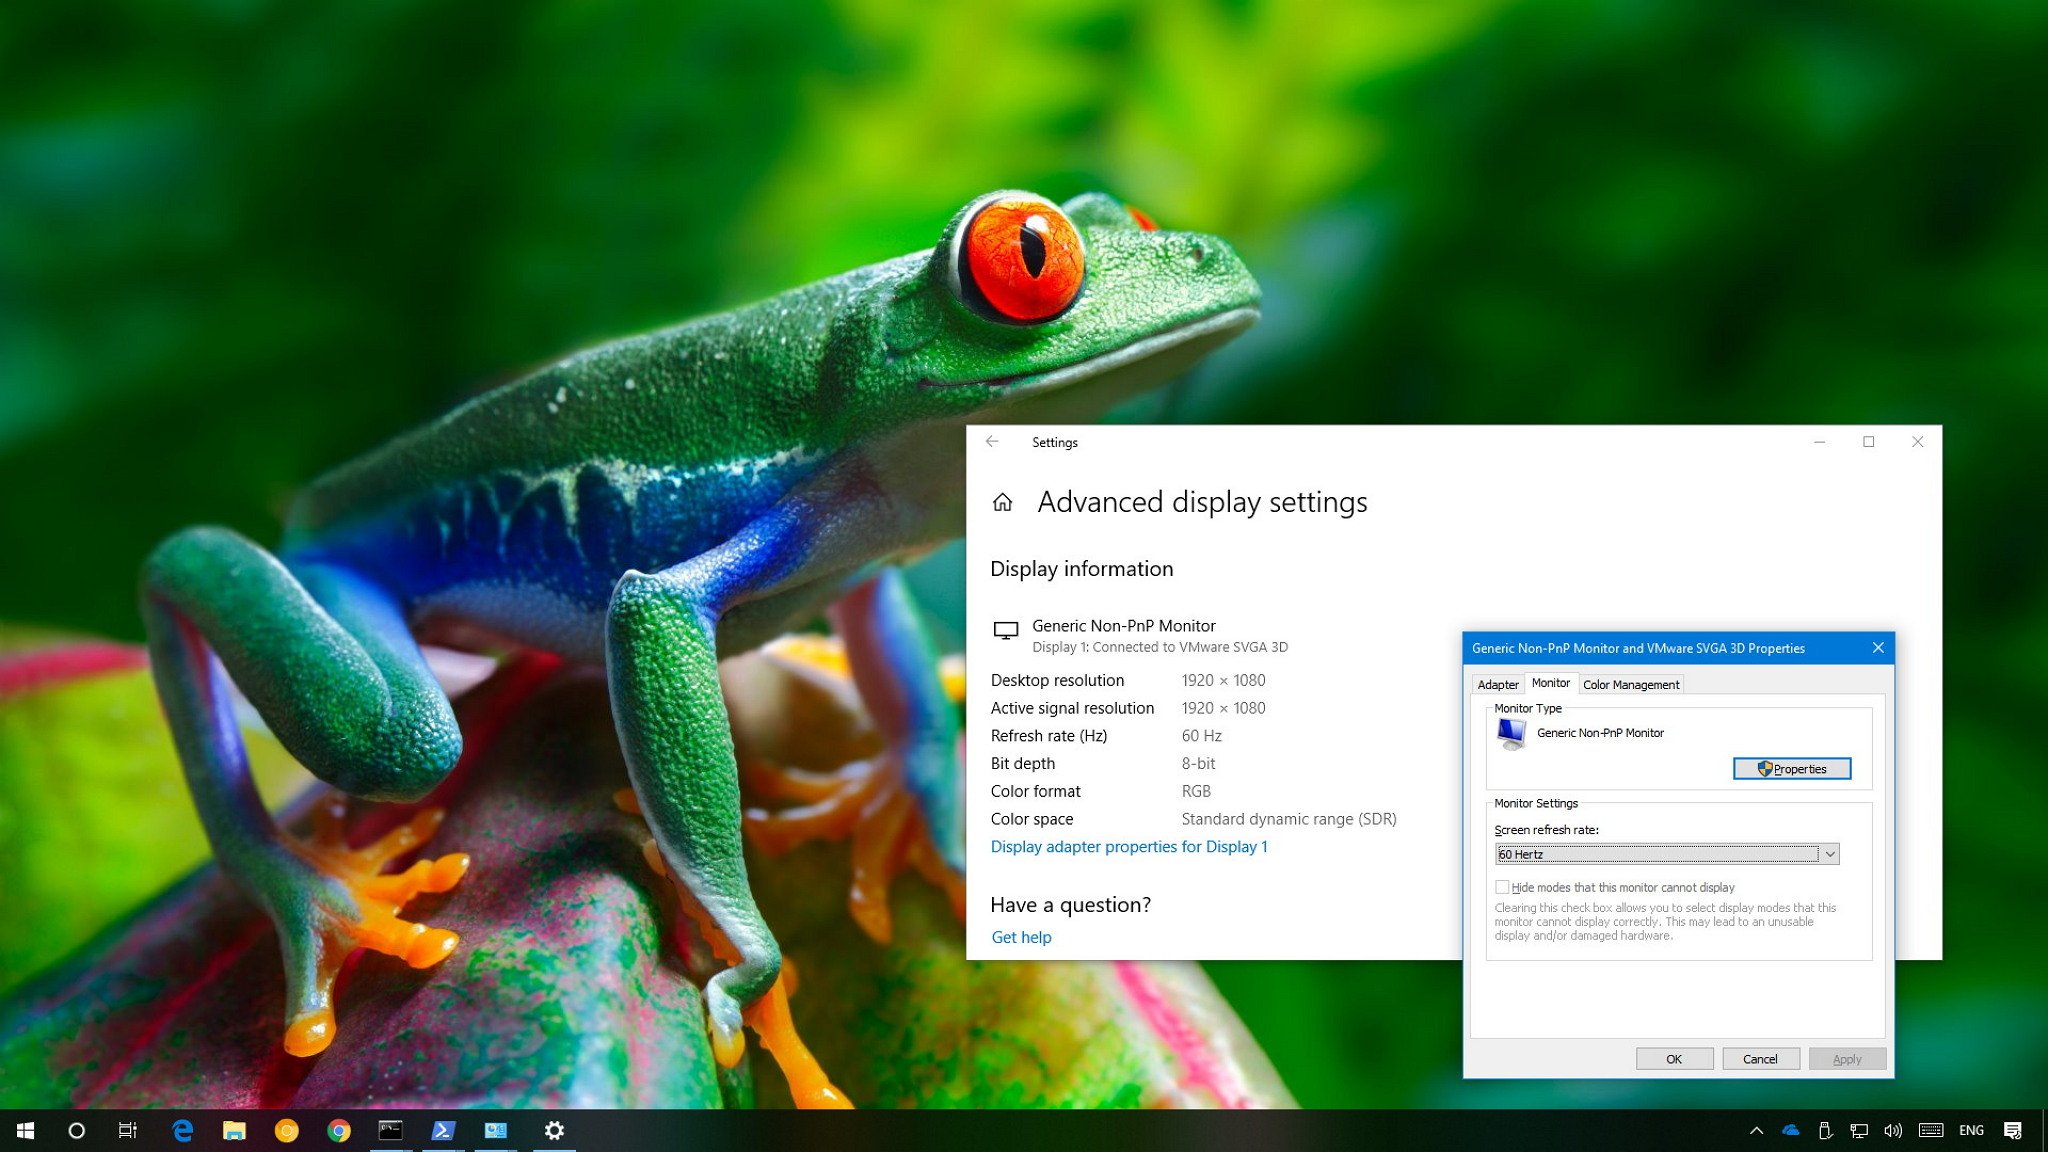
- In the Display settings window, scroll down and click on “Advanced display settings.”
- Under the Advanced display settings, select the monitor you want to modify if you have multiple monitors connected.
- Click on the “Display adapter properties” link.
- In the Properties window, navigate to the “Monitor” tab.
- From the Monitor tab, you’ll find the refresh rate drop-down menu, displaying the available options supported by your monitor.
- Select the desired refresh rate from the drop-down menu.
- Click on “Apply” to save the changes. Windows will ask for confirmation to keep the selected refresh rate. If the selected refresh rate works, Windows will keep the settings; otherwise, it will revert to the previous refresh rate after a few seconds.
- Click on “OK” to close the Properties window.
It’s important to note that the available refresh rate options may vary depending on your monitor’s capabilities and the graphics card connected to your system. If you don’t see the desired refresh rate in the drop-down menu, it might indicate that your monitor does not support higher refresh rates or that your graphics card is not capable of driving the display at that refresh rate.
Additionally, certain graphics card control panels, such as NVIDIA Control Panel or AMD Radeon Settings, may offer more advanced options for adjusting the refresh rate. You can access these control panels through the system tray or by right-clicking on the desktop and selecting the corresponding control panel option.
Remember, changing the refresh rate of your monitor might affect the stability and performance of your system. If you encounter any issues or notice visual artifacts after changing the refresh rate, revert to the previously working refresh rate or consult the support resources for your specific monitor or graphics card.
Changing Refresh Rate on Mac
If you’re using a Mac computer, adjusting the refresh rate of your monitor can easily be done through the system preferences. Follow these steps to change the refresh rate on Mac:
- Click on the Apple menu in the top-left corner of your screen and select “System Preferences” from the dropdown menu.
- In the System Preferences window, click on the “Displays” icon.
- In the Displays window, navigate to the “Display” tab.
- Hold down the Option key on your keyboard and click on the “Scaled” radio button to reveal the available refresh rate options.
- Choose the desired refresh rate from the list of available options.
- Close the System Preferences window to apply the changes.
It’s worth mentioning that the available refresh rate options may vary depending on your specific monitor and the capabilities of your Mac. Some monitors may not support higher refresh rates, or your Mac’s graphics card may have limitations on the available options.
If the desired refresh rate is not available in the scaled options, you may need to consider alternative methods. Certain monitors or adapters may have their own software or control panels that allow for customizing the refresh rate. It’s a good idea to consult the manufacturer’s website or documentation for any additional instructions specific to your monitor or adapter.
In some cases, using third-party software may provide more flexibility in changing the refresh rate on Mac. Tools like SwitchResX or DisplayMenu can offer additional options and finer control over the display settings, including refresh rate adjustment. However, be cautious when using third-party software and ensure that you download them from trusted sources.
After changing the refresh rate, take a moment to observe how your Mac and monitor handle the new setting. If you experience any issues like visual artifacts or instability, consider reverting to the previous refresh rate or consult the support resources for your specific monitor or Mac model.
By adjusting the refresh rate on your Mac, you can optimize your visual experience based on your preferences and the capabilities of your hardware.
Changing Refresh Rate on Linux
Changing the refresh rate on Linux often involves adjusting the display settings through the system’s graphical user interface (GUI) or using command-line tools. Here are instructions for changing the refresh rate on Linux:
Method 1: Through the GUI (X Window System)
- Open the display settings by navigating to the relevant section in your Linux distribution’s system settings. This may vary depending on the desktop environment you are using.
- Look for the display or monitor settings and select the monitor you want to modify if you have multiple monitors connected.
- Locate the refresh rate option and choose the desired refresh rate from the available options in the dropdown menu or slider.
- Apply the changes and close the display settings window for the new refresh rate to take effect.
Method 2: Using xrandr Command-Line Tool
- Open a terminal by pressing Ctrl+Alt+T or through your distribution’s menu.
- Enter the command “xrandr” to display a list of connected monitors and their available resolutions and refresh rates.
- Identify the name of the monitor you want to modify, usually denoted by a combination of letters and numbers (e.g., “DVI-0” or “HDMI-1”).
- Use the command “xrandr –output [monitor name] –rate [refresh rate]” to set the desired refresh rate. Replace “[monitor name]” with the name of your monitor and “[refresh rate]” with the desired refresh rate.
- For example, to set a refresh rate of 75Hz on a monitor named “HDMI-1,” you would use the command: “xrandr –output HDMI-1 –rate 75”.
- Press Enter to execute the command and apply the new refresh rate to the specified monitor.
Keep in mind that the available refresh rate options may depend on your hardware and the capabilities of your graphics card. If the desired refresh rate is not listed, it may indicate that your monitor does not support higher refresh rates or that your graphics card is not capable of driving the display at that refresh rate.
It’s recommended to test the new refresh rate and ensure its stability. If you encounter any issues or experience visual artifacts after changing the refresh rate, consider reverting to the previous setting or consult the support resources specific to your Linux distribution and hardware configuration.
By adjusting the refresh rate on Linux, you can enhance your visual experience, particularly in situations that benefit from smoother motion and reduced motion blur.
Troubleshooting Refresh Rate Issues
While changing the refresh rate of a monitor can often result in a smoother and more responsive display, it’s possible to encounter issues during the process. Here are some troubleshooting steps to help resolve common refresh rate issues:
- Compatibility check: Ensure that the chosen refresh rate is within the supported range of your monitor and graphics card. If the refresh rate exceeds the capabilities of your hardware, it may result in visual artifacts or instability.
- Update graphics drivers: Outdated or incompatible graphics drivers can cause refresh rate issues. Visit the website of your graphics card manufacturer and download the latest drivers for your specific model to ensure optimal performance and compatibility.
- Restart the system: Sometimes, a simple restart can resolve minor display issues. Restart your computer to allow the changes in refresh rate to take effect properly.
- Reset monitor settings: If you experience issues such as distorted or flickering display after changing the refresh rate, try resetting your monitor’s settings to its default values. Refer to the manufacturer’s instructions or user manual for guidance on how to reset your specific monitor model.
- Test different refresh rates: If the selected refresh rate is causing issues, try selecting a different refresh rate within the supported range. This can help identify if the issue is specific to a particular refresh rate or relates to general compatibility problems.
- Check cables and connections: Ensure that the cables connecting your monitor to the graphics card are securely plugged in. Loose or faulty connections can lead to display issues, including problems with the refresh rate.
- Try different ports: If you have multiple video input ports on your monitor, try connecting your graphics card to a different port. This can help determine if the issue is related to a specific port or cable.
- Consult manufacturer support: If you’ve exhausted troubleshooting steps and the issue persists, reach out to the manufacturer’s support for further assistance. They can provide guidance specific to your monitor and help address any underlying issues.
Remember to observe any warning messages or prompts when changing the refresh rate to ensure that the selected rate is within the recommended limits of your hardware. It’s always a good idea to test different refresh rates and monitor for any unusual behavior or visual artifacts before settling on the desired setting.
By following these troubleshooting steps, you can address common refresh rate issues and optimize your display for a smoother and more enjoyable viewing experience.
Benefits of Higher Refresh Rate
Opting for a higher refresh rate on your monitor can bring several benefits to your overall visual experience. Here are some advantages of choosing a higher refresh rate:
- Smoother motion: A higher refresh rate, such as 120Hz or 144Hz, results in smoother motion on the screen. It reduces motion blur and makes fast-paced actions, like gaming or watching action-packed videos, appear clearer and more fluid.
- Reduced motion blur: Higher refresh rates significantly reduce motion blur, which occurs when objects in motion appear blurred or smudged on the screen. This is especially beneficial for fast-moving scenes, ensuring that each frame is displayed more accurately and enhancing the overall image clarity.
- Improved responsiveness: Higher refresh rates provide improved responsiveness, which can be essential for activities like gaming. With a higher refresh rate, the screen updates more frequently, resulting in quicker response times and reduced input lag. This can give gamers a competitive edge by providing faster feedback and more precise control.
- Enhanced gaming experience: Gaming on a higher refresh rate monitor offers a more immersive experience. The increased refresh rate makes the gameplay feel smoother, more lifelike, and more engaging. It allows gamers to better track fast-moving objects, react more quickly, and enjoy a heightened sense of realism.
- Reduced eye strain and fatigue: Higher refresh rates can reduce eye strain and fatigue, particularly during prolonged use. Low refresh rates may cause flickering on the screen, resulting in discomfort and eye strain for some individuals. Increasing the refresh rate provides a more stable and flicker-free display, leading to a more comfortable viewing experience.
- Improved screen visibility: A higher refresh rate can enhance screen visibility, especially in fast-paced content, by minimizing screen tearing. Screen tearing occurs when the monitor displays parts of multiple frames simultaneously, creating a fragmented image. With a higher refresh rate, screen tearing is significantly reduced, resulting in a smoother and more cohesive display.
- Future-proofing your setup: Investing in a higher refresh rate monitor ensures that your setup is future-proof. As technology advances, more content and applications will be optimized for higher refresh rates, making your monitor ready for the latest and most demanding visual experiences.
It’s important to note that to fully experience the benefits of a higher refresh rate, your hardware, particularly your graphics card, should be capable of driving the monitor at that refresh rate. Additionally, not all activities and applications may fully utilize the benefits of a higher refresh rate, so the advantages may vary depending on your specific usage.
Overall, opting for a higher refresh rate monitor can greatly enhance your visual experience, providing smoother motion, reduced motion blur, improved responsiveness, and a more immersive gaming experience. It’s a worthwhile upgrade for those who value high-quality visuals and want to take their gaming or multimedia enjoyment to the next level.