
Adjusting Font Size Settings on an iPhone
When using an iPhone, the default font size may not always be ideal for your reading comfort. Fortunately, Apple provides users with various methods to adjust the font size on their devices. Whether you prefer a larger text size for better readability or a smaller one to fit more content on the screen, you can easily customize the font size settings to suit your needs. In this section, we will explore several methods you can use to change the font size on your iPhone.
Method 1: Changing Font Size in Settings
If you prefer to change the font size system-wide on your iPhone, you can do so by accessing the Settings app. Simply follow these steps:
- Open the Settings app on your iPhone’s home screen.
- Navigate to “Display & Brightness.”
- Locate and select “Text Size.”
- Adjust the Font Size slider to increase or decrease the text size to your preference.
Method 2: Using the Accessibility feature to change Font Size
Another way to modify the font size on your iPhone is by using the built-in Accessibility feature. Here’s how you can do it:
- Open the Settings app on your iPhone.
- Go to “Accessibility.”
- Choose “Accessibility Shortcut.”
- Enable the “Text Size” shortcut.
Method 3: Utilizing the Accessibility Shortcut
Alternatively, you can quickly access the font size settings by utilizing the Accessibility Shortcut. Follow these steps:
- Open the Settings app on your iPhone.
- Go to “Accessibility.”
- Choose “Accessibility Shortcut.”
- Enable the “Text Size” shortcut.
Method 4: Using Dynamic Type in Apps
Some apps, including Apple’s native apps like Mail and Notes, have their own font size settings known as Dynamic Type. To adjust the font size within these apps, follow these steps:
- Access the app you want to modify on your iPhone.
- Navigate to the app’s settings.
- Adjust the Dynamic Type settings to increase or decrease the font size.
Method 5: Applying a Larger Text Size in Safari
If you specifically want to change the font size in the Safari web browser, you can do so by following these steps:
- Open Safari on your iPhone.
- Click on the “Aa” symbol located in the top left corner.
- Choose a larger text size from the options provided.
By utilizing these methods, you can easily adjust the font size on your iPhone to enhance your reading experience across different apps and web pages. Experiment with different font sizes to find the one that suits you best.
Method 1: Changing Font Size in Settings
If you prefer to change the font size system-wide on your iPhone, you can do so by accessing the Settings app. This method allows you to adjust the font size across all apps and menus on your device. To change the font size in settings, follow these steps:
- Open the Settings app on your iPhone’s home screen.
- Navigate to the “Display & Brightness” option. It is usually located near the top of the list.
- Scroll down and locate the “Text Size” option. Tap on it to access the font size settings.
- You will see a slider with a preview sentence at the top. Drag the slider to the right to increase the font size or to the left to decrease it.
- As you move the slider, the preview sentence will reflect the changes in real-time. This allows you to visually assess the impact of adjusting the font size.
- Continue adjusting the slider until you find a font size that is comfortable for your reading needs.
- Once you are satisfied with the font size, simply exit the Settings app. The changes will be applied throughout your device.
By changing the font size in settings, you have the ability to make the texts on your iPhone larger or smaller to suit your preferences. This feature is especially useful for users who struggle with small or fine print, as it can significantly enhance readability across various apps and menus.
Method 2: Using the Accessibility feature to change Font Size
Another convenient way to change the font size on your iPhone is by utilizing the built-in Accessibility feature. This method allows you to quickly adjust the font size without navigating through multiple settings menus. Follow these steps to change the font size using the Accessibility feature:
- Open the Settings app on your iPhone.
- Scroll down and tap on the “Accessibility” option. It is usually represented by an icon of a person in a wheelchair.
- In the Accessibility settings, tap on “Display & Text Size.”
- Under the Display & Text Size section, you will find an option called “Text Size.” Tap on it.
- On the Text Size screen, you will see a slider that allows you to adjust the font size. Drag the slider to the right to increase the font size or to the left to decrease it.
- As you move the slider, the text above it will demonstrate the changes in real-time, giving you a preview of the new font size.
- Continue adjusting the slider until you find a font size that meets your preferences.
- Once you are satisfied with the font size, simply close the Settings app. The changes will be applied throughout your device.
By utilizing the Accessibility feature to change the font size, you can ensure that the texts on your iPhone are easy to read and access. This method is particularly beneficial for individuals with visual impairments or those who prefer larger fonts for enhanced readability.
Step 1: Opening the Settings App
Changing font size on your iPhone involves accessing the Settings app, which serves as the central hub for various device configuration options. To open the Settings app, follow these simple steps:
- Locate the Settings app icon on your iPhone’s home screen. It can usually be identified as a grey icon with gears.
- Tap on the Settings app icon to launch it.
- Once opened, you will be presented with a screen featuring various categories and options that can be customized.
- You can scroll through the list or use the search bar at the top to quickly find specific settings.
- Additionally, you can use the alphabetical index on the right-hand side to jump to a specific section.
- Tap on the desired option or category to access its settings and make necessary adjustments.
The Settings app is where you can customize various aspects of your iPhone’s behavior, appearance, and functionality. It serves as a control center for managing preferences related to connectivity, security, display, sound, accessibility, and much more. Being familiar with opening the Settings app is the first step towards harnessing the full potential of your iPhone and making personalized adjustments, such as changing the font size.
Step 2: Navigating to Display & Brightness
Once you have successfully launched the Settings app on your iPhone, the next step is to navigate to the Display & Brightness settings. This section allows you to adjust various display-related preferences, including font size. To navigate to Display & Brightness, follow these steps:
- On the main screen of the Settings app, scroll down and look for the option labeled “Display & Brightness.” It is usually located in the second or third section of the settings list.
- Once you have located “Display & Brightness,” tap on it to access the corresponding settings.
By tapping on “Display & Brightness,” you will be presented with a range of options to customize your iPhone’s display settings. This section allows you to adjust the brightness level, set the screen timeout duration, enable Dark Mode, and, most importantly, change the font size to suit your preferences.
Understanding how to navigate to Display & Brightness is crucial for accessing the font size settings effectively. By accessing this section, you can further personalize your iPhone’s display and optimize it according to your specific preferences for enhanced readability and visual comfort.
Step 3: Locating and Selecting Text Size
After navigating to the Display & Brightness settings on your iPhone, the next step is to locate and select the Text Size option. This option allows you to modify the font size settings to suit your reading comfort. To locate and select Text Size, follow these steps:
- Within the Display & Brightness settings, scroll down until you see the “Text Size” option. It is usually located towards the top of the list.
- Once you have located “Text Size,” tap on it to access the font size settings.
By selecting the Text Size option, you will be taken to a screen that displays a preview sentence along with a slider. This slider enables you to adjust the font size according to your preference. It is important to note that the changes made here will affect the font size across various apps and menus on your iPhone.
Navigating to and selecting the Text Size option is essential for modifying the font size settings on your iPhone. This step allows you to proceed with adjusting the font size to ensure comfortable and legible text for an enhanced reading experience across your device.
Step 4: Adjusting the Font Size Slider
Once you have accessed the font size settings by selecting the Text Size option, the next step is to adjust the font size using the slider. This slider allows you to increase or decrease the font size according to your preference. To adjust the font size slider, follow these steps:
- On the font size settings screen, you will see a slider that controls the font size. It is represented by a draggable button.
- Drag the slider to the right to increase the font size or to the left to decrease it.
- As you move the slider, you will notice a preview sentence at the top of the screen. This sentence dynamically adjusts based on the font size changes you make, allowing you to see a real-time preview of the new font size.
- Continue adjusting the slider until you find a font size that is comfortable for your reading needs. You can experiment with different sizes until you find the one that suits you best.
- Once you are satisfied with the font size, you can exit the font size settings screen by tapping the back button or closing the Settings app. The changes you made to the font size will be applied throughout your iPhone.
Adjusting the font size slider gives you the flexibility to customize the font size on your iPhone according to your specific preferences. Whether you prefer a larger font for better readability or a smaller font to fit more content on the screen, this step enables you to find the perfect balance for your personal comfort.
Method 3: Utilizing the Accessibility Shortcut
Another convenient way to change the font size on your iPhone is by utilizing the Accessibility Shortcut feature. This method allows you to quickly access the font size settings with just a few taps. Follow these steps to utilize the Accessibility Shortcut for adjusting the font size:
- Open the Settings app on your iPhone.
- Scroll down and tap on the “Accessibility” option. It is usually represented by an icon of a person in a wheelchair.
- Within the Accessibility settings, tap on “Accessibility Shortcut.”
- You will be presented with a list of accessibility features that can be enabled as shortcuts.
- Scroll down and locate the “Text Size” option. Tap on the toggle switch next to it to enable the Text Size shortcut.
- Once the Text Size shortcut is enabled, you can now access the font size settings quickly by triple-pressing the Home or Side button, depending on your iPhone model.
- After triple-pressing the Home or Side button, a menu will appear with various accessibility features. Tap on “Text Size” to access the font size settings directly.
- Adjust the font size using the slider or other options available.
- Once you are satisfied with the font size, exit the font size settings and continue using your iPhone.
By utilizing the Accessibility Shortcut, you can easily access the font size settings whenever you need to make quick adjustments. This method is particularly useful for individuals who frequently change the font size or require larger text sizes for better readability.
Step 1: Opening the Settings App
Changing the font size on your iPhone involves navigating through the Settings app. This app serves as the central hub for all customization options on your device. To open the Settings app and begin adjusting the font size, follow these steps:
- Locate the Settings app icon on your iPhone’s home screen. The icon resembles a set of gears and is typically located in a prominent position.
- Tap on the Settings app icon to launch it. This will open the main settings menu on your device.
- Once the Settings app is open, you will see a list of different categories and options that can be configured.
- Scroll through the settings list to explore the various customization options available.
- If you have a specific setting in mind and don’t want to scroll through the entire list, you can use the search bar at the top of the screen to quickly find a specific setting by typing in keywords.
- Alternatively, you can use the alphabetical index located on the right-hand side of the screen to jump to a specific section by tapping on a letter.
- Tap on the desired category or option to access its settings and make the necessary adjustments.
The Settings app is where you can customize various aspects of your iPhone, including font size. Familiarizing yourself with opening the Settings app is the first step towards accessing settings that can enhance your overall user experience.
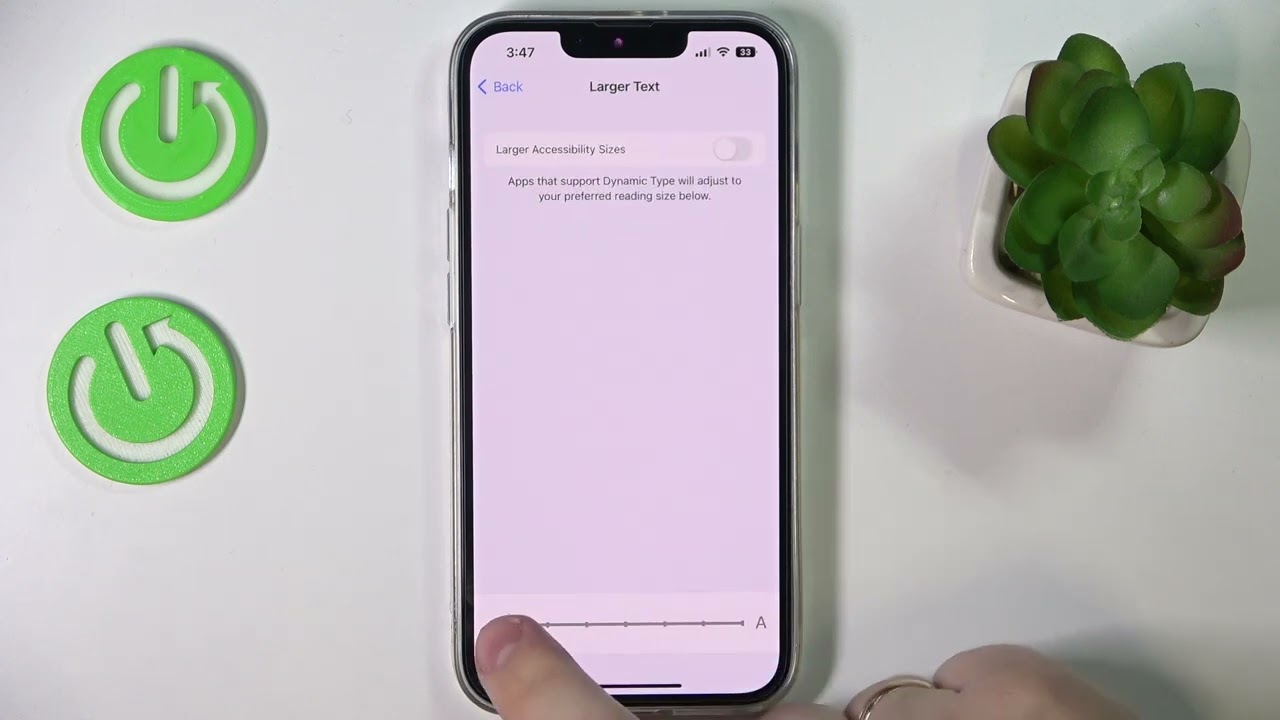
Step 2: Going to Accessibility
Once you have successfully opened the Settings app on your iPhone, the next step is to navigate to the Accessibility settings. This section allows you to configure various accessibility features, including the font size. To go to Accessibility on your iPhone, follow these steps:
- On the main screen of the Settings app, scroll down until you find the “Accessibility” option. It is usually represented by an icon of a person in a wheelchair.
- Tap on the “Accessibility” option to access the accessibility settings on your device.
Entering the Accessibility settings is essential for customizing various features to make your iPhone more accessible and user-friendly. This section offers a range of options designed to assist users with visual impairments, hearing difficulties, motor limitations, and more. To adjust the font size, you will need to access the settings within the Accessibility section.
By going to Accessibility, you can explore and utilize a wide range of features that can enhance your iPhone experience and make it more accessible according to your unique needs and preferences.
Step 3: Choosing Accessibility Shortcut
Once you have accessed the Accessibility settings on your iPhone, the next step is to choose the Accessibility Shortcut option. This allows you to enable a shortcut that provides quick access to frequently used accessibility features, including the font size settings. To choose the Accessibility Shortcut, follow these steps:
- Within the Accessibility settings, scroll down until you find the “Accessibility Shortcut” option. Tap on it to access the available shortcuts.
- You will see a list of accessibility features that can be enabled as shortcuts.
- Locate the “Text Size” option within the list and tap the toggle switch next to it to enable the Text Size shortcut.
- Once the Text Size shortcut is enabled, you can now access the font size settings quickly and easily.
Enabling the Accessibility Shortcut for Text Size provides a convenient way to access the font size settings without navigating through multiple menus. This shortcut can be triggered by triple-pressing the Home or Side button (depending on your iPhone model), instantly giving you access to adjust the font size.
Choosing the Accessibility Shortcut allows you to make on-the-fly adjustments to the font size whenever you need to without the need to navigate extensively within the settings. This can be particularly useful for individuals who frequently change the font size or require larger text sizes for improved readability.
Step 4: Enabling the Text Size Shortcut
After accessing the Accessibility settings and choosing the Accessibility Shortcut, the next step is to enable the Text Size shortcut specifically. Enabling this shortcut allows you to quickly access the font size settings on your iPhone. To enable the Text Size shortcut, follow these steps:
- Within the Accessibility settings, locate the “Text Size” option, which you previously selected to enable the shortcut.
- Tap the toggle switch next to “Text Size” to enable the shortcut.
Once the Text Size shortcut is enabled, you can quickly access the font size settings by performing a triple-press of the Home or Side button (depending on your iPhone model). This action will open a menu that includes a variety of accessibility features, including the Text Size option.
By enabling the Text Size shortcut, you gain immediate and convenient access to adjust the font size settings whenever it is needed. This shortcut provides a time-saving solution for individuals who frequently modify the font size or require larger text for easier reading.
Method 4: Using Dynamic Type in Apps
If you prefer to adjust the font size within specific apps on your iPhone, you can make use of the Dynamic Type feature. Dynamic Type allows apps to adapt the text size based on your preferred settings. This method is especially useful for apps that support Dynamic Type, such as Apple’s native apps like Mail and Notes. To use Dynamic Type to adjust the font size in apps, follow these steps:
- Access the app on your iPhone in which you want to modify the font size.
- Navigate to the app’s settings or preferences. This location may vary depending on the app.
- Look for an option related to “Text” or “Font Size.”
- Within the settings, you will find options to adjust the font size using a slider or predefined sizes.
- Slide the font size adjuster to the right to increase the font size or to the left to decrease it. Alternatively, choose a larger or smaller predefined font size from the list, if available.
- Observe the changes in the app’s font size as you make adjustments.
- Continue modifying the font size until you find a size that is comfortable for you.
- Exit the app’s settings or preferences, and the new font size will be applied within that app.
Using Dynamic Type in apps gives you more granular control over the font size within specific applications. It allows you to tailor the reading experience to your liking, making it easier to read and comprehend the content within the app.
Note that not all apps support Dynamic Type, so the availability of this feature may vary depending on the apps you use. However, many popular apps do support it, including Apple’s native apps and many third-party apps. Exploring the settings or preferences within each app can help you discover if Dynamic Type is available and make font size adjustments accordingly.
Step 1: Accessing the App you want to Modify
To modify the font size within a specific app on your iPhone using the Dynamic Type feature, you first need to access the app you wish to modify. Follow these steps to access the app you want to modify:
- Locate the app on your iPhone’s home screen or in the app library. The app’s icon and name should be easily recognizable.
- Tap on the app’s icon to launch it and open the app on your device.
By tapping on the app’s icon, you will enter the specific app you are targeting to modify the font size settings. This could be any app that supports Dynamic Type, such as Apple’s native apps like Mail, Notes, or third-party apps that implement this feature.
It’s important to note that the process of accessing the app may vary depending on your home screen layout, whether you have folders or use the app library, or if you have organized your apps in any specific way. Regardless, the primary goal is to find and tap on the app’s icon to launch it.
Once you have accessed the app, you can proceed further to navigate to its settings or preferences to modify the font size and personalize your reading experience.
Step 2: Navigating to App’s Settings
After accessing the app you wish to modify the font size in, the next step is to navigate to the settings or preferences within the app. Here’s how to navigate to the app’s settings:
- Look for the “Settings” or “Options” menu within the app. It is usually represented by an icon or labeled as such.
- Tap on the “Settings” or “Options” menu to open it.
- In some apps, you may find the font size settings directly in the main menu. In other cases, you may need to explore submenus or categories related to appearance or display options.
- If you are having trouble finding the font size settings, you can refer to the app’s documentation or help section for specific instructions.
By navigating to the app’s settings, you gain access to the specific configuration options available within that app. These settings allow you to customize various aspects of the app’s functionality, appearance, and, in this case, the font size.
Note that the location and terminology of the settings may vary from app to app. Some apps may label it as “Font Size,” while others may use terms like “Text Size,” “Display Options,” or “Appearance.” Taking the time to explore the app’s settings will help you locate the font size options and proceed with modifying it to your preference.
Once you have successfully navigated to the app’s settings, you can proceed to the next step of adjusting the dynamic font size according to your needs.
Step 3: Adjusting the Dynamic Type Settings
After navigating to the settings or preferences of the app you want to modify the font size in, the next step is to locate and adjust the Dynamic Type settings. Dynamic Type settings allow you to customize the font size according to your preference. To adjust the Dynamic Type settings, follow these steps:
- Within the app’s settings, look for an option related to “Text Size,” “Font Size,” or “Dynamic Type.” The exact terminology may vary depending on the app.
- Tap on the “Text Size,” “Font Size,” or “Dynamic Type” option to access the available font size settings.
- In some apps, you may find a slider that allows you to adjust the font size. Slide the adjuster to the right to increase the font size or to the left to decrease it.
- Alternatively, some apps may provide predefined font size options. Tap on the desired font size to select it.
- Observe the changes in the text size within the app as you make adjustments.
- Continue modifying the Dynamic Type settings until you find a font size that is comfortable for you.
- Once you are satisfied with the font size, exit the app’s settings or preferences. The new dynamic font size will be applied throughout the app.
The Dynamic Type settings allow you to personalize the font size within the specific app, making it easier to read and improve your overall user experience. By adjusting the font size in apps that support Dynamic Type, you can fine-tune the reading comfort according to your preferences.
Keep in mind that the availability and location of the Dynamic Type settings may vary depending on each app’s design and development. If you are having trouble locating the font size settings, refer to the app’s documentation or support resources for specific instructions.
Experiment with different font sizes until you find the one that suits your needs, enhancing readability and ensuring a more enjoyable experience within the app.
Method 5: Applying a Larger Text Size in Safari
If you specifically want to change the font size while browsing through Safari on your iPhone, you can adjust the text size to make it larger and more legible. Follow these steps to apply a larger text size in Safari:
- Open the Safari app on your iPhone. The Safari icon resembles a compass.
- Once Safari is open, navigate to the webpage where you want to adjust the font size.
- In the top left corner of the Safari screen, you will see an “Aa” symbol. Tap on this symbol.
- A menu will appear with various text size options. Tap on the larger “A” to increase the font size.
- Observe the changes in the text size on the webpage as you select a larger text size.
- If necessary, you can repeat the process and tap on the larger “A” multiple times to incrementally increase the font size further.
- To decrease the font size, tap on the smaller “A” in the menu.
- Continue adjusting the font size until the text is of a comfortable size for your reading needs.
- Once you are satisfied with the font size, you can continue browsing the webpage with the newly applied larger text size.
Applying a larger text size in Safari allows you to read web content more comfortably, ensuring that the text is easily readable on your iPhone’s screen. This feature is particularly useful for individuals who prefer larger text or have visual impairments that require a bigger font size for improved legibility.
Keep in mind that the font size adjustments in Safari are applied on a per-page basis, meaning that the changes made will only affect the current webpage. If you navigate to a different webpage, the text size settings will reset, and you will need to reapply the larger text size if desired.
Step 1: Opening Safari
To apply a larger text size in Safari on your iPhone, the first step is to open the Safari app. Safari is the default web browser on iOS devices and allows you to browse the internet seamlessly. Follow these steps to open Safari:
- Locate the Safari app on your iPhone’s home screen. The Safari icon is a compass-like image and is usually found in the lower row of icons or in a folder labeled “Utilities.”
- Tap on the Safari app icon to launch the browser.
- Safari will load with the default homepage or the last webpage you visited.
Once you have opened Safari, you can proceed to access web pages and apply a larger text size for better readability.
Safari offers a user-friendly browsing experience with a range of features, including the ability to adjust the text size to suit your needs. Whether you want to read articles, browse websites, or perform online activities, Safari offers a seamless platform for accessing web content on your iPhone.
By following the first step of opening Safari, you are ready to proceed to the next steps and make adjustments to the text size.
Step 2: Clicking on the “Aa” Symbol
After opening Safari on your iPhone, the next step is to locate and click on the “Aa” symbol. This symbol represents the text size options in Safari and allows you to adjust the font size of the webpage you are currently viewing. Follow these steps to access the “Aa” symbol:
- In the top left corner of the Safari screen, you will find an “Aa” symbol. It resembles two lowercase letter “a”s.
- Tap on the “Aa” symbol to open a menu with text size options.
By tapping on the “Aa” symbol, you enable access to the options for adjusting the font size within Safari. This symbol ensures quick and convenient access to the text size settings without having to navigate through menus or settings screens.
Safari’s “Aa” symbol is designed to prioritize ease of use and offers a straightforward way to modify the font size on individual webpages for better readability. It’s particularly helpful for those who prefer larger text sizes or have visual impairments that require a more comfortable reading experience.
Now that you have clicked on the “Aa” symbol, you can proceed to the next step and select the desired text size from the menu that appears.
Step 3: Choosing a Larger Text Size
After clicking on the “Aa” symbol in Safari, the next step is to choose a larger text size from the menu. This menu provides a range of text size options, allowing you to set the desired font size for better readability. Follow these steps to select a larger text size:
- Upon tapping the “Aa” symbol, a menu with text size options will appear.
- Inside the menu, you will see a list of different text sizes represented by the letter “A” next to a slider.
- To increase the font size, tap on the larger “A” in the menu. This will make the text size bigger, enhancing legibility.
- Observe the changes in the text size on the webpage as you select a larger text size. The content will dynamically adjust according to your selection.
- If necessary, you can tap on the larger “A” multiple times to incrementally increase the font size further.
- To decrease the font size, tap on the smaller “A” in the menu. This will reduce the text size.
- Continue choosing different text sizes until you find one that offers the optimal reading experience for you.
- Once you have selected the desired text size, you can start reading the webpage with the larger font size applied.
Choosing a larger text size in Safari allows you to customize the reading experience to your preferences, ensuring that the web content is comfortably legible on your iPhone’s screen. By selecting a larger text size, you can enhance readability and make browsing a more enjoyable and accessible experience.
For individuals with visual impairments or those who prefer larger text sizes for ease of reading, this feature in Safari makes it easier to consume web content without straining the eyes.
Now that you have chosen a larger text size, you can continue browsing the webpage with the new font size applied based on your selection.
Final Thoughts
Adjusting the font size on your iPhone is a valuable customization feature that allows you to enhance your reading experience, improve legibility, and tailor the device to your specific preferences. Whether you need larger text sizes for better visibility or smaller ones to fit more content on the screen, the methods explored in this guide provide you with various options to achieve your desired font size.
By navigating through the Settings app and utilizing the Accessibility features, you can make system-wide changes to the font size on your iPhone. Accessing the app settings allows you to modify the font size within specific applications, with the support of Dynamic Type or dedicated text size options. Additionally, Safari offers its own adjustments to apply a larger text size while browsing the web.
Experimenting with different font sizes is key to finding what works best for you and your visual comfort. Adjusting the font size to suit your needs can make a significant difference in reading ease and reduce eye strain, particularly for individuals with visual impairments or those who prefer larger text sizes.
Remember to explore the available options and settings on your iPhone, as each app and feature may offer unique customization possibilities beyond font adjustment. By maximizing your control over the device’s font size, you can ensure that text is clear and legible, allowing you to enjoy a more comfortable and personalized user experience.
Take the time to find the font size that suits your preferences, and enjoy an enhanced reading experience on your iPhone.