
Find the Settings app
Changing the desktop background in Windows is a simple and enjoyable way to personalize your computer and make it feel more like your own. Whether you want to use a beautiful nature photo or a personal picture, Windows provides various options to customize your desktop background. To get started, you will need to find the Settings app, which is where you can access all the customization options in Windows.
To find the Settings app, there are a few different methods you can use. One way is to click on the Start button located in the bottom-left corner of your screen. This will open the Start menu, where you will find a gear icon on the left side. Clicking on this gear icon will open the Settings app.
Another method to find the Settings app is by using the keyboard shortcut. Simply press the Windows key + I on your keyboard at the same time, and the Settings app will open directly. This shortcut is a quick and convenient way to access the settings in Windows.
Additionally, you can also use the search function to find the Settings app. Click on the search bar located on the taskbar, type “Settings” into the search box, and then click on the Settings app from the search results.
Once you have found the Settings app, you are ready to start changing your desktop background. The next section will guide you through the steps to open the Personalization settings in Windows.
Open the Personalization settings
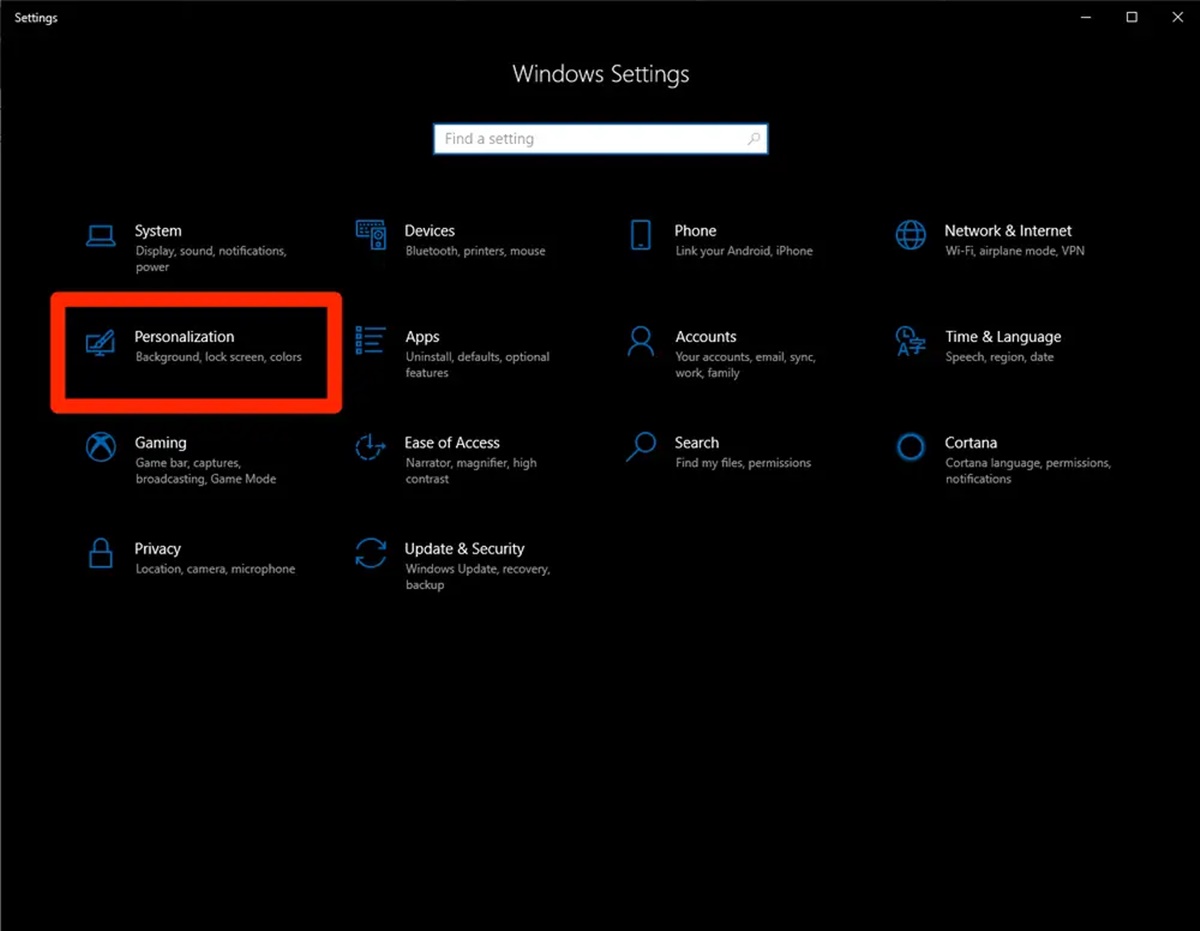
After finding the Settings app, the next step is to open the Personalization settings. This is where you can customize various aspects of your Windows experience, including the desktop background.
To open the Personalization settings, first, click on the “Personalization” option in the Settings app. You can find this option in the main menu of the app, usually represented by an icon that resembles a paintbrush or a monitor.
When you click on the “Personalization” option, a new window will open with a range of customization options. These options allow you to change the look and feel of your Windows environment to suit your preferences.
Alternatively, you can use the search function within the Settings app to find the Personalization settings. Type “Personalization” into the search bar and select the “Personalization” option from the search results.
Once you have opened the Personalization settings, you will be presented with a variety of customization options. These include themes, colors, fonts, and, of course, the desktop background.
Now that you have successfully accessed the Personalization settings, you are one step closer to changing your desktop background. The next section will walk you through the process of clicking on the Background tab, where you can choose from a selection of pre-installed wallpapers or select a custom image of your choosing.
Click on the Background tab
Once you have opened the Personalization settings, it’s time to navigate to the Background tab. This tab is where you can choose the new desktop background for your Windows computer.
To access the Background tab, look for the “Background” option in the menu on the left-hand side of the Personalization settings window. It is typically represented by an icon with a picture or landscape symbol.
Clicking on the “Background” option will display a variety of background customization options. These options allow you to choose from a selection of pre-installed wallpapers or even use your own custom image as the desktop background.
When you first open the Background tab, you will see a set of pre-installed wallpaper options to choose from. These wallpapers are organized into different categories, such as nature, art, and solid colors. Simply click on the image you like, and it will instantly apply as your new desktop background.
If you prefer to use your own image, you can click on the “Browse” button, usually located below the pre-installed wallpaper options. This will open a file explorer window where you can navigate to the location of your desired image. Once you have selected your image, click “Choose picture,” and it will be set as your new desktop background.
Furthermore, the Background tab also provides additional personalization options. You can choose how the selected background image is displayed on your desktop by adjusting the “Picture position” setting. This allows you to stretch, fill, or fit the image based on your preference.
Once you have chosen your desired background image and adjusted the display settings, you are ready to give your desktop a fresh new look. The following sections will explain how to set a slideshow as your desktop background, change the background picture at regular intervals, or set a solid color as the background.
Choose a new background image from the options
When it comes to changing your Windows desktop background, you have the option to choose from a variety of pre-installed wallpaper options. These wallpapers are categorized based on different themes and styles, allowing you to find the perfect image that matches your preferences.
To choose a new background image from the options provided by Windows, follow these simple steps:
- Open the Personalization settings as explained in the previous section.
- Click on the “Background” option in the menu on the left-hand side of the window.
- In the Background tab, you will see a range of pre-installed wallpapers displayed.
- Browse through the collection of wallpapers organized into different categories such as nature, art, and solid colors.
- Click on the image you like to preview it as your desktop background.
- If you are satisfied with the selection, simply close the Personalization settings, and the chosen image will be set as your new background.
Windows provides a wide variety of beautiful and captivating images to suit different tastes and moods. Whether you prefer serene landscapes, vibrant artwork, or simplistic designs, there is a background image for everyone.
Exploring the available options can be an enjoyable experience, as you get to discover stunning visuals that reflect your personal style and preferences. Take your time to browse through the categorized wallpapers, and when you find the one that catches your eye, simply click on it to instantly apply it as your desktop background.
Changing your desktop background allows you to inject personality into your computer and create an aesthetic environment that suits your mood and style. Now that you know how to choose a new background image from the options provided by Windows, you can easily refresh your desktop with a simple click.
Select a folder to choose a custom background image
If the pre-installed wallpaper options in Windows do not satisfy your preferences, you have the option to choose a custom background image of your own. This allows you to use personal photos, artworks, or any image that resonates with you as your desktop background. To select a folder that contains your custom background image, follow these steps:
- Open the Personalization settings as explained in the earlier sections.
- Click on the “Background” option in the menu on the left side of the window.
- In the Background tab, you will find the pre-installed wallpaper options.
- Beneath those options, you will see a button labeled “Browse.” Click on this button to open the file explorer window.
- Navigate to the folder where your desired custom background image is located.
- Once you have selected the folder, click on “Choose picture” to proceed.
By doing this, Windows will display all the images within the selected folder as potential background options. You can easily preview these images by simply clicking on them. If you are satisfied with a specific image, select it and close the Personalization settings. The chosen image will now be your custom background.
Selecting a folder to choose a custom background image gives you the opportunity to incorporate personal memories, favorite artworks, or stunning photographs into your desktop environment. It allows you to be creative and create a unique user experience that reflects your own style and preferences.
While selecting a folder, you can organize your images into different categories such as travel, family, or nature to make it easier to browse through and find the right image for the right occasion. This way, you can effectively customize your desktop background to suit your mood or the tasks you are working on.
With the ability to choose a custom background image folder, Windows provides flexibility and allows you to curate your own personal gallery of desktop backgrounds. So, go ahead and explore your collection of images, find the perfect one, and breathe new life into your desktop.
Adjust the position, fill, and colors of the background image
Once you have selected a background image for your Windows desktop, you have the option to further customize its appearance by adjusting the position, fill, and colors of the image. This allows you to fine-tune the visual aspects of the background and ensure it fits your screen and personal preferences perfectly.
To adjust the position, fill, and colors of the background image, follow these steps:
- Open the Personalization settings if you haven’t done so already.
- Click on the “Background” option in the menu on the left-hand side of the window.
- In the Background tab, select the background image you want to customize.
- Below the image preview, you will find the “Choose a fit” dropdown menu.
- Click on the dropdown menu to reveal the available image fill options:
- Fill: This option resizes the image to completely fill the screen, potentially cropping parts of the image if necessary.
- Fit: This option resizes the image to fit the screen without cropping any parts of the image. There may be empty areas around the image.
- Stretch: This option stretches the image to fit the screen, possibly distorting the original aspect ratio.
- Tile: This option repeats the image to fill the screen by tiling multiple copies of the image.
- Center: This option positions the image at the center of the screen without resizing it.
- Select the filling option that best suits your preferences.
- Additionally, you can choose whether you want the image to be displayed on a single monitor or on all connected monitors if you are using a multi-monitor setup.
- Next, you can also adjust the colors of the background image using the “Choose your accent color” option.
- Click on the color you prefer, or click on “Custom color” to select a specific color from the color palette.
By adjusting the position, fill, and colors of the background image, you can ensure the image fits perfectly on your screen and matches your desired look and feel. Whether you want the image to fill the entire screen, maintain its aspect ratio, or choose a specific accent color to complement the image, Windows provides the flexibility to make these customizations effortlessly.
Take your time to experiment with different options and find the combination that enhances your desktop experience and brings out the best in your chosen background image.
Set a slideshow as the desktop background
Instead of having a static background image, Windows provides an option to set a slideshow as your desktop background. This allows you to have a dynamic and ever-changing display of images that can add a refreshing touch to your desktop experience.
To set a slideshow as your desktop background, follow these steps:
- Open the Personalization settings as mentioned earlier.
- Click on the “Background” option in the menu on the left-hand side of the window.
- In the Background tab, select the “Slideshow” option from the “Background” dropdown menu.
- Click on the “Browse” button to select the folder that contains the images you want to include in the slideshow.
- Once you have selected the folder, click on “Choose this folder” to confirm your selection.
- Next, you will find the “Change picture every” dropdown menu where you can specify the time interval for image transitions.
- Choose a duration from the available options or enter a custom time interval for the image rotation.
- Now, you can also choose the “Shuffle” option if you want the images to appear in a random order within the slideshow.
- Lastly, you have the option to select whether the slideshow is displayed on a single monitor or on all connected monitors for multi-monitor setups.
After configuring the slideshow settings, the selected images within the chosen folder will start rotating as your desktop background. Each image will be displayed for the specified time interval before transitioning to the next image in the slideshow.
Setting a slideshow as your desktop background enables you to enjoy a variety of images on a regular basis, providing a fresh and dynamic experience each time you use your computer. This feature is especially useful for showcasing your favorite photos, artwork, or inspirational images.
Feel free to experiment with different folders, time intervals, and image options to create a personalized slideshow that perfectly suits your preferences. With the ability to set a slideshow as your desktop background, Windows allows you to transform your desktop into a constantly evolving visual showcase.
Change the background picture at regular intervals
If you prefer to have a different background picture on your desktop at regular intervals, Windows offers a feature that allows you to automatically change the background image based on a predefined schedule. This provides a fresh and dynamic look to your desktop, as it presents you with a new image every time the scheduled change occurs.
To change the background picture at regular intervals, follow these steps:
- Open the Personalization settings as mentioned earlier.
- Click on the “Background” option in the menu on the left-hand side of the window.
- In the Background tab, select the “Slideshow” option from the “Background” dropdown menu.
- Click on the “Browse” button to select the folder that contains the images you want to include in the rotation.
- Once you have selected the folder, click on “Choose this folder” to confirm your selection.
- In the “Change picture every” dropdown menu, choose the desired time interval for the background picture change.
- You can select a predefined time interval or enter a custom duration to suit your preferences.
- To enable further personalization, you can choose the “Shuffle” option to have the images displayed in a random order.
- Finally, specify whether the rotation should apply to a single monitor or all connected monitors in a multi-monitor setup.
Once you have configured the settings, Windows will automatically cycle through the images within the selected folder based on the specified time interval. Each picture will be displayed as the background for the designated duration before transitioning to the next image in the rotation.
This feature is especially useful if you have a vast collection of images that you would like to showcase on your desktop. It allows you to enjoy a different background picture at regular intervals, injecting variety and spontaneity into your computing experience.
Feel free to experiment with different time intervals, image folders, and shuffle options to create a background picture rotation that suits your taste. With the ability to change the background picture at regular intervals, Windows empowers you to personalize your desktop environment and keep it visually engaging.
Set a solid color as the desktop background
In addition to using images as your desktop background, Windows also provides the option to set a solid color as the background. This minimalist approach allows you to create a clean and visually simple desktop environment. Setting a solid color as the desktop background can be a great choice if you prefer a distraction-free workspace or if you want to match the background with a specific color scheme.
To set a solid color as your desktop background in Windows, follow these simple steps:
- Open the Personalization settings as mentioned earlier.
- Click on the “Background” option in the menu on the left-hand side of the window.
- In the Background tab, select the “Solid color” option from the “Background” dropdown menu.
- Once you choose the “Solid color” option, a palette of color options will appear below.
- Click on the color you want to use as your desktop background. You can choose from the predefined color options, or you can select “Custom color” to create a custom color.
- If you choose “Custom color,” a color picker will appear, allowing you to select a specific color by adjusting the sliders for hue, saturation, and brightness.
- Once you have chosen your preferred solid color, the background of your desktop will change accordingly.
Setting a solid color as your desktop background offers a sleek and minimalistic look. It eliminates distractions and allows your focus to remain on the tasks at hand. Moreover, it can also be beneficial for those who may find images or wallpapers visually overwhelming or distracting.
The ability to choose a custom color further reinforces the personalization aspect, as you can select a color that resonates with you or matches your preferred aesthetic. This way, your desktop background becomes an extension of your unique style and preferences.
Feel free to experiment with different colors and find the one that brings a sense of calm, creativity, or inspiration to your desktop. Whether it’s a bold and vibrant hue or a subtle and soothing shade, setting a solid color as your desktop background offers a refreshing change and allows you to tailor your computing environment to your liking.
Reset the default Windows background
If you have customized your Windows desktop background and want to revert back to the original default background provided by Windows, you can easily reset it. This can be useful if you are no longer satisfied with your current background or if you simply want to start fresh with a clean and familiar look.
To reset the default Windows background, follow these steps:
- Open the Personalization settings as mentioned earlier.
- Click on the “Background” option in the menu on the left-hand side of the window.
- In the Background tab, scroll down until you find the “Choose a fit” dropdown menu.
- In the “Choose a fit” dropdown menu, select either “Fill,” “Fit,” or “Stretch” depending on your preference.
- Below the “Choose a fit” dropdown menu, you will find the “Browse” button. Click on it to open the file explorer window.
- Navigate to the following location: C:\Windows\Web\Wallpaper
- Select the folder named “Windows” and click on “Choose this folder.”
By following these steps, you will reset the default Windows background to the original wallpaper collection provided by Windows. This collection includes a range of high-quality images, nature scenes, artistic creations, and more.
Resetting the default Windows background brings your desktop back to its initial state, undoing any customization you might have made. It can be a convenient way to restore a clean and familiar look if you no longer wish to have a personalized background.
Keep in mind that resetting the default Windows background will remove any previously selected custom images or slideshow settings. However, if you have a backup or have saved your preferred images, you can always reapply them after resetting the default background to further personalize your desktop.
With the option to reset the default Windows background, you have the flexibility to switch between customized backgrounds and the familiar Windows provided wallpapers whenever you desire.