
Overview
Changing your home address on Google Maps is a straightforward process that ensures accurate location information for yourself and others. Whether you have moved to a new residence or need to update an existing address, Google Maps provides a user-friendly interface to facilitate this change. By following a few simple steps, you can easily edit your home address on Google Maps and ensure that it reflects your current location.
Updating your home address on Google Maps offers numerous benefits. It ensures that your friends, family, and acquaintances have accurate directions when visiting your home. It also allows you to receive location-based recommendations and services tailored to your new address. By keeping your address up to date, you can enhance your overall Google Maps experience.
In this step-by-step guide, we will walk you through the process of changing your home address on Google Maps. Whether you’re using a computer or a mobile device, the steps are relatively similar. So, let’s dive in and update your home address on Google Maps!
Step 1: Sign in to Your Google Account
Before you begin updating your home address on Google Maps, you’ll need to ensure that you’re signed in to your Google account. This allows you to access and make changes to your personal information seamlessly.
To sign in to your Google account, follow these simple steps:
- Open a web browser on your computer or launch the Google Maps app on your mobile device.
- Click on the “Sign In” button located at the top right corner of the Google Maps page. If you’re using the mobile app, tap the menu icon (represented by three horizontal lines) and select “Sign In”.
- Enter your Google account email address or phone number in the provided field.
- Click “Next” and enter your password on the following screen. If you’re using a trusted device, you can enable the “Stay Signed In” option for quicker access in the future.
- Click “Next” again to complete the sign-in process.
Once you’re signed in, you’ll have access to various Google services, including Google Maps, where you can proceed to update your home address.
It’s important to note that if you don’t have a Google account, you’ll need to create one by clicking on the “Create Account” option during the sign-in process. This will allow you to enjoy the full features and benefits that Google Maps has to offer.
Step 2: Open Google Maps
Once you’ve signed in to your Google account, the next step is to open Google Maps. This can be done easily on your computer or mobile device.
Follow these steps to open Google Maps:
- On your computer, open a web browser and go to https://maps.google.com.
- If you’re using a mobile device, locate and tap on the Google Maps app icon to launch it.
By opening Google Maps, you’ll gain access to its interactive map interface, which allows you to search for locations, get directions, and make updates to your home address.
It’s worth noting that Google Maps also offers a wide range of additional features, such as real-time traffic updates, transit information, and satellite imagery. You can explore these features and customize your map view to suit your preferences.
Once you’ve successfully opened Google Maps, you’re ready to proceed to the next step and locate your current home address.
Step 3: Locate Your Current Home Address
Before editing your home address on Google Maps, it’s essential to locate your current home address on the map. This step ensures that you’re making changes to the correct location.
Here’s how you can locate your current home address on Google Maps:
- On the Google Maps homepage or app, use the search bar at the top of the screen to enter your current home address.
- As you start typing, Google Maps will suggest possible matches based on your input. Select the correct address from the list of suggestions.
- The map will then zoom in to display the location of your current home address. You can use the zoom controls or double-click on the map to adjust the view as needed.
If you’re unsure about the accuracy of the displayed address, you can verify it by comparing it with any physical landmarks or neighboring locations.
Locating your current home address on Google Maps is essential to ensure that you’re updating the correct location. By completing this step, you can proceed with confidence to edit your home address in the next step.
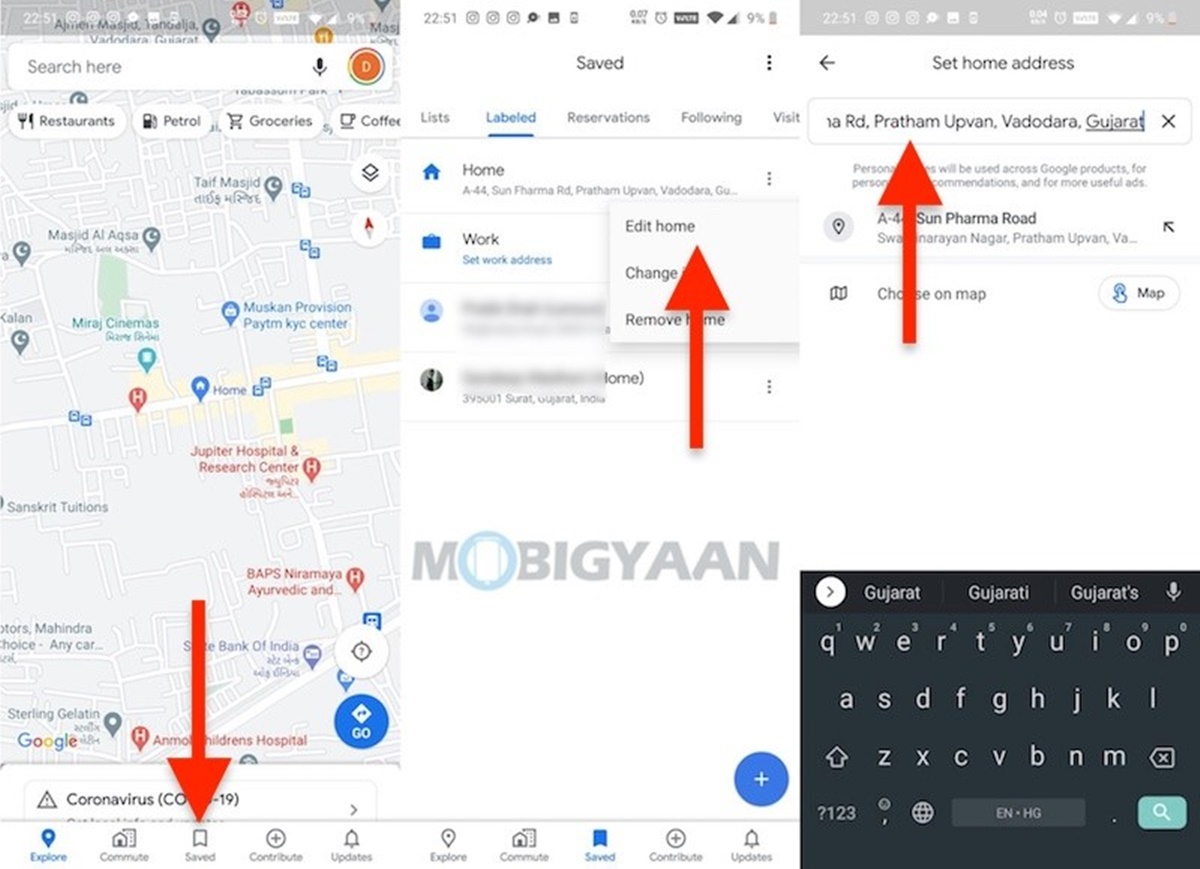
Step 4: Edit Your Home Address
With the location of your current home address identified on Google Maps, it’s time to proceed with editing the address to reflect your new or updated information. Google Maps provides a simple and intuitive interface for making these changes.
Follow these steps to edit your home address on Google Maps:
- In the search bar at the top of the Google Maps page or app, click on the address that is currently displayed for your home. This will open a small window with additional details about the location.
- Click on the “Edit” button or the pencil icon next to the displayed address. This will enable you to make changes to your home address.
- Update the address fields with your new or updated home information. You can include the street name and number, city, state, postal code, and any other relevant details.
- As you enter the new address details, Google Maps may provide suggestions or auto-fill options based on commonly used addresses in your area. Select the correct address from the available options.
While editing your home address, it’s important to be accurate and provide the correct information to ensure reliable directions and location services.
If you’re moving to a new location or the changes you’re making are significant, it may be helpful to double-check the updated address and compare it with official documentation or other reliable sources.
By successfully editing your home address on Google Maps, you’re one step closer to ensuring accurate location information on this widely-used platform.
Step 5: Save Changes
After editing your home address on Google Maps, it’s crucial to save the changes to finalize the update. Saving the changes ensures that your new or updated home address is accurately reflected on Google Maps.
Here’s how you can save the changes to your home address:
- Once you’ve finished editing the address fields, review the information to ensure its accuracy.
- Click on the “Save” button or the checkmark icon located in the window where you made the edits.
- Google Maps will then update the displayed address on the map and save your changes.
Upon saving the changes, you will see the updated home address displayed on Google Maps. This new address will be used for location-based services and directions.
It’s important to note that saving the changes only updates the address on Google Maps and does not automatically update it in other Google services or external databases. Additionally, it may take some time for the changes to propagate and be visible to other users of Google Maps.
By completing this step and saving the changes, you have successfully updated your home address on Google Maps.
Step 6: Verify the New Home Address
After saving the changes to your home address on Google Maps, it’s crucial to verify that the new address is accurately updated and displayed on the map. Verification ensures that the information is correct and can be relied upon by yourself and others.
Follow these steps to verify your new home address on Google Maps:
- Open Google Maps on your computer or mobile device.
- Use the search bar at the top of the screen to enter your newly updated home address.
- As you start typing, Google Maps will suggest possible matches based on your input. Select the correct address from the list of suggestions.
- The map will zoom in to display the location of your home. Check if the displayed address matches the one you entered earlier.
During the verification process, it’s essential to compare the displayed address with the information you provided when editing your home address. Ensure that all the details, including the street name, number, city, state, and postal code, are correct.
If the displayed address matches your updated information, you can be confident that your new home address has been successfully updated on Google Maps.
However, if there are any discrepancies or errors, you may need to go back and edit your home address again. Make sure to double-check the accuracy of the provided address and select the correct options from the suggestions.
By verifying your new home address, you can have peace of mind knowing that your address information on Google Maps is up to date and correctly displayed.
Step 7: Sync Changes Across Devices
Once you have updated your home address on Google Maps, it’s important to sync these changes across all your devices. By syncing the changes, you ensure that your updated address is consistently accessible and visible, regardless of the device you use to access Google Maps.
Here’s how you can sync the changes across devices:
- If you made the address updates on a computer, open Google Maps on your mobile device.
- Make sure you are signed in to the same Google account on both devices.
- Google Maps will automatically sync the changes made to your home address and reflect them on your mobile device.
- Similarly, if you made the address updates on a mobile device, open Google Maps on your computer while signed in to the same Google account. The changes will be synced and displayed on the computer.
By syncing the changes across devices, you ensure that your updated home address is consistently accessible, whether you’re using a computer, smartphone, or tablet.
If you encounter any issues with syncing the changes, make sure you are using the same Google account on all devices. Additionally, check your internet connection and ensure that you have the latest version of the Google Maps app installed on your mobile device.
By completing this step, you ensure that your updated home address is readily available on all your devices, providing a seamless and consistent experience.
Step 8: Update Home Address in Other Google Services
After successfully updating your home address on Google Maps, it’s important to ensure that your address is also updated in other Google services that may use this information. Updating your home address across Google’s ecosystem ensures consistency and accuracy across different platforms and services.
Follow these steps to update your home address in other Google services:
- Visit the Google Account settings page by going to https://myaccount.google.com/ and sign in to your Google account.
- In the “Personal info & privacy” section, click on “Your personal info”.
- Scroll down and find the section labeled “Contact info”. Click on the “Home address” field.
- Edit the address field with your new or updated home address.
- Save the changes by clicking on the “Save” button, usually located at the bottom of the page.
Updating your home address in your Google Account settings ensures that services such as Google Contacts, Google Pay, and other connected Google applications have the correct and up-to-date information.
Additionally, consider updating your address in other non-Google services that may be linked to your account, such as online shopping platforms, social media accounts, and utility providers.
By updating your home address in other Google services, you ensure consistency throughout your online presence and enhance the accuracy of location-related services and recommendations.