
Enable the Rich Formatting Toolbar
The rich formatting toolbar in Gmail provides users with a wide array of formatting options to enhance the appearance of their emails. By enabling this feature, you can easily customize the font style, size, color, and alignment of your text. Follow these steps to enable the rich formatting toolbar:
- Open your Gmail account and click on the ‘Settings’ gear icon located in the top-right corner of the screen.
- From the drop-down menu, choose ‘Settings’.
- Navigate to the ‘General’ tab.
- Scroll down until you find the ‘Rich Text Formatting’ section.
- Check the box next to ‘Enable the formatting toolbar’.
- Click the ‘Save Changes’ button at the bottom of the page.
Once you’ve completed these steps, the rich formatting toolbar will be available every time you compose a new email or reply to a message. This toolbar will give you the flexibility to format your text in a way that best suits your needs.
With the rich formatting toolbar enabled, you can now explore the various options it offers to customize the appearance of your email. Let’s take a closer look at how you can change the default font type, adjust the font size, modify the font color, align your text, and more. By mastering these formatting options, you can create visually appealing and professional-looking emails that stand out in your recipients’ inboxes.
Change the Default Font Type
By default, Gmail uses a specific font type for composing emails. However, you can easily change the font type and select one that fits your personal preferences or aligns with your branding. To change the default font type, follow these simple steps:
- Ensure that you have the rich formatting toolbar enabled, as mentioned in the previous section.
- Compose a new email or click on ‘Reply’ to an existing email.
- Locate the ‘Font’ drop-down menu in the formatting toolbar.
- Click on the arrow icon to expand the menu and view the available font options.
- Select the desired font type from the list.
As you select different font types, the text in your email will automatically update to reflect the changes. This allows you to preview how your chosen font will appear before finalizing your selection.
It’s worth noting that changing the default font type will only apply to the current email you’re composing or replying to. If you want to set a new default font type for all future emails, you’ll need to follow a different process, which we’ll discuss in a later section.
Experimenting with different font types can help you find the one that best matches your communication style or conveys the right tone for your messages. Whether you prefer a classic and formal font or a modern and quirky one, Gmail provides a variety of options to choose from.
Remember, the font type you select can have a significant impact on the readability and aesthetics of your emails. Therefore, it’s important to choose a font that is clear, easy on the eyes, and aligns with your professional or personal communication goals.
Adjust the Default Font Size
Customizing the font size in Gmail allows you to ensure that your emails are easy to read and visually appealing. The default font size may not always suit your preferences or the needs of your recipients. Fortunately, with the rich formatting toolbar enabled in Gmail, adjusting the font size is a breeze. Follow these steps to change the default font size:
- Make sure the rich formatting toolbar is enabled, as explained earlier.
- Create a new email or click on ‘Reply’ to an existing email.
- Locate the ‘Font Size’ drop-down menu in the formatting toolbar.
- Click on the arrow icon to expand the menu and view the available font size options.
- Select the desired font size for your text.
As you choose different font sizes, the text in your email will automatically adjust to reflect the changes. This allows you to preview how your selected font size will appear before finalizing your decision.
It’s important to note that changing the font size will only apply to the current email you’re composing or replying to. If you want to set a new default font size for all your future emails, there is a separate process that we’ll cover in a later section.
When adjusting the font size, it’s crucial to strike a balance between readability and aesthetics. Using a font size that is too small can strain your recipients’ eyes and make it difficult for them to read your message. On the other hand, a font size that is too large can make the email appear unprofessional or overpowering.
Consider the preferences of your recipients and the context of your email when determining the ideal font size. For important information or calls to action, it may be beneficial to use a slightly larger font size to draw attention. For general body text, a moderate font size that is easy to read on various devices is recommended.
By customizing the default font size in Gmail, you can enhance the readability and visual appeal of your emails, ensuring your messages are well-received by your recipients.
Modify the Font Color
Changing the font color in Gmail can help you add visual interest and emphasize important information in your emails. By default, Gmail uses a black font color for the text, but you have the option to modify it according to your preferences. Follow these simple steps to modify the font color:
- Ensure that the rich formatting toolbar is enabled, as mentioned earlier.
- Create a new email or click on ‘Reply’ to an existing email.
- Locate the ‘Text Color’ or ‘Font Color’ button in the formatting toolbar.
- Click on the button to open the color picker.
- Select your desired font color from the available options or enter a hex code to create a custom color.
As you choose different font colors, the text in your email will instantly update to reflect the changes. This allows you to preview how the selected font color will appear before finalizing your selection.
When selecting a font color for your emails, it’s important to consider readability and accessibility. Choose a color that offers sufficient contrast with the background, ensuring that your text remains easy to read. Keep in mind that some recipients may have visual impairments or be viewing your emails on different devices, so it’s crucial to opt for colors that are universally legible.
Additionally, consider the purpose and tone of your email when deciding on a font color. For professional or formal emails, it’s generally best to stick to conventional colors such as black or dark gray. However, for more creative or informal communications, you can experiment with different hues to align with your message or brand.
Remember that using font colors sparingly and strategically can make your emails more visually appealing and highlight important details. However, excessive use of multiple colors may lead to a cluttered and unprofessional appearance, so exercise moderation and choose your font colors wisely.
By modifying the font color in your Gmail emails, you can add a touch of personalization and make your messages more visually striking, thereby capturing the attention of your recipients.
Set the Default Text Background Color
Customizing the text background color in Gmail allows you to add a unique touch to your emails and make them visually appealing. By default, Gmail uses a white background for the text, but you have the option to modify it according to your preferences. Follow these steps to set the default text background color:
- Ensure that the rich formatting toolbar is enabled, as mentioned earlier.
- Create a new email or click on ‘Reply’ to an existing email.
- Locate the ‘Highlight Color’ or ‘Background Color’ button in the formatting toolbar.
- Click on the button to open the color picker.
- Select your desired text background color from the available options or enter a hex code to create a custom color.
As you choose different text background colors, the background of your text will instantly update to reflect the changes. This allows you to preview how the selected background color will appear before finalizing your choice.
When selecting a text background color, it’s important to consider readability and accessibility. Choose a color that offers sufficient contrast with the text color, ensuring that your words remain easily legible. Avoid using colors that are too bright or saturated, as they can strain the eyes and make reading difficult.
Additionally, keep in mind the context and purpose of your email when deciding on a text background color. For professional or formal communications, it’s best to stick to neutral or subtle colors that maintain a polished appearance. However, for more creative or informal emails, you can experiment with bolder background colors to showcase your personality or align with your branding.
Remember that the text background color should enhance the overall visual appeal of your email without overpowering the content. It should be used selectively to emphasize specific elements or sections, rather than covering the entire email with a bright or distracting background.
By setting the default text background color in Gmail, you can add a touch of personalization and make your emails stand out, capturing the attention of your recipients and making a lasting impression.
Use Bold, Italic, or Underline
In Gmail, you have the option to apply formatting styles such as bold, italic, and underline to your text. These formatting styles can help you emphasize certain words or phrases, add emphasis to important information, or convey a specific tone in your emails. Here’s how you can use these formatting options:
- Make sure the rich formatting toolbar is enabled, as mentioned earlier.
- Create a new email or click on ‘Reply’ to an existing email.
- Select the text you want to format with bold, italic, or underline.
- Locate the respective buttons for bold, italic, or underline in the formatting toolbar.
- Click on the desired button to apply the formatting to your selected text.
As you apply the formatting style, the selected text will instantly update to reflect the changes. You can also combine these formatting styles to create a more visually appealing and personalized effect. For example, you can bold and underline important keywords to draw attention to them, or use italics to emphasize quotes or thoughts.
It’s important to use these formatting options judiciously and purposefully, as excessive use of bold, italic, or underline can make your emails appear cluttered or unprofessional. Reserve their usage for highlighting key points, headings, or important information that you want to stand out to your recipients.
Remember that different email clients and devices may interpret these formatting styles differently. Therefore, it’s a good practice to double-check how your formatted text appears in different email clients or ask a recipient for feedback, especially if precise formatting is crucial to your message.
By utilizing bold, italic, and underline formatting options in Gmail, you can add visual emphasis and clarity to your emails, ensuring that your important information and ideas are effectively communicated to your recipients.
Apply Bullets or Numbering
Gmail allows you to apply bullets or numbering to create organized and visually appealing lists in your emails. Whether you’re presenting steps in a process, listing key points, or creating a simple to-do list, applying bullets or numbering can make your content more structured and easier to read. Here’s how you can utilize these formatting options:
- Ensure that the rich formatting toolbar is enabled, as mentioned earlier.
- Create a new email or click on ‘Reply’ to an existing email.
- Place your cursor at the beginning of the line where you want to apply bullets or numbering.
- Locate the ‘Bulleted list’ or ‘Numbered list’ button in the formatting toolbar.
- Click on the desired button to apply the formatting to your selected line.
- Press ‘Enter’ to create a new line and continue your bulleted or numbered list.
As you continue to press ‘Enter’, Gmail will automatically maintain the formatting and indentation for each new line, making it effortless to create well-structured lists.
Using bullets or numbering can help you present information in a clear and concise manner. Bulleted lists are useful when there is no specific order or priority, while numbered lists are ideal for step-by-step instructions or items that need to be followed in a specific sequence.
When using bullets or numbering, keep in mind the following best practices:
- Keep the list items brief and concise to maintain readability.
- Use parallel structure (i.e., consistency in grammar and style) for each list item.
- Avoid overcrowding your email with too many lists to maintain a clean and focused appearance.
By applying bullets or numbering in Gmail, you can effectively organize your content, highlight key ideas, and make your emails more visually appealing and easy to digest for your recipients.
Adjust the Text Alignment
In Gmail, you have the flexibility to adjust the text alignment to ensure your emails are visually balanced and aligned to your preference. By default, Gmail uses left alignment for text, but you can easily modify it to left, center, right, or justify alignment. Here’s how you can adjust the text alignment:
- Ensure that the rich formatting toolbar is enabled, as mentioned earlier.
- Create a new email or click on ‘Reply’ to an existing email.
- Select the text you want to align.
- Locate the ‘Text alignment’ buttons in the formatting toolbar.
- Click on the desired button to apply the text alignment to your selected text.
As you apply the text alignment, the selected text will rearrange itself based on the chosen alignment. Left alignment will align the text to the left margin, center alignment will center the text, right alignment will align the text to the right margin, and justify alignment will evenly space the text between the margins.
When deciding on the appropriate text alignment, consider the readability and aesthetics of your email. Left alignment is commonly used for general body text, as it creates a clean and consistent appearance. Center alignment is often used for headings or titles, as it adds emphasis and draws attention to the centered text. Right alignment is less common but can be utilized to create a distinct visual effect or align text in specific contexts. Justify alignment is useful for creating a polished and professional look, especially for longer paragraphs, as it results in a balanced and evenly spaced text block.
It’s important to note that the choice of text alignment should also factor in the overall design and formatting of your email. Consistency in alignment across different sections can enhance the visual flow and cohesion of your email.
By adjusting the text alignment in Gmail, you can create a visually pleasing and well-structured email that effectively communicates your message and engages your recipients.
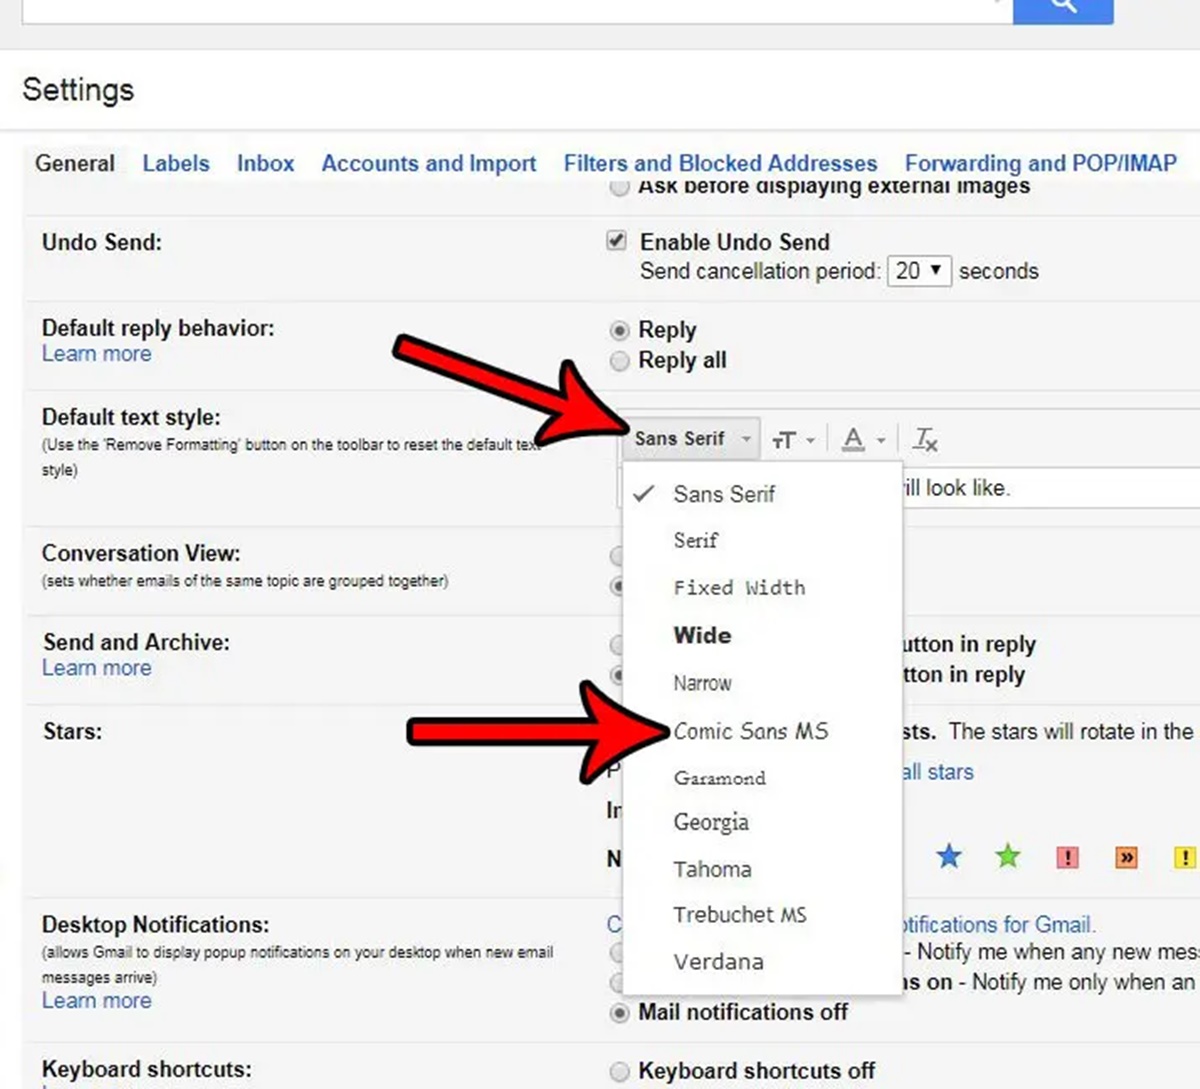
Change the Default Font for Composing Emails
Gmail allows you to customize the default font for composing emails, giving you the ability to personalize your messages and maintain consistency with your preferred font style. By changing the default font, you can ensure that every new email you write reflects your desired font choice. Follow these steps to change the default font for composing emails:
- Open your Gmail account and click on the ‘Settings’ gear icon located in the top-right corner of the screen.
- From the drop-down menu, choose ‘Settings’.
- Navigate to the ‘General’ tab.
- Scroll down until you find the ‘Default text style’ section.
- Select your preferred font from the ‘Font’ drop-down menu.
- Choose your desired size from the ‘Size’ drop-down menu.
- Optional: Modify other text styling options, such as bold or italics.
- Click the ‘Save Changes’ button at the bottom of the page.
After clicking ‘Save Changes’, every new email you compose in Gmail will have the font style and size you specified as the default. This ensures consistency in your communications and saves you the effort of manually changing the font for each new message.
When selecting the default font, consider factors such as readability, professionalism, and compatibility across different devices and email clients. Choose a font that reflects your personal or business brand, aligns with your communication style, and is easy on the eyes.
It’s worth mentioning that changing the default font only applies to the email composition screen in Gmail. Recipients will still view your messages using their own email client’s default font settings, so it’s important to keep content legible and avoid relying solely on font selection to convey your message.
By changing the default font for composing emails in Gmail, you can personalize your messages and present a consistent visual identity to your recipients, enhancing the overall impact of your communications.
Apply Your Changes
After making modifications to the font style, size, color, text alignment, and other formatting options in Gmail, it’s important to apply your changes to ensure that your emails reflect your desired settings. Here’s how you can apply your changes:
- Ensure that the rich formatting toolbar is enabled, as mentioned earlier.
- Create a new email or open an existing draft.
- Make the desired formatting adjustments, such as changing the font type, size, color, text alignment, or applying bold or italic styles.
- Review your email to ensure that the changes you made are accurately reflected in the content.
- If you’re satisfied with the formatting changes, proceed to send your email or save it as a draft for future use.
By applying your changes, you can ensure that your email is presented in the desired format, maintaining consistency and enhancing the visual appeal. Taking the time to review your email before sending or saving it helps you catch any potential formatting errors or inconsistencies that may affect the recipient’s experience.
Remember, when formatting your emails, it’s crucial to strike a balance between visual appeal and readability. Avoid excessive use of different formatting styles, as this can make your emails appear cluttered or unprofessional. Instead, focus on using formatting options to emphasize important information, create a clear hierarchy, and enhance the overall user experience.
Additionally, consider how your formatting choices may translate in different email clients or on various devices. Test your emails across different platforms to ensure that the formatting remains intact and the content is easily readable for your recipients.
By applying your changes in Gmail, you can deliver visually appealing and well-structured emails that effectively communicate your message, capture attention, and leave a positive impression on your recipients.