
Gather Your Supplies
Changing the ink cartridges in your Epson printer is a simple task that can be done in a few easy steps. Before you begin, make sure you have all the necessary supplies handy. Here’s a list of items you’ll need:
- New ink cartridges: Check your printer’s user manual or the manufacturer’s website to determine the specific ink cartridge models compatible with your printer.
- Clean cloth or paper towels: These will help you clean any ink spills or smudges that may occur during the cartridge replacement process.
- Latex gloves: Wearing gloves can help prevent ink from getting on your hands and ensure a clean and hassle-free ink cartridge change.
- Plastic bag or container: This will be used to store the old ink cartridges safely until you can dispose of them properly.
Once you have gathered all your supplies, you’ll be ready to proceed with changing the ink cartridges. It’s important to have everything you need within arm’s reach to ensure a smooth and efficient cartridge replacement process.
Turn Off Your Printer
Before you start the ink cartridge replacement process, it’s important to turn off your Epson printer. This is a crucial step to ensure your safety and prevent any damage to the printer or the new cartridges. Follow these steps to turn off your printer:
- Locate the power button on your printer. It is usually located on the front or top panel of the printer.
- Press and hold down the power button for a few seconds until the printer shuts down completely.
- Unplug the power cord from the wall outlet to ensure that there is no power supply to the printer.
Once the printer is turned off and unplugged, you can proceed with the next steps of changing the ink cartridges. Remember to wait a few minutes after turning off the printer to let it cool down before continuing with the replacement process. This will prevent any accidental burns or injuries.
Access the Cartridge Compartment
After turning off your Epson printer, the next step in changing the ink cartridges is to access the cartridge compartment. Here’s how you can do it:
- Locate the printer cover or access door on your Epson printer. The location of the cover may vary depending on the model of your printer.
- Gently lift or push the cover to open it. In some models, you may need to press a release button or latch to unlock the cover.
- Once the cover is open, you will see the cartridge compartment. This is where the ink cartridges are housed.
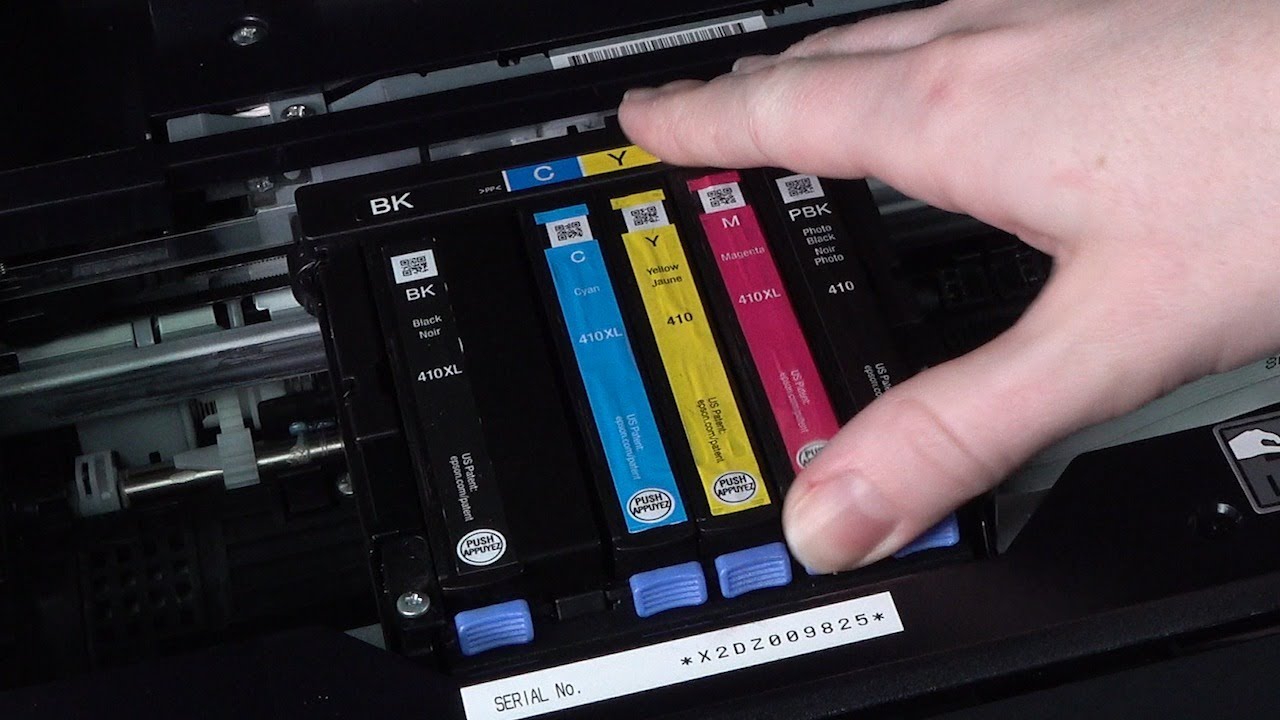
Take a moment to familiarize yourself with the cartridge compartment. You will notice that there are individual slots or holders for each ink cartridge. Each slot is labeled with the corresponding color of the cartridge – cyan, magenta, yellow, and black.
It’s important to handle the printer cover and cartridge compartment with care to avoid any damage. Follow the manufacturer’s instructions or refer to the printer’s user manual for specific guidance on how to access the cartridge compartment for your particular Epson printer model.
Remove the Old Ink Cartridges
Now that you have accessed the cartridge compartment, it’s time to remove the old ink cartridges from your Epson printer. Follow these steps to safely remove the old cartridges:
- Look for the colored tabs or levers near each ink cartridge. These tabs or levers are used to secure the cartridges in place.
- Gently press down or lift the tab or lever for the first ink cartridge you wish to remove. This will release the cartridge from its slot.
- With the tab or lever pressed or lifted, carefully pull the old ink cartridge out of its slot. Be cautious not to touch the electrical contacts or ink nozzles on the cartridge.
- Set the old cartridge aside on a clean surface or place it directly into the plastic bag or container designated for old cartridges.
- Repeat this process for each remaining ink cartridge that you want to replace.
Take note of the order in which the cartridges were removed. This is important for when you install the new cartridges later. You can also refer to the printer’s user manual or the labeling inside the cartridge compartment for guidance on cartridge removal and placement.
Be sure to handle the old cartridges with care and avoid getting ink on your hands or clothing. If you accidentally touch the ink, clean it off with a cloth or paper towel to prevent any stains or smudges.
Shake the New Ink Cartridges
Before installing the new ink cartridges into your Epson printer, it’s important to give them a gentle shake. This helps ensure that the ink inside the cartridges is evenly distributed and ready for optimal printing performance. Follow these steps to shake the new cartridges:
- Take one of the new ink cartridges out of its packaging. Be careful not to touch the electrical contacts or ink nozzles on the cartridge.
- Hold the cartridge firmly between your hands.
- Gently shake the cartridge from side to side a few times. The shaking motion helps loosen and distribute the ink inside the cartridge.
- Repeat this shaking process for each new ink cartridge that you will be installing.
It’s important to note that not all ink cartridges require shaking. Some models may have pre-shaken cartridges or cartridges that do not require shaking at all. Refer to the instructions provided with your new cartridges or consult the printer’s user manual for specific guidance on whether or not shaking is necessary.
Shaking the cartridges helps ensure a smooth and consistent ink flow, resulting in optimal print quality. It’s a simple step that can make a big difference in the performance of your printer and the quality of your printed documents or photos.
Install the New Ink Cartridges
With the old ink cartridges removed and the new cartridges shaken, it’s time to install the fresh ink cartridges into your Epson printer. Follow these step-by-step instructions to ensure a successful installation:
- Take one of the new ink cartridges out of its packaging. Be careful not to touch the electrical contacts or ink nozzles on the cartridge.
- Hold the cartridge with the label facing upward and the electrical contacts facing the cartridge slot.
- Align the cartridge with its corresponding slot in the cartridge compartment. The label on the cartridge should match the label on the slot.
- Gently slide the cartridge into the slot until you feel or hear a click. This indicates that the cartridge is securely in place.
- Repeat this process for each new ink cartridge that you are replacing.
Make sure to insert each cartridge into the correct slot to ensure proper color alignment and print quality. Double-check the labels on both the cartridges and the slots to avoid any mix-ups.
Once all the new cartridges are securely installed, close the printer cover or access door, making sure it snaps or latches into place. This will ensure that the cartridge compartment is properly sealed.
It’s worth noting that some printers may require an initialization or alignment process after installing new cartridges. If prompted by your printer or if you notice any alignment issues, follow the on-screen instructions or consult the printer’s user manual for guidance on how to complete this step.
Close the Cartridge Compartment
After successfully installing the new ink cartridges into your Epson printer, it’s important to close the cartridge compartment to ensure proper functionality and to protect the cartridges. Follow these steps to securely close the compartment:
- Ensure that all the new cartridges are properly inserted into their respective slots and securely clicked into place.
- Gently lower the printer cover or access door back into position.
- Press down on the cover or door firmly until you hear or feel it snap or latch into place. This ensures that the compartment is properly sealed.
It’s essential to close the cartridge compartment properly to prevent any dust, debris, or foreign objects from entering and potentially causing issues with the printer’s performance or print quality.
Take a moment to visually inspect the cartridge compartment to ensure that everything is aligned correctly and that the compartment is fully closed. If you notice any misalignment or gaps, double-check that the cartridges are inserted properly and that the cover or door is securely latched into place.
Once the cartridge compartment is closed, your printer is ready for use. It’s time to power it back on and perform a test print to ensure that the new cartridges are functioning correctly.
Refer to the next section for instructions on how to turn on your Epson printer and print a test page.
Turn On Your Printer
After closing the cartridge compartment, the next step in the ink cartridge replacement process is to turn on your Epson printer. Follow these steps to power up your printer:
- Ensure that the printer is still unplugged from the power outlet. This is essential for safety purposes.
- Locate the power cord that connects to your printer. It is usually at the back of the printer.
- Plug the power cord back into the wall outlet.
- Press the power button to turn on the printer. The location of the power button may vary depending on the model of your printer. It is typically found on the front or top panel.
After pressing the power button, you may see some initial setup or initialization messages on the printer’s display screen or LED indicators. Allow the printer a few moments to complete this process.
Once the printer has finished the startup process, it will be ready for use.
Keep in mind that some printers may require an alignment or calibration process after powering on. The printer will provide instructions on its display screen or through on-screen prompts. Follow these instructions to complete the setup and ensure optimal print quality.
Note that it may take a few minutes for the printer to be fully operational. During this time, avoid attempting to print anything and wait for the printer to indicate that it is ready.
Once the printer is turned on and ready to go, it’s time to move on to the final step: printing a test page.
Print a Test Page
Printing a test page is an important step after installing new ink cartridges in your Epson printer. This allows you to verify that the cartridges are properly installed and that the printer is functioning correctly. Follow these steps to print a test page:
- Make sure your printer is turned on and ready.
- Open a document or photo on your computer that you wish to print for the test page.
- Select “Print” from the file menu or press Ctrl+P (Command+P on a Mac) to open the print dialog box.
- In the print dialog box, ensure that your Epson printer is selected as the chosen printer.
- Look for an option or checkbox that allows you to print a test page or a sample page. The exact location and wording may vary depending on your printer model and the software you are using.
- Check the box or select the option to print a test page.
- Review the print settings, such as paper size and print quality, to ensure they are set correctly. Make any necessary adjustments.
- Click the “Print” button to start the test page printing process.
Once the test page is printed, examine it for any issues such as missing or faint colors, streaks, or smudges. This will help you determine if there are any problems with the ink cartridges or if further adjustments are needed.
If the test page comes out clean and without any issues, congratulations! Your new ink cartridges are successfully installed, and your printer is ready for regular use.
If you encounter any problems during the test page printing process or notice any print quality issues, consult the printer’s user manual or the manufacturer’s website for troubleshooting guidance. It may be necessary to recheck the cartridge installation or perform additional maintenance steps.
Remember to keep the test page as a reference for future comparison. It can help you identify any changes in print quality or performance over time.
Dispose of the Old Ink Cartridges Properly
Once you have successfully installed the new ink cartridges in your Epson printer, it’s crucial to dispose of the old cartridges appropriately. Improper disposal can harm the environment and potentially contaminate water sources. Follow these steps to dispose of the old ink cartridges responsibly:
- Check if your ink cartridges qualify for recycling. Many manufacturers, including Epson, provide recycling programs for their cartridges. Visit the manufacturer’s website or check the cartridge packaging for information on recycling options.
- If recycling options are available, follow the instructions provided to prepare the cartridges for recycling. This may include sealing them in special recycling bags or packaging.
- If recycling is not an option, you can still dispose of the cartridges properly. Place them in a sealed plastic bag to prevent leakage.
- Contact your local recycling center or waste management facility to inquire about their policies on ink cartridge disposal. They may accept them for recycling or provide guidance on how to dispose of them safely.
- If your local recycling center does not accept ink cartridges, check if there are any special collection events or drop-off locations. These events and locations may be organized periodically to collect printer cartridges for proper disposal or recycling.
- Alternatively, reach out to office supply stores or electronic retailers in your area. Some stores may have collection programs in place to collect and recycle ink cartridges from customers.
- Avoid throwing ink cartridges in your regular trash or dumping them in landfills. This not only harms the environment but also wastes the opportunity for recycling.
By disposing of your old ink cartridges responsibly, you contribute to reducing waste and minimizing the impact on the environment. Recycling cartridges also helps conserve natural resources used in their production and reduces the need for raw materials.
Remember to remove any personal or sensitive information, such as print heads or tape, from the cartridges prior to disposal. This helps protect your privacy and ensures the proper recycling or disposal of the cartridges.
Together, we can make a difference by taking small steps towards responsible disposal and recycling of electronic waste, including ink cartridges.