
Understanding the Fitbit Blaze Band
The Fitbit Blaze is a popular fitness tracker that comes with interchangeable bands, allowing you to customize its style to suit your preferences. The band is an essential component of the Fitbit Blaze, as it not only provides a secure fit but also adds a touch of personalization to your device.
The Fitbit Blaze band is made of high-quality materials, ensuring durability and comfort during wear. It is designed to be lightweight and flexible, allowing for unrestricted movement while tracking your daily activities. The band is also sweat-resistant, making it suitable for intense workouts and outdoor activities.
One important factor to consider when choosing a Fitbit Blaze band is the size. The band comes in various sizes to accommodate different wrist sizes, so it’s crucial to select the appropriate size for a comfortable fit. The bands are also available in a range of colors and materials, including silicone, leather, and metal, allowing you to express your personal style.
It’s worth noting that the Fitbit Blaze bands are designed to be easily interchangeable. This means you can switch between different bands depending on the occasion or your mood. Whether you’re going for a casual look or a more formal appearance, there’s a Fitbit Blaze band to suit every style.
Furthermore, the Fitbit Blaze bands are compatible with quick-release mechanisms, which ensures simple and hassle-free band replacement. With just a few easy steps, you can change the band on your Fitbit Blaze and give it a fresh new look.
Overall, understanding the Fitbit Blaze band is essential for making informed decisions when it comes to choosing, replacing, and maintaining your device’s band. By familiarizing yourself with the different options available and the ease of band replacement, you can enhance both the functionality and aesthetics of your Fitbit Blaze.
Choosing the Right Band for Your Fitbit Blaze
When it comes to choosing a band for your Fitbit Blaze, there are several factors to consider. Your choice should not only reflect your personal style but also meet your comfort and functionality needs. Here are some tips to help you select the perfect Fitbit Blaze band:
1. Material: Fitbit Blaze bands are available in various materials, including silicone, leather, and metal. Silicone bands are lightweight, comfortable, and perfect for daily workouts. Leather bands add a touch of elegance and are ideal for more formal occasions. Metal bands offer durability and a stylish look, making them suitable for both casual and dressier settings.
2. Size: Fitbit Blaze bands come in different sizes to accommodate various wrist sizes. It’s important to measure your wrist accurately to ensure an optimal fit. The band should be snug but not too tight or too loose. Most bands are adjustable, allowing for a customizable fit.
3. Colors and Styles: Fitbit Blaze bands are available in a wide range of colors, allowing you to personalize your device to match your style and preferences. From bold and vibrant hues to more neutral and classic tones, there’s a band for every taste. Additionally, some bands feature unique patterns and textures, providing even more options for customization.
4. Activity Level: Consider your activity level when selecting a Fitbit Blaze band. If you lead an active lifestyle and engage in intense workouts or outdoor activities, a sweat-resistant and durable band will be ideal. On the other hand, if you primarily use your Fitbit Blaze for everyday wear, a more comfortable and lightweight band might be preferable.
5. Interchangeability: The Fitbit Blaze bands are designed for easy interchangeability, allowing you to switch between bands effortlessly. Keeping this in mind, you can consider purchasing multiple bands to have various options to match different outfits and occasions.
By considering these factors, you can choose a Fitbit Blaze band that not only suits your style but also meets your comfort and lifestyle needs. Remember that the band is an essential part of your Fitbit Blaze experience, so take your time in selecting the right one that will enhance both the functionality and aesthetic of your device.
Removing the Current Band on Your Fitbit Blaze
Changing the band on your Fitbit Blaze is a simple process that requires a few easy steps. Here’s a guide on how to remove the current band from your Fitbit Blaze:
1. Flip your Fitbit Blaze: Turn your Fitbit Blaze over so that the face is resting on a soft, flat surface to prevent any scratches or damage.
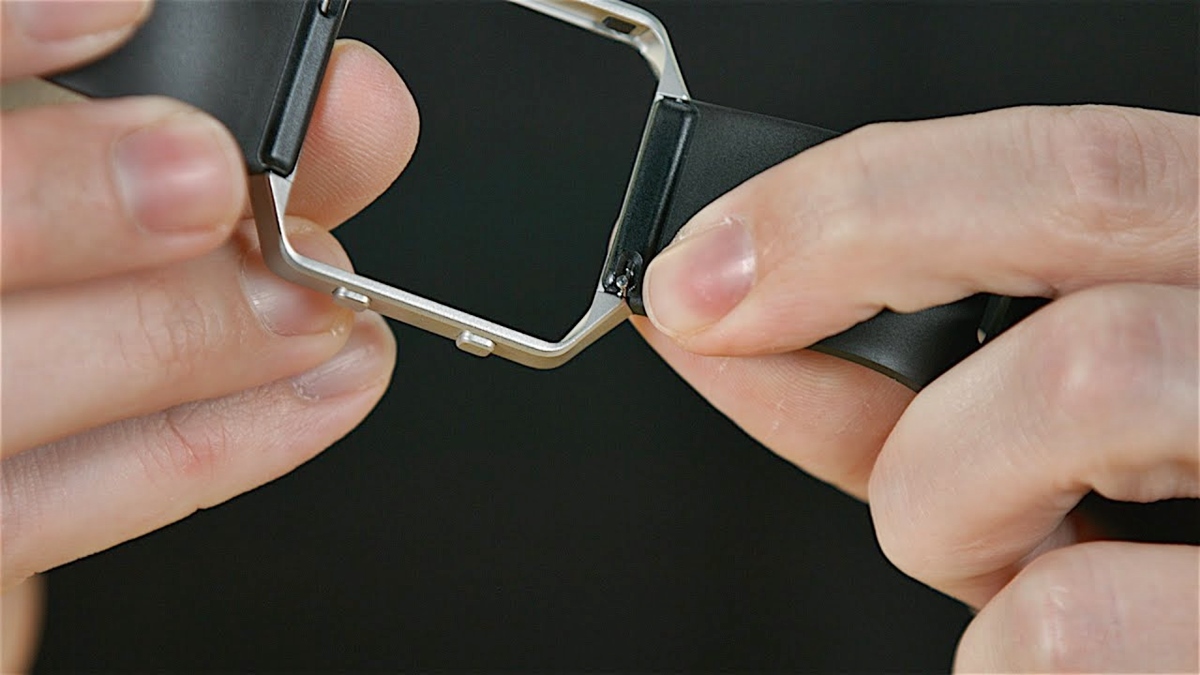
2. Locate the Quick-Release Pins: Look for the two metal pins on the underside of your Fitbit Blaze band. These pins secure the band to the device.
3. Push the Quick-Release Pins: Using your thumb or a small tool, gently push one of the quick-release pins inward. This will release the band from the latch on that side.
4. Repeat for the Other Side: Once you have released one side of the band, repeat the process for the other side. Push the second quick-release pin inward to detach the band completely from the device.
5. Remove the Band: With both quick-release pins pushed in, lift the band away from the device. The band should easily slide off, allowing you to remove it completely.
Note: If you’re having difficulty pushing in the quick-release pins, you can use a small tool like a toothpick or a paperclip to assist you. Be careful not to apply too much force or damage the pins.
Removing the current band on your Fitbit Blaze is a straightforward process that doesn’t require any specialized tools. Once you have successfully removed the band, you can proceed to the next steps of preparing and installing your new Fitbit Blaze band for a fresh and personalized look.
Preparing the New Band for Installation
Before you can install the new band on your Fitbit Blaze, it’s important to prepare it properly. Here are the steps to follow to ensure a smooth installation process:
1. Check the Compatibility: Ensure that the new band you have is specifically designed for the Fitbit Blaze. Compatibility is crucial to guarantee a proper fit and functionality.
2. Inspect the New Band: Before installation, carefully examine the new band for any defects, damage, or irregularities. Check for any loose or damaged parts that may affect the band’s performance.
3. Clean the Fitbit Blaze: Take a clean, lint-free cloth and gently wipe down the surface of your Fitbit Blaze. This will remove any dust, dirt, or residue that could interfere with the installation process.
4. Align the Quick-Release Pins: On the new band, ensure that the quick-release pins are properly aligned with the holes on the Fitbit Blaze. The pins should easily slide into the latch mechanism on each side.
5. Test the Band Removal: Before installing the new band, perform a quick test by gently pulling on the quick-release pins to ensure they are securely attached to the latch mechanism. This will prevent any accidental detachment while wearing the Fitbit Blaze.
6. Familiarize Yourself with the Band: Take a moment to familiarize yourself with the new band’s features and adjustments. If the band has any additional components or special features, make sure you understand how they work and how to adjust them for a comfortable fit.
Note: It’s always a good idea to refer to the manufacturer’s instructions or any included documentation for specific guidance on preparing and installing the new band.
By properly preparing the new band, you can ensure a successful installation onto your Fitbit Blaze. Taking the time to inspect, clean, and align the band will help you avoid any complications and ensure that the band fits securely and functions properly. Once you have completed the preparation steps, you’re ready to move onto the next step of installing the new band on your Fitbit Blaze.
Installing the New Band on Your Fitbit Blaze
Now that you have prepared the new band, it’s time to install it onto your Fitbit Blaze. Follow these steps for a successful installation:
1. Align the Band: Hold the new band in your hand and align it with the slots on the sides of the Fitbit Blaze. Ensure that the quick-release pins are aligned with the holes on the device.
2. Insert the Quick-Release Pins: With the band aligned, gently push one of the quick-release pins into the hole on the device’s slot. Apply slight pressure until you feel the pin slide into place. Repeat this step for the other side of the band.
3. Secure the Band: Once both quick-release pins are inserted, give the band a gentle tug to ensure it is securely attached to the Fitbit Blaze. The band should be snug and should not easily detach from the device.
4. Test the Fit: Put the Fitbit Blaze on your wrist and check the fit of the new band. It should be comfortable and secure, allowing the device to sit snugly on your wrist without being too tight or too loose.
5. Make Adjustments: If necessary, adjust the band to achieve the desired fit. Many bands come with adjustable straps or buckle systems that allow you to fine-tune the fit for optimal comfort during wear.
6. Double-Check Security: Ensure that the quick-release pins are fully inserted and engaged with the latch mechanism on each side of the Fitbit Blaze. This will prevent any accidental detachment of the band while in use.
With these steps, you can easily install the new band onto your Fitbit Blaze. Taking the time to align the band properly and ensuring a secure fit will enhance both the comfort and functionality of your device. Now that you have successfully installed the new band, you can enjoy a refreshed look and continue tracking your fitness goals in style.
Securing the Band to Your Fitbit Blaze
Once you have installed the new band on your Fitbit Blaze, it’s important to ensure that it is securely fastened to the device. Here are the steps to follow to ensure a properly secured band:
1. Check the Fit: Put the Fitbit Blaze on your wrist and make sure that the band is snug but not too tight. It should fit comfortably and securely on your wrist, allowing the device to sit properly.
2. Adjust the Straps: If your new band has adjustable straps, use them to customize the fit according to your wrist size and comfort preferences. Ensure that the straps are fastened securely to prevent any slippage during activities.
3. Double-Check the Quick-Release Pins: Verify that the quick-release pins are fully inserted and engaged with the latch mechanism on both sides of the Fitbit Blaze. Give them a gentle tug to ensure they are securely attached.
4. Test the Band: Move your wrist around and perform some light activities to test the band’s stability. It should remain in place without any shifting or loosening during movement.
5. Pay Attention to Comfort: Ensure that the band is comfortable to wear throughout the day. It should not cause any irritation or discomfort, even during prolonged use. If you experience any discomfort, readjust the band or consider trying a different size or material.
6. Regularly Check for Security: Periodically check the band’s security while wearing it. Make sure that the quick-release pins are still securely in place and that there are no signs of loosening or detachment.
By following these steps, you can securely fasten the band to your Fitbit Blaze, ensuring a comfortable and reliable fit. Regularly checking the band’s security will help prevent any unexpected detachment and ensure that your Fitbit Blaze stays securely in place during your daily activities.
Adjusting the Fit of Your New Band
Once you have installed the new band on your Fitbit Blaze, it’s important to ensure that it fits comfortably and securely on your wrist. Here are some tips for adjusting the fit of your new band:
1. Check the Fit: Put on your Fitbit Blaze and assess how it feels on your wrist. The band should be snug but not too tight, allowing for a comfortable fit without restricting blood circulation.
2. Use the Adjustment Holes: If your band has adjustment holes, secure it by fastening the buckle or the clasp to the appropriate hole. Make sure the band is securely fastened, but still allows for some flexibility and movement.
3. Test for Comfort: Move your wrist in different directions and perform simple tasks to ensure that the band doesn’t cause any discomfort or irritation. If you feel any pinching or chafing, try adjusting the band to a looser or tighter setting until you find the right fit.
4. Assess Strap Length: If your band has a strap with excess length, you may need to trim it to prevent it from sticking out or getting in your way. Follow the manufacturer’s instructions or consult a professional to avoid damaging the band.
5. Consider Temperature and Activities: Keep in mind that the fit of your band may vary in different situations. For example, during hot weather, your wrist may swell slightly, requiring a looser setting. Similarly, during intense workouts, you may want to adjust the band for a tighter fit to prevent slippage.
6. Personalize for Your Comfort: Everyone’s wrist is unique, so take the time to find the adjustments that work best for you. Experiment with different settings and pay attention to your comfort level to achieve the optimal fit.
Remember, finding the perfect fit may require a bit of trial and error. Regularly check the fit of your band to ensure that it remains comfortable and secure. Keeping your Fitbit Blaze band properly adjusted will enhance your overall experience and allow you to wear your device with confidence.
Tips and Tricks for Maintaining Your Fitbit Blaze Band
Proper maintenance is essential to keep your Fitbit Blaze band in good condition and extend its lifespan. Here are some useful tips and tricks to help you maintain your Fitbit Blaze band:
1. Clean Regularly: Regularly clean your band to remove dirt, sweat, and oil buildup. Use a mild soap or a gentle cleaning solution and a soft cloth to wipe the band down. Avoid using harsh chemicals or abrasive materials that can damage the band. Allow the band to air dry before wearing it again.
2. Avoid Excess Moisture: While Fitbit Blaze bands are sweat-resistant, excessive exposure to moisture can degrade the materials over time. Remove your Fitbit Blaze band before swimming, showering, or participating in water-based activities to prevent damage.
3. Keep Away from Extreme Temperatures: Extreme temperatures, both hot and cold, can affect the integrity of your Fitbit Blaze band. Avoid exposing the band to direct sunlight, excessive heat, or freezing temperatures, as these can cause the band to warp or crack.
4. Avoid Abrasive Surfaces: Be cautious when wearing your Fitbit Blaze band around rough surfaces or abrasive materials. These can scratch or damage the band. Remove the band or use a protective cover if you anticipate contact with such surfaces.
5. Store Properly: When not in use, store your Fitbit Blaze band in a cool, dry place away from direct sunlight. Avoid leaving it in extreme temperatures or in an area with high humidity, as moisture and heat can cause the band to degrade or develop a musty odor.
6. Rotate Bands: If you have multiple Fitbit Blaze bands, consider rotating them regularly. This allows the bands to have time to air out, preventing moisture buildup and reducing the risk of unpleasant odors.
7. Check for Wear and Tear: Regularly inspect your Fitbit Blaze band for any signs of wear and tear. Look for loose threads, cracks, or damaged connection points. If you notice any issues, consider replacing the band to maintain optimal functionality and aesthetics.
8. Follow Manufacturer’s Instructions: Always refer to the manufacturer’s guidelines and instructions for specific care recommendations for your Fitbit Blaze band. These instructions may vary depending on the materials used in your particular band.
By following these tips and tricks, you can ensure the longevity and durability of your Fitbit Blaze band. Taking proper care of the band will not only keep it looking great but also contribute to a comfortable and enjoyable fitness tracking experience.
Troubleshooting Common Issues with Band Replacement
While changing the band on your Fitbit Blaze is a relatively straightforward process, you may encounter some common issues. Here are some troubleshooting tips to help you address and overcome these challenges:
1. Difficulty Removing the Current Band: If you’re having trouble removing the current band, try using a small tool like a toothpick or a paperclip to assist you. Apply gentle pressure to push in the quick-release pins and release the band from the device.
2. Misalignment of the Quick-Release Pins: Ensure that the quick-release pins on the new band are properly aligned with the holes on the Fitbit Blaze. They should easily slide into place, securing the band to the device. If you’re having trouble aligning the pins, double-check that you have the correct-sized band.
3. Band Not Securing Properly: If the new band doesn’t seem to secure properly, double-check that both quick-release pins are fully inserted and engaged with the latch mechanism on each side of the Fitbit Blaze. If the band still feels loose or insecure, try cleaning the quick-release pins and the latch mechanism to remove any debris that may be interfering with their interaction.
4. Incorrect Band Size: If you find that the new band is too tight or too loose, consider exchanging it for a different size. Ensure that you have accurately measured your wrist and selected the appropriate band size according to the manufacturer’s guidelines. Remember that properly adjusting any straps or buckles on the band can also help achieve a more comfortable fit.
5. Band Dislodging During Activities: If you notice that the band frequently becomes dislodged or shifts during physical activities, double-check that the quick-release pins are securely engaged and that the band is properly sized and adjusted. Tighten the band and make sure it sits snugly on your wrist to prevent slippage. Alternatively, consider using a band with a more secure fastening mechanism, such as a buckle or a double-locking mechanism.
6. Abnormal Band Wear: If you notice excessive wear or damage to the band, such as fraying, cracking, or discoloration, it may be a sign of poor quality or improper use. Consider investing in a higher-quality band or consult the manufacturer for further assistance.
7. Seek Professional Help: If you have tried troubleshooting steps and are still experiencing issues with your Fitbit Blaze band replacement, it may be helpful to seek assistance from a Fitbit customer support representative or a professional in a Fitbit retail store. They can provide additional guidance and help resolve any specific issues you may be facing.
Remember that persistence and patience are key when troubleshooting band replacement issues. By following these troubleshooting tips and seeking the appropriate help when necessary, you can successfully overcome common challenges and enjoy a comfortable and secure fit with your Fitbit Blaze band.