
Why Change Android Notification Sounds?
When it comes to personalizing your Android device, changing the notification sounds can make a significant difference. The default notification sound can become monotonous and easily blend in with other sounds in your surroundings. By customizing the notification sound, you can give your device a unique and personal touch, making it more enjoyable to receive notifications.
Additionally, changing the notification sound can help you differentiate between various apps or specific types of notifications. By assigning a distinct sound to different apps or notifications, you can easily identify what requires your attention even before checking your device. This can be particularly useful when you receive a high volume of notifications, allowing you to prioritize and respond to important ones promptly.
Furthermore, changing the notification sound can enhance your overall user experience. The sound that accompanies a notification plays a crucial role in creating the desired emotional response. Whether you want a cheerful tone to brighten your day or a calming sound to create a peaceful environment, selecting a custom notification sound can help set the right mood and add a personal touch to your device.
Moreover, customizing the notification sound can provide a level of consistency and familiarity across different devices. If you use multiple Android devices, having the same notification sound across all of them can create a seamless experience. It helps in avoiding confusion and allows you to quickly identify when a notification comes from a specific app, regardless of which device you are using.
Overall, changing the Android notification sounds can offer a range of benefits, from personalization and convenience to emotional and aesthetic appeal. It allows you to create a unique and enjoyable experience while staying organized and responsive to the notifications that matter most to you.
Step 1: Accessing the Sound Settings
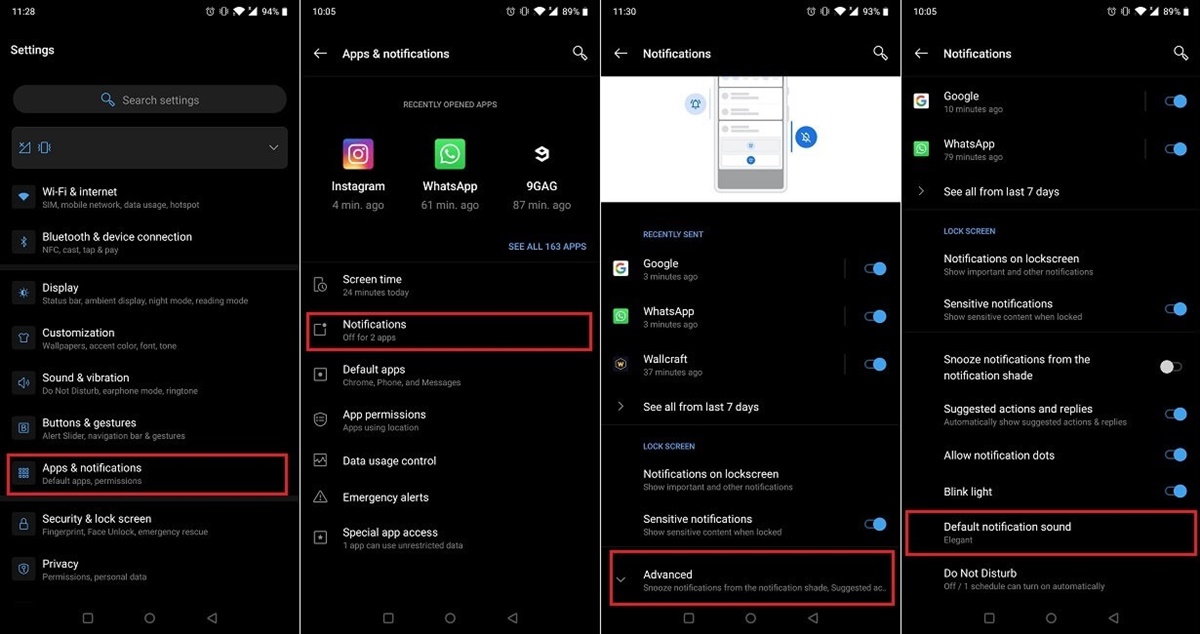
To change the notification sound on your Android device, you’ll need to access the Sound Settings. Here’s how you can do it:
- Unlock your Android device and navigate to the home screen.
- Swipe down from the top of the screen to reveal the notification panel.
- Tap on the gear-shaped icon in the top-right corner to open the Settings menu.
- Scroll down and tap on the “Sound” or “Sound & vibration” option. The wording may vary slightly depending on your device’s manufacturer and software version.
- You should now see various sound-related options. Look for “Notifications” or “Notification sound” and tap on it.
- On some devices, you might need to tap on “Advanced” or “More” to access additional sound settings.
- Once you’re in the notification sound settings, you’re ready to proceed to the next step.
Accessing the sound settings may vary slightly depending on the device and Android version you’re using. However, the general process remains the same: open the Settings menu, find the sound-related options, and locate the notification sound settings.
It’s worth noting that some devices may have customized interfaces, such as Samsung’s One UI or Huawei’s EMUI. In such cases, the exact steps to access the sound settings may differ slightly. However, the fundamental concept remains unchanged.
With the sound settings accessed, you’re now ready to customize the notification sound for your Android device. Let’s move on to the next step to learn how to select the app for which you want to change the notification sound.
Step 2: Selecting the App
After accessing the sound settings, the next step is to choose the specific app for which you want to change the notification sound. Follow these steps:
- In the notification sound settings, you’ll see a list of apps or categories for which you can customize the notification sound.
- Scroll through the list and locate the app for which you want to change the notification sound.
- Tap on the app to select it. You may also find categories like “Default notification sound” or “System notifications” which can be customized.
If you can’t find the app in the list, it’s possible that the app doesn’t support custom notification sounds or that the feature is not available on your device.
Keep in mind that some apps may have additional sound settings within their own settings menu. For such apps, changing the notification sound within the system sound settings may not apply. In such cases, you may need to access the app’s settings and look for a specific notification sound setting.
Once you’ve selected the app for which you want to change the notification sound, you’re ready to proceed to the next step, where you’ll learn how to change the actual sound.
Note that the process of selecting the app may differ slightly depending on the device and Android version. However, the general idea remains the same: locate the app in the sound settings and select it to customize the notification sound.
Step 3: Changing the Notification Sound
Now that you have selected the app for which you want to change the notification sound, it’s time to choose a new sound. Follow these steps:
- After selecting the app, you’ll see the current notification sound associated with it.
- Tap on the notification sound option to open the sound selection menu.
- You will be presented with a list of available notification sounds on your device.
- Scroll through the list to explore different options. You can select a sound that comes preloaded with your device or choose a custom sound if you have one saved.
- As you scroll, tapping on a sound will play a preview of it, allowing you to hear how it sounds before making a selection.
- Once you find a sound you like, tap on it to choose it as the new notification sound for the selected app.
If you want to use a custom sound that is not available in the list, you can add it to your device’s notification sound folder. Ensure that the custom sound file is in a compatible format, such as MP3 or WAV, and then place it in the designated folder.
Remember that the availability of sounds and the appearance of the sound selection menu may vary based on your device and Android version. Manufacturers often customize the user interface, resulting in some differences.
Once you have chosen the new notification sound, you’re ready to move on to the next step, where you’ll learn how to adjust advanced settings for the selected app’s notifications.
Step 4: Adjusting Advanced Settings
After selecting the new notification sound, you may want to further customize the advanced settings for the selected app’s notifications. Follow these steps to adjust the advanced settings:
- In the sound settings, locate the app for which you changed the notification sound.
- Tap on the app to access the advanced notification settings.
- Here, you’ll find additional options to fine-tune how the notifications are delivered.
- You may see options such as notification sound volume, vibration patterns, notification light settings, or even how notifications appear on the lock screen.
- Adjust these settings according to your preferences. Some devices may even offer granular control over specific types of notifications within the app.
- Take your time to explore and configure the advanced settings to customize the app’s notifications to your liking.
It’s important to note that the availability and range of advanced settings may vary depending on the app and your device. Some apps may provide more customization options than others.
By adjusting the advanced settings, you can create a tailored notification experience that aligns with your needs and preferences. Whether it’s choosing a specific vibration pattern, adjusting the notification volume, or enabling/disabling the notification light, these settings allow you to enhance the way you interact with notifications from the selected app.
Once you have adjusted the advanced settings to your satisfaction, it’s time to move on to the next step, where you’ll test the new notification sound.
Step 5: Testing the New Sound
After changing the notification sound and adjusting the advanced settings, it’s important to test the new sound to ensure it’s working as expected. Here’s how you can test the new notification sound:
- Exit the sound settings and return to the home screen or any other app.
- Wait for a notification to arrive for the app you customized.
- Once the notification appears, listen for the new sound you set.
- If you don’t hear the new sound, double-check that you selected the correct app and sound in the notification settings.
- If the sound is playing too softly or too loudly, you may need to adjust the notification sound volume in the sound settings or the volume controls of your device.
- Continue testing by deliberately triggering notifications for the selected app to ensure the sound plays consistently.
During the testing phase, it’s important to pay attention to any inconsistencies or issues with the new sound. If the sound doesn’t play at all or if it plays incorrectly, you may need to repeat the previous steps to ensure you’ve correctly set the new sound for the desired app.
Keep in mind that some apps have their own notification sound settings within their settings menu. If you’re still not hearing the new sound, it’s worth checking if the app has any additional sound settings that may override the system settings.
Once you’re satisfied that the new sound is working as intended, you can move on to the final step, where you’ll learn how to restore the default notification sound if desired.
Step 6: Restoring Default Notification Sound
If you ever decide to revert to the default notification sound for the selected app or if you simply want to change it to something else, you can easily restore the default notification sound. Follow these steps:
- Access the sound settings on your Android device.
- Locate the app for which you changed the notification sound.
- Tap on the app to open the notification sound settings.
- Instead of selecting a new sound, look for an option such as “Default” or “Reset to default.”
- Tap on this option to restore the default notification sound for the selected app.
- Confirm any prompts or dialog boxes that appear to proceed with the reset.
Once you’ve completed these steps, the app will use the default notification sound that is set by the Android system. Keep in mind that restoring the default notification sound will remove any custom sound you had previously set.
If you want to change the notification sound to a different custom sound, you can revisit the sound settings and follow the earlier steps to select a new sound.
It’s worth noting that the process to restore the default notification sound may vary slightly depending on your Android device and software version. However, the general concept remains the same: locate the app in the sound settings and choose the “Default” or “Reset to default” option.
With this final step, you’ve successfully learned how to restore the default notification sound or change it to something else for the selected app. Enjoy customizing your Android device’s notification sounds to suit your preferences and personal style!