Why Blur the Background
Blurring the background during video calls has become increasingly popular, and for good reason. It not only adds a touch of professionalism but also helps to maintain privacy and reduce distractions. Here are a few key reasons why you might want to consider blurring your background during a Skype call:
- Enhanced Professionalism: Blurring the background can give your video calls a more professional look and feel. Whether you’re participating in a business meeting or a job interview, a clean and uncluttered background can help you create a positive impression.
- Privacy: Not everyone has the perfect setting for video calls. Blurring the background allows you to maintain your privacy by hiding personal information or a messy room that you might not want others to see. It helps to keep the focus on you and your conversation rather than your surroundings.
- Reduced Distractions: A cluttered or busy background can be distracting for both you and the person you’re talking to. By blurring the background, you eliminate visual distractions, ensuring that the focus remains on the conversation and the participants involved.
- Professional Branding: If you’re using Skype for business purposes or representing your brand, blurring the background can create a cohesive and branded experience. It allows you to showcase your company logo, tagline, or other specific branding elements without any visual distractions competing for attention.
These are just a few of the benefits of blurring the background during Skype calls. Whether it’s for professional reasons or personal preferences, taking a few extra moments to enable background blur can significantly enhance the overall quality and impact of your video calls.
How to Enable Background Blur in Skype
If you’re looking to enable background blur in Skype, you’ll be pleased to know that it’s a simple process. Skype offers multiple methods to achieve this, depending on your preferences and the specific circumstances of your call. Below, we outline three primary methods to enable background blur in Skype:
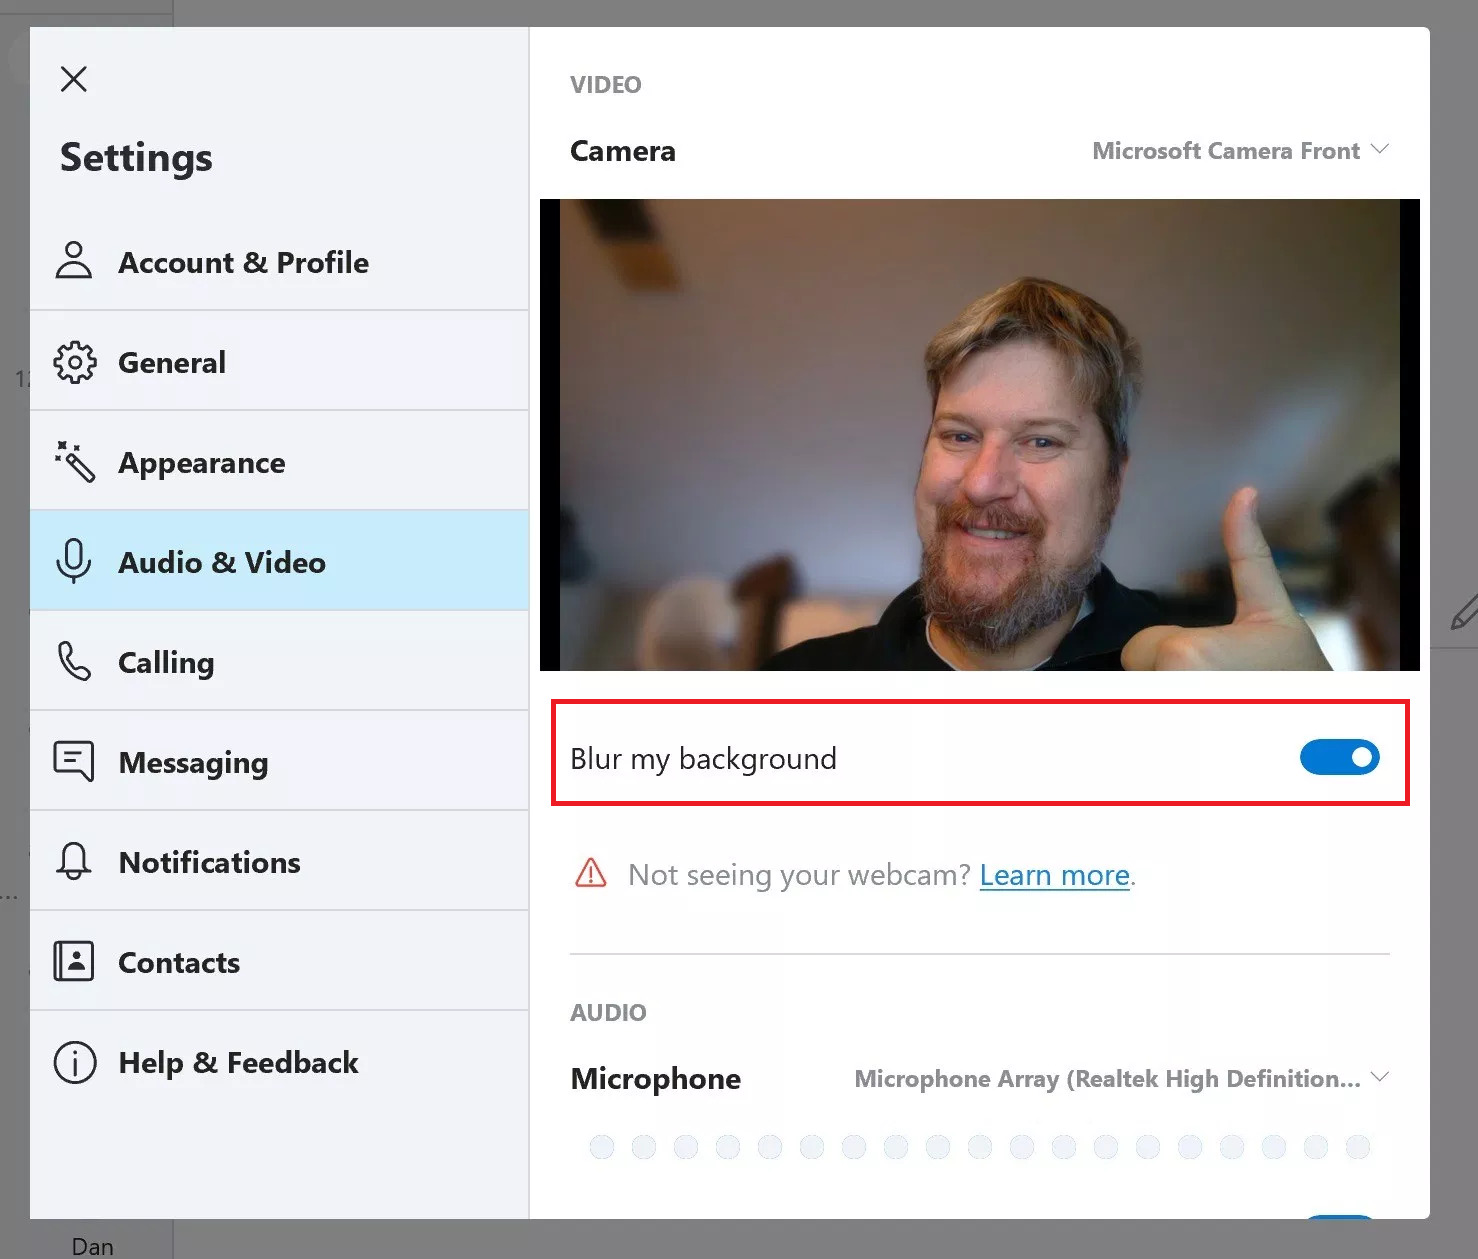
- Method 1: Before a Skype Call: To enable background blur before starting a Skype call, follow these steps:
- Open the Skype application on your device and sign in to your account.
- In the main Skype window, locate and click on your profile picture or display name.
- From the dropdown menu, select “Settings” and then click on the “Audio & Video” tab.
- In the “Video” section, check the box labeled “Blur my background.”
- Close the settings window, and you’re ready to start your call with a blurred background.
- Method 2: During a Skype Call: If you forgot to enable background blur before the call, no worries! You can still activate it during the call by following these steps:
- While in a Skype call, locate the three-dot “More options” button at the bottom right corner of the screen.
- Click on the button to reveal a dropdown menu, and then select the “Blur my background” option.
- Skype will instantly blur your background, ensuring a distraction-free and professional-looking call.
- Method 3: Using a Virtual Background: Skype also offers the option to use virtual backgrounds, which can be a fun and creative alternative to background blur. To use a virtual background, follow these steps:
- During a Skype call, click on the three-dot “More options” button located at the bottom right corner of the screen.
- From the dropdown menu, choose “Apply background effects.”
- A side panel will appear with various background options. Select a virtual background that suits your preference.
- Skype will replace your actual background with the chosen virtual background, giving your video call a unique touch.
By following these methods, you can easily enable background blur in Skype and enjoy a more professional and immersive video calling experience.
Method 1: Before a Skype Call
Enabling background blur before starting a Skype call is an effortless process. By taking a few moments to set it up in advance, you’ll be ready to engage in a video call with a professional and distraction-free look. Follow these steps to enable background blur before a Skype call:
- Open the Skype application on your device and sign in to your account.
- In the main Skype window, locate and click on your profile picture or display name. This will open a dropdown menu with various options.
- Select “Settings” from the dropdown menu. This will open the Skype settings window.
- In the settings window, click on the “Audio & Video” tab. This is where you can customize your audio and video settings.
- Scroll down to the “Video” section of the settings window. Here, you’ll find options to configure your video settings.
- Check the box labeled “Blur my background.” This option will be available if your device meets the system requirements for background blur.
- Once you’ve enabled background blur, close the settings window.
- You’re now ready to start your Skype call with a blurred background. When your video is active during the call, your background will appear softly blurred, keeping the focus on you.
It’s worth noting that the effectiveness of background blur can vary depending on your device’s capabilities and the lighting conditions in your environment. It’s advisable to test your background blur settings before important calls to ensure everything is functioning as desired.
By following this simple method, you can easily enable background blur in Skype before starting a call. Remember to adjust your audio and video settings in the Skype application to achieve the best results for your video calls.
Method 2: During a Skype Call
Forgot to enable background blur before starting your Skype call? No worries! You can still activate it during the call by following these quick steps:
- While in a Skype call, locate the three-dot “More options” button at the bottom right corner of the screen. It is represented by three vertically aligned dots.
- Click on the “More options” button to reveal a dropdown menu with additional settings and options.
- From the dropdown menu, select the “Blur my background” option. This will instantly activate background blur for your ongoing call.
- Upon selecting the option, Skype will automatically apply background blur, obscuring any objects or details behind you.
- Voila! Your background is now discreetly blurred, ensuring a distraction-free and professional-looking video call.
During the call, if you wish to disable background blur, simply follow the same steps outlined above and uncheck the “Blur my background” option. This will revert your video feed to its original appearance, showing the actual background.
It’s important to note that the effectiveness of background blur might vary depending on factors such as your device’s capabilities and the lighting conditions in your environment. To ensure desired results, it’s recommended to test the background blur functionality before important calls.
This method allows you to quickly enable and disable background blur without interrupting your ongoing Skype call. It provides an easy solution for adding a professional touch to your video conversations, even if you initially forget to enable the feature. Remember, a clean and distraction-free background can help improve the overall quality and impact of your video calls.
Method 3: Using a Virtual Background
If you’re looking to add a touch of creativity or personalization to your Skype calls, using a virtual background can be an excellent option. Skype offers a variety of virtual backgrounds that allow you to replace your actual background with an image or a pre-selected backdrop. Here’s how you can use a virtual background during your Skype call:
- During a Skype call, locate the three-dot “More options” button at the bottom right corner of the screen. It will appear as three vertically aligned dots.
- Click on the “More options” button to access a dropdown menu with additional settings and features.
- From the dropdown menu, choose the “Apply background effects” option. This will open a side panel with different background options.
- In the background effects panel, you can choose from a variety of virtual backgrounds. Preview the options and select the one that suits your preference.
- Once you’ve selected a virtual background, it will replace your actual background in the video call. You’ll be able to see yourself against the chosen backdrop.
- To revert to your original background or to disable the virtual background, simply repeat the steps and choose the “None” option from the background effects panel.
Using a virtual background can be a fun and engaging way to spice up your Skype calls. It allows you to showcase your creativity, display a professional image, or add a touch of personality to your video conversations. Just make sure to choose a background that aligns with the context and tone of your call.
Remember, the effectiveness of virtual backgrounds may vary depending on factors such as lighting conditions and device capabilities. It is advisable to test your chosen virtual background before important calls to ensure a seamless experience.
By utilizing the virtual background feature in Skype, you have the flexibility to transform your video calls into visually appealing and captivating experiences.
Troubleshooting Background Blur Issues
While background blur in Skype is a useful feature, you may encounter occasional issues that affect its functionality. Here are some troubleshooting tips to help you address common background blur problems:
- Ensure Adequate Lighting: Background blur relies on distinguishing your presence from the background. Insufficient or uneven lighting can affect the accuracy of the feature. Make sure that your environment is well-lit, preferably by natural or soft lighting, to achieve optimal results.
- Consider Using a Webcam with Built-in Background Blur Feature: If you frequently encounter issues with background blur, consider investing in a webcam that has a built-in background blur feature. These webcams often have specialized hardware or software that offers more reliable and consistent background blur capabilities.
- Test Your Background Blur before a Call: Before important calls, it’s advisable to test the background blur functionality. Start a test call or use Skype’s preview feature to ensure that your background is properly blurred and that there are no glitches or performance issues. This will give you the opportunity to adjust settings or troubleshoot any problems in advance.
By following these troubleshooting tips, you can overcome common background blur issues and ensure a smooth and professional video calling experience in Skype.
It’s worth noting that the effectiveness of background blur may also be influenced by factors such as the power and specifications of your device, internet connection stability, and the Skype application version you’re using. Keeping your device and Skype app up-to-date can help resolve compatibility issues and improve overall performance.
If you continue experiencing persistent background blur issues despite troubleshooting, it may be helpful to seek support from Skype’s customer service or consult their official online resources for additional assistance.
Remember, background blur is a valuable feature that enhances the visual quality of your video calls. By addressing troubleshooting issues, you can make the most of this feature and enjoy professional and distraction-free conversations on Skype.
Ensure Adequate Lighting
Adequate lighting plays a crucial role in achieving optimal background blur in Skype. Insufficient or uneven lighting can affect the accuracy and effectiveness of the feature. Here are some tips to ensure you have the right lighting conditions for the best background blur results:
- Opt for Natural or Soft Lighting: Natural lighting is the most flattering and can contribute to better background blur. Whenever possible, position yourself facing a window or a natural light source. Soft lighting, such as that from a desk lamp with a diffuser or a ring light, can also help create an evenly lit environment.
- Avoid Harsh or Direct Lighting: Harsh lighting, like direct sunlight or bright overhead lights, can create harsh shadows and uneven lighting. This can make it difficult for the background blur feature to distinguish between your presence and the background. If using natural lighting, ensure that it is diffuse and not creating sharp shadows on your face.
- Eliminate Background Light Source Interference: Be mindful of any light sources behind you or in the background that could interfere with the background blur. These can include lamps, windows, or other illuminated objects. Ensure that the main light source is in front of you or to the side, rather than behind you, to maintain a clear distinction between you and the background.
- Avoid Changing Lighting Conditions: Inconsistencies in lighting can affect how well the background blur works. Try to maintain a stable lighting environment throughout your call so that the feature can effectively differentiate between you and the background. Avoid sudden changes in lighting, such as turning on or off lights, as it can impact the quality of the background blur.
- Adjust Your Camera Settings: If your webcam has manual settings, you can adjust the exposure, brightness, or contrast to better match the lighting conditions. Experiment with different settings to find the optimal balance between a well-lit face and a properly blurred background.
By ensuring adequate and appropriate lighting, you can maximize the effectiveness of the background blur feature in Skype. Remember that lighting conditions may vary, so it’s important to test and adjust as needed before important calls to achieve the desired professional and distraction-free look.
Consider experimenting with different lighting setups and finding what works best for your specific environment. With the right lighting, you can enhance the overall appearance of your video calls and make the most of the background blur feature in Skype.
Consider Using a Webcam with Built-in Background Blur Feature
If you frequently encounter issues with background blur or want a more reliable and consistent experience, consider investing in a webcam that has a built-in background blur feature. These webcams are specifically designed to provide enhanced background blur capabilities and offer various advantages. Here’s why you might want to consider using a webcam with a built-in background blur feature:
- Enhanced Image Processing: Webcams with built-in background blur feature often come with advanced image processing technology. They use algorithms and sensors to precisely detect and differentiate between you and the background, resulting in a more accurate and seamless blur effect.
- Built-in Hardware Optimization: These webcams are optimized to handle the background blur feature efficiently. They have dedicated hardware components that allow for real-time processing and application of the blur effect without impacting the overall performance of your computer or device.
- Adjustable Blur Intensity: Many webcams with built-in background blur feature offer the option to adjust the intensity of the blur effect. This allows you to customize the level of background blur according to your preferences and the context of your video calls.
- Compatibility and Integration: Webcams integrated with background blur features are designed to seamlessly integrate with common video calling applications like Skype. They provide a plug-and-play experience, eliminating the need for additional setup or configuration.
- Simplicity and Convenience: Using a webcam with a built-in background blur feature eliminates the need for software-based solutions or manual adjustments. Once the webcam is connected, the blur functionality is readily available, ensuring a hassle-free and consistent experience.
While these webcams bring additional benefits, it’s essential to check the specifications and compatibility with your device before making a purchase. Ensure that the webcam is compatible with your operating system and video calling application, such as Skype.
Investing in a webcam with a built-in background blur feature offers a reliable and convenient solution for achieving professional-looking video calls. With enhanced image processing and optimized hardware, these webcams can greatly improve the quality and effectiveness of the background blur feature.
Consider choosing a webcam with a built-in background blur feature if you frequently use video calling applications and prioritize a seamless and consistent background blur experience.
Test Your Background Blur before a Call
Before important calls on Skype, it’s crucial to test the background blur functionality to ensure a seamless and professional video calling experience. Testing the feature beforehand allows you to identify and address any issues or adjustments needed before your call. Here are some valuable tips to help you test your background blur effectively:
- Start a Test Call: Utilize Skype’s testing features, such as “Echo / Sound Test Service,” to initiate a test call. This allows you to see how the background blur feature performs before an actual call. Choose a suitable environment and enable the background blur option to observe how effectively it blurs the background.
- Check for Glitches or Performance Issues: During the test call, pay attention to any glitches or performance issues with the background blur feature. Look for any instances where the background blur may not be consistent or where it may fail to properly blur certain areas. Make note of any performance problems, as they could impact the overall quality of your video calls.
- Adjust Lighting Conditions: Experiment with different lighting conditions during the test call. While maintaining adequate lighting, try adjusting the intensity or direction of the light to observe how it affects the background blur. This will help you identify the optimal lighting setup for achieving the best results.
- Consider Environmental Factors: Take note of any environmental factors that might impact the background blur. Objects or patterns in the background, such as busy wallpaper or complex textures, may cause the blurring algorithm to struggle. Look for any potential background elements that might interfere with the desired blur effect.
- Make Adjustments if Necessary: Based on the results of your test call, you may need to make adjustments. If the background blur is not satisfactory, consider changing your positioning, adjusting the lighting, or removing any elements that might disrupt the blur effect. This will ensure that your background is appropriately blurred and allows the focus to remain on you during your important calls.
By conducting these tests before your calls, you can address any issues or concerns with the background blur feature in Skype. Testing helps you optimize your camera setup, lighting conditions, and environmental factors to achieve the desired professional and distraction-free video calling experience.
Remember, the effectiveness of the background blur feature can vary depending on your device, lighting conditions, and environment. Regularly testing the feature will ensure that you are well-prepared and can confidently utilize the background blur functionality during your Skype calls.
Final Thoughts
Enabling background blur in Skype can significantly enhance the visual quality and professionalism of your video calls. Whether you’re conducting business meetings, job interviews, or personal conversations, blurring the background can help maintain privacy, reduce distractions, and create a more focused and engaging environment.
By following the methods outlined in this article, you can easily enable background blur in Skype. Before a call, you can adjust the settings in the Skype application to blur your background. During a call, you have the option to activate background blur or even use virtual backgrounds for added creativity.
However, it’s crucial to troubleshoot any issues you may encounter. Ensure adequate lighting, consider using a webcam with a built-in background blur feature, and test the functionality before important calls. These steps will help you address any challenges and maximize the effectiveness of the background blur feature.
Keep in mind that the success of background blur relies on various factors, such as lighting conditions, device capabilities, and software compatibility. By adapting your environment, testing the feature, and making necessary adjustments, you can create a visually appealing and distraction-free backdrop for your Skype calls.
Remember to regularly update your Skype application and keep an eye out for any new features or improvements that enhance the background blur experience. Stay informed about the latest updates to ensure you are utilizing the most advanced options available.
With a little time and effort invested in enabling and optimizing background blur, you can elevate the quality and professionalism of your Skype video calls. Embrace the feature and enjoy the benefits of a clean and distraction-free background that puts the focus right where it should be – on you and your conversation.