
Choosing the Right USB Hub
When it comes to attaching a USB hub to your desk, one of the first things you need to consider is choosing the right USB hub for your needs. With a plethora of options available in the market, it can be overwhelming to make the best choice. However, by considering a few key factors, you can narrow down your options and select the perfect USB hub.
1. Number of Ports: The number of ports on the USB hub is crucial, as it determines how many devices you can connect simultaneously. Assess your requirements and choose a hub that offers enough ports to accommodate all your devices, taking into account future additions as well.
2. USB Version: USB hubs come in different versions, such as USB 2.0, USB 3.0, and USB-C. Consider the devices you plan to connect and their compatibility with different USB versions. USB 3.0 and USB-C hubs offer faster data transfer speeds, so they are ideal for devices that require high-speed connectivity.
3. Power Supply: Some USB hubs draw power directly from the computer, while others have a separate power supply. Depending on the devices you plan to connect, determine if the USB hub requires additional power to ensure smooth functioning.
4. Design and Portability: The design and portability of the USB hub are essential factors to consider, especially if you plan to use it on the go. Look for a hub that is compact and lightweight, making it easy to carry in your laptop bag or backpack.
5. Compatibility: Ensure that the USB hub you choose is compatible with your computer’s operating system. Whether you are using Windows, macOS, or a Linux distribution, make sure the hub is compatible with your device for seamless connectivity.
6. Build Quality: Look for a USB hub made from durable materials. You want a hub that can withstand regular use without succumbing to wear and tear. High-quality hubs offer better longevity and performance, so invest in one that meets your requirements.
By considering these factors and conducting thorough research, you can confidently choose the right USB hub for your desk. The perfect USB hub will enhance your productivity and provide a convenient way to connect and manage your devices effortlessly.
Gathering the Necessary Tools and Equipment
Before you start attaching a USB hub to your desk, it’s important to gather all the necessary tools and equipment. Having everything prepared in advance will ensure a smooth and efficient installation process. Here are the essential items you’ll need:
1. USB Hub: Of course, the main item you’ll need is the USB hub itself. Make sure you have purchased the appropriate one that meets your requirements, as discussed in the previous section.
2. Screwdriver: Depending on the type of attachment mechanism on your USB hub, you may need a screwdriver to secure it to your desk. Check the manufacturer’s instructions to determine if a screwdriver is required and the type of screws it uses.
3. Mounting Bracket or Adhesive Strips: Some USB hubs come with a mounting bracket that allows you to attach it to the desk using screws. If your USB hub doesn’t have a mounting bracket, you can use adhesive strips designed for mounting electronic devices on various surfaces.
4. Cable Management Solutions: To keep your desk organized and free of tangled cables, gather some cable management solutions. This could include cable clips, Velcro straps, cable sleeves, or cable raceways, depending on your preference and the layout of your desk.
5. Cleaning Supplies: Before attaching the USB hub, it’s a good idea to clean your desk surface. Gather some cleaning supplies, such as a microfiber cloth and a gentle cleaning solution, to wipe down the area where you’ll be attaching the hub. This will ensure a clean and secure attachment.
6. Optional Accessories: Depending on your specific needs and preferences, you may also consider additional accessories such as a USB extension cable or a USB hub with built-in cable management features. These can provide flexibility and convenience in connecting your devices and managing the cables.
By gathering these necessary tools and equipment beforehand, you’ll be well-prepared to attach your USB hub to your desk. This will streamline the installation process and help create a tidy and functional workspace.
Determining the Placement of the USB Hub on the Desk
Once you have gathered all the necessary tools and equipment, the next step is to determine the ideal placement of the USB hub on your desk. The placement plays a crucial role in ensuring easy access to the hub and efficient cable management. Here are some factors to consider when determining the placement:
1. Accessibility: Choose a location that provides convenient access to the USB hub. Ideally, it should be within arm’s reach so that you can easily connect and disconnect devices without straining or stretching cables.
2. Desk Space: Look for an area on your desk that has enough space to accommodate the USB hub and the devices you plan to connect. Avoid overcrowding the area as it can make it difficult to manage the cables and may lead to a cluttered workspace.
3. Cable Length: Consider the length of the cables attached to your devices. Ensure that the USB hub is positioned in a way that allows the cables to reach their respective devices comfortably without any tension or strain.
4. Ventilation: Some USB hubs, especially those with power adapters or that support high-speed data transfer, can generate heat. To prevent overheating, place the hub in an area that allows for proper ventilation, away from any heat sources or confined spaces.
5. Cable Management: Think about how you will manage the cables connected to the USB hub. Choose a location that allows for easy cable routing and organization. You can make use of cable clips, Velcro straps, or cable raceways to keep the cables tidy and prevent them from becoming tangled.
6. Aesthetics: Consider the overall aesthetics of your workspace. Choose a placement that blends well with the design and layout of your desk. If you have a dedicated cable management system, position the USB hub in a way that complements the overall appearance.
Take some time to assess your desk and experiment with different placements before settling on the final position for your USB hub. Once you have determined the ideal placement, you can proceed with attaching the hub to your desk and connecting your devices for a clutter-free and efficient workspace.
Preparing the Desk for Attachment
Before you can attach the USB hub to your desk, it’s important to properly prepare the desk surface. This will ensure a secure and stable attachment, preventing any potential damage to your desk or the USB hub. Here are the steps to follow for preparing the desk:
1. Clean the Surface: Begin by cleaning the area where you plan to attach the USB hub. Use a microfiber cloth and a gentle cleaning solution to remove any dust, dirt, or grease from the desk surface. A clean surface will provide better adhesion and prevent any debris from interfering with the attachment process.
2. Measure and Mark: Measure the dimensions of the USB hub and use a ruler or a tape measure to mark the exact location where you want to attach the hub. Double-check the measurements to ensure accuracy and precision.
3. Check for Obstacles: Look for any obstacles or obstructions that may interfere with the attachment process, such as cables, drawers, or uneven surfaces. Clear away any objects or rearrange them to create a clear and flat area for the USB hub.
4. Consider Accessibility: Take into account how easily you can access the USB hub in its desired location. Ensure that there is enough space for inserting and removing USB cables and that it’s not obstructed by other objects on the desk.
5. Test the Adhesion: If you are using adhesive strips for attachment, test the adhesion strength by applying a small piece to the desired location on the desk. Wait for a few minutes to ensure that it holds securely. If it doesn’t adhere properly, consider using a different adhesive method or consult the manufacturer’s instructions for alternative attachment options.
6. Allow for Ventilation: If your USB hub generates heat during operation, it’s important to ensure proper ventilation. Avoid attaching the hub in an enclosed area that could block airflow. If necessary, leave some space around the hub to allow for adequate air circulation.
By properly preparing the desk surface, you’ll create an optimal foundation for attaching the USB hub. This will not only ensure a secure and stable attachment but also contribute to the longevity and performance of your USB hub setup.
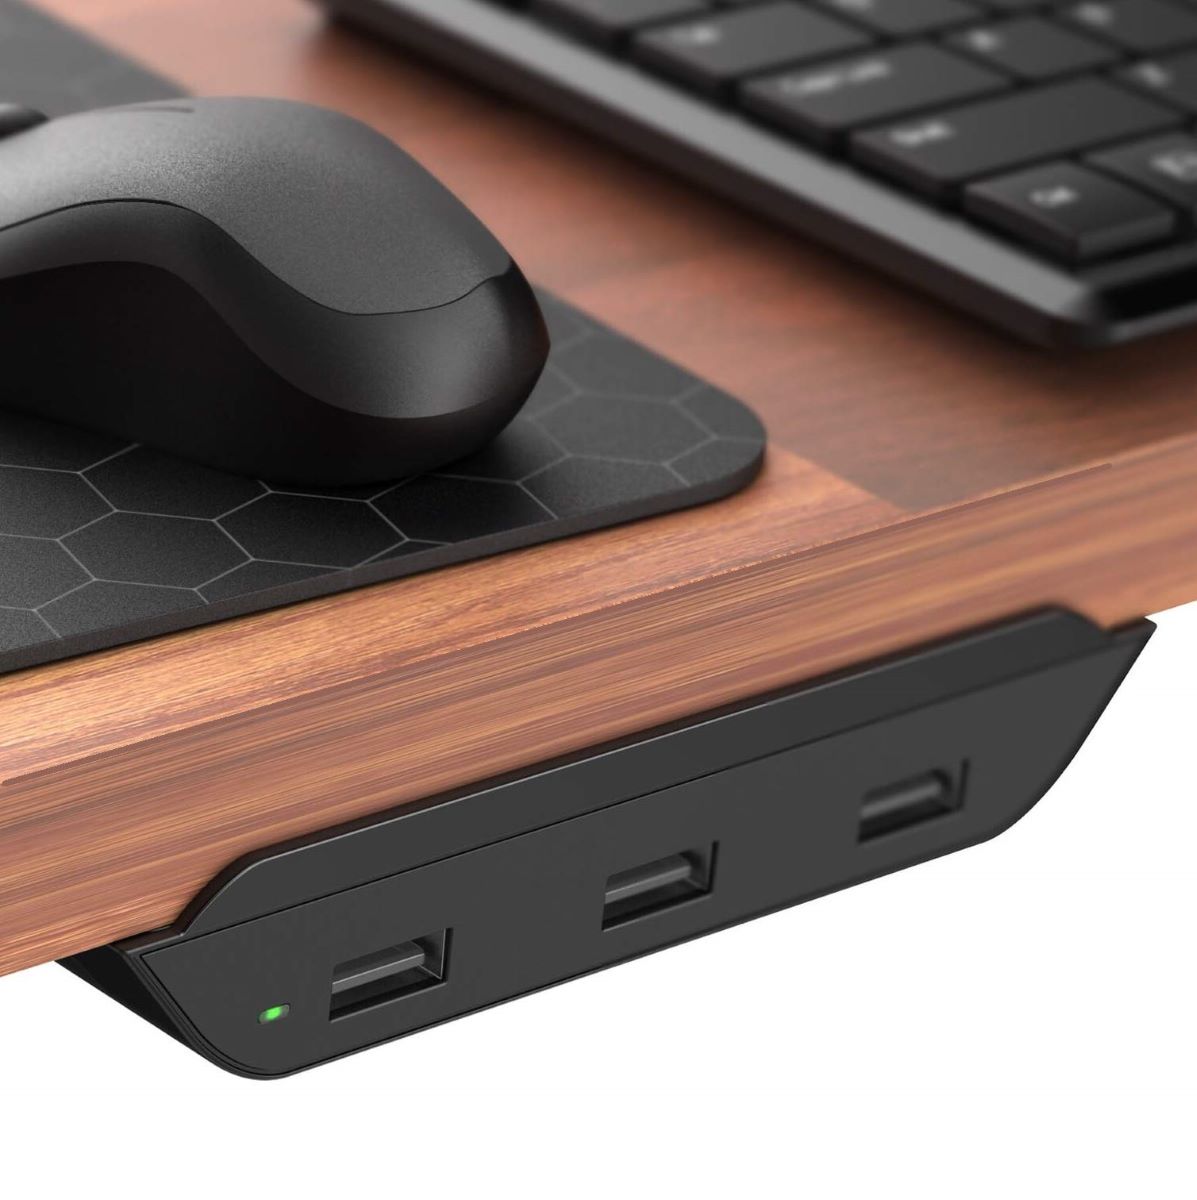
Attaching the USB Hub to the Desk
Once you have prepared the desk surface, you can proceed to attach the USB hub. The method of attachment will depend on the type of hub and the mounting options it provides. Here’s a general guide on how to attach the USB hub to your desk:
1. Mounting Bracket: If your USB hub comes with a mounting bracket, position the hub on the marked location and align the screw holes with those on the bracket. Use a screwdriver to secure the hub in place by tightening the screws.
2. Adhesive Strips: If there is no mounting bracket, you can use adhesive strips designed for mounting electronic devices. Remove the backing from the adhesive strip and carefully position the USB hub on the marked location. Press firmly to ensure a strong bond between the hub and the desk surface. Follow the manufacturer’s instructions for the specific adhesive strips you are using.
3. Adjustable Clamp: Some USB hubs may come with an adjustable clamp that allows you to attach it to the edge of the desk. Position the clamp on the desired edge and tighten it to secure the USB hub in place. Ensure that the clamp is firmly attached and provides a stable hold for the hub.
4. Magnetic Attachment: In certain cases, the USB hub may have a magnetic base for attachment. Simply place the hub on the marked location and let the magnet hold it in place. Ensure that the magnet has a strong grip and the hub is securely attached.
5. Follow Instructions: It’s important to carefully read and follow the manufacturer’s instructions for attaching the specific USB hub model you are using. They may provide detailed steps or additional considerations to ensure a proper attachment.
6. Double-Check Stability: Once the USB hub is attached, double-check its stability. Gently wiggle the hub to ensure that it is securely fastened and won’t easily come loose. This will help prevent any accidental dislodging of the hub during regular use.
By following these steps, you can successfully attach the USB hub to your desk, providing a stable and accessible location for connecting your devices. Ensure that the hub is securely attached before moving on to the next steps of connecting devices and managing cables.
Connecting Devices to the USB Hub
Now that you have successfully attached the USB hub to your desk, it’s time to connect your devices to the hub. Follow these steps to ensure a smooth and organized connection process:
1. Check the Ports: Identify the ports on the USB hub and determine which ones you will use for each device. Take note of any specific port specifications, such as USB 3.0 or USB-C, that your devices require for optimal performance.
2. Insert Cables: Begin by inserting the USB end of the cables into the corresponding ports on the USB hub. Make sure the connections are secure by gently pushing the plugs in until they click into place.
3. Connect Devices: Connect the other end of the cables to your devices, such as smartphones, external hard drives, printers, or any other USB-compatible devices you wish to connect. Ensure that the connections are snug to avoid any loose connections that can affect data transfer.
4. Power On: If your USB hub requires external power, make sure to plug in the power adapter and turn on the hub. This will provide power to the devices connected to the hub and allow them to function properly.
5. Check Device Recognition: Once the devices are connected, check if they are being recognized by your computer or other applicable devices. Ensure that the drivers and necessary software are up to date to avoid any compatibility issues.
6. Test Device Functionality: Test the functionality of each connected device to ensure that they are working as expected. Transfer files, print documents, or perform any other actions specific to the devices connected to the hub to verify their functionality.
By carefully connecting your devices to the USB hub, you can effectively expand the number of available USB ports on your desk and create a streamlined setup. This enables efficient device management and eliminates the need for constantly plugging and unplugging devices directly into your computer.
Organizing and Managing Cables
One of the key challenges when it comes to attaching a USB hub to your desk is managing the cables. To create a clean and organized workspace, follow these tips for effectively organizing and managing the cables:
1. Use Cable Clips or Cable Ties: Cable clips or cable ties are great tools for keeping cables neatly bundled and secured. Attach cable clips to the edge of your desk or use cable ties to group cables together, preventing them from tangling or becoming a tangled mess.
2. Use Cable Sleeves or Raceways: Cable sleeves or raceways are ideal for concealing and guiding cables along the desk. They provide a streamlined appearance and prevent cables from getting tangled or obstructing your workspace. Simply feed the cables through the sleeve or raceway to keep them organized.
3. Create Cable Channels: If your desk has built-in cable management features, such as cable channels or grommets, make use of them to route and hide cables. This allows for a clutter-free desk surface and easy cable management.
4. Arrange Cables According to Length: Arrange the cables according to their length to avoid excess cable clutter. Coil and tie up any extra length of cable to prevent tangles and ensure a clean and organized appearance.
5. Label Cables: If you have several cables connected to the USB hub, labeling them can help identify which cable is for which device. Use cable labels or color-coded tags to easily distinguish between different cables, making it easier to locate and manage specific connections.
6. Consider Wireless Options: If possible, consider using wireless connections for devices that have that capability. This eliminates the need for physical cables and reduces cable clutter, resulting in a cleaner and more streamlined workspace.
By implementing these cable management techniques, you can maintain a tidy and organized desk space, free from the hassle of tangled cables. A well-managed cable system not only improves the aesthetics of your workspace but also enhances productivity by reducing the time spent untangling cables or searching for specific connections.
Testing and Troubleshooting the USB Hub Connection
After connecting your devices to the USB hub, it’s essential to test the connection to ensure everything is functioning properly. If you encounter any issues, troubleshooting can help identify and resolve potential problems. Follow these steps to test and troubleshoot the USB hub connection:
1. Device Recognition: Check if your computer or other applicable devices recognize the devices connected to the USB hub. Ensure that the devices are being detected and properly displayed in the device manager or system settings.
2. Data Transfer Speed: Test the data transfer speed between your devices and the computer. Copy files of varying sizes and monitor the transfer rate to ensure that it is performing at expected speeds.
3. Device Functionality: Verify that all devices connected to the USB hub are functioning correctly. Test each device’s functionality, such as printing a document if it’s a printer, or accessing files if it’s an external hard drive. Address any compatibility issues or errors as they arise.
4. Power Supply: If your USB hub requires external power, ensure that it is receiving sufficient power from the power source. Check the power adapter and make sure it is properly connected. In case of power-related issues, try plugging the adapter into a different outlet or using a different power source if available.
5. Cable Integrity: Inspect the cables connected to the USB hub for any breaks or damage that could affect performance. Replace any faulty cables if necessary. Sometimes, using high-quality, shielded USB cables can help resolve connectivity issues and ensure stable data transfer.
6. USB Port Selection: Test different USB ports on the hub to ensure they are all functioning correctly. If a particular port is not working, it could be a sign of a faulty port or a compatibility issue. Avoid using that port and distribute the devices to other available ports.
7. Check for Driver Updates: Confirm that your computer has the latest drivers installed for the USB hub and connected devices. Visit the manufacturer’s website or use driver update software to check for any available updates. Updating drivers can often resolve compatibility issues and improve performance.
8. Restart and Reset: If you encounter persistent issues, try restarting your computer and resetting the USB hub. Disconnect the devices, unplug the USB hub from the computer, wait for a few seconds, and then reconnect everything. This can help refresh the connection and resolve minor glitches.
By testing and troubleshooting the USB hub connection, you can identify any issues early on and take appropriate steps to resolve them. A well-tested and properly functioning USB hub connection ensures a smooth and efficient workflow, allowing you to maximize the benefits of your device setup.
Maintaining and Cleaning the USB Hub
To ensure optimal performance and longevity of your USB hub, it’s important to establish a regular maintenance routine. By keeping the hub clean and taking preventive measures, you can avoid potential issues and ensure a reliable connection. Follow these maintenance and cleaning tips for your USB hub:
1. Dusting: Regularly dust your USB hub to prevent dust buildup, which can affect the performance of the ports. Use a soft microfiber cloth or an anti-static brush to gently wipe off any dust or debris from the hub’s surface.
2. Unplug Devices Properly: When disconnecting devices from the USB hub, make sure to unplug them properly. Avoid pulling on the cables, as this can strain the USB ports. Instead, firmly grasp the connector and gently unplug it from the hub to prevent damage.
3. Avoid Overloading: Be mindful of not overloading the USB hub with more devices than it can handle. Excessive power draw can lead to performance issues. If you need to connect several high-powered devices, consider using a powered USB hub with sufficient power supply.
4. Keep the Hub Cool: Ensure proper ventilation around the USB hub to prevent overheating. Avoid obstructing air vents, and keep the hub away from sources of heat. Overheating can affect the performance of the hub and the connected devices.
5. Avoid Liquids and Moisture: To prevent damage, keep your USB hub away from liquids and moisture. Accidental spills or exposure to moisture can cause a short circuit or affect the internal components. If any liquid comes into contact with the hub, disconnect it immediately and allow it to thoroughly dry before using it again.
6. Check for Firmware Updates: Periodically check for firmware updates for your USB hub. Manufacturers often release firmware updates to enhance performance, add new features, or address bug fixes. Follow the manufacturer’s instructions to update the firmware and keep your hub up-to-date.
7. Inspect and Replace Faulty Cables: Regularly inspect the USB cables connected to your hub for any signs of wear or damage. If you notice frayed wires or loose connectors, replace the cables promptly to avoid potential connectivity issues or data loss.
8. Follow Manufacturer’s Guidelines: Refer to the manufacturer’s guidelines and recommendations for specific maintenance instructions. They may provide additional information on cleaning methods, safe usage practices, and troubleshooting tips for your specific USB hub model.
By following these maintenance and cleaning practices, you can keep your USB hub in optimal condition and enjoy reliable and uninterrupted connectivity. Regular care and maintenance will help extend the lifespan of your hub and ensure hassle-free usage.