
Why do pop-ups get blocked?
Pop-ups are an integral part of internet browsing experience, serving a variety of purposes such as displaying important messages, delivering notifications, or providing additional information. However, many web browsers have built-in pop-up blockers to protect users from intrusive or malicious pop-up ads.
The primary reason why pop-ups get blocked is to enhance user experience and prevent unwanted interruptions while browsing. Pop-up ads can be incredibly annoying and disruptive, often appearing unexpectedly and obstructing the content users are attempting to view. By blocking pop-ups, web browsers aim to create a more seamless and enjoyable browsing environment.
Furthermore, pop-ups can also be used for malicious purposes. They may contain scams, phishing attempts, or malware that can compromise the security of users’ devices and personal information. Blocking pop-ups helps to prevent users from inadvertently clicking on harmful links or downloading malicious files.
Most modern web browsers implement pop-up blockers by default, but users also have the option to customize their settings according to their preferences. While blocking pop-ups is generally recommended, there are instances when allowing them may be necessary, such as for accessing certain websites with legitimate pop-up functionality or completing specific tasks that require pop-ups.
It is worth noting that not all pop-ups are intrusive or harmful. Some websites use legitimate pop-ups for important functionality, such as login windows, web form submissions, or confirmation messages. In these cases, it may be necessary to adjust the browser’s settings to allow pop-ups from specific websites while still maintaining overall protection against unwanted pop-up advertisements.
Overall, the primary motivations behind blocking pop-ups are to improve user experience, protect against malicious attacks, and minimize interruptions during browsing sessions. However, it is essential to strike a balance and have the flexibility to allow pop-ups when needed for legitimate purposes.
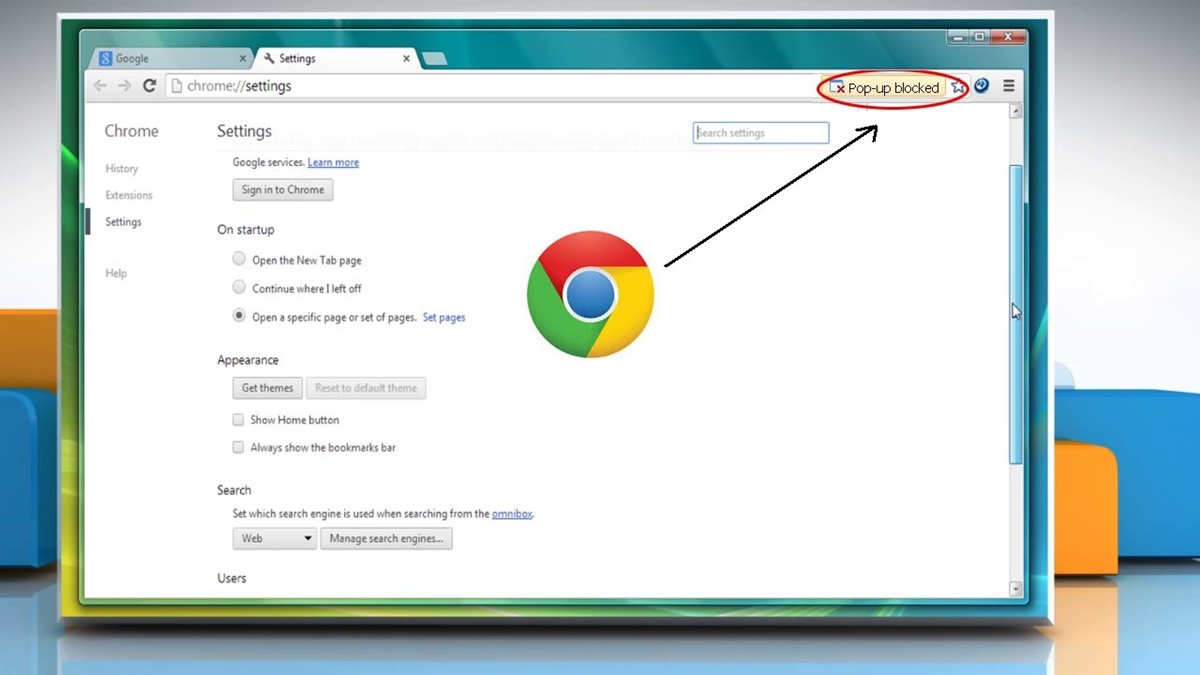
How to allow pop-ups in Google Chrome
Google Chrome, one of the most popular web browsers, has a built-in pop-up blocker to prevent unwanted pop-ups from appearing. However, if you need to allow pop-ups for specific websites or adjust the browser’s settings to accommodate certain tasks, you can follow these steps:
- Launch Google Chrome and click on the three-dot menu icon in the top-right corner of the browser window.
- From the dropdown menu, select “Settings”.
- Scroll down and click on “Privacy and security” in the left-hand sidebar.
- Under the “Privacy and security” section, click on “Site Settings”.
- Scroll down and click on “Pop-ups and redirects”.
- To allow all pop-ups, toggle the switch next to “Blocked (recommended)” to turn it off.
- If you want to allow pop-ups for specific websites, toggle the switch next to “Blocked (recommended)” to keep it on, then click on “Add” next to the “Allow” section and enter the website’s URL.
- Click “Add” to save the changes.
By following these steps, you can customize the pop-up settings in Google Chrome to either allow all pop-ups or selectively enable them for specific websites. Keep in mind that it is recommended to keep the pop-up blocker enabled to protect against unwanted advertisements and potentially harmful pop-ups.
Remember that allowing pop-ups can affect your browsing experience and security, so it is important to exercise caution and only allow them for trusted websites or when necessary. Regularly reviewing and managing your pop-up settings in Google Chrome can help ensure a safe and seamless browsing experience.
How to allow pop-ups in Mozilla Firefox
Mozilla Firefox, a widely-used web browser, comes with a built-in pop-up blocker to prevent intrusive pop-ups from disrupting your browsing experience. However, there may be instances where you need to allow pop-ups for certain websites or adjust the browser’s settings. Here’s how you can do it:
- Launch Mozilla Firefox and click on the three-line menu icon in the top-right corner of the browser window.
- From the dropdown menu, select “Preferences” (or “Options” on Windows).
- In the left-hand sidebar, click on “Privacy & Security”.
- Scroll down until you find the “Permissions” section.
- Under the “Permissions” section, locate the “Block pop-up windows” checkbox and make sure it is unchecked.
- If you want to allow pop-ups for specific websites, click on the “Exceptions” button next to the “Block pop-up windows” option.
- In the “Exceptions for” section, enter the website’s URL that you want to allow pop-ups for and click “Allow”.
- Click “Save Changes” to apply the settings.
Following these steps will enable you to customize the pop-up settings in Mozilla Firefox, allowing you to either disable the pop-up blocker entirely or selectively allow pop-ups for specific websites. It is important to exercise caution when allowing pop-ups, as they can be intrusive and potentially harmful. Remember to only allow pop-ups for trusted websites or when necessary.
Keep in mind that enabling pop-ups can impact your browsing experience and security. It is recommended to keep the pop-up blocker enabled by default to safeguard against unwanted advertisements and malicious pop-ups. Regularly reviewing and managing your pop-up settings in Mozilla Firefox is crucial to ensure a safe and seamless browsing experience.
How to allow pop-ups in Microsoft Edge
Microsoft Edge is a popular web browser that includes a built-in pop-up blocker to prevent intrusive pop-ups from disrupting your browsing experience. However, there might be situations where you need to allow pop-ups for specific websites or modify the browser’s settings. Here’s how you can do it:
- Launch Microsoft Edge and click on the three-dot menu icon in the top-right corner of the browser window.
- From the dropdown menu, select “Settings”.
- In the left-hand sidebar, click on “Privacy, search, and services”.
- Scroll down until you find the “Permissions” section.
- Under the “Permissions” section, click on “Popup and Redirects”.
- To allow all pop-ups, toggle the switch next to “Block pop-ups” to off.
- If you want to allow pop-ups for specific websites, toggle the switch next to “Block pop-ups” to on, then click on “Add” and enter the website’s URL.
- Click “Add” to save the changes.
By following these steps, you can customize the pop-up settings in Microsoft Edge to either allow all pop-ups or selectively enable them for specific websites. However, it’s important to note that enabling pop-ups can affect your browsing experience and security. Use caution and only allow pop-ups for trusted websites or when necessary.
Remember, it is generally recommended to keep the pop-up blocker enabled to protect against unwanted advertisements and potentially malicious pop-ups. Regularly reviewing and managing your pop-up settings in Microsoft Edge can help ensure a safe and seamless browsing experience.
How to allow pop-ups in Internet Explorer
Internet Explorer (IE) is a web browser that comes with a built-in pop-up blocker to prevent unwanted pop-ups from disrupting your browsing experience. However, there may be situations where you need to allow pop-ups for certain websites or adjust the browser’s settings. Here’s how you can do it:
- Launch Internet Explorer and click on the gear icon in the top-right corner of the browser window.
- From the dropdown menu, select “Internet Options”.
- In the Internet Options window, navigate to the “Privacy” tab.
- Under the Pop-up Blocker section, click on the “Settings” button.
- If you want to allow pop-ups for specific websites, enter the website’s URL in the “Address of website to allow” field and click the “Add” button.
- Click “Close” to save the changes.
By following these steps, you can customize the pop-up settings in Internet Explorer to allow pop-ups for specific websites. However, it’s important to exercise caution when enabling pop-ups, as they can be intrusive and potentially harmful. Only allow pop-ups for trusted websites or when necessary.
Keep in mind that enabling pop-ups can impact your browsing experience and security. It is recommended to keep the pop-up blocker enabled by default to protect against unwanted advertisements and malicious pop-ups. Regularly reviewing and managing your pop-up settings in Internet Explorer is important to ensure a safe and seamless browsing experience.
How to allow pop-ups in Safari
Safari, the default web browser for Apple devices, has a built-in pop-up blocker that helps prevent intrusive pop-ups from disrupting your browsing experience. However, there may be times when you need to allow pop-ups for specific websites or adjust the browser’s settings. Here’s how you can do it:
- Launch Safari and click on “Safari” in the top menu.
- From the dropdown menu, select “Preferences”.
- In the Preferences window, click on the “Websites” tab at the top.
- In the left-hand sidebar, click on “Pop-up Windows”.
- To allow pop-ups for all websites, uncheck the “Block pop-up windows” option.
- If you want to allow pop-ups for specific websites, scroll down and find the website in the list. Then, select “Allow” from the dropdown menu next to the website’s name.
- Alternatively, you can click on “Add Website” and enter the website’s URL to add it to the list of allowed websites.
By following these steps, you can customize the pop-up settings in Safari to either allow all pop-ups or selectively enable them for specific websites. However, it’s important to exercise caution when enabling pop-ups, as they can be intrusive and potentially harmful. Only allow pop-ups for trusted websites or when necessary.
Remember that enabling pop-ups can impact your browsing experience and security. It is recommended to keep the pop-up blocker enabled by default to protect against unwanted advertisements and malicious pop-ups. Regularly reviewing and managing your pop-up settings in Safari will ensure a safe and seamless browsing experience.
How to allow pop-ups in Opera
Opera is a popular web browser known for its speed and flexibility. By default, Opera blocks pop-ups to enhance your browsing experience and protect you from intrusive or malicious content. However, there may be situations where you need to allow pop-ups for specific websites or customize the browser’s settings. Here’s how you can do it:
- Launch Opera and click on the Opera logo in the top-left corner of the browser window.
- From the dropdown menu, hover over “Settings” and click on “Preferences” (or “Settings” on Windows).
- In the left-hand sidebar, click on “Websites”.
- Scroll down until you find the “Pop-ups” section.
- To allow all pop-ups, select “Allow all sites to show pop-ups”.
- If you want to allow pop-ups for specific websites, click on the “Manage exceptions” button.
- In the “Address” field, enter the website’s URL for which you want to allow pop-ups and select “Allow” from the “Behavior” dropdown menu.
- Click “Done” to save the changes.
By following these steps, you can customize the pop-up settings in Opera to either allow all pop-ups or selectively enable them for specific websites. However, it’s important to exercise caution when allowing pop-ups, as they can be intrusive and potentially harmful. Only allow pop-ups for trusted websites or when necessary.
It’s worth noting that enabling pop-ups can affect your browsing experience and security. It is recommended to keep the pop-up blocker enabled by default to protect against unwanted advertisements and malicious pop-ups. Regularly reviewing and managing your pop-up settings in Opera can help ensure a safe and seamless browsing experience.
How to allow pop-ups in Brave
Brave is a privacy-focused web browser that blocks intrusive ads and unwanted pop-ups by default. However, there may be instances when you need to allow pop-ups for specific websites or customize the browser’s settings. Here’s how you can do it:
- Launch Brave and click on the three-line menu icon in the top-right corner of the browser window.
- From the dropdown menu, select “Settings”.
- In the left-hand sidebar, click on “Shields”.
- Underneath the “General” tab, locate the “Block pop-ups” option.
- To allow all pop-ups, toggle the switch next to “Block pop-ups” to off.
- If you want to allow pop-ups for specific websites, toggle the switch next to “Block pop-ups” to on, then click on “Manage exceptions”.
- In the “Site” field, enter the website’s URL for which you want to allow pop-ups and select “Allow” from the dropdown menu next to it.
- Click “Save” to save the changes.
By following these steps, you can customize the pop-up settings in Brave to either allow all pop-ups or selectively enable them for specific websites. Exercise caution when allowing pop-ups, as they can be intrusive and potentially harmful. Only allow pop-ups for trusted websites or when necessary.
Be aware that enabling pop-ups can affect your browsing experience and security. It is recommended to keep the pop-up blocker enabled by default to protect against unwanted advertisements and malicious pop-ups. Regularly reviewing and managing your pop-up settings in Brave will help ensure a safe and seamless browsing experience.
How to allow pop-ups in Microsoft Edge (Legacy)
Microsoft Edge (Legacy) is an older version of the Microsoft Edge browser that was replaced by the new Chromium-based version. If you are using the Legacy version and need to allow pop-ups for specific websites or customize the browser’s settings, you can follow these steps:
- Launch Microsoft Edge (Legacy) and click on the gear icon in the top-right corner of the browser window.
- From the dropdown menu, select “Internet Options”.
- In the Internet Options window, navigate to the “Privacy” tab.
- Under the Pop-up Blocker section, click on the “Settings” button.
- If you want to allow pop-ups for specific websites, enter the website’s URL in the “Address of website to allow” field and click the “Add” button.
- Click “Close” to save the changes.
Note that the steps mentioned above apply specifically to the Legacy version of Microsoft Edge. The newer Chromium-based version of Microsoft Edge utilizes a different interface and settings menu. Therefore, for the latest version of Microsoft Edge, refer to the corresponding section in this article.
While using Legacy Microsoft Edge, it’s essential to exercise caution when allowing pop-ups, as they can be intrusive and potentially harmful. Only allow pop-ups for trusted websites or when necessary.
Remember that enabling pop-ups can impact your browsing experience and security. It is recommended to keep the pop-up blocker enabled by default to protect against unwanted advertisements and malicious pop-ups. Regularly reviewing and managing your pop-up settings in Microsoft Edge (Legacy) will ensure a safe and seamless browsing experience.
How to allow pop-ups on a Mac
If you’re using a Mac and need to allow pop-ups for specific websites or adjust the browser’s settings to accommodate certain tasks, you can follow these steps:
- If you’re using the Safari browser, launch Safari and click on “Safari” in the top menu.
- From the dropdown menu, select “Preferences”.
- In the Preferences window, click on the “Websites” tab at the top.
- In the left-hand sidebar, click on “Pop-up Windows”.
- To allow pop-ups for all websites, uncheck the “Block pop-up windows” option.
- If you want to allow pop-ups for specific websites, scroll down and find the website in the list. Then, select “Allow” from the dropdown menu next to the website’s name.
- Alternatively, you can click on “Add Website” and enter the website’s URL to add it to the list of allowed websites.
If you’re using a different browser like Google Chrome or Mozilla Firefox, the process may vary slightly. Here’s a general outline:
- Launch your preferred browser (e.g., Google Chrome, Mozilla Firefox).
- Click on the browser’s menu icon, usually located in the top-right corner of the browser window.
- From the dropdown menu, select “Settings” or “Preferences”.
- Navigate to the “Privacy and Security” or similar section in the settings.
- Look for the Pop-ups or Pop-ups/Blocked section and adjust the settings to allow pop-ups either for all websites or specific ones.
By following these steps, you can customize the pop-up settings on your Mac’s browser to allow pop-ups for specific websites or modify the browser’s overall behavior. However, it’s important to exercise caution when enabling pop-ups, as they can be intrusive and potentially harmful. Only allow pop-ups for trusted websites or when necessary.
Remember, enabling pop-ups can impact your browsing experience and security. It is recommended to keep the pop-up blocker enabled by default to protect against unwanted advertisements and malicious pop-ups. Regularly reviewing and managing your pop-up settings on your Mac will help ensure a safe and seamless browsing experience.
How to allow pop-ups on a mobile device
Allowing pop-ups on a mobile device can vary depending on the operating system and the browser you are using. Here’s a general guide on how to enable pop-ups on popular mobile devices:
iOS (iPhone or iPad)
If you’re using Safari as your browser on an iOS device:
- Open the Settings app on your iPhone or iPad.
- Scroll down and tap on “Safari”.
- Under the “GENERAL” section, toggle on the “Block Pop-ups” option to disable it.
If you’re using a different browser like Google Chrome on your iOS device:
- Open the Google Chrome app on your iPhone or iPad.
- Tap on the three-dot menu icon in the bottom-right corner of the browser.
- From the list of options, tap on “Settings”.
- Scroll down and tap on “Content Settings”.
- Tap on “Block Pop-ups” and toggle it off.
Android
If you’re using the Chrome browser on an Android device:
- Open the Chrome app on your Android device.
- Tap on the three-dot menu icon in the top-right corner of the browser.
- From the list of options, tap on “Settings”.
- Scroll down and tap on “Site Settings”.
- Tap on “Pop-ups and redirects”.
- Toggle the switch next to “Block Pop-ups” to the off position.
The steps mentioned above are general instructions for enabling pop-ups on popular mobile platforms. However, the exact settings and options might vary depending on the version of the operating system and the browser you are using. It’s always a good idea to consult the specific instructions or support documentation provided by the browser or device manufacturer for more accurate and up-to-date information.
Please note that enabling pop-ups on a mobile device can leave you vulnerable to unwanted advertisements or potentially malicious pop-ups. It is recommended to exercise caution and only allow pop-ups for trusted websites or when necessary.
How to whitelist specific websites for pop-ups in various browsers
While it’s generally recommended to keep pop-up blockers enabled for a smoother and safer browsing experience, there may be instances where you need to allow pop-ups for specific websites. Whitelisting specific websites for pop-ups can be done in different ways depending on the browser you’re using. Here’s how to do it in some popular browsers:
Google Chrome
- Launch Google Chrome and click on the three-dot menu icon in the top-right corner of the browser window.
- From the dropdown menu, select “Settings”.
- Scroll down and click on “Privacy and security” in the left-hand sidebar.
- Under the “Privacy and security” section, click on “Site Settings”.
- Scroll down and click on “Pop-ups and redirects”.
- Toggle the switch next to “Blocked (recommended)” to keep it on, then click on “Add” next to the “Allow” section.
- Enter the website’s URL and click “Add” to whitelist it for pop-ups.
- Repeat the process for any other websites you want to whitelist.
Mozilla Firefox
- Launch Mozilla Firefox and click on the three-line menu icon in the top-right corner of the browser window.
- From the dropdown menu, select “Preferences” (or “Options” on Windows).
- In the left-hand sidebar, click on “Privacy & Security”.
- Scroll down and click on “Exceptions” next to “Block pop-up windows”.
- In the “Address of website” field, enter the URL of the website you want to whitelist.
- Click “Allow” and then “Save Changes”.
- Repeat the process for any other websites you want to whitelist.
Microsoft Edge
- Launch Microsoft Edge and click on the three-dot menu icon in the top-right corner of the browser window.
- From the dropdown menu, select “Settings”.
- In the left-hand sidebar, click on “Site permissions”.
- Click on “Pop-ups and redirects”.
- To whitelist a website, click on “Add” under the “Allow” section.
- Enter the website’s URL and click “Add” to whitelist it for pop-ups.
- Repeat the process for any other websites you want to whitelist.
These are just a few examples of how to whitelist specific websites for pop-ups in popular browsers. The exact steps may vary depending on the browser and its version. Remember to exercise caution when allowing pop-ups and only whitelist trusted websites to avoid potential security risks.
How to prevent certain pop-ups from appearing on your PC
Pop-ups can be frustrating, especially when they disrupt your browsing experience. Fortunately, there are steps you can take to prevent certain pop-ups from appearing on your PC. Here are some effective methods:
Enable pop-up blockers
Most modern web browsers come with built-in pop-up blockers that can effectively prevent many intrusive pop-ups from appearing. Ensure that your browser’s pop-up blocker is enabled to automatically block unwanted pop-ups.
Install a reputable ad-blocker extension
Consider installing a reputable ad-blocker extension for your browser. These extensions not only block ads but can also help prevent certain types of pop-ups from appearing. Explore popular options such as AdBlock Plus or uBlock Origin, which have customizable settings to enhance your browsing experience.
Keep your operating system and browser up to date
Regularly updating your operating system and web browser is important for many reasons, including security enhancements. New updates often include improved pop-up blocking features that can help prevent certain pop-ups from appearing on your PC.
Exercise caution when downloading or installing software
Unwanted pop-ups can sometimes occur as a result of downloading or installing potentially unwanted programs (PUPs). When downloading software, be sure to do so from trusted sources. Read and understand the installation prompts to avoid inadvertently agreeing to install additional software that may generate pop-ups.
Be mindful of adware and malware
Adware or malware infections can cause persistent and unwanted pop-ups on your PC. Ensure that you have reliable and up-to-date antivirus software installed. Regularly scan your system for any potential threats and remove any detected malware or adware to prevent further pop-up issues.
Disable notifications from specific websites
Some websites may generate pop-ups in the form of notifications. You can prevent these notifications from appearing by adjusting your browser’s settings. Look for the “Notifications” section in your browser’s settings and manage the permission settings for individual websites.
By following these preventive measures, you can significantly reduce the number of unwanted pop-ups appearing on your PC. The combination of pop-up blockers, ad-blocker extensions, cautious browsing habits, and regular system maintenance will contribute to a more enjoyable and uninterrupted browsing experience.
Other tips and tricks for managing pop-ups on your PC
In addition to the methods mentioned earlier, here are some additional tips and tricks for effectively managing pop-ups on your PC:
Review browser extensions
Periodically review and manage the browser extensions you have installed. Some extensions may inadvertently allow pop-ups or introduce unwanted behavior. Disable or remove any extensions that may be causing undesirable pop-up issues.
Use a virtual private network (VPN)
Consider using a reputable VPN service when browsing the internet. A VPN can encrypt your internet connection and help protect you from malicious pop-ups and ads by blocking unwanted content at the network level.
Adjust browser privacy and security settings
Explore your browser’s privacy and security settings to see if there are additional options for managing pop-ups. Some browsers offer more granular control over pop-up preferences or specific settings to block certain types of pop-ups.
Report malicious pop-ups
If you encounter particularly intrusive or malicious pop-ups, report them to the appropriate authorities. Many browsers have mechanisms in place for reporting harmful or deceptive pop-ups to help protect other users.
Educate yourself about safe browsing habits
Staying informed about safe browsing practices can go a long way in managing pop-ups effectively. Be cautious when clicking on suspicious links, downloading files from untrustworthy sources, or providing personal information on unfamiliar websites.
Consider alternative browsers
If pop-ups continue to be a persistent issue, you might want to explore alternative web browsers. Some browsers have more robust pop-up blocking features, while others offer advanced customization options to tailor your browsing experience to your liking.
Utilize browser add-ons or plugins
Some browsers provide add-ons or plugins specifically designed to enhance pop-up blocking capabilities. These extensions can offer additional features and fine-tuning options to further manage and control pop-ups based on your preferences.
By implementing these tips and tricks, you can better manage and control pop-ups on your PC, ensuring a more seamless and enjoyable browsing experience. Remember to regularly review and update your browser and security settings, exercise caution when browsing unfamiliar websites, and stay informed about the latest online threats and how to protect yourself from them.