
How to Access the Widgets Panel
The Widgets panel on your iPad allows you to quickly access and organize your favorite apps, information, and functionalities. With just a few simple steps, you can customize your Home Screen and Today View to display the widgets that are most relevant and useful to you. Here’s how to access the Widgets panel:
- Start by unlocking your iPad and navigating to the Home Screen. This is the main screen that appears when you turn on your device.
- Swipe right from the left edge of the screen or swipe down from the top right corner to reveal the Today View. This is where your widgets are displayed.
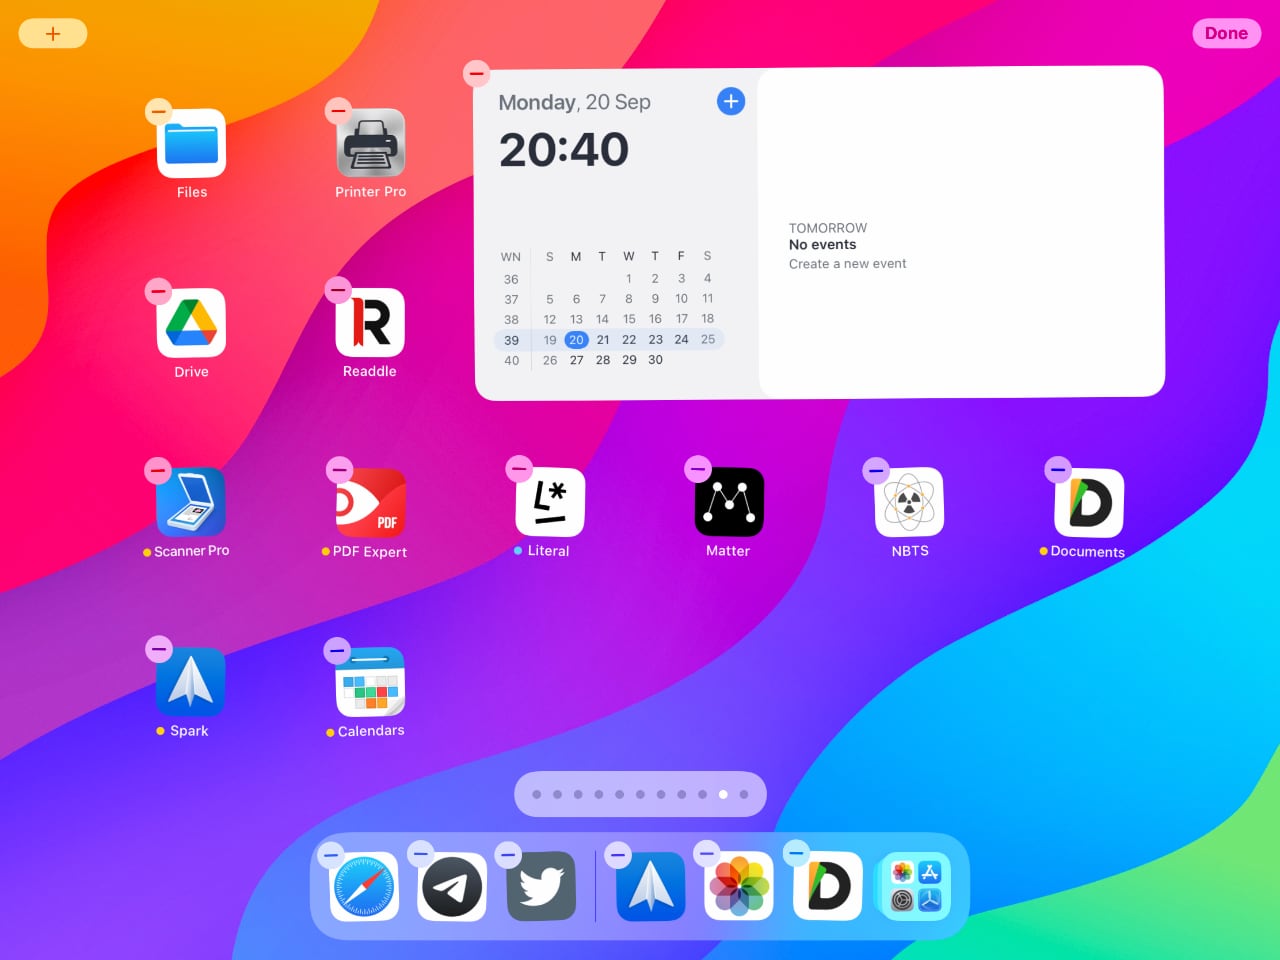
- Scroll to the bottom of the Today View and look for the “Edit” button. It is usually located at the bottom of the screen, below all the widgets.
- Tap the “Edit” button to enter the widget-editing mode. You will now see a list of widgets that are available to add to your Home Screen or Today View.
- To add a widget to your Home Screen, tap the green “+” icon next to the widget’s name. This will place the widget on your Home Screen in the order you have selected.
- Similarly, you can add widgets to your Today View by tapping the green “+” icon next to the widget’s name. The added widgets will be displayed in the Today View according to the order you choose.
That’s it! You have successfully accessed the Widgets panel on your iPad. You can now proceed to customize and arrange the widgets on your Home Screen and Today View to suit your preferences and needs.
Adding Widgets to Your Home Screen
The Home Screen of your iPad serves as a quick-access hub for your most frequently used apps and information. With the Widgets feature, you can now add useful and personalized widgets to your Home Screen for easy access. Here’s how you can add widgets to your Home Screen:
- Unlock your iPad and navigate to the Home Screen.
- Tap and hold on any empty space on your Home Screen, or on an app icon until the apps start jiggling.
- Look for the “+” icon at the top-left corner of the screen and tap it. This will open the Widgets panel.
- Browse through the available widgets and select the one you want to add to your Home Screen.
- Tap the widget you want to add and choose the desired size from the options available.
- Tap “Add Widget” to confirm and add the widget to your Home Screen. It will now appear in the selected position.
- To rearrange the widget’s position, simply tap and hold it, then drag it to the desired location on your Home Screen.
- When you are satisfied with the placement, tap anywhere on the screen or press the home button to exit the editing mode. The widgets will now be permanently displayed on your Home Screen.
By adding widgets to your Home Screen, you can conveniently access important information, view updates, or control various apps without having to open them individually. Enjoy the enhanced functionality and personalization that widgets bring to your iPad’s Home Screen!
Rearranging Widgets on the Home Screen
Once you have added widgets to your Home Screen on your iPad, you may want to organize them in a way that suits your personal preferences. Fortunately, rearranging widgets is a simple and straightforward process. Here’s how you can easily rearrange widgets on your Home Screen:
- Unlock your iPad and navigate to the Home Screen where the widgets are located.
- Tap and hold on any widget that you want to move. After a brief moment, the widgets will start to jiggle, indicating that you are in editing mode.
- While the widgets are jiggling, drag the selected widget to the desired position on your Home Screen. You can move it to a different page or place it next to other widgets.
- If you want to move the widget to a different page, drag it to the edge of the screen until the screen starts to slide, then drop it onto the desired page.
- To place the widget next to another widget, move it close to the desired widget until you see a blue line indicating the position, then release your finger to drop the widget in that spot.
- Continue rearranging the rest of the widgets on your Home Screen in the same manner until you have achieved the desired layout.
- Once you have finished rearranging the widgets, tap anywhere on the screen or press the home button to exit editing mode. The widgets will no longer jiggle, and your new layout will be saved.
Take the time to organize your widgets in a way that makes accessing your favorite apps and information more efficient for you. Whether you prefer to group similar widgets together or prioritize frequently used ones, rearranging widgets on your Home Screen allows you to customize the layout to your liking.
Removing Widgets from the Home Screen
If you no longer need certain widgets on your iPad’s Home Screen or if you want to declutter your screen, you can easily remove them. Here’s how to remove widgets from your Home Screen:
- Unlock your iPad and navigate to the Home Screen that contains the widgets you want to remove.
- Tap and hold on any widget until they start jiggling, indicating that you are in editing mode.
- Look for the small “X” icon at the top-left corner of the widget you want to remove. Tap on it.
- An alert message will appear, asking you to confirm the removal of the widget. Select “Remove” to proceed.
- The widget will disappear from your Home Screen immediately after you confirm the removal.
- If you have multiple pages on your Home Screen and want to remove a widget from a different page, swipe left or right to navigate to that page first before following the above steps.
- Once you have removed the desired widgets, tap anywhere on the screen or press the home button to exit editing mode. The remaining widgets will no longer jiggle, and your Home Screen will be cleaner and more streamlined.
By removing widgets that you no longer need, you can declutter your Home Screen and create a more focused and organized layout. Regularly reviewing and removing unnecessary widgets can help you maintain a clean and efficient iPad experience.
Customizing Widget Stacks
Widget Stacks are a convenient way to organize and access multiple related widgets in a compact space on your iPad’s Home Screen. By customizing widget stacks, you can personalize the content, arrangement, and appearance of the widgets within the stack. Here’s how you can customize widget stacks:
- Unlock your iPad and navigate to the Home Screen that contains the widget stack you want to customize.
- Tap on the widget stack to expand it and reveal the widgets within.
- Swipe up or down within the widget stack to scroll through the different widgets it contains.
- If you want to add more widgets to the stack, tap the “Edit Stack” button located at the bottom of the expanded stack.
- A list of available widgets will appear. Tap the green “+” icon next to each widget you want to add to the stack.
- To remove a widget from the stack, tap the red “-” icon next to the widget’s name.
- Use the handles on the right side of each widget to rearrange their order within the stack. Simply tap and hold the handle of a widget, then drag it up or down to the desired position.
- If you want to change the appearance of the stack, tap the “Stack Settings” button at the top right corner of the expanded stack.
- In the Stack Settings menu, you can choose between “Automatic” or “Manual” sorting for the widgets within the stack.
- With “Automatic” sorting, the system will arrange the widgets based on usage, relevance, or other factors.
- With “Manual” sorting, you have full control over the order of the widgets within the stack.
- Adjust any other settings available within the Stack Settings menu, such as showing the most recent widget first or enabling the Smart Rotate feature.
- Once you have finished customizing the widget stack, tap anywhere outside of the stack or press the home button to exit editing mode. The stack will collapse, and your changes will be saved.
By customizing widget stacks, you can organize and access multiple widgets in a unified and space-saving manner. Tailor the content and appearance of your widget stacks to create a personalized and efficient Home Screen layout on your iPad.
Modifying Widget Sizes
One of the advantages of widgets on the iPad’s Home Screen is the ability to customize their sizes. By modifying widget sizes, you can prioritize certain widgets, display more information, or create a visually appealing layout. Here’s how you can modify widget sizes on your Home Screen:
- Unlock your iPad and navigate to the Home Screen that contains the widget you want to modify the size of.
- Tap and hold on any empty space on your Home Screen or on an app icon until the apps start to jiggle, indicating that you are in editing mode.
- Locate the widget you want to modify the size of and tap on it to select it.
- Once the widget is selected, you will see a menu with options at the top and bottom of the widget.
- Look for the “Edit Widget” or “Edit Stack” button, which may vary depending on the widget type.
- Tapping on the “Edit Widget” button will usually reveal a menu that allows you to choose the available size options for that particular widget.
- Select the desired size option for the widget by tapping on it. You may have choices such as small, medium, or large.
- After selecting the size, tap anywhere outside of the widget or press the home button to exit editing mode. The widget will now reflect the modified size you have chosen.
- If you are using a widget stack, you can also modify the size of the entire stack by selecting the stack and adjusting its size in the Edit Stack menu.
By modifying widget sizes, you can customize the layout and visual presentation of your Home Screen. Whether you prefer smaller widgets to conserve space, larger widgets for more prominent display, or a combination of sizes for different types of information, adapting widget sizes allows you to create a personalized and visually appealing Home Screen experience on your iPad.
Changing Widget Display Settings
Customization options for widgets on your iPad go beyond just their size. You also have the ability to change the display settings of widgets to further personalize your Home Screen. Here’s how you can change the display settings for widgets:
- Unlock your iPad and navigate to the Home Screen that contains the widget you want to modify the display settings for.
- Tap and hold on any empty space on your Home Screen or on an app icon until the apps start to jiggle, indicating that you are in editing mode.
- Locate the widget you want to change the display settings for and tap on it to select it.
- Once the widget is selected, look for the “Edit Widget” or “Edit Stack” button, depending on the widget type.
- Tapping on the “Edit Widget” button will typically bring up a menu with customization options for that particular widget.
- Explore the available display settings for the widget. This may include options such as selecting the information shown, changing the font size, enabling or disabling certain functionalities, or adjusting the visual appearance.
- Make your desired changes by selecting the appropriate options within the widget’s display settings menu.
- After adjusting the settings, tap anywhere outside of the widget or press the home button to exit editing mode. The widget will now reflect the changes you made to its display settings.
Changing the display settings of widgets allows you to tailor their appearance and functionality to suit your preferences and needs. Whether you want to highlight specific information, adjust the visual style, or enable/disable certain features, take advantage of the available display settings to create a customized and personalized Home Screen experience on your iPad.
Adding Widgets to Today View
Today View provides a convenient way to access widgets and get a snapshot of important information at a glance on your iPad. To make the most of this feature, you can add widgets to your Today View. Here’s how you can add widgets:
- Unlock your iPad and navigate to the Home Screen.
- Swipe right from the left edge of the screen or swipe down from the top right corner to reveal the Today View.
- Scroll to the bottom of the Today View and look for the “Edit” button. It is usually located at the bottom of the screen, below all the widgets.
- Tap the “Edit” button to enter the widget-editing mode. You will now see a list of available widgets.
- To add a widget to your Today View, tap the green “+” icon next to the widget’s name. This will place the widget in the “Active” section of your Today View.
- Rearrange the order of the widgets by tapping and holding the handle icon next to each widget, then dragging it up or down to the desired position.
- If you want to remove a widget from your Today View, tap the red “-” icon next to the widget’s name in the “Active” section.
- If you have multiple pages in your Today View, swipe left or right to navigate between them and add or remove widgets as desired.
- Once you have finished customizing your Today View, tap anywhere on the screen or press the home button to exit editing mode. The widgets will now be displayed in the order you selected.
Adding widgets to your Today View allows you to have quick access to useful information from your favorite apps, such as weather updates, calendar events, news headlines, and more. Customize your Today View to display the widgets that are most relevant and helpful to you, ensuring a productive and efficient iPad experience.
Organizing Widgets in Today View
Once you have added widgets to your Today View on your iPad, you may want to organize them in a way that suits your preferences and allows for easy access to the information you need. Here’s how you can organize widgets in Today View:
- Unlock your iPad and navigate to the Home Screen.
- Swipe right from the left edge of the screen or swipe down from the top right corner to reveal the Today View.
- Scroll to the bottom of the Today View and tap the “Edit” button to enter the widget-editing mode.
- In the widget-editing mode, you will see a list of all the widgets available for Today View. Active widgets will be in the “Active” section, while inactive widgets will be in the “More Widgets” section.
- To organize the order of the widgets in the “Active” section, tap and hold on the handle icon next to a widget, then drag it up or down to the desired position.
- You can also organize widgets from the “More Widgets” section by tapping the green “+” icon next to a widget’s name to move it to the “Active” section. Once added, you can rearrange it within the “Active” section.
- To remove a widget from the “Active” section, tap the red “-” icon next to the widget’s name.
- Continue organizing and customizing the order of the widgets in the “Active” section as desired.
- If you have multiple pages in your Today View, you can swipe left or right to navigate between them and organize widgets on each page separately.
- Once you have finished organizing your widgets, tap anywhere on the screen or press the home button to exit editing mode. The widgets will now be displayed in the order you selected in your Today View.
By organizing widgets in your Today View, you can prioritize the information that is most important to you and ensure quick and easy access to it. Take the time to arrange your widgets in a way that enhances your productivity and aligns with your preferences, ensuring a seamless and personalized experience on your iPad.
Removing Widgets from Today View
If you want to declutter your Today View or no longer need certain widgets on your iPad, you can easily remove them from your Today View. Here’s how you can remove widgets from Today View:
- Unlock your iPad and navigate to the Home Screen.
- Swipe right from the left edge of the screen or swipe down from the top right corner to reveal the Today View.
- Scroll to the bottom of the Today View and tap the “Edit” button to enter the widget-editing mode.
- In the widget-editing mode, you will see a list of all the widgets available for Today View.
- Locate the widget you want to remove and tap the red “-” icon next to its name.
- The widget will automatically be removed from the “Active” section of your Today View.
- If you want to add the widget back to your Today View in the future, you can find it in the “More Widgets” section and tap on the green “+” icon next to its name.
- If you have multiple pages in your Today View, you can swipe left or right to navigate between them and remove widgets from each page separately.
- Once you have finished removing the widgets you no longer need, tap anywhere on the screen or press the home button to exit editing mode. Your Today View will now be updated without the removed widgets.
By removing widgets from your Today View, you can declutter and streamline the information you have at a glance. Take the time to review and remove any unnecessary widgets to ensure that your Today View only displays the most relevant and useful information for your needs on your iPad.