
Steps to Add Contacts to an Automation in ActiveCampaign
If you’re using ActiveCampaign to manage your email marketing campaigns, adding contacts to an automation is a powerful way to streamline your communication and deliver targeted messages to your audience. Here are the steps to add contacts to an automation in ActiveCampaign:
- Select the Automation: Begin by navigating to the Automations tab in your ActiveCampaign dashboard. Choose the automation you want to add contacts to or create a new one.
- Choose a Trigger: Triggers determine when contacts enter the automation. Select the trigger that best fits your campaign goals. It could be a specific action, like a form submission or email link click, or a schedule-based trigger like a specific date or time.
- Define the Entry Point: Once you’ve chosen your trigger, specify the entry point of the automation. This defines the source from where contacts will enter the automation, such as a specific list, tag, or segment.
- Set Up the Automation Actions: After defining the entry point, add the necessary actions to your automation workflow. These actions can include sending emails, adding or removing tags, updating contact fields, and more. Each action determines how contacts will progress through the automation.
- Configure the Automation Settings: Customize the automation settings as per your campaign requirements. Set the delay between actions, define the goals or conditions for contacts to exit the automation, and configure other parameters to align with your marketing strategy.
- Add Conditions and Filters: To tailor your automation further, you can add conditions and filters to create personalized experiences for contacts. These can include criteria based on contact data, behavior, engagement, or any other specific attributes you want to target.
- Customize and Personalize the Messages: Craft compelling and relevant messages for each automation step. Use merge tags to dynamically personalize the content based on contact information. Make sure your emails provide value and align with the goals of your automation.
- Test the Automation: Before publishing your automation, test it to ensure everything is functioning as intended. Send test emails, trigger the automation with sample contacts, and review the workflow to make any necessary adjustments.
- Publish the Automation: Once you’re satisfied with your automation setup and testing, it’s time to publish it. Your automation is now live and ready to engage and nurture your contacts based on the defined triggers and actions.
By following these steps, you can successfully add contacts to an automation in ActiveCampaign, allowing you to automate and optimize your email marketing efforts for better engagement and conversions.
Step 1: Select the Automation
The first step in adding contacts to an automation in ActiveCampaign is to select the automation you want to work with. To do this, log in to your ActiveCampaign account and navigate to the “Automations” tab in your dashboard.
If you already have an existing automation that you want to add contacts to, locate it in the list of automations and click on it to open it. On the other hand, if you want to create a new automation, click on the “New Automation” button and give it a name that reflects its purpose.
Choosing the right automation is crucial because it determines the workflow and actions that contacts will go through. Consider your campaign goals and the specific actions and messages you want to deliver to your contacts. Select an automation that aligns with your objectives.
ActiveCampaign offers various types of automations, such as “Email,” “Site,” “SMS,” “Split Action,” and more. Each type serves specific purposes and has different triggers and actions available. Depending on your needs, you can select the most appropriate type of automation for your campaign.
Furthermore, if you want to use a pre-built automation template, ActiveCampaign provides a wide range of templates for different purposes. These templates can be customized to fit your specific requirements, saving you time and effort in setting up your automation.
Once you have selected or created the automation, you will be taken to the automation editor, where you can design and configure the workflow. In the editor, you can see the different triggers, actions, conditions, and filters that are available for your automation.
Take your time to familiarize yourself with the automation editor and its various features. Understanding how everything works will help you build an effective and efficient automation for your email marketing campaigns.
Step 2: Choose a Trigger
Once you have selected the automation you want to work with in ActiveCampaign, the next step is to choose a trigger. Triggers determine when contacts enter the automation and initiate the workflow you have designed.
ActiveCampaign offers a variety of triggers to choose from, allowing you to tailor your automation to the specific actions and behaviors you want to target. Here are some common triggers you can select:
- Email Link Click: Trigger the automation when a contact clicks on a specific link in an email.
- Web Page Visit: Initiate the automation when a contact visits a particular web page.
- Form Submission: Trigger the automation when a contact fills out and submits a specific form.
- Tag Added: Start the automation when a specific tag is added to a contact.
- Date-Based: Initiate the automation based on a specific date or time, such as a birthday or anniversary.
When choosing a trigger, consider your campaign goals and the desired actions you want your contacts to take. For example, if you want to send a follow-up email to contacts who have clicked on a particular link, you would select the “Email Link Click” trigger.
It’s important to note that some triggers may require additional setup, such as configuring link tracking or integrating with other tools. Follow the instructions provided by ActiveCampaign to ensure the trigger is properly set up before moving forward.
ActiveCampaign also allows you to add multiple triggers to an automation, creating more flexibility and control over when contacts enter the workflow. You can set up multiple triggers to capture different actions or behaviors, ensuring that your contacts are targeted at the right time with the right messages.
Once you have chosen the trigger, it’s time to move on to the next step and define the entry point for your contacts in the automation.
Step 3: Define the Entry Point
After choosing a trigger for your automation in ActiveCampaign, the next step is to define the entry point. The entry point determines how contacts will enter the automation, ensuring that only the right contacts are included in the workflow.
When defining the entry point, you have a few options to consider:
- Specific List: You can choose to add contacts to the automation based on their membership in a specific list. This ensures that only contacts from that list will enter the automation.
- Tag or Segment: Another option is to define the entry point by adding a specific tag or segment. Contacts that have the specified tag or belong to the designated segment will enter the automation.
- Custom Field Value: You can also define the entry point based on a specific value in a custom field. This allows for more granular targeting of contacts based on their individual attributes.
- Conditional Logic: ActiveCampaign also offers conditional logic options for the entry point. This allows you to define multiple criteria that must be met for a contact to enter the automation, such as being on a specific list and having a certain tag.
By defining the entry point, you ensure that only the relevant contacts for your automation are included. This is especially useful when you have multiple automations running simultaneously or when you’re segmenting your audience based on specific criteria.
Consider the goals of your automation and the specific targeting criteria you want to apply. For example, if your trigger is a form submission, you may want to define the entry point as contacts who have submitted that particular form.
It’s important to note that you can have multiple entry points in an automation. This allows for greater flexibility and control over which contacts enter the workflow. You can set up multiple entry points based on different lists, tags, or segments to accommodate various scenarios and purposes.
Once you have defined the entry point for your contacts, you can proceed to set up the automation actions and design the workflow that aligns with your campaign objectives.
Step 4: Set Up the Automation Actions
Once you have defined the entry point and selected the trigger for your automation in ActiveCampaign, the next step is to set up the automation actions. Actions are the tasks and communications that will be carried out as contacts progress through the automation workflow.
Setting up the automation actions involves determining what actions should occur and in what order. Here are some key actions you can include in your automation:
- Sending Emails: Email is a powerful communication tool, and ActiveCampaign allows you to send automated emails to contacts at specific points in your automation. You can use pre-designed email templates or create custom emails to deliver engaging and personalized content to your contacts.
- Adding or Removing Tags: Tags are helpful for segmenting your contacts and tracking their behavior. You can add or remove tags from contacts based on their actions or engagement levels. This helps to trigger specific actions or send targeted messages to different segments of your audience.
- Updating Contact Fields: Contact fields store information about your contacts, and you can update these fields dynamically as they progress through the automation. This allows you to collect and store valuable data that can be used for personalization and future targeting.
- Creating Tasks: Tasks help you stay organized and ensure that important follow-up actions are taken. You can create tasks for yourself or your team members as contacts reach specific points in the automation. This helps to keep everyone on track and accountable.
- Preventing Contacts from Receiving Future Emails: If you have contacts who have reached a certain goal or milestone in the automation, you can set actions to prevent them from receiving future emails or going through certain steps. This ensures that contacts don’t receive redundant or irrelevant messages.
When setting up the actions, consider the goals of your automation and the specific interactions you want to have with your contacts. Think about the sequence of actions that will deliver the desired outcome and keep your contacts engaged.
ActiveCampaign’s automation editor provides a visual interface where you can drag and drop actions into your workflow and arrange them in the desired sequence. Take advantage of this feature to design a logical and efficient automation flow.
It is worth noting that you can have multiple actions within a single automation step as well as multiple automation steps within your overall workflow. This allows you to create complex and personalized journeys for your contacts based on their behavior and engagement.
Once you have set up the automation actions, you can move on to configuring the automation settings to further refine and optimize your automation.
Step 5: Configure the Automation Settings
After setting up the automation actions in ActiveCampaign, it’s time to configure the automation settings. The automation settings allow you to customize various parameters and fine-tune the behavior of your automation.
Here are some key settings you can configure:
- Delay Between Actions: You can set a delay between each action in your automation. This allows you to control the timing and pacing of your messages. Consider the optimal interval between each action to ensure that contacts receive your communications at the right time.
- Exit Conditions or Goals: Define the conditions or goals for contacts to exit the automation. For example, you can set a goal that once a contact completes a purchase, they will exit the automation. This helps to prevent unnecessary actions or communications for contacts who have already achieved the desired outcome.
- Analytics and Reporting: Enable analytics and reporting for your automation to track its performance. ActiveCampaign provides valuable insights and data on open rates, click-through rates, conversions, and more. Utilize this information to optimize your automation and make data-driven decisions.
- Conditional Split Actions: Activate conditional split actions to create branching paths within your automation. This allows you to dynamically segment your contacts based on their behavior, interests, or any other criteria you choose. By providing targeted content and experiences, you can improve engagement and conversion rates.
- Pause or Restart Automation: You have the option to pause or restart your automation at any time. This is useful when you want to make adjustments to the workflow or temporarily stop the automation for a specific group of contacts.
Take the time to review and configure these settings based on your specific campaign objectives. Customizing the automation settings ensures that it aligns with your marketing strategy and delivers the desired results.
Throughout the configuration process, ActiveCampaign provides a user-friendly interface that allows you to easily make changes and updates. The automation editor gives you a clear overview of your workflow and settings, making it convenient to adjust any aspects as needed.
Remember, automation settings may vary depending on the specific type of automation you’re using. Familiarize yourself with the options and features available for the type of automation you have chosen.
Once you have configured the automation settings, you can proceed to the next step of adding conditions and filters to further personalize and optimize your automation.
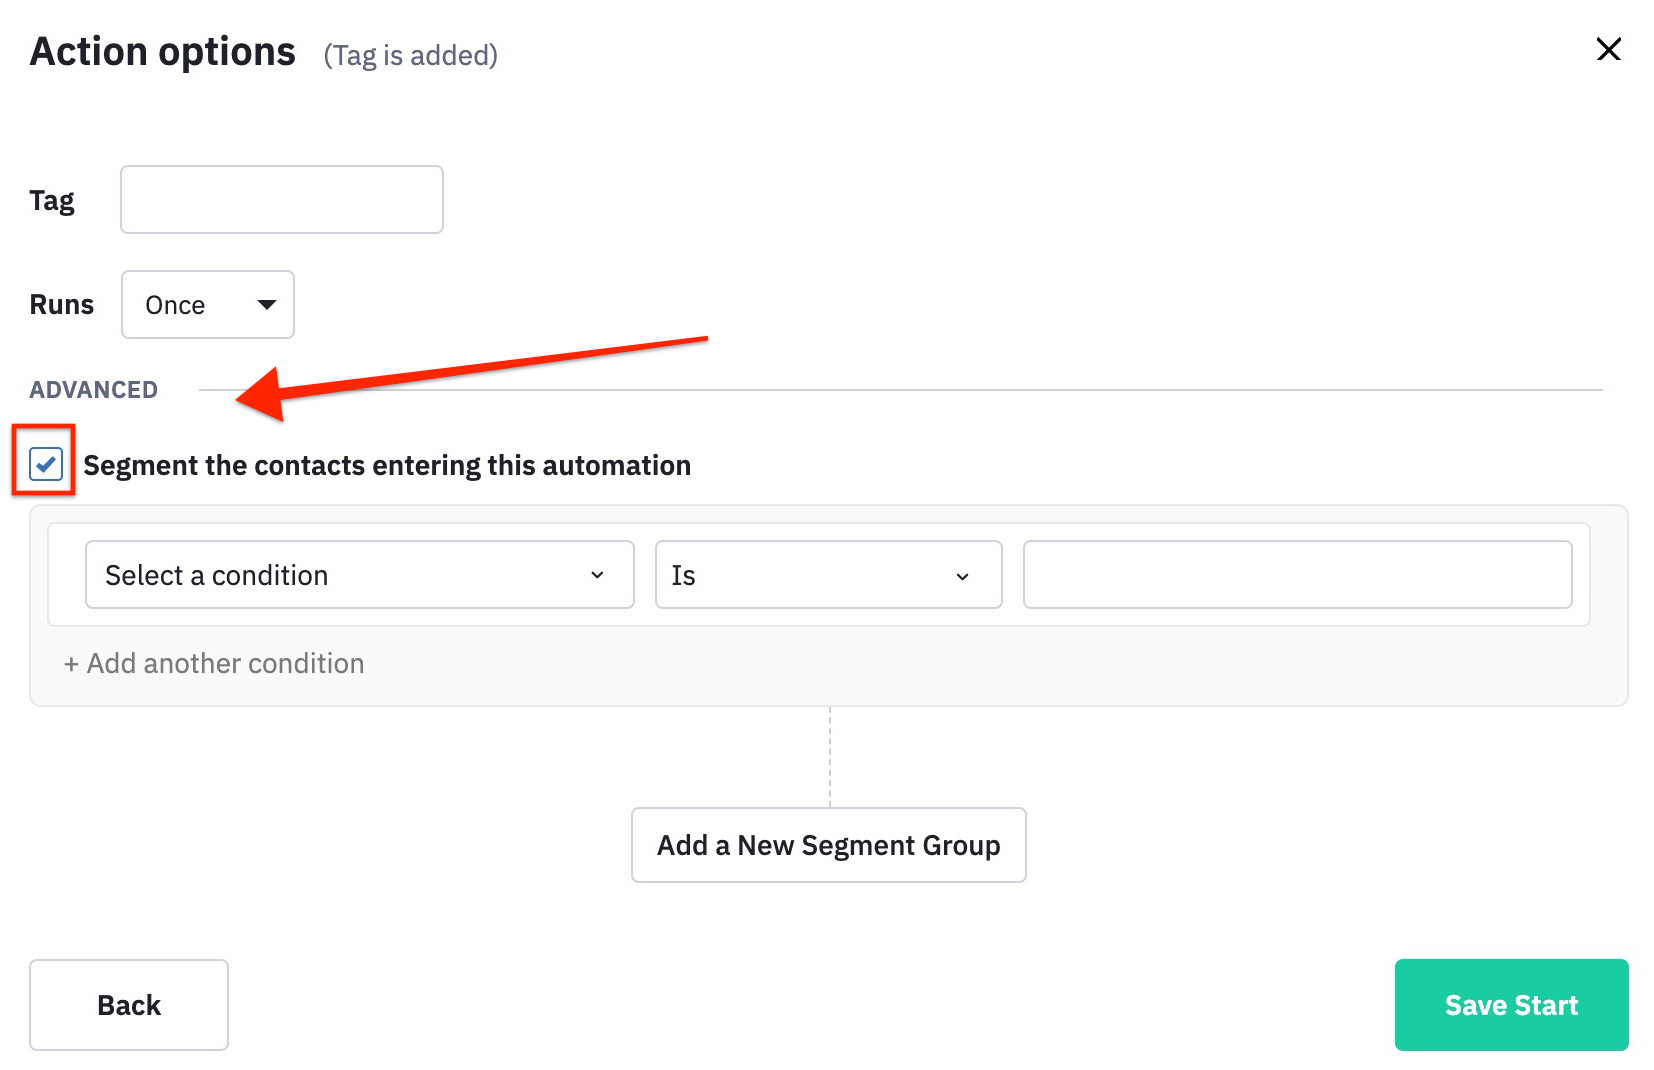
Step 6: Add Conditions and Filters
To make your automation in ActiveCampaign more targeted and personalized, the next step is to add conditions and filters. Conditions and filters allow you to further segment and refine the contacts within your automation workflow based on specific criteria and behavior.
Here’s how you can add conditions and filters to your automation:
- Tag-Based Filters: Use tags to filter contacts within your automation based on their specific tags. This allows you to create personalized experiences for different segments of your audience.
- List-Based Filters: Filter contacts within your automation by their membership in specific lists. This helps you tailor the messaging and actions based on different list criteria.
- Custom Field Filters: Leverage custom fields to filter contacts based on specific attributes or data points. This allows for more granular targeting and personalization within your automation.
- Behavioral Filters: ActiveCampaign provides behavioral filters to segment contacts based on their actions and engagement. You can filter contacts based on email opens, link clicks, website visits, and more.
- Conditional Logic: Take advantage of conditional logic to create more complex filters by combining multiple criteria. This allows you to build highly targeted segments and deliver tailored communications.
Adding conditions and filters helps you ensure that your contacts receive the most relevant messages and actions based on their specific interests, behavior, and attributes. By segmenting your audience, you can provide a more personalized and engaging experience, leading to better response rates and conversions.
When adding conditions and filters, consider the goals of your automation and the specific criteria you want to target. Think about the actions or behaviors that indicate a certain level of interest or engagement, and use these as triggers for your filters.
ActiveCampaign’s automation editor makes it easy to add and configure conditions and filters within your workflow. Simply drag and drop the appropriate filters into your automation steps and adjust the settings as needed.
Regularly review and refine your conditions and filters to ensure they are up to date and accurately capturing your target audience. By continually optimizing your segmentation, you can enhance the effectiveness of your automation and deliver more impactful messages.
Once you have added the conditions and filters to your automation, you can move on to the next step of customizing and personalizing your messages.
Step 7: Customize and Personalize the Messages
To create a more engaging and personalized experience for your contacts in ActiveCampaign, it’s important to customize and personalize the messages within your automation. Tailoring your messages to your audience’s specific needs and interests can greatly enhance their engagement and drive better results.
Here’s how you can customize and personalize your messages:
- Dynamic Content: Utilize dynamic content within your emails to deliver personalized information to each contact. By using merge tags, you can insert individual contact information such as names, locations, or other relevant details.
- Segmentation-Based Content: Leverage your segmentation to create targeted content for different groups of contacts. Customize the messaging and offers based on the specific interests or behaviors identified through your segmentation filters.
- Personalized Subject Lines: Craft subject lines that grab the attention of your contacts and make them feel like the email was designed specifically for them. Use their name or reference their previous interaction to create a sense of personalization.
- Clear Call-to-Action: Ensure your messages have a clear and compelling call-to-action (CTA). Encourage your contacts to take the desired action, such as making a purchase, downloading a resource, or signing up for an event. Customize the CTA based on the specific goals of your automation.
- A/B Testing: Experiment with different variations of your messages to see what resonates best with your audience. Use A/B testing to compare different subject lines, content layouts, or CTAs, and optimize your messages based on the results.
When customizing and personalizing your messages, put yourself in the shoes of your contacts. Consider what would capture their attention, engage their interest, and provide value to them. Tailor your content to address their pain points, answer their questions, or offer solutions that meet their needs.
ActiveCampaign’s email editor provides a user-friendly interface to help you craft visually appealing and effective messages. Take advantage of the available design options, templates, and customization features to create professional-looking emails that align with your brand and resonate with your audience.
Regularly review and optimize your messages based on the performance data and insights provided by ActiveCampaign’s reporting features. Pay attention to open rates, click-through rates, conversions, and other key metrics to gauge the impact and effectiveness of your messages.
By customizing and personalizing your messages, you can create a better connection with your contacts, increase engagement, and drive higher conversion rates within your automation.
Step 8: Test the Automation
Before launching your automation in ActiveCampaign, it’s crucial to thoroughly test it to ensure that everything is functioning correctly. Testing helps you identify any potential issues or gaps in your automation’s workflow, allowing you to make necessary adjustments before contacts start entering the automation.
Here are some key steps to follow when testing your automation:
- Verify Trigger Functionality: Confirm that the trigger you have set-up correctly initiates the automation. Test different scenarios to ensure that the trigger accurately captures the desired actions or behaviors of your contacts.
- Check Automation Flow: Review the sequence of actions within your automation workflow. Confirm that each action is executed in the correct order and that there are no missing or redundant steps.
- Test Personalization: Verify that any dynamic content or personalized fields within your messages are populating correctly. Use test contacts with various attributes to ensure that the personalization is accurate.
- Send Test Emails: Send test emails to yourself or a small group of colleagues to check for any formatting issues, broken links, or other errors within the email content.
- Use Sample Contacts: Trigger the automation using sample contacts with different attributes and behaviors. Follow their journey through the automation and monitor if they receive the appropriate actions and messages as expected.
- Monitor Data and Tracking: Check the data and tracking within ActiveCampaign’s reporting features to ensure that the automation is accurately capturing relevant metrics and engagement data.
Actively incorporate feedback from your testing process to refine and improve your automation. Pay attention to any issues or glitches that arise during testing and make the necessary adjustments to streamline the workflow and enhance the user experience.
Additionally, it can be helpful to involve others in the testing process to get fresh perspectives and gather feedback. This can include team members, stakeholders, or even trusted customers who can provide valuable insights on the effectiveness and user-friendliness of your automation.
By thoroughly testing your automation, you can catch any potential issues or gaps before launching it to a larger audience. This ensures a smooth and seamless experience for your contacts, maximizes the effectiveness of your campaigns, and minimizes the risk of any unwanted surprises.
Step 9: Publish the Automation
After testing and ensuring that your automation in ActiveCampaign is functioning as intended, it’s time to take the final step: publishing the automation. Publishing your automation makes it live and ready to engage with your contacts based on the defined triggers and actions.
Here are the steps to follow when publishing your automation:
- Double-Check Settings: Before publishing, review all the settings and configurations of your automation. Verify that the delay between actions, exit conditions, and other parameters align with your campaign goals.
- Ensure Contact Segmentation: Confirm that the segmentation criteria, such as tags or lists, are set up properly to ensure that the right contacts will enter the automation and receive the intended communication.
- Set the Automation Live: Once you have double-checked everything, click the “Publish” button or toggle the status of your automation from “Draft” to “Live”. This activates the automation and allows contacts to start entering and progressing through the workflow.
- Monitor and Evaluate: After publishing, closely monitor the performance and engagement of your automation. Keep an eye on key metrics like open rates, click-through rates, and conversions to assess the effectiveness of your automated campaigns.
- Make Iterative Improvements: Actively analyze the data and insights provided by ActiveCampaign’s reporting features. Identify areas for improvement, such as low engagement or conversion rates, and make iterative adjustments to optimize your automation over time.
Remember that automation is not a one-time setup. It requires ongoing monitoring, evaluation, and optimization to ensure its continued effectiveness. Regularly review the performance of your automation and make necessary updates to align with the changing needs and preferences of your audience.
When publishing your automation, it’s essential to communicate any changes or new workflows to your team members or stakeholders involved in your marketing efforts. This ensures everyone is on the same page and understands how the automation will impact their work or the overall campaign strategy.
By publishing your automation, you are maximizing the efficiency of your email marketing efforts, automating tasks, and delivering targeted and personalized messages to your contacts. Continuous improvement and refinement based on data and feedback will help you optimize the performance of your automation and drive better results for your business.