
Factors to Consider When Determining the Distance
When setting up a projector, one of the key considerations is the optimal distance between the projector and the screen. Getting this distance right is essential to ensure a clear and crisp image that can be comfortably viewed by the audience. However, determining the ideal distance involves taking into account various factors that can impact the viewing experience. Here are some factors to consider when determining the distance for your projector:
- Throw Ratio and Lens: The throw ratio of a projector determines the distance the projector needs to be from the screen to achieve a specific screen size. Projectors with a lower throw ratio require shorter distances, while projectors with a higher throw ratio need to be placed farther away. Additionally, the type of lens used in the projector can affect the overall image quality and throw distance.
- Screen Size and Aspect Ratio: The desired screen size and aspect ratio play a crucial role in determining the projector’s placement. Larger screens generally require the projector to be placed farther away, while smaller screens allow for closer placement. Additionally, the aspect ratio of the screen should match the native aspect ratio of the projector to avoid image distortion.
- Projector’s Light Output: Consider the projector’s light output, measured in lumens. Higher lumen projectors can produce brighter images, allowing for greater flexibility in placement and accommodating more ambient light in the room.
- Ambient Light in the Room: The amount of ambient light in the room needs to be taken into account when determining the projector’s distance. Brighter rooms require the projector to be placed farther away to compensate for the increased light, while darker rooms allow for closer placement.
- Projector Mount and Adjustments: The type of projector mount used and the available adjustment options can influence the distance. Ceiling-mounted projectors may have more flexibility in placement compared to tabletop setups.
Keep in mind that these factors are interrelated, and finding the optimal distance requires some experimentation and adjustment. It’s also important to consider the viewing distance and room layout to ensure an immersive viewing experience without any obstruction.
Throw Ratio and Lens
The throw ratio and lens of a projector play a crucial role in determining the distance between the projector and the screen. The throw ratio is a measurement that indicates the distance the projector needs to be from the screen to achieve a specific screen size. It is calculated by dividing the distance from the projector to the screen by the width of the projected image. For example, a projector with a throw ratio of 1.5:1 means that for every 1.5 feet of distance, the width of the projected image will be 1 foot.
Projectors with a lower throw ratio, such as 0.8:1, are considered short-throw projectors. These projectors can be placed closer to the screen, allowing for a larger image in a smaller space. Short-throw projectors are ideal for small rooms or spaces where the projector needs to be placed near the audience.
On the other hand, projectors with a higher throw ratio, such as 2.0:1, are known as long-throw projectors. These projectors need to be placed farther away from the screen to achieve the same screen size as a short-throw projector. Long-throw projectors are suitable for larger rooms or venues where there is ample space for the projector to be positioned farther from the screen.
Along with the throw ratio, the type of lens used in the projector can also affect the throw distance. Different lenses have different characteristics, such as zoom capabilities or lens shift, which can impact the flexibility of placement. Projectors with zoom lenses allow for adjusting the image size without moving the projector, providing more versatility in placement options.
It’s important to consider the throw ratio and lens when determining the projector’s distance from the screen. Understanding these specifications will help ensure that you select a projector that meets your desired screen size and placement requirements. It’s recommended to consult the projector’s manual or specifications sheet for detailed information on the throw ratio and lens options available for the particular model you are considering.
Screen Size and Aspect Ratio
When determining the distance between a projector and the screen, the desired screen size and aspect ratio are important factors to consider. The screen size refers to the dimensions of the projected image, while the aspect ratio refers to the proportion of the width to the height of the image.
For the screen size, it is essential to consider the viewing distance and the intended audience. A larger screen size can create a more immersive and engaging experience, but it also requires the projector to be placed farther away from the screen. Conversely, a smaller screen size allows for closer placement of the projector but may sacrifice some visual impact.
The aspect ratio of the screen is another key consideration. The most common aspect ratios for projectors are 4:3 (standard), 16:9 (widescreen), and 1.85:1 (cinemascope). It’s important to match the native aspect ratio of the projector with the desired aspect ratio of the screen to avoid image distortion or cropping.
For instance, if you plan to watch primarily movies or video content, a widescreen 16:9 aspect ratio might be ideal, providing a cinematic experience. On the other hand, if you need to display presentations or documents, a standard 4:3 aspect ratio may be more suitable. Some projectors offer flexible aspect ratio settings, allowing you to adjust the image to fit different screen sizes and aspect ratios.
It’s worth noting that the screen size and aspect ratio can also be affected by the available space and the room layout. Before finalizing your decision on the screen size, consider the seating arrangement and the viewing distance. You want to ensure that everyone in the audience can comfortably see and enjoy the content without straining their eyes.
Projector’s Light Output
The light output of a projector, measured in lumens, is a critical factor to consider when determining the distance between the projector and the screen. The light output determines how bright the projected image will appear, and it plays a significant role in accommodating different ambient lighting conditions in the room.
Higher lumen projectors are capable of producing brighter images, making them suitable for environments with higher levels of ambient light. If you plan to use the projector in a room with large windows or bright lighting, a higher lumen projector is recommended to ensure that the projected image remains vivid and visible.
On the other hand, if the room is primarily used for home theater purposes or has controlled lighting conditions, a lower lumen projector may be sufficient. Lower lumen projectors can still deliver vibrant images in darker environments and may offer other advantages such as improved contrast ratios.
It’s important to strike a balance between the projector’s light output and the desired screen size and distance. A brighter image may allow for a larger screen or longer throw distance, while a less bright image may require a smaller screen size or a closer placement of the projector to maintain image quality.
Keep in mind that the brightness of the projected image will diminish as the distance between the projector and the screen increases. Therefore, it’s essential to consider the intended viewing distance and the required image brightness when selecting a projector with the appropriate light output.
Consult the specifications of different projectors to determine the light output that best suits your specific needs. Additionally, consider the room environment and the intended use of the projector to make an informed decision about the required light output for your setup.
Ambient Light in the Room
When determining the distance between a projector and the screen, it’s important to consider the amount of ambient light present in the room. The level of ambient light can have a significant impact on the perceived image quality and overall viewing experience.
If the room where the projector will be used has a significant amount of ambient light, such as natural light from windows or bright overhead lighting, it is recommended to place the projector farther away from the screen. This distance allows the projector to compensate for the additional light and maintain a clear and visible image.
On the other hand, if the room has controlled lighting conditions or minimal ambient light, the projector can be placed closer to the screen. This proximity allows for a more immersive viewing experience and may result in a brighter and more vibrant image.
It’s important to note that even with a high lumen projector, excessive ambient light can wash out the projected image and reduce its clarity. Therefore, it’s advisable to minimize or control the amount of ambient light in the room to achieve the best possible image quality.
Consider using blackout curtains or blinds to block out natural light sources, or dimming the lights in the room to reduce the impact of ambient lighting. Additionally, choosing a screen with good ambient light rejection properties can help mitigate the effects of ambient light, allowing for better visibility and contrast even in bright environments.
By carefully assessing the ambient light conditions in the room, you can select the optimal distance for your projector to ensure the best possible image quality and an enjoyable viewing experience.
Projector Mount and Adjustments
When setting up a projector, the type of mount used and the available adjustments can greatly influence the distance between the projector and the screen. The proper mount and adjustments allow for precise positioning and alignment, resulting in an optimal viewing experience.
There are different types of mounts available, including ceiling mounts and tabletop mounts. Ceiling mounts are popular for home theaters or rooms with limited floor space, as they keep the projector out of the way and provide flexibility in terms of projector placement. On the other hand, tabletop mounts are suitable for portable projectors or situations where the projector needs to be easily moved or repositioned.
Once the mount is selected, it’s essential to have the necessary adjustment options for proper alignment. The most common adjustments include tilt, swivel, and height adjustments. Tilt adjustments allow you to adjust the angle of the projected image, ensuring that the image is aligned with the screen. Swivel adjustments help to fine-tune the horizontal alignment of the image, reducing any trapezoidal distortion caused by a skewed projection angle. Height adjustments allow you to raise or lower the projector to achieve the desired screen position.
These adjustment options are particularly useful when the projector needs to be placed off-center or when the screen requires a specific alignment due to room limitations. Correctly aligning the projector with the screen ensures that the image fills the screen properly and reduces any skewed or distorted projection.
Some projectors also offer features like lens shift, which allows you to physically shift the lens position vertically or horizontally without moving the entire projector. This feature can greatly simplify the alignment process and provide additional flexibility in projector placement while maintaining the desired distance from the screen.
Ensure that the projector mount and adjustment capabilities are compatible with your specific projector model. Consulting the projector’s manual or seeking professional advice can help you choose the best mount and understand the available adjustments for your particular setup.
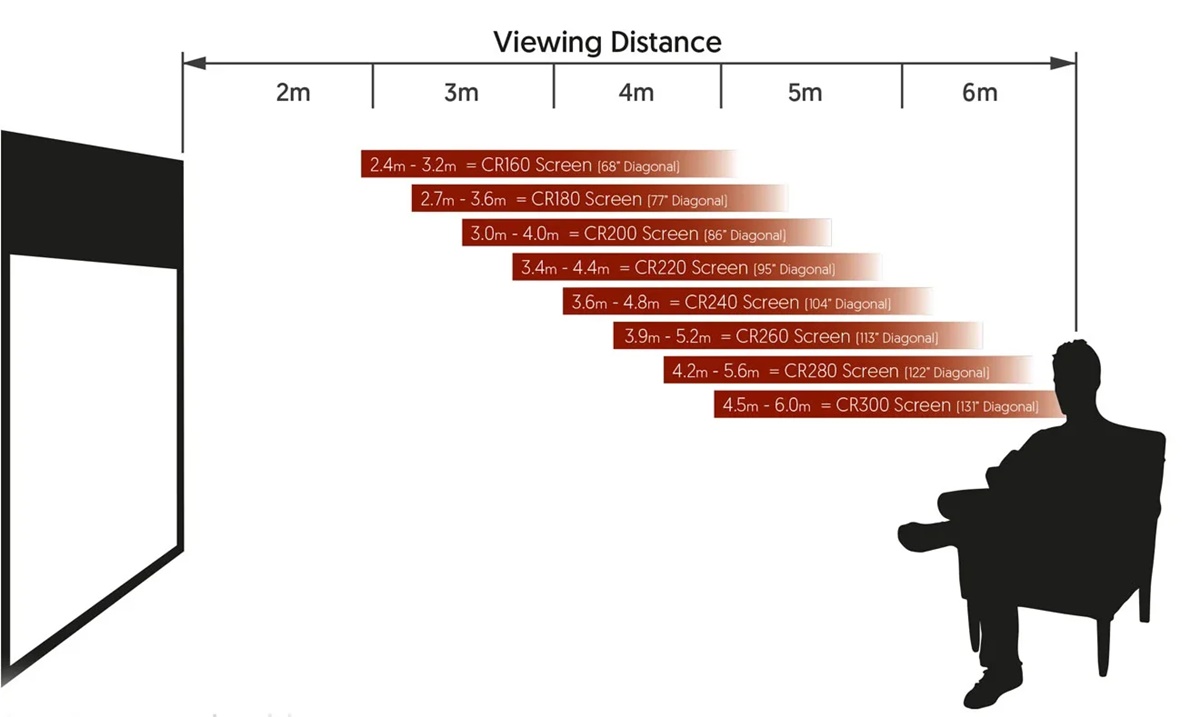
Viewing Distance and Room Layout
When determining the distance between a projector and the screen, it’s important to consider the viewing distance and the layout of the room. These factors play a crucial role in ensuring an immersive and comfortable viewing experience for the audience.
The viewing distance refers to the distance between the audience and the screen. It’s essential to strike a balance between being close enough to see the details of the projected image and being far enough to comfortably perceive the entire screen without straining the eyes. Generally, a viewing distance of around 1.5 to 2 times the screen diagonal is recommended for optimal viewing.
Consider the size of the room and the seating arrangement when determining the viewing distance. If the room is small, the projector may need to be placed closer to the screen to achieve the desired viewing distance. Conversely, in larger rooms, the projector can be positioned farther away to accommodate a larger screen size or provide a wide-angle viewing experience.
The layout of the room also influences the projector’s distance. Take into account any obstructions, such as furniture, pillars, or other equipment, that may obstruct the projector’s line of sight to the screen. These obstacles may require adjustments in the projector’s placement to ensure an unobstructed view for all audience members.
In addition to the viewing distance and room layout, consider the height at which the projected image will be displayed. The projector should be placed at a height that aligns with the audience’s eye level or slightly above it. This ensures that everyone can comfortably view the screen without straining their necks or having their view obstructed by others.
Take the time to experiment with different projector placements and viewing distances to find the optimal setup for your specific room and audience. Consider conducting a test run with temporary setups before finalizing the projector’s placement to ensure that all viewers will have an excellent viewing experience.
Calculating the Throw Distance
Calculating the throw distance is an important step in determining the optimal distance between a projector and the screen. By calculating the throw distance, you can ensure that the projected image fills the screen properly and that the audience can view the content without any distortion or loss of clarity.
Most projectors come with a throw distance calculator or a throw distance formula provided in the user manual or on the manufacturer’s website. These calculators or formulas take into account the projector’s throw ratio, screen size, and desired throw distance to provide you with accurate measurements.
To calculate the throw distance, you will need the throw ratio of your projector. The throw ratio is typically expressed as a range, such as 2.0-2.4:1. If you have a specific throw ratio, use that number for accurate measurements. Multiply the throw ratio by the screen width to determine the minimum and maximum throw distances for your projector.
For example, if your projector has a throw ratio of 2.0:1 and your screen width is 100 inches, the calculated throw distance would be 200 inches to 240 inches. This means that the projector should be placed between 16.7 feet and 20 feet from the screen.
It’s important to note that the throw distance can be affected by factors such as lens shift, zoom settings, and the specific lens being used. These variables can allow for additional adjustments in the throw distance to meet your specific needs.
Additionally, some projectors offer keystone correction, which allows you to correct any trapezoidal distortion caused by the projection angle. However, it’s important to minimize the use of keystone correction as much as possible, as it can affect the image quality. It’s best to opt for proper placement and alignment of the projector rather than relying heavily on keystone correction.
Remember that throw distance calculations are estimates, and each environment may have unique factors that impact the actual distance required. It’s always advisable to consult the projector’s manual, use online calculators provided by the manufacturer, or seek professional advice to ensure accurate throw distance measurements for your specific setup.
Short-Throw vs Long-Throw Projectors
Short-throw and long-throw projectors are two common types of projectors that offer different benefits and are suitable for specific environments and setups.
A short-throw projector is designed to be placed closer to the screen or wall compared to a traditional long-throw projector. These projectors typically have a throw ratio of less than 1:1, allowing for a larger image to be projected in a smaller space. Short-throw projectors are ideal for small rooms or spaces where there is limited distance between the projector and the screen. With a shorter throw distance, the presenter or audience can be positioned near the projected image without casting shadows on the screen or being blinded by the projector’s bright light. Short-throw projectors are commonly used in classrooms, small home theaters, or conference rooms.
On the other hand, long-throw projectors are designed for larger spaces or situations where the projector needs to be placed farther away from the screen. These projectors typically have a throw ratio of 1.5:1 or higher. Long-throw projectors are suitable for venues such as auditoriums, large conference rooms, or outdoor events. They provide the ability to project large images onto larger screens from a considerable distance. The longer throw distance allows for the projector to be placed out of the way, providing convenience and flexibility in larger spaces where audience proximity to the projector may not be a concern.
It’s important to consider the specific needs of your setup when choosing between short-throw and long-throw projectors. Factors such as room size, desired screen size, audience placement, and the available mounting options should be taken into account.
Short-throw projectors are usually more expensive than long-throw projectors due to their specialized lens design and technology. However, they offer the benefit of being able to project larger images in confined spaces without sacrificing image quality or audience comfort. Long-throw projectors, on the other hand, provide flexibility in larger venues but may require more careful planning in terms of placement and distance calculations.
Always refer to the projector’s specifications and manufacturer guidelines to understand the throw ratio and recommended distance for your specific projector model. Additionally, consult with professionals or experts in the field for personalized advice based on your specific requirements and installation constraints.
Ceiling Mount vs Tabletop Placement
When setting up a projector, one important decision to make is whether to opt for a ceiling mount or tabletop placement. Both options have their own advantages and considerations to keep in mind when determining the optimal placement for your projector.
Ceiling Mount: Ceiling mounting is a popular choice for permanent projector installations in classrooms, home theaters, or conference rooms. By mounting the projector on the ceiling, you can free up valuable floor or tabletop space and keep the projector out of the way. Ceiling mounts also provide more flexibility in terms of projector placement, as they can easily be adjusted to achieve the desired projection angle. This flexibility ensures that the projected image is properly aligned with the screen, minimizing any keystone distortion or image cropping. Ceiling mounting also reduces the risk of accidental damage or interference from people and objects passing by the projector.
Tabletop Placement: Tabletop placement is a practical choice for portable projectors or situations where frequent movement or repositioning of the projector is necessary. Tabletop setups are commonly used in smaller meeting rooms, impromptu presentations, or home entertainment setups. They offer convenience and ease of installation since the projector can simply be placed on a table or any other flat surface. Tabletop placement allows for quick adjustments and flexibility in projector positioning, making it ideal for scenarios where the projector needs to be easily moved or shared among different locations. However, tabletop placement may require additional measures to ensure stability, such as using anti-vibration pads or securing the projector to the table to prevent accidental falls or disturbances.
When deciding between ceiling mount and tabletop placement, consider factors such as the intended usage, room layout, and portability requirements. Ceiling mounting provides a clean and permanent solution for dedicated installations, while tabletop setups offer more flexibility and convenience for portable or temporary usage.
Additionally, remember to consider the available distance and line of sight from the projector to the screen. Ceiling mounts are beneficial in situations where there are no potential obstacles or obstructions that can block the projected image. Tabletop placement may require careful positioning to ensure an unobstructed projection path.
Lastly, always refer to the projector’s manual or consult with professionals to understand any specific requirements or recommendations from the manufacturer regarding ceiling mount or tabletop placement options for your particular projector model.
Adjusting the Projector’s Height
Adjusting the height of the projector is an important aspect of achieving optimal projection alignment and ensuring a clear and properly-oriented image. The height adjustment allows you to position the projector at the correct level relative to the screen and the audience’s eye level.
There are several considerations when adjusting the projector’s height:
- Screen Height: Consider the height of the screen or projection surface. The projector’s height should be adjusted so that the projected image is centered and fills the screen appropriately. If the screen is placed higher on the wall, the projector may need to be elevated to maintain a proper alignment.
- Seating Arrangement: Take into account the audience’s eye level. Ideally, the projected image should be at or slightly above eye level for comfortable viewing. Adjust the projector’s height accordingly to ensure that everyone in the audience has a clear view without straining their necks or having their view obstructed by others.
- Mounting Options: Consider the type of mount or placement method being used. Ceiling-mounted projectors typically have height adjustment capabilities that allow you to raise or lower the projector as needed. Tabletop placements may require additional measures, such as using height-adjustable stands, to achieve the desired height and alignment.
- Keystone Correction: Avoid excessive reliance on keystone correction when adjusting the projector’s height. Keystone correction is used to correct distorted images caused by a skewed projection angle, but it can impact image quality. It’s best to position the projector at the correct height and angle to minimize the need for keystone correction.
Take the time to fine-tune the projector’s height to ensure that the projected image is aligned with the screen and optimally oriented for the audience. Consider conducting a test projection and making adjustments as needed until the image is properly positioned.
It’s important to note that some projectors provide additional features like lens shift, which allows for vertical or horizontal adjustment of the lens without physically moving the projector. This feature can simplify the process of adjusting the projector’s height while maintaining optimal image quality and alignment.
Refer to the projector’s manual or seek professional advice for specific guidelines on adjusting the height of your projector model. By properly adjusting the height, you can achieve a well-aligned and visually pleasing projection setup for your audience.
Keystone Correction and Image Quality
Keystone correction is a feature commonly found in projectors that allows for the adjustment of distorted images caused by a skewed projection angle. It is particularly useful when the projector cannot be positioned directly in front of the screen or when the available mounting options are limited. While keystone correction can correct image distortion, it is important to understand its impact on image quality.
Keystone correction works by digitally manipulating the projected image to correct for the trapezoidal distortion. It adjusts the shape of the image to make it appear rectangular and aligned with the screen. This adjustment can be done vertically, horizontally, or both, depending on the projector’s capabilities.
However, it is worth noting that using keystone correction can introduce some degree of image degradation or loss of image resolution. The digital adjustment alters the original image, potentially resulting in a slight softening of the image or a reduction in pixel sharpness. This can be more noticeable with higher keystone correction angles.
To minimize the impact of keystone correction on image quality, it is advisable to position the projector as close to the ideal alignment as possible. By properly setting up the projector’s placement and adjusting the projector’s height and angle, you can reduce the reliance on extensive keystone correction.
If you find that keystone correction is necessary, aim to use as little adjustment as possible to achieve the desired image alignment. This approach helps preserve the image quality and sharpness, maintaining a clearer and sharper projected image.
It is also important to note that some projectors offer vertical or horizontal lens shift as an alternative to keystone correction. Lens shift physically adjusts the position of the lens, allowing for correction without digitally altering the image. This feature provides a higher-quality solution for maintaining image integrity while aligning the projector with the screen.
Before relying heavily on keystone correction, consider exploring alternative mounting options or adjustments to achieve the desired alignment. By minimizing keystone correction and prioritizing proper projector placement and alignment, you can maintain the best possible image quality, ensuring a visually satisfying experience for your audience.
Test and Adjust the Placement
Once you have determined the initial placement for your projector, it is essential to thoroughly test and adjust the placement to achieve the best possible projection setup. Testing and making adjustments ensures that the projected image is clear, sharp, well-aligned, and optimized for the specific environment and audience.
Here are some steps to follow when testing and adjusting the placement of your projector:
- Verify Image Size and Alignment: Start by checking if the projected image fills the screen properly and is accurately aligned. Ensure that there is no overspill or underspill, and make necessary adjustments to achieve a perfectly centered image.
- Check for Keystone Distortion: Evaluate the image for any noticeable trapezoidal distortion caused by the projection angle. Use keystone correction or consider adjusting the projector’s height and angle to minimize or eliminate such distortion.
- Assess Image Focus and Clarity: Verify that the projected image is in focus and clear across the entire screen. Adjust the focus ring on the projector lens if necessary to achieve optimal image sharpness.
- Consider Ambient Lighting: Test the projected image in different lighting conditions, such as with lights on or off, curtains open or closed, and assess how the ambient light impacts the perceived image quality. Make adjustments to the distance, brightness, or screen properties, if needed, to optimize visibility in the given lighting conditions.
- Evaluate Viewing Angle: Analyze the viewing experience from various angles in the room to ensure that the image quality remains consistent and viewable from multiple perspectives. Adjust the projection angle, screen position, or seating arrangement as necessary to maintain a satisfactory viewing experience for all audience members.
- Consider Audio and Cable Management: Take the opportunity to test the audio setup and ensure that the sound system is properly connected and functioning. Also, check the cable management to ensure that cords are neatly organized and out of the way of foot traffic or potential obstacles.
By thoroughly testing and adjusting the placement of your projector, you can fine-tune the setup and address any issues or limitations. This process will help you achieve an optimal projection experience, ensuring that the audience can enjoy clear, well-aligned, and immersive visuals.
It is important to note that the testing and adjustment process may require some time and patience. Make use of test patterns, calibration tools, or professional assistance to aid in achieving the best possible results based on your specific projection setup.