
Charging Fitbit Alta
Charging your Fitbit Alta is a simple and straightforward process that ensures your device remains powered up and ready to track your daily activities. In this section, we will guide you through the steps to connect the charging cable, perform the charging process, monitor the battery level, and troubleshoot any charging issues that may arise.
To charge your Fitbit Alta, follow these steps:
- Locate the charging port on the back of your Fitbit Alta device.
- Connect the charging cable to the charging port by aligning the pins on the cable with the corresponding slots on the device.
- Ensure that the charging cable is securely inserted into the device to establish a proper connection.
- Plug the other end of the charging cable into a USB port on your computer, a wall charger, or a power bank.
- Ensure that the charging cable is firmly connected to the power source.
Once the charging cable is connected, you will notice a battery icon on the screen of your Fitbit Alta displaying the charging status. The battery icon will appear as an animated lightning bolt when the device is charging. It is recommended to charge your Fitbit Alta when the battery level is low to prevent it from completely draining.
Monitoring the battery level is essential to ensure your Fitbit Alta is adequately charged when needed. To check the battery level, swipe up on the device screen until you see the battery icon. The battery icon will display the remaining battery percentage, indicating how much power is left in your device.
If you encounter any charging issues with your Fitbit Alta, such as difficulty in establishing a connection or the device not charging properly, try the following troubleshooting steps:
- Ensure that the charging cable and the device’s charging port are clean and free from debris.
- Try using a different USB port or power source to rule out any issues with the current power supply.
- Restart your Fitbit Alta by pressing and holding the side button until the Fitbit logo appears on the screen.
- If the problem persists, try resetting your device by following the instructions provided by Fitbit.
By following these guidelines for charging your Fitbit Alta and troubleshooting any potential issues, you can ensure that your device remains powered up and ready to help you track your fitness goals and daily activities.
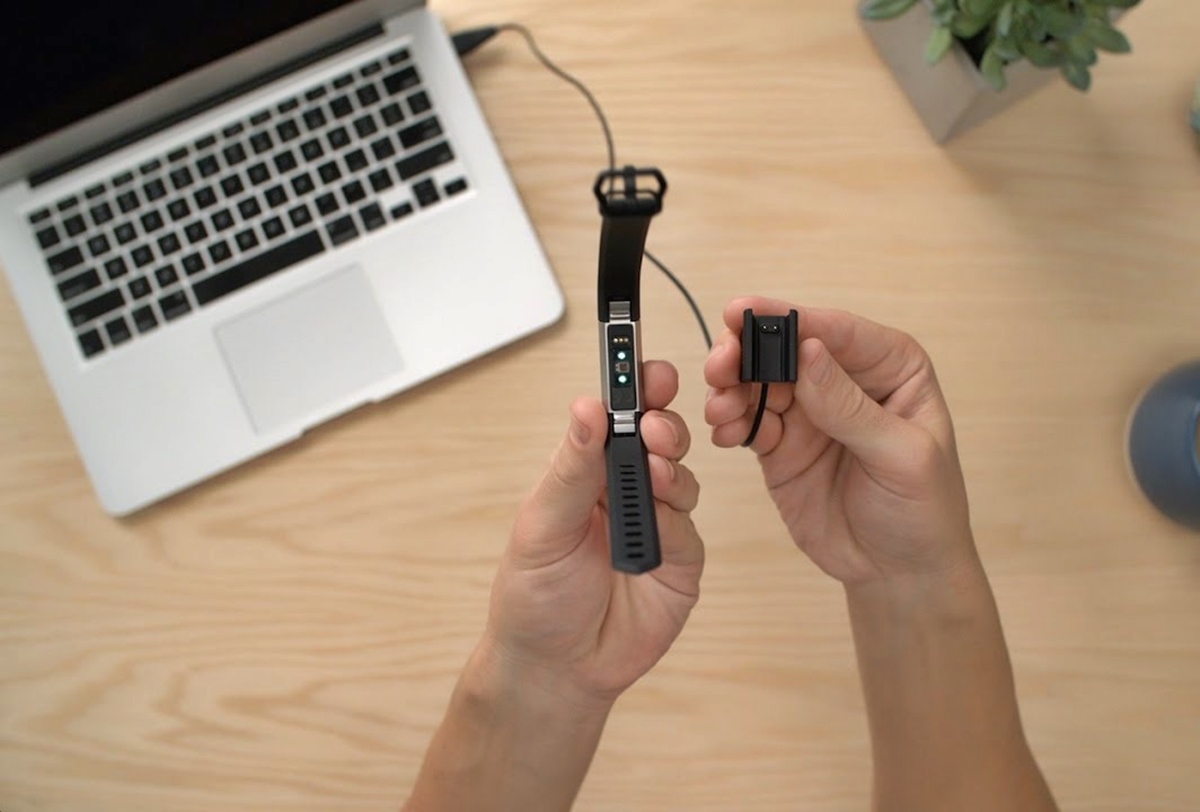
Connecting the Charging Cable
When it comes to charging your Fitbit Alta, properly connecting the charging cable is crucial to ensure a reliable and efficient charging process. In this section, we will walk you through the steps to connect the charging cable to your Fitbit Alta device.
Follow these simple steps to connect the charging cable:
- Locate the charging port on the back of your Fitbit Alta. It is a small rectangular port located on the bottom of the device.
- Take the charging cable provided with your Fitbit Alta and locate the connector end. The end of the cable has two small metal pins.
- Align the pins on the charging cable with the corresponding slots on the device’s charging port. Ensure that the pins are aligned correctly for a proper connection.
- Once aligned, gently insert the charging cable into the charging port. Take care not to force or damage the pins.
- Ensure that the charging cable is firmly inserted and securely connected to the device. A loose connection may prevent proper charging.
Once the charging cable is successfully connected, you are ready to begin the charging process. Plug the other end of the cable into a power source, such as a USB port on your computer, a wall charger, or a power bank. Make sure that the power source is reliable and provides an adequate amount of power for charging.
It is recommended to use the original charging cable provided by Fitbit. Using third-party charging cables may not provide the same level of performance and reliability, potentially leading to charging issues or damage to your device.
Remember to periodically check the connection between the charging cable and your Fitbit Alta. If you notice any signs of damage or a loose connection, consider replacing the charging cable to ensure optimal charging performance.
By properly connecting the charging cable to your Fitbit Alta, you can ensure a seamless charging experience and keep your device powered up to track your daily activities and reach your fitness goals.
Charging the Device
Charging your Fitbit Alta is essential to ensure that it remains powered up and ready to track your daily activities. In this section, we will guide you through the process of charging your device efficiently and effectively.
Once you have connected the charging cable to your Fitbit Alta and plugged it into a power source, the charging process begins. Here are some key points to keep in mind:
- Make sure the charging cable is securely connected to the Fitbit Alta and the power source. A loose connection can lead to interrupted charging or slow charging speeds.
- When properly connected, you will see a battery icon on the screen of your Fitbit Alta indicating the charging status. It will appear as an animated lightning bolt symbol, showing that the device is charging.
- The battery icon may also display the percentage of battery remaining while charging. This gives you an idea of how much charge the device has and how long it may take to reach a full charge.
- Leave your Fitbit Alta connected to the charging cable until it reaches a full charge. The duration may vary depending on the battery level and the charging speed. Typically, it takes about 1 to 2 hours to fully charge.
- During the charging process, you can continue to wear your Fitbit Alta. However, keep in mind that the charging cable can be a bit restrictive, so you may find it more comfortable to remove the device temporarily.
It is important to note that overcharging your Fitbit Alta can potentially affect the battery life over time. To prolong the lifespan of your device’s battery, avoid leaving it connected to the charger for an extended period once it is fully charged.
Regularly monitor the charging progress to ensure that your Fitbit Alta is charging correctly. If you suspect any issues with the charging process, such as slow charging or the device not charging at all, refer to the troubleshooting section for solutions.
By following these charging guidelines, you can keep your Fitbit Alta charged and ready to track your activities, allowing you to make the most of your device’s features and functionalities.
Monitoring the Battery Level
Monitoring the battery level of your Fitbit Alta is essential to ensure that you always have enough power to track your activities and meet your fitness goals. In this section, we will guide you on how to check the battery level of your device and keep track of its remaining charge.
Here are the steps to monitor the battery level of your Fitbit Alta:
- Swipe up on the device screen to access the main menu.
- Continue swiping up until you reach the battery icon.
- The battery icon will display the remaining battery percentage, indicating how much charge is left in your Fitbit Alta.
- Keep an eye on the battery level to ensure you have enough power for your daily activities.
It is important to note that the battery life of your Fitbit Alta may vary depending on usage, settings, and other factors. Generally, the device can last up to 7 days on a single charge, but this can differ based on individual usage patterns.
In addition to monitoring the battery level through the device itself, you can also view the battery status in the Fitbit app. After syncing your Fitbit Alta with the app, go to the device’s dashboard to find detailed information about the battery level and usage.
If you notice that the battery level is running low, it is recommended to charge your Fitbit Alta as soon as possible. Preventing the battery from completely draining will not only ensure uninterrupted use of your device but also help maintain the overall health of the battery.
Regularly monitoring the battery level allows you to plan your charging sessions accordingly, ensuring that your Fitbit Alta is always ready to track your activities and keep you motivated on your fitness journey.
Troubleshooting Charging Issues
Experiencing charging issues with your Fitbit Alta can be frustrating, but there are several troubleshooting steps you can take to resolve the problem. In this section, we will provide you with some common solutions to help you troubleshoot charging issues with your device.
If you encounter any charging problems with your Fitbit Alta, try the following steps:
- Ensure that the charging cable and the charging port on your Fitbit Alta are clean and free from any debris or dirt. Use a soft, lint-free cloth to clean both the cable and the charging port.
- Try connecting the charging cable to a different USB port or power source. Sometimes, the issue may lie with the power supply, and changing the source can help establish a proper connection.
- Check if the charging cable is firmly plugged into both the device and the power source. A loose connection can result in incomplete or interrupted charging.
- Restart your Fitbit Alta by pressing and holding the side button until the Fitbit logo appears on the screen. This simple reset may fix minor software glitches that could be causing the charging problem.
- If none of the above steps resolve the issue, you can try performing a factory reset on your Fitbit Alta. Keep in mind that this will erase all the data and settings on your device, so make sure to back up any important information beforehand.
If the charging problem persists even after trying these troubleshooting steps, it is recommended to contact Fitbit customer support for further assistance. They will be able to provide you with specific solutions or guide you through the warranty process if necessary.
It’s worth noting that using a third-party charging cable may also cause charging issues with your Fitbit Alta. To ensure optimal charging performance, always use the original charging cable provided by Fitbit or purchase a certified replacement cable.
By following these troubleshooting steps and seeking assistance when needed, you can overcome charging issues with your Fitbit Alta and enjoy uninterrupted tracking of your activities and progress on your fitness journey.