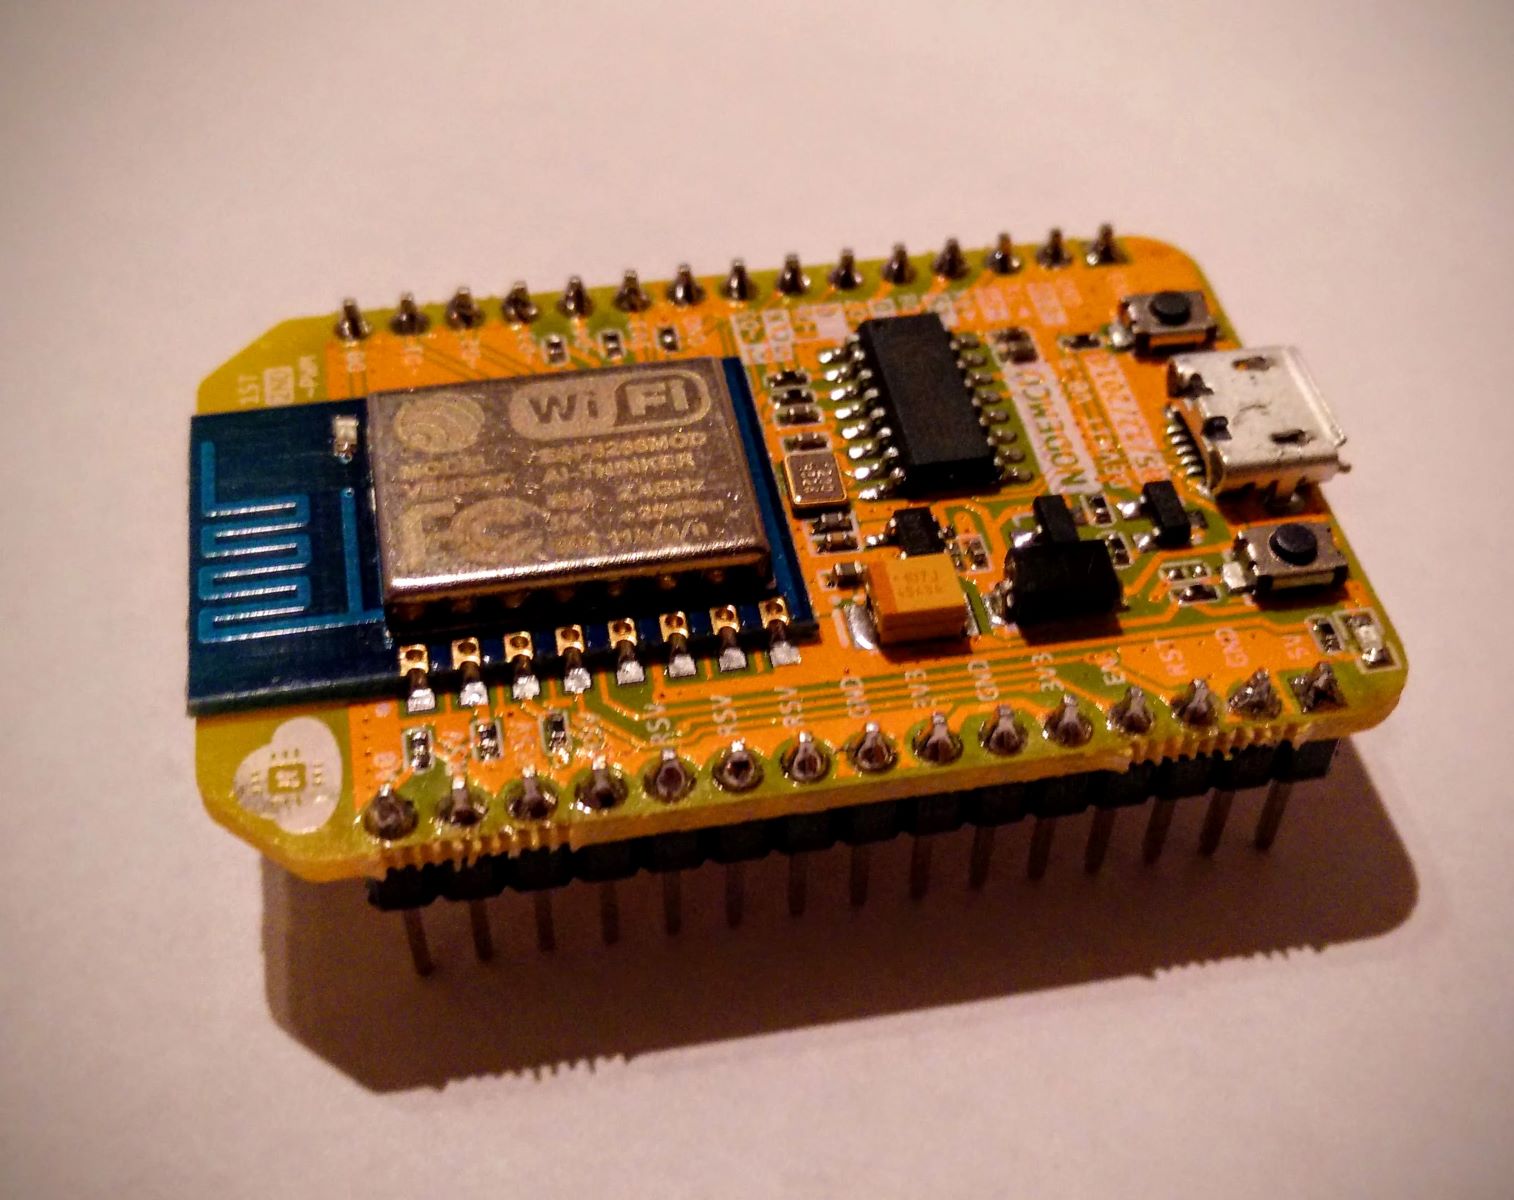
Overview of NodeMCU
NodeMCU is an open-source firmware and development board that enables rapid prototyping and development of Internet of Things (IoT) applications. It is based on the ESP8266 Wi-Fi module, which provides connectivity for devices to interact with each other via the internet.
One of the key advantages of NodeMCU is its easy-to-use programming environment. It supports the Lua scripting language, making it beginner-friendly for those new to IoT development. Additionally, NodeMCU offers a range of GPIO pins that can be used to interface with various sensors, actuators, and other electronic components.
With NodeMCU, developers have the flexibility to create smart devices that can be controlled remotely, collect data from the environment, and interact with other connected devices. Its compact size, low power consumption, and built-in Wi-Fi capabilities make it suitable for a wide array of IoT applications, such as home automation, smart agriculture, industrial monitoring, and more.
In addition to its hardware capabilities, NodeMCU has a vibrant and active community of developers. This means there is a wealth of resources, tutorials, and support available to assist developers in their projects. Whether you are a hobbyist or a professional, NodeMCU provides a powerful and cost-effective platform to explore and implement innovative IoT solutions.
Overall, NodeMCU is an excellent choice for IoT development due to its ease of use, versatility, and affordability. Whether you are a beginner or an experienced developer, NodeMCU provides a solid foundation for bringing your IoT ideas to life.
What is Internet of Things (IoT) and why do we need it?
The Internet of Things (IoT) refers to the network of interconnected physical devices, objects, and systems that are embedded with sensors, software, and network connectivity that enables them to collect and exchange data. These devices range from everyday objects like refrigerators and thermostats to automobiles, industrial machinery, and more.
So why do we need IoT? The answer lies in the potential it holds to revolutionize our daily lives. IoT offers numerous benefits, including:
1. Automation and Efficiency: By connecting devices and systems, IoT enables automation and improves efficiency in various domains such as home automation, energy management, and industrial processes. For instance, smart thermostats can learn about your preferences and automatically adjust the temperature, reducing energy consumption.
2. Improved Decision-Making: IoT-generated data provides valuable insights for decision-making. For instance, in agriculture, IoT sensors can monitor soil moisture levels, temperature, and other factors, allowing farmers to make data-driven decisions about irrigation and crop management.
3. Enhanced Safety and Security: IoT can enhance safety and security through applications such as smart surveillance, emergency response systems, and asset tracking. For instance, connected security cameras can send real-time alerts to homeowners’ smartphones when suspicious activity is detected.
4. Healthcare and Well-being: IoT applications can improve healthcare delivery and enhance well-being. For instance, wearable devices can track vital signs and send data to healthcare providers, enabling remote patient monitoring and early detection of health issues.
5. Environmental Sustainability: IoT can contribute to environmental sustainability by optimizing energy usage, reducing waste, and enabling smart transportation systems.
Overall, IoT has the potential to transform industries and our daily lives by improving efficiency, decision-making, safety, and sustainability. It opens up a world of possibilities, enabling us to create smart, connected systems that improve our quality of life.
Getting started with NodeMCU
If you’re new to NodeMCU, getting started is relatively easy. Here are the basic steps to get you up and running:
1. Obtaining the NodeMCU board: NodeMCU boards are readily available online and can be purchased from various electronics suppliers. Choose a board that fits your requirements, ensuring it is compatible with the ESP8266 Wi-Fi module.
2. Installing the Arduino IDE: The Arduino Integrated Development Environment (IDE) is commonly used for programming NodeMCU. Download and install the Arduino IDE from the official website, then open it on your computer.
3. Adding the ESP8266 board to the Arduino IDE: NodeMCU is built around the ESP8266 module. To use it with the Arduino IDE, you’ll need to add the ESP8266 board to the list of supported boards. Open the Arduino IDE, navigate to “Preferences,” and paste the following URL in the “Additional Boards Manager URLs” field: http://arduino.esp8266.com/stable/package_esp8266com_index.json
4. Installing the NodeMCU firmware: Once you’ve set up the Arduino IDE, you’ll need to install the NodeMCU firmware onto the ESP8266 module. This firmware allows you to write and run code on the NodeMCU board. Follow the instructions provided by the firmware documentation to install it on your board.
5. Connecting NodeMCU to your computer: Use a USB cable to connect the NodeMCU board to your computer. Ensure the correct COM port is selected in the Arduino IDE, and you’re ready to start programming.
6. Programming NodeMCU using the Arduino IDE: With NodeMCU connected and the board selected in the Arduino IDE, you can start writing your code. The Arduino IDE uses a programming language similar to C++, making it relatively easy to get started. Write your code to control the GPIO pins, read sensor data, or connect to Wi-Fi networks.
7. Uploading and running the code: Once you’ve written your code, click on the “Upload” button in the Arduino IDE to compile and upload it to the NodeMCU board. If successful, your code will begin running on the board, enabling it to perform the desired functions.
By following these steps, you’ll be able to get started with NodeMCU and start building your own IoT projects. As you gain more experience, you can explore additional features and libraries to expand the capabilities of your NodeMCU board.
Installing the NodeMCU firmware
Before you can begin programming your NodeMCU board, you need to install the NodeMCU firmware onto the ESP8266 module. The firmware acts as the bridge between the hardware and your code, allowing you to control the NodeMCU board’s functionalities. Here are the steps to install the NodeMCU firmware:
1. Downloading the NodeMCU firmware: Visit the NodeMCU GitHub repository and navigate to the releases section. Download the latest release of the firmware based on your specific NodeMCU board version.
2. Connecting the NodeMCU board: Use a USB cable to connect your NodeMCU board to your computer. Ensure it is correctly plugged in to establish a connection.
3. Using ESP8266Flasher: ESP8266Flasher is a tool that allows you to flash firmware onto the ESP8266 module. Download the ESP8266Flasher tool and open it on your computer.
4. Configuring ESP8266Flasher: In the ESP8266Flasher tool, select the appropriate COM port for your NodeMCU board from the drop-down menu. Make sure the baud rate is set to 115200, and verify that the correct firmware file is selected.
5. Flashing the firmware: Press the “Flash” button in the ESP8266Flasher tool to start the flashing process. This will take a few moments, and you will see the progress in the log window. Once the process is complete, you will receive a message confirming the successful flash.
6. Verifying the firmware installation: To confirm that the firmware was successfully installed, open a serial terminal application, such as Arduino IDE’s Serial Monitor, and connect to the NodeMCU board. You should see the NodeMCU prompt, indicating that the firmware installation was successful.
7. Testing the firmware: Once the firmware is installed, you can test it by uploading a simple program to blink an LED connected to one of the GPIO pins. If the LED blinks as expected, you can be confident that the NodeMCU firmware is functioning correctly.
By following these steps, you can install the NodeMCU firmware onto your NodeMCU board. This process is crucial as it enables the board to execute your code and perform the desired functions in your IoT applications.
Flashing the NodeMCU firmware onto the ESP8266
Flashing the NodeMCU firmware onto the ESP8266 module is a crucial step in setting up your NodeMCU board for programming and IoT development. The firmware allows you to write and run code on the board, enabling it to perform various functions. Here’s how to flash the NodeMCU firmware onto the ESP8266:
1. Preparation: Before you begin flashing, ensure that you have the necessary tools and software. You will need a USB-to-Serial converter (or an Arduino board acting as a programmer), jumper wires, and the NodeMCU firmware file.
2. Establishing connections: Connect the ESP8266 module to the USB-to-Serial converter or the Arduino board. Make sure to connect the appropriate pins: GND with GND, RX with TX, and TX with RX.
3. Entering flashing mode: To prepare the ESP8266 for flashing, you need to put it into flashing mode. You can do this by holding down the “GPIO0” button (or connecting the GPIO0 pin to ground) while pressing the “Reset” button on the module. This will put the ESP8266 into bootloading mode, ready for the firmware to be flashed.
4. Flashing the firmware: Open the appropriate flashing tool, such as ESP8266Flasher or nodemcu-flasher, on your computer. Select the COM port corresponding to your USB-to-Serial converter or Arduino board, as well as the NodeMCU firmware file you downloaded.
5. Configuring flashing settings: Double-check that the flashing settings are correctly configured. Ensure that the baud rate is set to 115200 and that the other settings match the requirements of your specific ESP8266 module.
6. Starting the flash: Click on the “Flash” or “Start” button in the flashing tool to begin the flashing process. The tool will start writing the NodeMCU firmware onto the ESP8266 module. This process may take a few minutes.
7. Verifying the flash: Once the flashing process is complete, the tool will display a success message. You can then disconnect the ESP8266 module from the USB-to-Serial converter or Arduino board.
8. Testing the firmware: To check if the NodeMCU firmware was successfully flashed, you can upload a simple test program to the board. For example, you can program the board to blink an LED connected to one of the GPIO pins. If the LED blinks, it indicates that the NodeMCU firmware is correctly installed and functioning.
By following these steps, you can flash the NodeMCU firmware onto the ESP8266 module. This allows you to unlock the full potential of the NodeMCU board and start developing exciting IoT applications.
Connecting NodeMCU to your computer
To begin programming and interacting with your NodeMCU board, you need to establish a connection between the board and your computer. Here are the steps to connect NodeMCU to your computer:
1. USB cable: Use a USB cable that is compatible with your NodeMCU board to connect it to your computer. Ensure that the USB cable is in good condition and has a data transfer capability.
2. USB port: Locate an available USB port on your computer and plug in one end of the USB cable. Make sure the port is functioning correctly, and no other devices are connected to it, as this may cause conflicts.
3. NodeMCU power: Once the USB cable is connected, your NodeMCU board will receive power directly from the USB port of your computer. This eliminates the need for an external power supply, making it convenient for development and testing.
4. Device recognition: After connecting the NodeMCU board to your computer, give it a few seconds to allow the computer to recognize the newly connected device. The operating system should automatically detect the NodeMCU board and install any necessary drivers.
5. USB driver installation (if required): In some cases, your computer may require specific USB drivers to recognize the NodeMCU board. If the drivers are not automatically installed, you can manually install them by downloading them from the NodeMCU documentation or manufacturer’s website.
6. COM port selection: Open the Arduino IDE or any other programming environment you are using to program the NodeMCU. In the IDE, navigate to the Tools menu and select the appropriate COM port for your NodeMCU board. The COM port number may vary depending on your computer and the number of devices connected to it.
7. Testing the connection: To ensure that the NodeMCU board is successfully connected to your computer, you can upload a simple program that performs a basic function, such as blinking an LED. If the program is uploaded and executed successfully, it indicates that the NodeMCU board is correctly connected to your computer.
8. Troubleshooting: If you encounter any issues with the connection, such as the board not being recognized or the program failing to upload, double-check the USB cable, USB port, and COM port selection. You can also refer to the NodeMCU documentation or seek assistance from the community for troubleshooting steps.
By following these steps, you can establish a connection between your NodeMCU board and your computer. This connection allows you to program the board, upload firmware, and interact with various sensors and actuators to build your IoT applications.
Programming NodeMCU using the Arduino IDE
The Arduino Integrated Development Environment (IDE) is a popular choice for programming NodeMCU, as it provides a user-friendly interface and a large community of developers. Here are the steps to program NodeMCU using the Arduino IDE:
1. Installing the Arduino IDE: First, download and install the Arduino IDE from the official website. Make sure to select the version appropriate for your operating system.
2. Adding the ESP8266 board: Open the Arduino IDE and go to “File” > “Preferences”. In the “Additional Boards Manager URLs” field, enter the following URL: http://arduino.esp8266.com/stable/package_esp8266com_index.json. Click “OK” to save the changes.
3. Board selection: In the Arduino IDE, navigate to “Tools” > “Board” and select “NodeMCU 1.0 (ESP-12E Module)” from the list of available boards. This ensures that the IDE uses the correct settings for programming the NodeMCU board.
4. Port selection: Now, go to “Tools” > “Port” and select the COM port corresponding to your NodeMCU board. This is the port you identified when connecting the NodeMCU to your computer.
5. Opening a new sketch: To start a new program, click on “File” > “New”. This will open a new blank sketch in the IDE’s editor. This is where you will write your code.
6. Writing the code: Write your program in the Arduino programming language, which is similar to C++. You can include the necessary libraries and use the provided functions to interact with the NodeMCU’s hardware and perform specific tasks.
7. Uploading the code: Once your code is written, click on the “Upload” button or go to “Sketch” > “Upload” to compile and upload your program to the NodeMCU board. The Arduino IDE will compile the code and transfer it to the board.
8. Verifying the upload: After the uploading process is complete, you should see the status information in the output window at the bottom of the Arduino IDE. If the upload was successful, you can proceed to test your program on the NodeMCU board.
9. Serial communication: Use the “Serial Monitor” feature in the Arduino IDE to establish a serial communication link between the NodeMCU board and your computer. This allows you to send and receive data for debugging and monitoring purposes.
By following these steps, you can program the NodeMCU board using the Arduino IDE. Take advantage of the vast Arduino community and the available libraries to explore the full potential of your NodeMCU and create exciting IoT applications.
Understanding the NodeMCU code structure
When programming NodeMCU, it’s essential to understand the basic structure of the code to ensure smooth execution and create efficient and readable programs. The NodeMCU code structure typically consists of the following elements:
1. Setup function: The setup() function is a mandatory part of every NodeMCU program. It is called once when the board starts up and is used to initialize variables, set pin modes, and configure any necessary settings. It is typically where you define the initial behavior of your program.
2. Loop function: The loop() function is the heart of your NodeMCU program. It runs continuously in a loop after the setup() function has completed. This is where you place the main logic of your program, including reading sensor data, performing calculations, controlling actuators, and making decisions based on certain conditions.
3. Variables: Variables are used to store and manipulate data within a program. NodeMCU supports various data types, such as integers, floating-point numbers, strings, and booleans. You can declare variables at the beginning of your program or within specific functions, depending on their scope and usage.
4. Functions: Functions are reusable blocks of code that perform specific tasks. They allow you to organize your code and make it more modular and easier to understand. You can define custom functions to encapsulate certain functionality, such as reading sensor values or controlling an actuator, which can be called from other parts of your code.
5. Libraries: Libraries are pre-written code modules that provide additional functionality and simplify programming. NodeMCU has a vast library collection that covers various domains, including sensors, actuators, communication protocols, and more. You can import and utilize these libraries in your code by including the necessary headers and calling their functions.
6. Comments: Comments are used to provide explanations, document the code, and make it more readable. NodeMCU supports both single-line (//) and multi-line (/* */) comments. It is good practice to include comments to describe the purpose and functionality of your code blocks, making it easier for others (or your future self) to understand the program.
7. Conditional statements and loops: NodeMCU supports common programming constructs like if-else statements, for loops, while loops, and switch-case statements. These control flow structures allow you to create decision-making processes, repetition, and iteration within your code.
8. Error handling: It is essential to include error handling mechanisms in your NodeMCU code to catch and handle any issues that may arise during execution. This can involve checking return values, using try-catch blocks, or implementing error codes and messages to provide helpful information for troubleshooting.
9. Timers and delays: NodeMCU offers built-in functions to manage time-based operations. You can use timers and delays to schedule events, control timing intervals, and regulate the execution of certain tasks within your program.
By understanding and utilizing these elements in the NodeMCU code structure, you can create well-organized and efficient programs that effectively control your IoT applications.
Working with GPIO pins on NodeMCU
The NodeMCU board provides General Purpose Input/Output (GPIO) pins that can be used to interact with the outside world, including sensors, actuators, and other devices. GPIO pins can be configured as either input or output, allowing you to read digital signals or control external components. Here’s what you need to know about working with GPIO pins on NodeMCU:
1. Pin numbering: NodeMCU labels its pins with the prefix “D” followed by a number. For example, D0, D1, D2, etc. These pin numbers are essential when defining and referencing GPIO pins in your code.
2. Pin modes: GPIO pins can be set as either input or output using the pinMode() function. For input pins, you can read the state of the pin and determine whether it is HIGH (logic level 1) or LOW (logic level 0). For output pins, you can set the pin state as HIGH or LOW to control external devices.
3. Digital read and write: To read from an input pin, use the digitalRead() function, which returns the state of the pin as either HIGH or LOW. To write to an output pin, use the digitalWrite() function to set the pin state as either HIGH or LOW.
4. Internal pull-up and pull-down resistors: NodeMCU allows you to enable internal pull-up or pull-down resistors on GPIO pins. This helps ensure a stable state when the pin is not connected to any external device. You can enable the internal pull-up resistor by using the pinMode() function with the INPUT_PULLUP argument.
5. Interrupts: NodeMCU supports interrupt functionality on some GPIO pins. Interrupts allow your code to respond immediately to external events, such as a change in pin state or a specific signal. You can attach interrupt service routines (ISRs) to these pins to handle the interrupt events.
6. PWM (Pulse Width Modulation): Some GPIO pins on NodeMCU support PWM output. PWM allows you to simulate analog output by rapidly toggling the pin between HIGH and LOW states with different duty cycles. You can use the analogWrite() function to control the PWM output signal.
7. Pin limitations and considerations: It’s important to note that GPIO pins have limitations, such as voltage and current restrictions. Check the specifications of your NodeMCU board and the datasheets of the components you are connecting to ensure compatibility. Also, be mindful of potential conflicts with other pins or onboard peripherals.
8. External components and circuits: When working with GPIO pins, you’ll likely connect them to various external components, such as sensors, LEDs, relays, and more. It’s crucial to understand the electrical characteristics of these components and the necessary circuit connections to ensure proper functionality.
By utilizing the GPIO pins on NodeMCU, you can interface with external devices, control actuators, read sensor data, and create interactive projects that bring your IoT applications to life.
Using NodeMCU to communicate with sensors and actuators
NodeMCU, with its GPIO pins and programming capabilities, makes it easy to communicate with various sensors and actuators in your IoT projects. By connecting sensors to NodeMCU, you can gather data from the environment, while actuators allow you to control external devices. Let’s explore how to use NodeMCU for sensor and actuator communication:
1. Sensor integration: Connect your sensor to one of the GPIO pins on NodeMCU. This typically involves connecting power, ground, and data pins of the sensor to the corresponding pins on the NodeMCU board. Refer to the datasheets or documentation of your sensor for specific pin connections.
2. Reading sensor data: Use the appropriate library or code snippets to read data from the connected sensor. This may involve configuring the pin mode, initializing the sensor, and utilizing sensor-specific functions to obtain readings such as temperature, humidity, light intensity, motion detection, or any other measurable parameter.
3. Handling sensor data: Once you have the sensor readings, you can process and analyze the data within your code. This could involve performing calculations, applying thresholds, or triggering specific actions based on the sensor data. Manipulate the data to fit your desired application requirements.
4. Actuator control: Connect the actuator device, such as an LED, motor, relay, or servo, to one of the GPIO output pins. This typically involves connecting the control pin of the actuator to the desired GPIO pin on NodeMCU, along with the appropriate power and ground connections.
5. Controlling actuators: Use the digitalWrite() function to control the output pin connected to the actuator. You can set the pin to HIGH or LOW to turn the actuator on or off, or use PWM modulation to achieve dimming or variable speed control, depending on the capabilities of the connected actuator.
6. Sensor-actuator interaction: Utilize the sensor data within your code to determine the desired behavior of the connected actuators. For example, you can program NodeMCU to turn on an LED when a certain threshold of temperature is exceeded, or activate a motor based on the detection of motion from a sensor.
7. Synchronization and timing: Coordinate the timing and synchronization of sensor readings, actuator control, and other operations within your code to ensure smooth and efficient operation. Incorporate delays, timing intervals, or timers to regulate the execution of specific tasks and ensure proper interaction between sensors and actuators.
8. Error handling and feedback: Implement error handling mechanisms and feedback loops to handle any errors or unexpected conditions that may arise during sensor and actuator interactions. This can involve error-checking, validation, and providing feedback to the user or administrator through status messages or visual indicators.
By effectively communicating with sensors and actuators using NodeMCU, you can collect meaningful data from the environment and control external devices to create intelligent and responsive IoT applications.
NodeMCU and Wi-Fi connectivity
NodeMCU is equipped with built-in Wi-Fi capabilities, allowing it to connect to wireless networks and access the internet. This makes it an ideal choice for IoT applications that require connectivity and remote communication. Here’s what you need to know about NodeMCU and Wi-Fi connectivity:
1. Connecting to Wi-Fi networks: Using the Wi-Fi library available in the Arduino IDE, you can easily connect NodeMCU to an existing Wi-Fi network. Specify the SSID (network name) and password in your code to initiate the connection. NodeMCU will then associate with the network and obtain an IP address.
2. Wireless network scanning: NodeMCU has the ability to scan for nearby Wi-Fi networks. You can use the Wi-Fi library to scan for available networks and obtain information such as network name, signal strength, and security settings. This information can be useful for network selection or displaying available networks on an interface.
3. Wi-Fi modes: NodeMCU supports different Wi-Fi modes, including Station mode (connecting to an existing network), Access Point mode (creating its own network), or a combination of both (Station+AP mode). You can choose the appropriate mode based on the application requirements.
4. IP configuration: NodeMCU can obtain an IP address automatically through DHCP (Dynamic Host Configuration Protocol). Alternatively, you can assign a static IP address to NodeMCU if needed. The IP address allows NodeMCU to communicate on the network and access internet-based services.
5. Web server functionality: NodeMCU can function as a web server, allowing it to serve web pages, handle HTTP requests, and respond to client interactions. With this capability, NodeMCU can be used to create web interfaces for controlling and monitoring IoT devices or showcasing sensor data through a browser.
6. Secure communication: NodeMCU supports secure communication over the Wi-Fi network using protocols such as HTTPS and SSL/TLS. This enables the encryption of data exchanged between NodeMCU and other devices, ensuring the confidentiality and integrity of the transmitted information.
7. Wi-Fi event handling: NodeMCU provides event-driven mechanisms to handle Wi-Fi connectivity events, such as connecting to a network, disconnecting from a network, or obtaining an IP address. These events can trigger specific actions or callbacks in your code, allowing you to respond to changes in Wi-Fi connectivity status.
8. Network debugging and troubleshooting: NodeMCU offers various debugging functionalities to assist with network-related issues. You can print Wi-Fi connection status, check signal strength, monitor network traffic, and troubleshoot any problems that may arise during Wi-Fi communication.
With its Wi-Fi capabilities, NodeMCU opens up a wide range of possibilities for building connected IoT applications. Whether it’s accessing web services, retrieving data from the cloud, or communicating with other devices, NodeMCU’s Wi-Fi connectivity empowers you to create powerful and versatile IoT solutions.
Setting up a web server using NodeMCU
NodeMCU provides the ability to set up a web server, allowing you to create web-based interfaces for controlling and monitoring your IoT devices. With a web server on NodeMCU, you can serve web pages, handle HTTP requests, and interact with connected devices through a browser. Here’s how to set up a web server using NodeMCU:
1. Include necessary libraries: To set up a web server, you’ll need to include the necessary libraries in your code. NodeMCU supports the ESP8266WebServer library, which simplifies the process of creating and handling web server functionality.
2. Define server and handle routes: Create an instance of the ESP8266WebServer class to define your server object. You can then specify the routes or URLs that the server should respond to and the corresponding functions or handlers that should be executed when those routes are accessed.
3. Start the server: In your setup() function, start the web server by calling the server.begin() function. This will initialize the server and make it ready to handle incoming HTTP requests.
4. Handle HTTP requests: Set up the necessary functions to handle the different types of HTTP requests (GET, POST, etc.) that your server should respond to. These functions can include actions such as reading sensor data, controlling actuators, or updating device settings based on the request parameters.
5. Serve web pages: Create HTML or other web files to serve as the web pages for your interface. You can include JavaScript, CSS, and images to make the web pages interactive and visually appealing. Use functions such as server.send() to send these files to the client when requested.
6. Interact with clients: Use server.on() functions to handle specific events, such as when a client connects or disconnects from the server. You can execute code or trigger actions based on these events, allowing you to track client connections and perform tasks accordingly.
7. Process form submissions: If your web pages include forms, set up handlers to process the form submissions. Extract the form data from the HTTP request, validate and sanitize the inputs, and perform the relevant actions or store the data as required for your application.
8. Error handling and redirection: Implement error handling mechanisms to handle invalid routes or incorrect requests. You can provide appropriate error messages or redirect clients to specific pages when certain conditions are not met.
9. Customize server behavior: NodeMCU allows you to customize your web server by adjusting server settings, setting access privileges, or implementing authentication mechanisms. These additional features can enhance the security and functionality of your web server.
By following these steps, you can set up a web server on NodeMCU, enabling you to create web-based interfaces for controlling and monitoring your IoT devices. With this web server functionality, you can provide a user-friendly and accessible interface to interact with your IoT applications from any browser-enabled device.
Controlling NodeMCU remotely through smartphone applications
Controlling your NodeMCU board remotely through smartphone applications adds convenience and flexibility to your IoT projects. By developing or using existing smartphone applications, you can interact with your NodeMCU board from anywhere, expanding the possibilities of your smart devices. Here’s how you can control NodeMCU remotely through smartphone applications:
1. Choosing a smartphone platform: Determine the smartphone platform you want to develop for, such as iOS or Android. This will help you select the appropriate development tools and frameworks.
2. Developing a mobile application: If you have the necessary programming skills, you can develop a custom mobile application specifically designed to control your NodeMCU board. Use the appropriate programming language, such as Swift for iOS or Java/Kotlin for Android, and utilize libraries or frameworks that enable communication with NodeMCU.
3. Utilizing existing IoT platforms: There are various IoT platforms, such as Blynk, ThingsBoard, or Cayenne, that offer ready-to-use smartphone applications along with cloud services. These platforms often provide pre-built widgets and easy integration with NodeMCU, making it simple to create a custom control interface.
4. Connecting NodeMCU to the smartphone application: Establish a connection between your NodeMCU board and the smartphone application. This can be achieved by utilizing Wi-Fi or other wireless communication protocols such as Bluetooth or MQTT. Ensure that both the NodeMCU board and the smartphone are connected to the same network or using a common communication channel.
5. Implementing control features: Define the functionality you want to enable through the smartphone application. This can include turning on/off connected devices, adjusting settings, monitoring sensor data, or performing specific actions triggered remotely.
6. User interface design: Design an intuitive and user-friendly interface for your smartphone application. Arrange buttons, sliders, or other interactive elements to provide easy control and monitoring of your NodeMCU board. Consider the aesthetics and usability of the interface to enhance the user experience.
7. Security considerations: Implement appropriate security measures to ensure the privacy and integrity of your data. Use encryption techniques, secure authentication mechanisms, and implement proper access controls to protect your NodeMCU board from unauthorized access or malicious actions.
8. Testing and iteration: Test your smartphone application to ensure its functionality and compatibility with your NodeMCU board. Debug any issues or inconsistencies and iterate on the design and features based on user feedback or further improvements.
By developing or utilizing smartphone applications, you can control your NodeMCU board remotely, providing you with convenient access to your IoT devices from your smartphone. This opens up possibilities for home automation, smart appliances, or remote monitoring and control in various IoT applications.
Integrating NodeMCU with popular IoT platforms like Amazon Web Services (AWS) and Google Cloud Platform (GCP)
Integrating NodeMCU with popular IoT platforms like Amazon Web Services (AWS) and Google Cloud Platform (GCP) allows you to leverage the power of cloud computing and services for your NodeMCU-based IoT projects. These platforms offer a range of features and functionalities that can enhance your IoT applications. Here’s how you can integrate NodeMCU with AWS and GCP:
1. Setting up an AWS or GCP account: To begin, create an account on the desired IoT platform, whether it’s AWS or GCP. Follow the platform-specific instructions to set up your account and access the necessary cloud services.
2. Provisioning IoT resources: Both AWS and GCP offer IoT-specific services and resources that you can provision for your NodeMCU-based devices. These resources include IoT hubs, device registries, authentication mechanisms, and more. Provision the required resources based on your project’s needs.
3. Device registration: Register your NodeMCU devices with the IoT platform. This typically involves generating a unique identity for each device, such as an X.509 certificate, and associating it with your NodeMCU board. This registration links your NodeMCU device with the cloud services.
4. Data ingestion and storage: Decide how you want to handle data ingestion and storage. AWS IoT Core and GCP IoT Core provide MQTT and HTTP endpoints that allow your NodeMCU board to send data to the cloud. You can configure rules, topics, and data pipelines to store, process, and analyze data in services like AWS S3, DynamoDB, GCP Cloud Storage, or BigQuery.
5. Device management: AWS IoT Core and GCP IoT Core offer device management capabilities, enabling you to remotely manage and monitor your NodeMCU devices. This includes functionalities like remote configuration updates, firmware over-the-air (OTA) updates, and monitoring device health and status.
6. Cloud-triggered actions: Define actions in the cloud platform that should be triggered based on specific events or data received from your NodeMCU devices. This can include invoking AWS Lambda functions or GCP Cloud Functions to perform desired tasks, sending notifications or alerts, or interacting with other cloud services.
7. Integration with other cloud services: AWS and GCP offer a range of additional cloud services that can be integrated with your NodeMCU devices. For example, you can leverage AWS IoT Analytics or GCP Dataflow for data processing, use AWS Lambda or GCP Cloud Functions for serverless computing, or utilize AWS SNS or GCP Pub/Sub for event-driven messaging.
8. Security and access control: Implement appropriate security measures to protect your NodeMCU devices and the data exchanged with the IoT platform. Utilize authentication mechanisms, data encryption, and access controls provided by AWS and GCP to ensure the confidentiality and integrity of your IoT data.
By integrating NodeMCU with popular IoT platforms like AWS and GCP, you can take advantage of the scalability, reliability, and analytics capabilities offered by these cloud services. This integration expands the capabilities of your NodeMCU-based IoT projects and empowers you to build robust, scalable, and connected applications.
Troubleshooting common issues with NodeMCU
While working with NodeMCU, you may encounter various issues that can affect the performance and functionality of your IoT projects. Troubleshooting these issues can help identify and resolve problems efficiently. Here are some common issues you may come across when working with NodeMCU and troubleshooting tips:
1. Connection problems: If you’re experiencing issues connecting to your NodeMCU board, check the physical connections, including the USB cable, power source, and Wi-Fi network. Ensure that your computer recognizes the board and is communicating with it, and that you have entered the correct Wi-Fi credentials.
2. Firmware issues: If your NodeMCU board is not responding or executing code as expected, there may be firmware-related issues. Verify that the NodeMCU firmware is installed correctly and up to date. Consider re-flashing the firmware or updating it if necessary.
3. Incorrect pin assignments: Double-check your code to ensure that you have assigned the correct GPIO pins for your sensors, actuators, and other connected components. Review the NodeMCU pinout diagram to verify the pin assignments are accurate.
4. Power supply problems: Insufficient or unstable power supply can cause erratic behavior or unreliable performance of your NodeMCU board. Ensure that you are providing an adequate and stable power source within the recommended voltage limits to avoid unexpected issues.
5. Network connectivity problems: If you’re having trouble connecting to your NodeMCU board over a network, verify that the Wi-Fi network is functioning correctly. Double-check the SSID, password, and network settings in your code and ensure they match the actual network configuration.
6. Sensor or actuator failures: If your sensors or actuators are not functioning properly, inspect the connections and wiring for loose or faulty connections. Ensure that you are using the correct voltage levels and compatible components. Test the components individually to identify any specific issues.
7. Code errors or bugs: Review your code for syntax errors, logic mistakes, or missing libraries. Use debugging techniques such as printing debug statements or utilizing the Serial Monitor to identify potential errors or problematic code sections. Break down complex code into smaller, testable parts to isolate any potential issues.
8. Memory constraints: NodeMCU boards have limited memory resources. If you encounter unexpected crashes or erratic behavior, consider optimizing your code, avoiding memory leaks, and freeing up memory when necessary. Use libraries and functions that are memory-efficient and avoid unnecessary resource consumption.
9. Community support and resources: If you’re unable to resolve the issue on your own, reach out to the NodeMCU community for assistance. Online forums, developer communities, and dedicated NodeMCU resources provide valuable insight and troubleshooting tips.
By systematically addressing and troubleshooting these common issues, you can effectively debug and resolve problems encountered during NodeMCU development. Persistence, attention to detail, and utilizing available resources will help you overcome challenges and ensure the smooth operation of your NodeMCU-based IoT projects.