
Checking the Battery Status of Your Echo Dot
The Amazon Echo Dot is a portable device that runs on battery power, allowing you to use it wirelessly in any part of your home. However, it’s important to keep an eye on the battery status to ensure uninterrupted usage. In this section, we will explore three different methods to check the battery level of your Echo Dot.
Method 1: Using the Alexa App
The Alexa app provides a convenient way to monitor the battery status of your Echo Dot. Here’s how you can do it:
- Launch the Alexa app on your smartphone or tablet.
- Select the Devices tab at the bottom of the screen.
- Find your Echo Dot in the list of devices and tap on it.
- Scroll down to the Device Details section and look for the Battery level.
This method is especially useful if you’re not near your Echo Dot physically but still want to check its battery status.
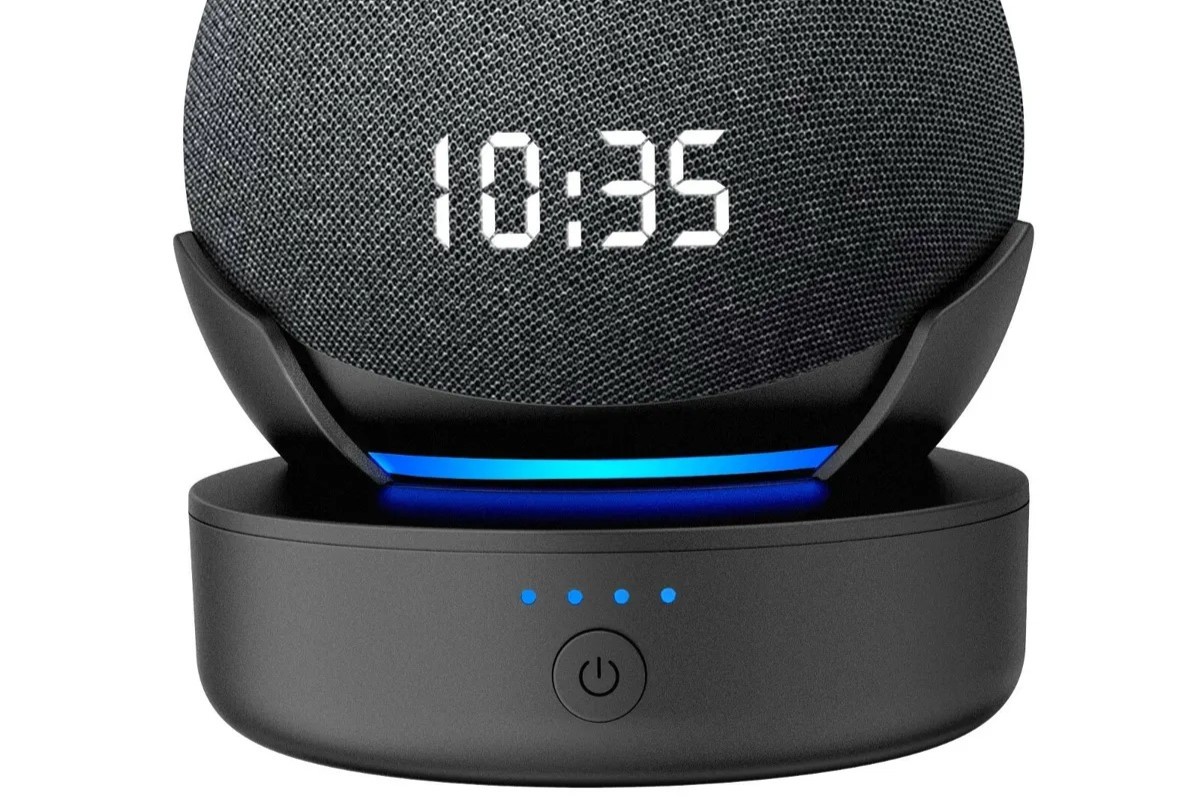
Method 2: Checking the LED Status on the Echo Dot
Your Echo Dot features a ring of LED lights that can provide information about various device functions, including battery status. Here’s how you can interpret the LED colors to check the battery level:
- Green: This indicates that your Echo Dot has a sufficient charge.
- Yellow: The battery level is moderate, and you should consider recharging soon.
- Red: This means your Echo Dot has a low battery and needs to be charged immediately.
- Flashing Red: If the LED lights are flashing red, it indicates that the battery is critically low, and the device will soon shut down.
By observing the LED status, you can quickly assess the battery level of your Echo Dot at a glance.
Method 3: Using Voice Commands
If you are near your Echo Dot and prefer a hands-free approach, you can also check the battery status using voice commands. Simply say, “Alexa, what’s the battery level?” or “Alexa, how much battery is left?” and she will inform you about the current battery status of your Echo Dot.
Keep in mind that these voice commands may vary slightly depending on your Echo Dot generation and any software updates that have been applied.
Now that you know how to check the battery status of your Echo Dot, let’s discuss how long it takes to charge the device and some helpful tips for extending its battery life.
Method 1: Using the Alexa app
The Alexa app provides a convenient way to monitor the battery status of your Echo Dot. By following a few simple steps, you can easily check how much battery life is left on your device.
To begin, ensure that you have the Alexa app installed on your smartphone or tablet. If you haven’t already, you can download it from the App Store or Google Play Store. Once the app is successfully installed, launch it to proceed with the battery check.
Upon opening the Alexa app, you will find different tabs at the bottom of the screen. Tap on the “Devices” tab to view the list of Alexa-enabled devices linked to your account. From there, locate your Echo Dot and select it to access the device settings.
Once you are on the Echo Dot settings page, scroll down to find the “Device Details” section. Here, you will see various information related to your Echo Dot, including the battery level. The battery percentage will be displayed, indicating the remaining charge on your device.
If you see a high percentage, it indicates that your Echo Dot has sufficient charge. However, if the battery level is low, it’s a good idea to charge your device to avoid any interruptions during usage. Remember to plug it into a power source using the provided USB cable and adapter.
Checking the battery status through the Alexa app is especially advantageous if you are not physically near your Echo Dot. You can monitor the battery level remotely and plan accordingly to charge it when needed.
In addition to monitoring the battery status, the Alexa app offers other features to enhance your Echo Dot experience. You can explore different skills, manage your device settings, and even create routines to automate tasks. It serves as a comprehensive hub for all things Echo Dot-related.
Now that you know how to check the battery status of your Echo Dot using the Alexa app, let’s move on to the next method: checking the LED status on the device.
Method 2: Checking the LED Status on the Echo Dot
Your Echo Dot is equipped with a ring of LED lights that can provide valuable information about the device, including the battery status. By observing the LED colors and patterns, you can easily check the battery level of your Echo Dot.
Here’s how you can interpret the LED status:
- Green: A solid green LED light indicates that your Echo Dot has a sufficient charge. This means you can continue using it without any worries.
- Yellow: When the LED light turns yellow, it indicates that the battery level is moderate and it’s advisable to consider recharging your Echo Dot soon. This will ensure you have enough power for uninterrupted usage.
- Red: If the LED light turns red, it means that your Echo Dot has a low battery and needs to be charged immediately. We recommend connecting it to a power source using the provided USB cable and adapter for charging.
- Flashing Red: In case the LED lights are flashing red, it signifies that the battery is critically low. Your Echo Dot will soon shut down if not charged promptly. Connect it to a power source as soon as possible to ensure continuous usage.
By keeping an eye on the LED status, you can quickly assess the battery level of your Echo Dot without needing to access any external apps or devices.
Please note that the LED status interpretation may vary depending on the generation of your Echo Dot. However, most Echo Dot models follow similar color coding patterns for the battery status.
Checking the LED status is especially convenient if you are near your Echo Dot physically. It allows for quick and easy verification of the battery level at a glance.
Now that you know how to check the battery status using the LED lights on your Echo Dot, let’s move on to the next method: using voice commands.
Method 3: Using Voice Commands
If you are near your Echo Dot and prefer a hands-free approach, you can also check the battery status using voice commands. This method allows you to retrieve the current battery level of your Echo Dot without physically accessing any apps or settings.
To check the battery status using voice commands, simply say, “Alexa, what’s the battery level?” or “Alexa, how much battery is left?” Your Echo Dot’s virtual assistant, Alexa, will promptly respond with the current battery percentage.
It’s important to note that the specific voice commands may vary slightly depending on the generation of your Echo Dot and any software updates that have been applied. However, Alexa is designed to understand various phrasings for checking the battery status, so feel free to experiment with different combinations of words.
Using voice commands to check the battery level is especially convenient if you have your hands full or are in another part of the room. It allows for a seamless and effortless way to retrieve the information you need.
It’s worth mentioning that voice commands can be used for more than just checking the battery status. Alexa offers a wide range of capabilities, from playing music and setting reminders to controlling smart home devices and providing information. Take advantage of these features to make the most out of your Echo Dot.
Now that you know how to check the battery status of your Echo Dot using voice commands, let’s move on to discuss how long it takes to charge an Echo Dot and share some tips to extend its battery life.
How Long Does It Take to Charge an Echo Dot?
Charging your Echo Dot is essential to keep it powered and ready for use. The time it takes to fully charge your Echo Dot depends on a few factors:
Battery Capacity: The battery capacity of your Echo Dot will determine the charging time. Newer models generally have larger batteries and may take longer to charge compared to older models with smaller batteries.
Charging Method: The charging method you use will also impact the charging time. The recommended way to charge an Echo Dot is by connecting it to a power source using the included USB cable and adapter.
Power Source: The power source you use can affect the charging speed. It is recommended to use a wall outlet instead of charging through a computer or other devices, as the latter may provide slower charging speeds.
On average, it can take approximately 2-3 hours to fully charge an Echo Dot. However, keep in mind that this is just an estimate and the actual time may vary depending on the factors mentioned above. It’s always a good idea to monitor the LED status or check the battery level through the Alexa app to ensure that your Echo Dot is fully charged before use.
During the charging process, the LED lights on your Echo Dot will indicate the charging status. When the device is plugged in and charging, the LED light will turn orange. Once the device is fully charged, the LED light will turn green, indicating that it’s ready for use.
It’s worth noting that you can still use your Echo Dot while it’s charging. However, it’s recommended to keep it connected to the power source to maintain a consistent charge and prevent interruptions during use.
Now that you know how long it typically takes to charge your Echo Dot, let’s explore some tips to extend its battery life and maximize your device’s performance.
Tips for Extending Your Echo Dot’s Battery Life
In order to make the most out of your Echo Dot’s battery life and ensure long-lasting performance, consider implementing these helpful tips:
1. Optimize Volume Levels: Higher volume levels require more power to amplify the sound. Lowering the volume when not needed can help conserve battery life and allow your Echo Dot to last longer on a single charge.
2. Adjust Sleep Settings: The Echo Dot has a sleep mode feature that allows you to conserve battery power during periods of inactivity. Configure this setting through the Alexa app to automatically put your device to sleep after a certain period of inactivity.
3. Minimize Wi-Fi Usage: Constantly searching for and connecting to Wi-Fi networks drains the battery. To optimize battery life, reduce unnecessary Wi-Fi usage by disabling or limiting the Echo Dot’s connection to Wi-Fi when not required.
4. Disable Power-Hungry Features: Certain power-intensive features, such as the always-on microphone or active noise cancellation, can significantly impact battery life. Temporarily disabling these features when not needed can extend the battery’s longevity.
5. Opt for Energy-Saving Mode: Echo Dot devices have an energy-saving mode that automatically activates when the battery level is low. In this mode, the device conserves power by disabling non-essential features. This helps to prolong battery life until you can recharge your Echo Dot.
6. Regularly Update Firmware: Keeping your Echo Dot’s firmware up to date ensures that it benefits from regular software optimizations and bug fixes. These updates often include battery performance enhancements, allowing for better efficiency and longer-lasting battery life.
7. Store in Optimal Conditions: Extreme temperatures, both high and low, can negatively affect battery life. Ideally, store your Echo Dot in a cool, dry place where the temperature is between 32°F (0°C) and 95°F (35°C) to maintain optimal battery health.
By following these tips, you can help extend the battery life of your Echo Dot, ensuring that it remains powered and ready for use whenever you need it.
Now that you’re armed with the knowledge of how to maximize your Echo Dot’s battery life, you can enjoy uninterrupted usage and make the most out of your portable smart speaker.