
Possible Reasons for Google Meet Camera Not Working
If you’re experiencing issues with your camera not working during a Google Meet session, there could be several reasons behind it. Understanding these potential causes will help you identify and resolve the problem swiftly. Here are some common factors to consider:
1. Camera Hardware Issues: The first step is to check your camera hardware. Ensure that it’s properly connected and functioning correctly. Sometimes, a simple unplugging and reconnecting of the camera can solve the problem. Additionally, ensure that the camera lens is clean and free from any obstructions.
2. Camera Settings: Check if the camera settings on your device are properly configured. Ensure that the camera is enabled and not blocked by any privacy settings or applications that might be using it. Adjusting the camera resolution and frame rate settings might also help resolve the issue.
3. Camera Access to Google Meet: Granting camera access to Google Meet is vital for it to function properly. Make sure that you have given the necessary permissions for the camera to be used during the meeting. To do this, go to your browser’s settings and ensure that Google Meet has access to your camera.
4. Outdated Google Meet or Operating System: An outdated version of Google Meet or your operating system can cause compatibility issues with your camera. Check for updates and install them if available. Keeping the software up to date can often resolve camera-related problems.
5. Background Applications or Extensions: Disable any unnecessary background applications or browser extensions that might be interfering with the camera’s functionality. Some third-party applications or extensions might conflict with Google Meet, leading to camera issues.
6. Cache and Cookies: Clearing your browser’s cache and cookies can alleviate camera problems. Over time, accumulated cache and cookies can hinder the proper functioning of various website features, including the camera. Clearing them will ensure a fresh start and potentially resolve the issue.
7. Network Connectivity: Unstable or poor network connectivity can impact the performance of your camera during a Google Meet session. Check your internet connection and consider switching to a more reliable network if possible.
8. Firewall or VPN: Firewalls or VPNs (Virtual Private Networks) can sometimes block the camera’s access to Google Meet. Temporarily disable your firewall or VPN and check if the camera starts working. Remember to re-enable them once the issue is resolved.
9. Restart Device and Browser: Sometimes, a simple restart can fix temporary glitches or conflicts that might be causing the camera to malfunction. Try restarting your device and browser, and then check if the camera works properly.
If you have gone through these troubleshooting steps and the camera is still not working in Google Meet, it may be time to reach out to Google Support for further assistance.
Check Camera Hardware and Settings
When encountering camera issues during a Google Meet session, it is important to begin the troubleshooting process by checking your camera hardware and settings. Here are some steps you can take to ensure that your camera is properly functioning:
1. Verify Camera Connection: First, check if your camera is securely connected to your device. Ensure that the USB cable or any other connection method is properly inserted into the appropriate port. If you are using an integrated camera on a laptop, make sure it is not covered or blocked.
2. Clean the Camera Lens: Sometimes, a smudged or dirty camera lens can affect the image quality or cause the camera to malfunction. Use a soft, lint-free cloth to gently clean the camera lens. Avoid using abrasive materials or fluids that may damage the lens.
3. Adjust Camera Settings: Access the camera settings on your device to ensure they are configured correctly. Open the camera app or go to your device’s settings menu to adjust settings such as resolution, brightness, or exposure levels. Experimenting with these settings might help resolve any camera-related issues.
4. Check Privacy Settings: Some devices have privacy settings that allow you to control which apps or programs have access to your camera. Check if the camera permissions for Google Meet are enabled. On Windows, you can find these settings in the Privacy section of the Settings app. On macOS, go to System Preferences and select Security & Privacy, then navigate to the Privacy tab.
5. Test the Camera with Other Applications: To determine if the camera issue is specific to Google Meet or a broader problem, test it with other applications. Open a camera app or use video calling software like Skype or Zoom to verify if the camera works in those programs. If it does, the problem may lie within the Google Meet application or your browser settings.
6. Update Camera Drivers: Outdated or incompatible camera drivers can cause the camera to malfunction. Check the manufacturer’s website for any available driver updates. Installing the latest drivers for your camera may resolve compatibility issues.
If you have followed these steps and the camera still does not work in Google Meet, it may be necessary to investigate other potential causes. Remember, troubleshooting camera hardware and settings is just the first step in resolving camera-related issues during a Google Meet session.
Grant Camera Access to Google Meet
If your camera is not working during Google Meet sessions, one potential cause could be an issue with camera access permissions. Here are some steps you can take to ensure that Google Meet has the necessary camera access:
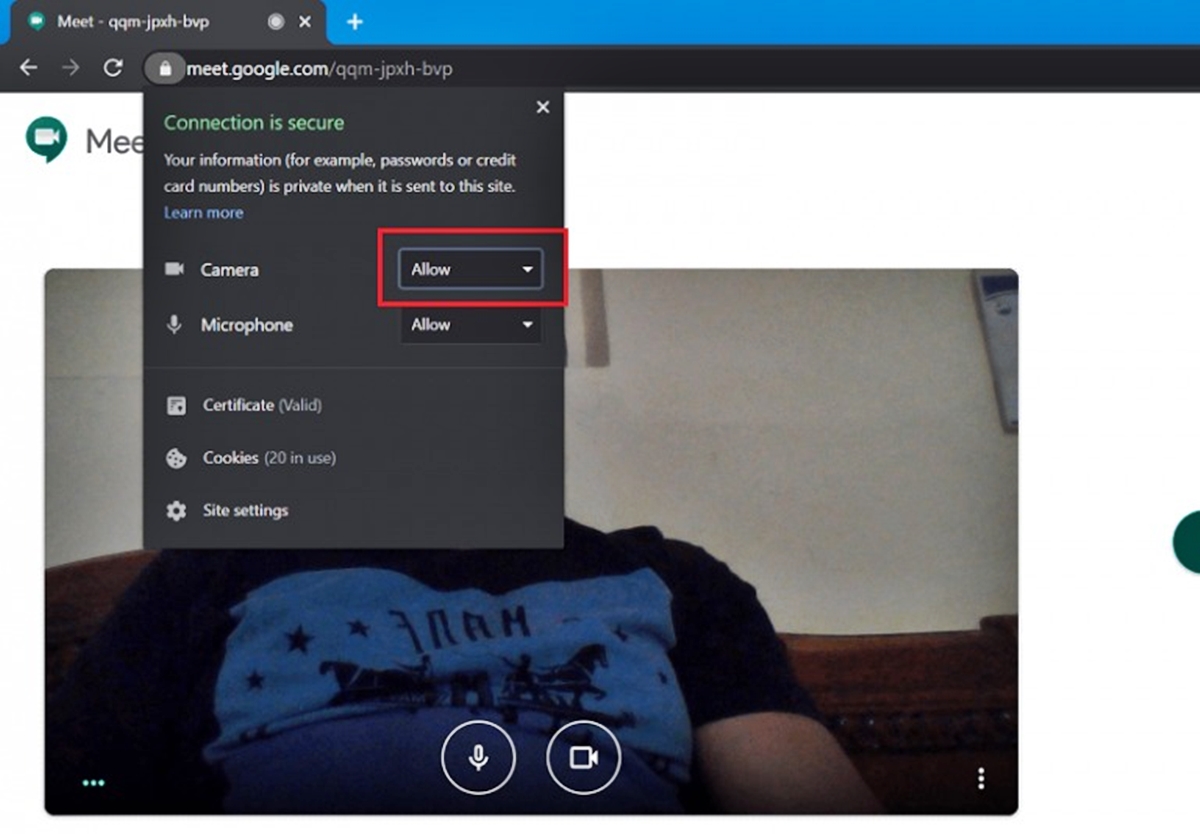
1. Browser Camera Permissions: Start by checking the camera permissions within your web browser. In most browsers, you can access these settings by clicking on the lock or info icon in the address bar or navigating to the browser’s settings menu. Look for camera-related settings and ensure that they are set to allow Google Meet access to your camera.
2. Reset Camera Permissions: Clearing and resetting the camera permissions for Google Meet might help resolve any issues. To do this, go to your browser’s settings, find the camera permissions section, and revoke access for Google Meet. Then, revisit Google Meet and grant camera permissions again when prompted. This will ensure a fresh start for the camera access settings.
3. Check Browser Extensions: Certain browser extensions or add-ons might interfere with the camera functionality in Google Meet. Disable any extensions that are related to camera access or video conferencing and try using Google Meet again. If the camera starts working, you can narrow down the issue to a specific extension that needs to be permanently disabled or updated.
4. Verify Camera Access on Mobile Devices: If you are using Google Meet on a mobile device, such as a smartphone or tablet, ensure that the Google Meet app has been granted camera access in the device’s settings. Go to the device’s settings, find the app permissions section, and make sure Google Meet has permission to access the camera.
5. Check Operating System Permissions: In addition to browser permissions, ensure that your operating system allows Google Meet to access your camera. Go to the privacy settings on your device, find the camera permissions section, and make sure Google Meet is enabled to access the camera. Restart your device after making any changes to ensure the settings take effect.
6. Review Firewall or Antivirus Settings: Sometimes, firewall settings or antivirus software can block camera access to Google Meet. Temporarily disable your firewall or antivirus and check if the camera starts working. If it does, you may need to add Google Meet to the allowed applications list to ensure proper camera access while maintaining security.
By following these steps and granting the necessary camera access to Google Meet, you can increase the chances of resolving camera issues and maximizing your video conferencing experience.
Update Google Meet and Operating System
Keeping your Google Meet application and operating system up to date is crucial for maintaining optimal performance and resolving camera-related issues. Here are some steps you can take to ensure that both Google Meet and your operating system are updated:
1. Update Google Meet: Check if there are any available updates for the Google Meet application. Updates often include bug fixes and improvements that can address camera issues. Open the app store or marketplace on your device and search for “Google Meet”. If an update is available, install it to ensure you have the latest version.
2. Update Operating System: Keeping your device’s operating system up to date is equally important. Updates can introduce new features and enhancements that can positively impact camera functionality. For Windows, go to the Settings app and navigate to the Update & Security section. On macOS, click on the Apple menu and select “Software Update”. For mobile devices, go to the system settings and look for the Software Update or System Updates option.
3. Automatic Updates: Enable automatic updates for both Google Meet and your operating system if available. This ensures that you receive the latest updates without having to manually check for them. Automatic updates are convenient and help safeguard against potential issues by ensuring that your software is always up to date.
4. Restart After Updating: After installing updates for Google Meet or your operating system, restart your device. A restart can help apply the updates effectively and remove any lingering issues that may have affected camera functionality. It is also a good practice to restart your device on a regular basis to keep everything running smoothly.
5. Test Camera After Updating: Once the updates are installed and your device is restarted, test the camera during a Google Meet session. Check if the camera is functioning correctly and the issue has been resolved. If the problem persists, consider exploring other troubleshooting options or reaching out to technical support.
Regularly updating both the Google Meet application and your operating system ensures that you have access to the latest features and fixes, providing a more stable and reliable camera experience during Google Meet sessions.
Disable Background Applications or Extensions
If you are experiencing camera issues during Google Meet sessions, background applications or browser extensions may be interfering with the camera’s functionality. Disabling or temporarily removing these applications or extensions can help resolve the problem. Here are some steps you can take:
1. Identify Background Applications: Take note of any applications running in the background of your device. Applications that use the camera, such as video conferencing software or virtual meeting tools, may conflict with Google Meet. Close or exit these applications before starting a Google Meet session to ensure they do not interfere with the camera.
2. Disable Browser Extensions: Browser extensions can also affect camera functionality. Disable any extensions that are not necessary during Google Meet sessions, especially those related to video or camera functions. To do this, go to your browser’s settings and navigate to the extensions or add-ons section. Temporarily disable the relevant extensions and check if the camera issue persists.
3. Test Without Extensions: If disabling specific extensions does not resolve the problem, consider testing Google Meet without any extensions enabled. Open an incognito or private browsing window, as these typically do not load extensions by default. Launch Google Meet in this window and check if the camera works properly. If it does, it indicates that one or more extensions were causing the issue.
4. Update or Remove Problematic Extensions: If you have identified a specific extension causing camera problems, update it to the latest version. Developers often release updates that address compatibility issues. If updating the extension does not resolve the problem, consider removing it temporarily or permanently. You can always reinstall it later, ensuring it does not interfere with the camera functionality in Google Meet.
5. Use a Different Browser: If you continue to experience camera issues after disabling all extensions, consider using a different browser for your Google Meet sessions. Sometimes, specific browser configurations or conflicts between extensions might affect the camera functionality. Switching to a different browser can help isolate the issue and provide a smoother camera experience.
By disabling background applications and extensions, you can eliminate potential conflicts that might be responsible for the camera issues in Google Meet. It allows the camera to function without any unnecessary interference, ensuring a smooth and uninterrupted video conferencing experience.
Clear Browser Cache and Cookies
If you’re facing camera issues during Google Meet sessions, clearing your browser’s cache and cookies can help resolve the problem. Cache and cookies are temporary files that your browser stores to enhance browsing speed and remember website preferences. However, over time, these files can accumulate and cause conflicts that affect camera functionality. Here’s how you can clear your browser cache and cookies:
1. Access Browser Settings: Open your browser’s settings menu. The location may vary depending on the browser you’re using, but it is typically accessible from the top-right corner of the browser window or through a menu icon.
2. Clear Cache and Cookies: Look for options related to privacy, security, or browsing history. Within those settings, find the option to clear cache and cookies. It may be listed as “Clear browsing data” or similar terms.
3. Choose Time Range: You may be prompted to select a time range for clearing the data. It is recommended to choose “All time” to ensure that all cached files and cookies are removed. This ensures a complete reset of your browser’s cache.
4. Clear the Data: Once you’ve selected the time range, click on the “Clear” or “Delete” button to initiate the clearing process. Depending on the amount of data being cleared, it may take a few moments.
5. Restart the Browser: After clearing the cache and cookies, restart your browser. This ensures that any cached data still in memory is fully cleared, allowing for a fresh start.
6. Test the Camera: Open Google Meet and join a meeting to test if the camera issue has been resolved after clearing the cache and cookies. Verify that the camera is working as expected.
7. Repeat as Needed: If you continue to experience camera issues, consider repeating the process on a regular basis. Clearing the cache and cookies periodically can help maintain browser performance and prevent any potential conflicts that might arise in the future.
Clearing your browser’s cache and cookies is a simple yet effective solution for addressing camera issues in Google Meet. By removing cached files and resetting stored data, you can promote a smoother and more reliable camera experience during your video conferencing sessions.
Troubleshoot Network Connectivity
If your camera is not working during Google Meet sessions, network connectivity issues could be the culprit. Here are some steps to troubleshoot network connectivity problems and potentially resolve the camera issue:
1. Check Internet Connection: Ensure that you have a stable and reliable internet connection. Test your connection speed using an online speed test tool. If your internet speed is slow or unstable, try moving closer to your Wi-Fi router or connect to a more reliable network.
2. Restart Modem and Router: Sometimes, power cycling your modem and router can help resolve temporary network connectivity issues. Turn off both devices, wait for about 30 seconds, then turn them back on. Allow the devices to restart and establish a fresh connection.
3. Disconnect Other Devices: If other devices on your network are consuming a significant amount of bandwidth, it can affect your Google Meet session and camera performance. Disconnect any devices that are not in use or limit their Internet usage during important video conferences.
4. Check Firewall Settings: Firewalls, both on your device and network level, can sometimes block the necessary connections for Google Meet and the camera to function properly. Temporarily turn off your firewall and test if the camera issue persists. If the camera works with the firewall disabled, adjust your firewall settings to allow Google Meet and the camera to communicate.
5. Use a Wired Connection: If you are using a Wi-Fi connection and experiencing inconsistency or signal strength issues, try connecting your device directly to the router using an Ethernet cable. A wired connection often provides more stable and reliable network connectivity.
6. Test on a Different Network: If possible, try using Google Meet and testing the camera on a different network. This can help identify if the issue is specific to your current network. If the camera works fine on a different network, it indicates that there may be network-related problems or restrictions on your original network that need to be addressed.
7. Contact your Internet Service Provider (ISP): If you have tried troubleshooting your network connectivity but the camera issue persists, it may be worth contacting your ISP for assistance. They can help identify any network issues or provide guidance on optimizing your internet connection for video conferencing purposes.
By following these steps to troubleshoot network connectivity, you can ensure a stable and reliable network connection for Google Meet. Resolving any network issues can help improve camera performance and provide a seamless video conferencing experience.
Disable Firewall or VPN
If you’re facing camera issues during Google Meet sessions, it’s worth considering whether your firewall or VPN (Virtual Private Network) settings are interfering with the camera functionality. Here are some steps to disable your firewall or VPN and potentially resolve the problem:
1. Windows Firewall
– Go to the Control Panel on your Windows device.
– Navigate to the System and Security section.
– Click on the Windows Defender Firewall option.
– Select the “Turn Windows Defender Firewall on or off” link on the left side.
– Choose “Turn off Windows Defender Firewall” for both private and public networks.
– Click on the “OK” button to save the changes.
2. Firewall on macOS
– Open System Preferences on your Mac.
– Click on “Security & Privacy.”
– Select the “Firewall” tab.
– Click on the padlock icon and enter your administrator password.
– Click on “Turn Off Firewall.”
– Confirm your choice when prompted.
3. Third-party Firewall Software
– If you’re using third-party firewall software, open the application.
– Look for the settings or preferences section related to the firewall.
– Disable the firewall option temporarily or create an exception for Google Meet.
– Save the changes and exit the application.
4. Disabling VPN
– If you are using a VPN, locate the VPN application or settings on your device.
– Disconnect or disable the VPN connection temporarily.
– If you’re using a browser extension VPN, disable it within your browser settings.
– Restart your browser or the Google Meet application to ensure the changes take effect.
5. Test the Camera
– After disabling the firewall or VPN, join a Google Meet session and test if the camera functionality has been restored.
– If the camera now works without any issues, it confirms that the firewall or VPN was causing the problem.
– Remember to re-enable your firewall or VPN after using Google Meet for security purposes.
While disabling your firewall or VPN is a temporary measure, it can help determine if they are the cause of the camera issues in Google Meet. If disabling them resolves the problem, you may need to adjust the settings or create exceptions to allow Google Meet to function properly while maintaining your device’s security.
Restart Device and Browser
If you’re encountering camera issues during Google Meet sessions, one of the simplest yet effective troubleshooting steps you can take is to restart your device and browser. Restarting can help resolve temporary glitches, conflicts, or system issues that may be affecting the camera’s functionality. Here’s how you can restart your device and browser:
1. Restarting Your Device
– On a computer, click on the Start menu and select “Restart” or “Shut down” and then turn it back on after a few moments. Alternatively, you can press the power button to shut it down and then turn it on again.
– On a mobile device, press and hold the power button until the power menu appears. Select the option to restart your device.
2. Closing and Restarting Your Browser
– On your computer, close all browser windows and tabs. Then, reopen the browser by clicking on its icon on the desktop or in the taskbar. Alternatively, you can use the keyboard shortcut Ctrl + Shift + T to reopen the most recently closed tabs.
– On your mobile device, close the browser app completely. Depending on your device and operating system, swipe up from the bottom of the screen or go to the Recent Apps menu, then swipe the browser app away or tap the X or Close button to close it. Reopen the browser to start fresh.
3. Join a Google Meet Session
– After restarting both your device and browser, join a Google Meet session to test if the camera issue has been resolved.
– Check if the camera works properly without any glitches or errors.
– If the camera still doesn’t work, consider trying other troubleshooting steps or reaching out to technical support for further assistance.
Restarting your device and browser can clear out temporary files, refresh the system, and resolve minor issues that might impact the camera’s performance during Google Meet sessions. It’s a quick and simple step that can often provide a solution to camera-related problems.
Contact Google Support for Further Assistance
If you have exhausted all the troubleshooting steps and your camera is still not working during Google Meet sessions, it may be time to reach out to Google Support for further assistance. Here’s how you can contact them:
1. Google Meets Help Center: Visit the Google Meet Help Center at https://support.google.com/meet/. Here, you can find various articles, guides, and FAQs that may provide solutions to common camera issues. Use the search function to find specific topics related to your problem.
2. Submit a Support Request: If you’re unable to find a solution in the Help Center, you can submit a support request. Go to the Google Meet support page and click on the “Contact support” or “Submit a request” link. Provide details about your camera issue, including any steps you have already taken to troubleshoot it. Google support agents will review your request and provide assistance as soon as possible.
3. Participate in Google Meet Community: Engage with the Google Meet Community, a forum where users can share their experiences and seek help from other community members. Post your camera issue in the relevant category, and someone from the community or even a Google representative may respond with potential solutions.
4. Social Media Channels: Connect with Google Meet through their official social media channels such as Twitter or Facebook. While they may not provide real-time technical support, they can direct you to the appropriate resources or relay your issue to the relevant team for further assistance.
5. Seek Help from School or Workplace IT Support: If you are using Google Meet for educational or workplace purposes, reach out to your school’s or company’s IT support team. They may have specific insights or solutions to address camera issues within your organization’s network or system configuration.
When contacting Google Support, provide as much relevant information as possible to help them understand and diagnose the camera problem. Be prepared to follow any additional steps or provide further details they may request.
Remember, Google’s support team is dedicated to assisting users with their technical issues, and they have the expertise to help you resolve camera-related problems during Google Meet sessions. So don’t hesitate to seek their assistance when necessary.