
What is Location Tagging on Instagram?
Location tagging is a feature on Instagram that allows users to add a specific location to their posts. This feature enables users to share their current location or the location where a photo or video was taken. When a user adds a location tag, their post becomes discoverable to others who are exploring posts from that particular location.
Location tagging on Instagram serves as a virtual map, connecting users with similar interests and experiences in a specific location. Whether it’s a café, landmark, city, or even an event, adding a location tag helps create a sense of community and allows users to engage with posts that are relevant to their interests.
The location tag can appear in different formats. It can be the name of a city, a specific venue, or even a custom location created by other users. This feature not only enhances the storytelling aspect of Instagram posts but also adds an additional layer of context to the content being shared.
Location tagging goes beyond just marking a spot on a map. It has become a way for users to show off their travel adventures, discover hidden gems in their city, or promote businesses and events. By tagging a location, users can share their experiences and recommendations with their followers and the wider Instagram community.
Furthermore, location tagging allows users to explore posts from a specific location. By searching for a particular city or venue, users can discover content related to that location. This feature is especially beneficial for travelers looking for recommendations or locals wanting to keep up with what’s happening in their area.
Whether it’s a picturesque beach, a trendy café, or a historical landmark, location tagging on Instagram adds a geospatial element to the platform, making it more dynamic and interactive. It encourages users to discover new places, connect with like-minded individuals, and share their own experiences with the global Instagram community.
Why is Location Tagging important?
Location tagging on Instagram plays a significant role in enhancing the overall user experience and expanding the reach of posts. Here are some reasons why location tagging is important:
- Increased Discoverability: By adding a location tag to your Instagram posts, you make them discoverable to users who are browsing specific locations. This can significantly increase the visibility of your content and attract new followers who have an interest in that location.
- Targeted Audience: Location tagging allows you to reach a more targeted audience. If you’re promoting a local business, for example, adding a location tag ensures that your content is seen by users who are in the vicinity and potentially interested in your products or services.
- Community Engagement: Using location tags helps foster a sense of community among Instagram users. By tagging a location, you are connecting with others who have shared experiences or interests in that specific place. It opens up opportunities for engagement, networking, and building meaningful connections.
- Curated Content: Location tagging enables users to curate content based on specific locations. This feature is especially useful for travelers, as it allows them to create personalized travel guides or showcase their adventures in different destinations. It also helps locals highlight the best spots in their city and share recommendations with others.
- Event Promotion: For businesses and event organizers, location tagging serves as a powerful promotional tool. Tagging the location of an event increases its visibility and allows users to discover and engage with related content. It can generate buzz, attract attendees, and create a sense of anticipation for upcoming events.
Location tagging on Instagram is a valuable feature that enhances both personal and business accounts. It enables users to reach a wider audience, connect with like-minded individuals, and share experiences related to specific locations. Whether you’re an avid traveler, a local business, or simply looking to connect with others in your area, location tagging is an essential tool for maximizing your presence on Instagram.
How to enable Location Tagging on Instagram?
Enabling location tagging on Instagram allows you to add specific locations to your posts. It’s easy to do, and here’s how you can enable location tagging:
- Open the Instagram app on your mobile device.
- Go to your profile by tapping on the “Profile” icon at the bottom right corner of the screen.
- Tap on the three horizontal lines at the top right corner to open the menu.
- From the menu, select “Settings”.
- Scroll down and tap on “Privacy”.
- Under Privacy, select “Location”.
- Ensure that the “Location Services” option is enabled. This allows Instagram to access your device’s location information.
- Return to Instagram and create a new post by tapping on the plus sign at the bottom center of the screen.
- Select the photo or video you want to post.
- On the “New Post” screen, you will see an option to add a location. Tap on “Add Location”.
- Start typing the name of the location in the search bar. Instagram will display suggestions based on your input.
- Select the correct location from the list of suggestions.
- Complete your post by adding captions, hashtags, and any other desired elements. Once you’re ready, tap on “Share” to publish your post with the location tag.
Once you have enabled location services and followed these steps, you will be able to tag locations in your Instagram posts. Remember to only add the location tag if you are comfortable sharing your location information with your followers and the wider Instagram community.
How to add a Location Tag to your Instagram post?
Adding a location tag to your Instagram post is a simple process. Follow these steps to easily include a specific location in your Instagram posts:
- Open the Instagram app on your mobile device.
- Tap on the plus sign at the bottom center of the screen to create a new post.
- Select the photo or video that you want to share from your gallery or take a new one using the camera.
- Once you have chosen your media, tap on “Next” at the top right corner.
- On the “New Post” screen, you will see an option to add a location. Tap on “Add Location”.
- Type the name of the location in the search bar. As you type, Instagram will display a list of locations to choose from.
- Select the correct location from the list by tapping on it.
- Complete your post by adding captions, hashtags, or any other desired elements.
- Review your post to ensure everything is as you want it.
- Tap on “Share” to publish your post with the location tag. Your post will now be visible to others who are exploring that specific location.
It’s important to note that you have the option to remove or change the location tag even after you have posted your content. Simply go to your post, tap on the three dots at the top right corner, and select “Edit”. From there, you can modify the location tag or remove it completely.
Adding a location tag to your Instagram post not only provides additional context and information but also increases its visibility to users who are interested in that particular location. It’s a great way to connect with others who share similar interests or experiences in a specific area and can help your content reach a wider audience within the Instagram community.
How to explore posts by location on Instagram?
Exploring posts by location on Instagram allows you to discover content related to specific places, whether it’s a city, landmark, or a local venue. Here’s how you can easily explore posts by location:
- Open the Instagram app on your mobile device.
- Tap on the magnifying glass icon at the bottom center of the screen to access the Explore page.
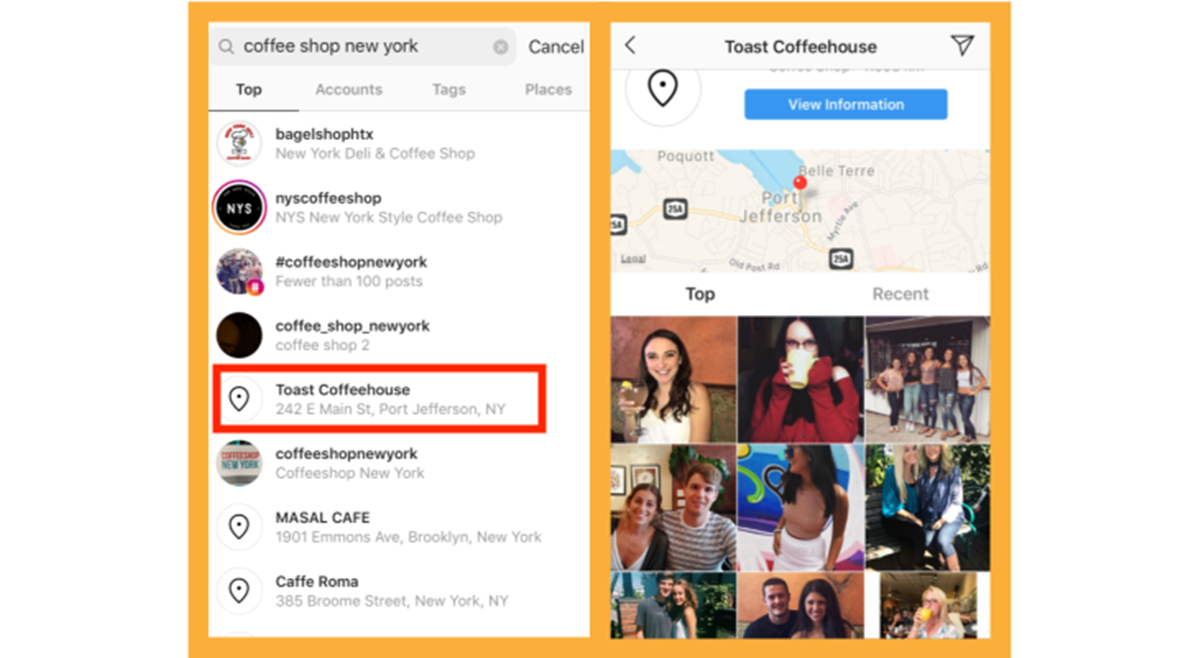
- At the top of the Explore page, you will see a search bar. Tap on it.
- Type in the name of the location you want to explore. Instagram will display suggestions based on your input.
- Select the location from the list by tapping on it.
- On the location page, you will see a grid of posts that have been tagged with that specific location. These posts may include photos, videos, and stories.
- You can scroll through the posts to explore the content from that location.
- To refine your search further, you can use the filter options at the top of the page. You can filter by “Top” posts, which are the most popular or engaging posts from that location, or “Recent” posts, which are the most recent content shared.
- Additionally, you can tap on the “Places” tab just above the grid of posts. This will show you a map view of the location and the nearby places that have been tagged. You can explore the posts from those places as well.
- If you find a post that interests you, you can tap on it to view it in detail, like it, leave a comment, or even save it for later.
- When you’re finished exploring the posts from that location, you can go back to the Explore page by tapping on the magnifying glass icon.
Exploring posts by location on Instagram is a fantastic way to discover new places, find inspiration, and connect with others who have shared experiences or interests in a specific location. Whether you’re planning a trip, looking for local recommendations, or simply curious about a particular place, exploring posts by location allows you to immerse yourself in the Instagram community and discover the world through the eyes of others.
How to remove a Location Tag from your Instagram post?
If you’ve added a location tag to your Instagram post but want to remove it for any reason, you can easily do so. Here’s how you can remove a location tag from your Instagram post:
- Open the Instagram app on your mobile device.
- Go to your profile page by tapping on the “Profile” icon at the bottom right corner of the screen.
- Scroll through your posts and find the post from which you want to remove the location tag.
- Tap on the post to open it.
- At the top right corner of the post, you will see three dots. Tap on them to access additional options.
- From the menu that appears, select “Edit”.
- On the editing screen, you will see the location tag below the caption. Tap on the “X” next to the location tag to remove it.
- After removing the location tag, you can make any other desired edits to your post, such as modifying the caption or adding/removing hashtags.
- Once you are satisfied with the changes, tap on “Done” to save the modifications.
- Your post will now be updated without the location tag.
Removing a location tag from your Instagram post allows you to maintain privacy or make adjustments to your content as needed. It’s important to note that removing the location tag does not delete or impact the original post; it solely removes the tagged location information associated with it.
Keep in mind that location tags can be a valuable way to connect with others, share experiences, and engage with the Instagram community. However, should you ever wish to remove a location tag from a post, the steps outlined above will help you easily accomplish that.