
Choosing the Right Battery
Choosing the Right Battery
When it comes to DIY watch care, selecting the correct battery for your timepiece is crucial. The first step is to determine the type of battery your watch requires. This information can typically be found in the watch's manual, or you can search for the specifications online using the watch's model number. Additionally, you may take the old battery to a watch repair shop or jeweler to ensure you purchase the correct replacement.
It's important to note that watch batteries come in various sizes and types, so it's essential to match the old battery with the new one. Common types of watch batteries include silver oxide, lithium, and alkaline, each with its own unique characteristics. Silver oxide batteries are the most popular choice for watches due to their long life and stable voltage, making them ideal for analog and digital timepieces. On the other hand, lithium batteries are known for their high energy density and extended shelf life, making them suitable for more complex watches with additional features.
Furthermore, consider the brand and quality of the battery. Opting for a reputable brand ensures reliability and longevity, reducing the frequency of battery replacements. While generic batteries may be more affordable, they may not offer the same level of performance and longevity as their brand-name counterparts. It's worth investing in a high-quality battery to safeguard the functionality of your watch.
In summary, choosing the right battery for your watch involves identifying the correct type, size, and brand. By ensuring you have the appropriate replacement, you can prolong the lifespan of your timepiece and maintain its accuracy. Taking the time to select the right battery is a small yet significant step in preserving the functionality of your watch.
Tools and Materials Needed
Tools and Materials Needed
Before embarking on the task of changing your watch battery, it’s essential to gather the necessary tools and materials. Having the right equipment at hand will streamline the process and ensure a successful battery replacement.
First and foremost, you’ll need a clean and well-lit workspace to carry out the procedure. A flat surface with ample lighting will facilitate a clear view of the watch components and prevent any small parts from getting lost. Additionally, a soft cloth or mat can be used to protect the watch from scratches or damage during the battery replacement process.
The primary tool required for opening the watch back is a case back opener. This specialized tool comes in various designs, including adjustable wrench-like tools and case knives. Selecting the appropriate case back opener that matches the type of watch back you have is crucial to prevent damage to the watch casing.
Furthermore, a pair of non-magnetic tweezers is indispensable for handling the delicate components inside the watch. Tweezers with fine tips enable precise manipulation of small parts and aid in safely removing and inserting the battery without causing any damage.
Additionally, a magnifying glass or a magnifier with built-in LED lights can be beneficial, especially for individuals with visual impairments or for working with intricate watch mechanisms. This tool enhances visibility and allows for a closer inspection of the watch components.
Lastly, having the correct replacement battery, as determined in the previous section, is essential. Ensure that the new battery matches the specifications of the old one to guarantee compatibility and optimal performance.
Removing the Watch Back
Removing the Watch Back
Before delving into the intricacies of changing the watch battery, the first step is to access the internal components by removing the watch back. This process requires precision and care to avoid damaging the watch casing or its intricate mechanisms.
Begin by identifying the type of watch back your timepiece has. There are generally three common types of watch backs: screw-off, snap-off, and screw-down. Each type necessitates a distinct approach for removal.
- Screw-off Watch Back: If your watch features small notches on the back, it likely has a screw-off back. To remove this type of watch back, use a case back opener with adjustable pins that fit into the notches. Gently rotate the opener counterclockwise to unscrew the back, taking care not to apply excessive force.
- Snap-off Watch Back: Watches with snap-off backs can be identified by a small indentation or groove along the edge of the case back. To remove this type, carefully insert a case knife or a specialized case opening tool into the groove and apply gentle pressure to pop off the back.
- Screw-down Watch Back: Typically found in diver’s watches and those designed for high water resistance, screw-down backs feature a threaded ring that secures the back in place. To remove this type of watch back, a case back opener with adjustable pins or a specific wrench-like tool is required to rotate and unscrew the ring in a counterclockwise direction.
Regardless of the type of watch back, it’s crucial to exercise patience and caution during the removal process. Avoid using excessive force or sharp objects that may scratch or damage the watch casing. Once the back is removed, place it in a secure location to prevent misplacement.
With the watch back successfully removed, the internal components, including the old battery, are now accessible for the subsequent steps in the battery replacement process.
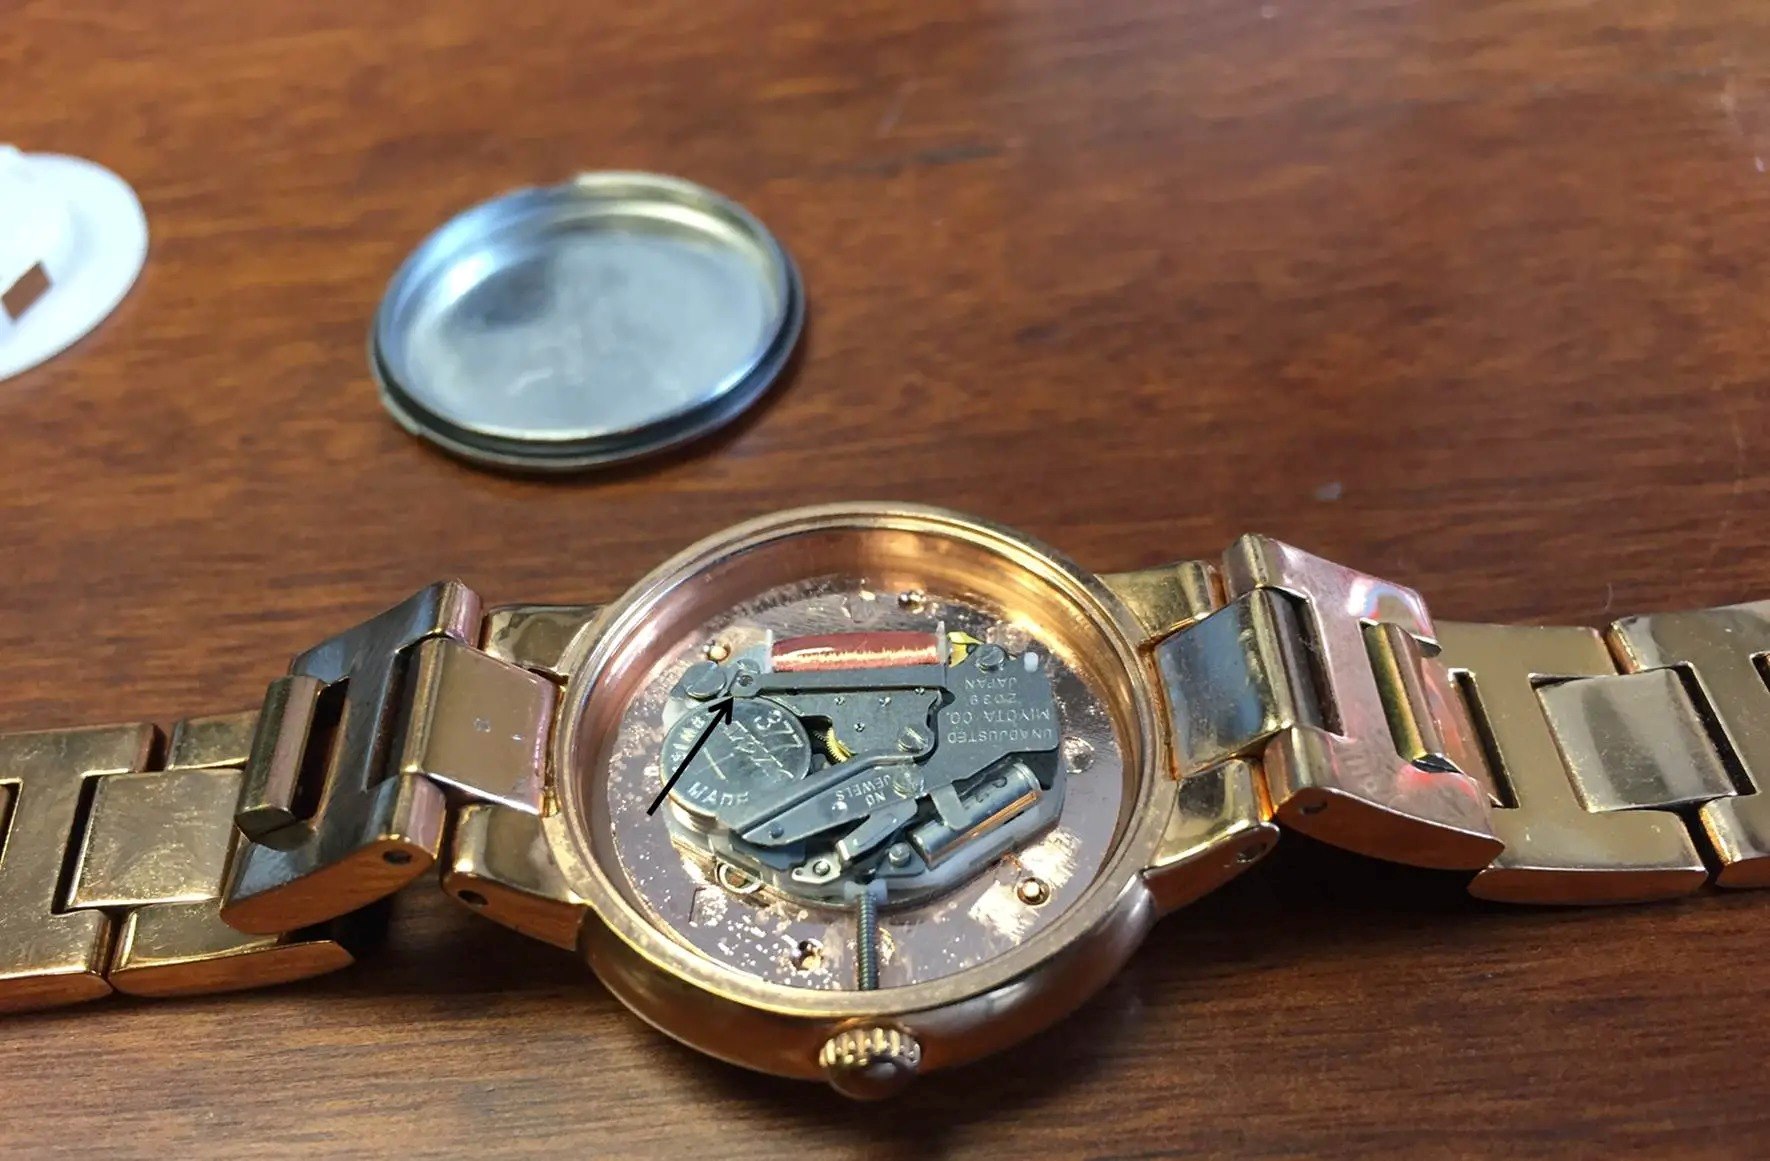
Identifying and Removing the Old Battery
Identifying and Removing the Old Battery
After successfully gaining access to the internal components of the watch by removing the back, the next step in changing the watch battery is to identify and remove the old battery. This stage requires attention to detail and precision to ensure a seamless transition to the new battery.
Locate the old battery within the watch mechanism. Depending on the watch model, the battery may be secured in place by a small metal clip, a screw, or a spring. Carefully observe how the old battery is positioned and attached to the watch to facilitate its safe removal.
Using non-magnetic tweezers, delicately unfasten any clips or screws holding the old battery in place. Exercise caution to prevent any sudden movements that may dislodge small components or damage the watch’s internal circuitry. If the battery is held in position by a spring, gently release the tension and carefully lift out the old battery.
As you remove the old battery, take note of its orientation and polarity. Most watch batteries have their positive and negative terminals clearly marked. It’s essential to remember the battery’s positioning to ensure the correct installation of the new battery later in the process.
Once the old battery is detached from the watch, handle it with care and dispose of it responsibly. Many local recycling centers or electronic stores offer battery recycling services, allowing you to properly discard the old battery while minimizing environmental impact.
With the old battery successfully removed, the watch is now ready for the installation of the new battery, marking a pivotal stage in the DIY watch care process.
Installing the New Battery
Installing the New Battery
With the old battery safely removed, the installation of the new battery marks a critical phase in the DIY watch care process. Attention to detail and precision is paramount to ensure the proper functioning of the timepiece after the battery replacement.
Begin by identifying the correct orientation and polarity of the new battery. Most watch batteries have their positive and negative terminals clearly marked. Align the new battery in the same position and orientation as the old one, ensuring that the polarity matches the original configuration.
Using non-magnetic tweezers, carefully place the new battery into its designated position within the watch mechanism. Take care to avoid touching the battery terminals with your fingers, as oils and debris can affect its performance and longevity. Gently secure the battery in place, ensuring that it sits snugly and securely within the compartment.
For watches with a metal clip or a screw securing the battery, reattach the clip or screw with precision, ensuring that the battery remains firmly in place. If the old battery was held in position by a spring, delicately reposition the spring to secure the new battery, ensuring that it maintains proper contact with the watch’s circuitry.
After the new battery is securely installed, use non-magnetic tweezers to gently press any reset buttons or contacts that may be present to ensure proper connectivity and functionality. This step is particularly important for digital watches or timepieces with additional features that may require a reset after a battery replacement.
Once the new battery is in place and any necessary adjustments have been made, carefully inspect the watch mechanism to ensure that all components are properly aligned and secured. This meticulous approach is crucial in guaranteeing the optimal performance and longevity of the newly installed battery.
Replacing the Watch Back
Replacing the Watch Back
After successfully installing the new battery and ensuring that all components are securely in place, the next step in the DIY watch care process is to replace the watch back. This stage is crucial in safeguarding the internal components and restoring the timepiece to its fully enclosed state.
When replacing the watch back, it’s essential to align it properly to ensure a secure and snug fit. Begin by identifying the correct orientation of the watch back, taking note of any alignment marks or indicators that facilitate its proper placement. Improper alignment may result in difficulty in closing the watch back or, in some cases, damage to the casing threads.
For watches with screw-off backs, carefully position the back over the casing and use a case back opener with adjustable pins to gently rotate it clockwise. Exercise caution to avoid cross-threading, as this may cause damage to the watch casing. Once the back is positioned correctly, tighten it until it is snug, ensuring that it is securely fastened without over-tightening.
If your watch features a snap-off back, align the back with the casing and apply gentle pressure around the edges to snap it back into place. Take care to apply even pressure to prevent any misalignment or damage to the casing. Ensure that the back is securely seated and flush with the watch casing.
For watches with screw-down backs, carefully position the back over the casing and use a case back opener with adjustable pins or a specialized wrench-like tool to rotate and screw down the back in a clockwise direction. As with screw-off backs, avoid over-tightening to prevent damage to the casing threads.
Once the watch back is securely replaced, inspect the casing to ensure that it is properly aligned and closed. Verify that there are no gaps or misalignments, as these may compromise the watch’s water resistance and overall integrity. A well-sealed watch back is essential for maintaining the internal components and protecting the watch from external elements.
With the watch back successfully replaced, the timepiece is now fully enclosed and ready for the final step in the DIY watch care process: testing the watch to ensure that the new battery is functioning optimally.
Testing the Watch
Testing the Watch
After completing the meticulous process of replacing the watch back, the final and crucial step in the DIY watch care journey is to test the timepiece to ensure that the new battery is functioning optimally. This step verifies the successful installation of the battery and guarantees the accurate operation of the watch.
Begin by gently pressing the crown or designated buttons to activate the watch. Observe the display or hands to confirm that the watch is operational. In the case of digital watches, check for the presence of the display and ensure that the time, date, and any additional features are functioning correctly. For analog watches, observe the movement of the hands to verify that they are moving smoothly and accurately.
Next, set the time and date if applicable, ensuring that the watch responds accurately to adjustments. This step is essential for watches with date complications, as it validates the proper functioning of the timepiece’s internal mechanisms. Additionally, if the watch features additional functions such as chronographs or alarms, test each function to confirm that they operate as intended.
Observe the watch’s performance over a period of time to ensure that the new battery maintains consistent power delivery. A well-installed battery should provide reliable and stable energy to the watch, resulting in consistent timekeeping and functionality. Monitor the watch for any irregularities or issues that may indicate a potential problem with the battery or its installation.
For watches with water resistance capabilities, perform a water resistance test to ensure that the watch back replacement has maintained the timepiece’s integrity. This can be achieved by exposing the watch to a controlled water environment or having its water resistance verified by a professional if the watch is intended for underwater use.
Finally, wear the watch regularly and monitor its performance in real-world conditions. Pay attention to any deviations in timekeeping or unexpected behavior that may indicate underlying issues. Regular observation and testing of the watch’s functionality contribute to its long-term reliability and performance.
By thoroughly testing the watch after the battery replacement, you can be confident in the successful completion of the DIY watch care process. A properly functioning timepiece not only enhances your daily life but also reflects the meticulous care and attention invested in its maintenance.