
Choosing the Right Type of Battery
When embarking on a DIY power project, selecting the appropriate type of battery is crucial for achieving optimal results. Different battery chemistries offer varying levels of performance, lifespan, and suitability for specific applications. By understanding the key factors that influence battery selection, you can make an informed decision that aligns with your project’s requirements.
First and foremost, consider the energy storage capacity needed for your intended use. If you require high energy density in a compact size, lithium-ion batteries are a popular choice. Conversely, if your project demands a cost-effective solution with a long cycle life, lead-acid batteries may be more suitable. Understanding the specific power and energy requirements of your application will guide you in choosing a battery with the right balance of capacity and performance.
Moreover, the operating environment plays a significant role in determining the ideal battery type. For applications in extreme temperatures, such as off-grid solar installations, deep-cycle lead-acid batteries exhibit robust performance. In contrast, lithium iron phosphate batteries excel in applications requiring lightweight and portable power, making them well-suited for mobile electronics and electric vehicles.
Considering the maintenance demands of different battery chemistries is also essential. While lead-acid batteries necessitate regular maintenance to ensure longevity, lithium-based batteries offer a maintenance-free experience. By evaluating the ongoing maintenance requirements, you can select a battery type that aligns with your preferences and capabilities.
Additionally, factor in the cost and availability of the chosen battery type. Lead-acid batteries are renowned for their affordability and widespread availability, making them a practical choice for budget-conscious projects. Conversely, lithium-based batteries, while offering superior performance, often come with a higher price tag. Understanding the cost implications and availability of replacement batteries will contribute to the long-term sustainability of your DIY power solution.
By carefully considering the energy storage capacity, operating environment, maintenance demands, and cost implications, you can confidently select the right type of battery for your DIY power project. This foundational decision will set the stage for a successful and efficient power solution tailored to your specific needs.
Gathering the Necessary Materials and Tools
Before diving into the process of creating a DIY battery, it’s essential to gather all the required materials and tools to ensure a smooth and efficient workflow. By assembling the necessary components in advance, you can streamline the construction process and minimize interruptions. Here’s a comprehensive list of materials and tools you’ll need for your DIY battery project:
Materials:
- Battery cells: Depending on the chosen battery type, acquire the requisite number of battery cells, whether lead-acid, lithium-ion, nickel-metal hydride, or other chemistries.
- Battery management system (BMS): For lithium-based batteries, a BMS is essential to monitor and balance cell voltages, enhancing safety and longevity.
- Electrolytes and electrodes: If you're pursuing a homemade electrochemical cell, obtain the necessary electrolytes and electrodes, such as sulfuric acid for lead-acid batteries or lithium salt for lithium-ion cells.
- Battery enclosure: Secure a suitable enclosure to house and protect the battery components, ensuring safety and structural integrity.
- Connecting wires and terminals: High-quality wires and terminals are essential for interconnecting battery cells and facilitating electrical conductivity.
- Insulating materials: Utilize insulating materials to prevent electrical shorts and ensure the insulation of exposed components within the battery assembly.
- Safety equipment: Prioritize safety by acquiring protective gear, including gloves, goggles, and a fire extinguisher, to mitigate potential risks during the construction process.
Tools:
- Battery spot welder or soldering iron: Depending on the chosen battery type, a spot welder or soldering iron is essential for securely connecting battery cells and components.
- Battery charger: A compatible battery charger is necessary for initial charging and maintenance of the DIY battery.
- Multimeter: A multimeter enables precise voltage and continuity measurements, aiding in the testing and calibration of the constructed battery.
- Insulation cutter and heat gun: These tools are indispensable for shaping and insulating wires, ensuring proper electrical insulation within the battery assembly.
- Hand tools: Prepare a set of basic hand tools, including screwdrivers, pliers, wire cutters, and wrenches, for assembling and securing battery components.
By procuring the essential materials and tools outlined above, you’ll be well-equipped to commence the construction of your DIY battery with confidence and efficiency. Ensuring the availability of these components and tools sets the stage for a successful and organized project, ultimately leading to the creation of a functional and reliable homemade power source.
Preparing the Workspace
Creating a conducive and organized workspace is essential for undertaking a DIY battery project safely and efficiently. By establishing a well-prepared environment, you can minimize potential hazards, ensure precision during assembly, and maintain a systematic approach to the construction process. Here are key steps to prepare your workspace for the DIY battery project:
Clean and Well-Ventilated Area:
Prioritize a clean and well-ventilated workspace to facilitate a healthy and safe working environment. Adequate ventilation is particularly crucial when working with chemicals, such as electrolytes, to mitigate the risk of exposure to fumes and ensure proper air circulation.
Organize Tools and Materials:
Arrange your tools, materials, and components in an orderly manner to streamline the construction process. By organizing and labeling the various items, you can easily locate and access what you need, enhancing efficiency and reducing the likelihood of errors or oversights.
Safety Measures:
Prior to commencing the project, ensure that safety measures are in place. This includes having a well-stocked first aid kit readily available, understanding the location of fire extinguishers, and wearing appropriate personal protective equipment (PPE) such as gloves and safety goggles to safeguard against potential hazards.
Workstation Stability:
Stabilize your workstation to prevent accidental spills or disruptions during the battery assembly. Secure work surfaces and ensure that all equipment and components are placed on stable platforms to minimize the risk of accidents and damage to the materials.
Clear Work Area:
Clear the work area of any unnecessary clutter or obstructions to create a focused and unobstructed space for the construction process. This includes removing any tripping hazards, organizing cables and wires, and maintaining a tidy and uncluttered workspace.
Emergency Protocols:
Establish clear emergency protocols and exit routes in the event of unforeseen incidents. Familiarize yourself with emergency shutdown procedures for equipment and power sources, and ensure that all project participants are aware of the necessary safety protocols.
By meticulously preparing your workspace according to the outlined steps, you can create an environment that promotes safety, organization, and efficiency throughout the DIY battery project. A well-prepared workspace sets the stage for a successful and focused construction process, ultimately contributing to the creation of a reliable and functional homemade power source.
Creating the Battery Components
Embarking on the creation of DIY battery components involves a systematic approach to assembling the essential elements that form the heart of the power source. Whether constructing battery packs from individual cells or fabricating electrochemical cells from raw materials, meticulous attention to detail and precision is paramount. Here’s a step-by-step guide to creating the fundamental components of a DIY battery:
Cell Preparation:
For projects utilizing individual battery cells, carefully inspect and prepare each cell for assembly. This involves verifying the voltage and capacity of the cells, ensuring they are free from damage or defects, and arranging them in the desired configuration for the battery pack.
Electrode Fabrication:
In the case of homemade electrochemical cells, the fabrication of electrodes is a critical step. This process typically involves applying electrode materials, such as graphite or lithium compounds, onto conductive substrates, followed by precision shaping and assembly to create functional electrodes.
Electrolyte Handling:
When working with electrolytes, exercise caution and precision to handle and introduce the electrolyte into the battery cells or electrochemical cell assembly. Adhere to proper safety protocols and utilize appropriate protective equipment to minimize the risk of exposure to corrosive or hazardous substances.
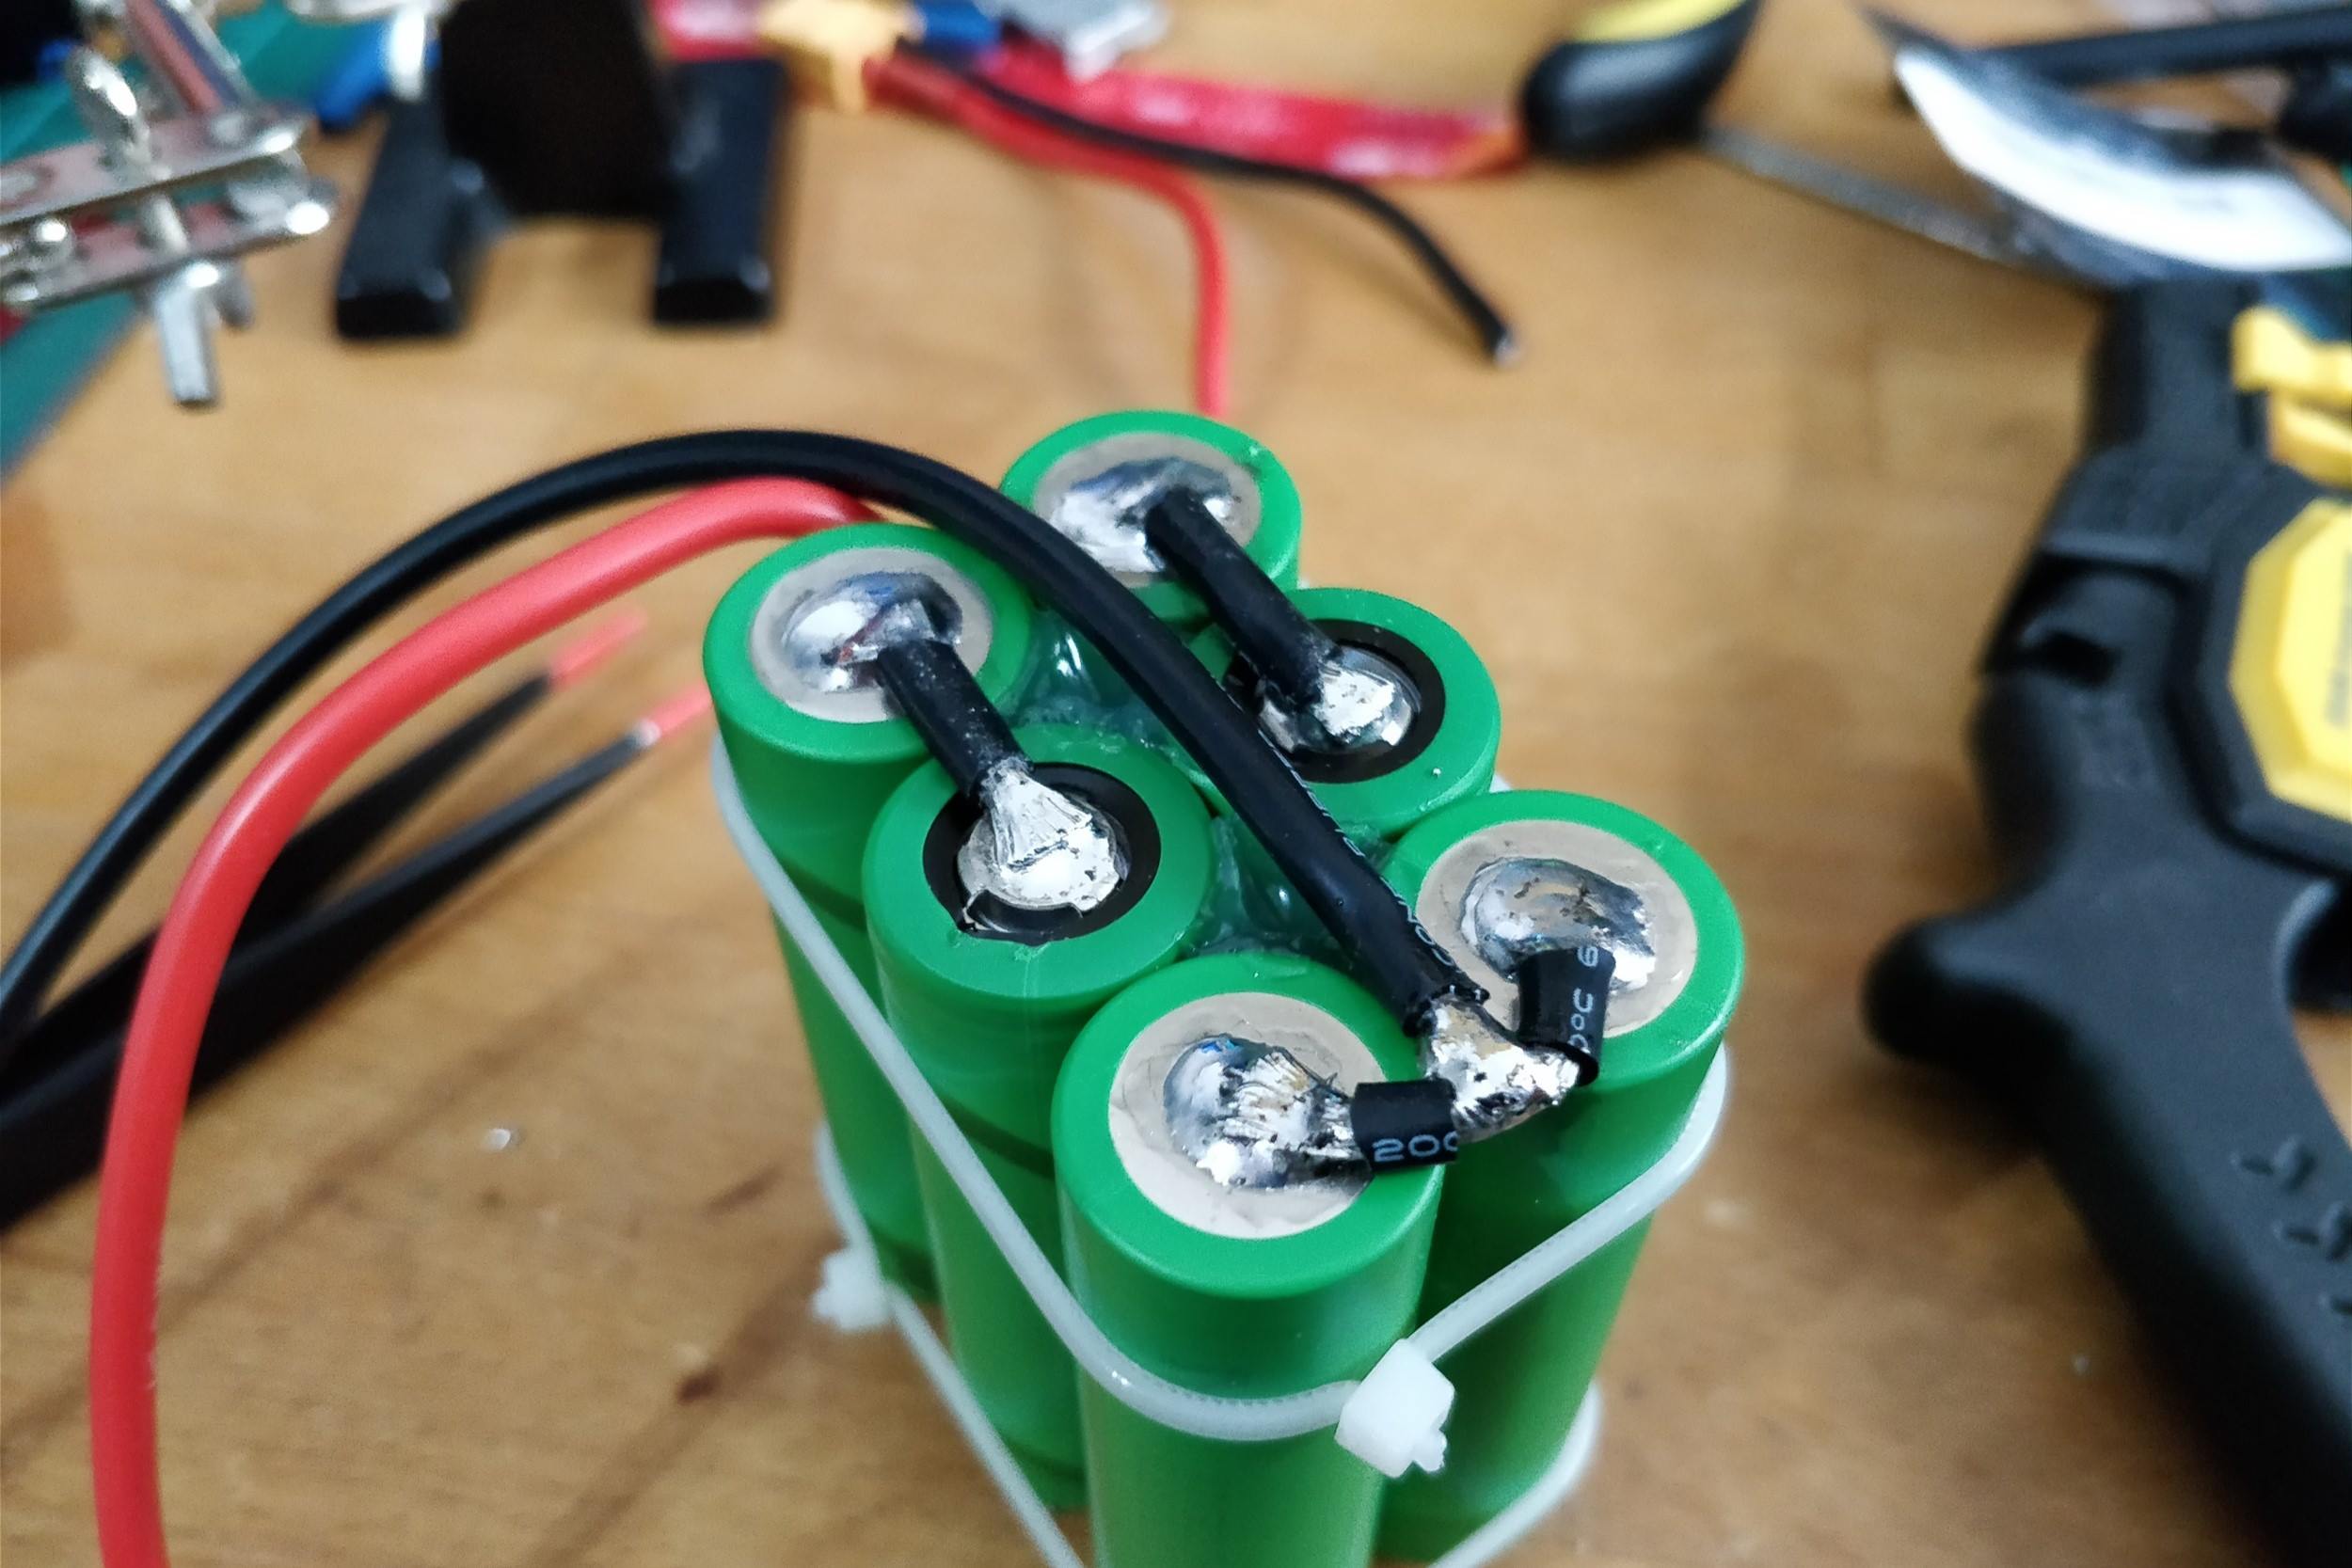
Interconnection and Insulation:
With the battery components prepared, proceed to interconnect the cells or electrodes using high-quality conductive materials. Employ meticulous insulation techniques to prevent electrical shorts and ensure the integrity of the interconnected components within the battery assembly.
BMS Integration (For Lithium-Based Batteries):
For projects involving lithium-based batteries, integrate a battery management system (BMS) to monitor cell voltages, balance the cells, and provide essential safety features. Carefully follow the manufacturer’s guidelines for BMS installation and calibration to optimize the performance and lifespan of the battery.
Enclosure Assembly:
Once the battery components are interconnected and insulated, assemble them within a suitable enclosure designed to house and protect the battery assembly. Ensure that the enclosure provides adequate ventilation and structural support while safeguarding against environmental factors and physical damage.
By following this systematic approach to creating the battery components, you can lay the foundation for a robust and functional DIY power source. Meticulous attention to detail, adherence to safety protocols, and precision in component assembly are integral to the successful creation of reliable homemade batteries, tailored to your specific energy storage needs.
Assembling the Battery
Assembling the various components of a DIY battery marks a pivotal phase in the construction process, where meticulous attention to detail and precision is essential to ensure the functionality and safety of the power source. Whether creating a battery pack from individual cells or assembling homemade electrochemical cells, the following steps outline the systematic approach to assembling a DIY battery:
Cell Arrangement and Connection:
If working with individual battery cells, arrange them in the desired configuration within the battery enclosure. Pay careful attention to the polarity and interconnection of the cells, ensuring secure and reliable electrical connections while maintaining proper insulation to prevent short circuits.
Electrode Stacking and Sealing:
In the case of homemade electrochemical cells, carefully stack and seal the prepared electrodes and separators within the designated cell housing. Exercise precision to maintain uniform electrode alignment and secure sealing to contain the electrolyte within the cell assembly.
Integration of BMS (For Lithium-Based Batteries):
For lithium-based batteries, integrate the battery management system (BMS) within the battery pack, ensuring proper placement and secure electrical connections. Calibrate the BMS according to the manufacturer’s specifications to enable comprehensive monitoring and management of the lithium cells.
Insulation and Enclosure Securing:
Following the interconnection of battery components, meticulously insulate exposed conductive elements and secure the components within the battery enclosure. Utilize insulating materials and secure mounting to prevent movement or damage to the interconnected elements, maintaining electrical safety and structural integrity.
Final Testing and Verification:
Prior to finalizing the assembly, conduct thorough testing to verify the integrity and functionality of the assembled battery. This includes voltage measurements, continuity checks, and, if applicable, BMS calibration to ensure that the battery operates within the specified parameters and safety thresholds.
Sealing and Safety Precautions:
Upon successful testing and verification, seal the battery enclosure securely, incorporating appropriate safety features and measures to prevent unauthorized access and protect against environmental factors. Adhere to safety guidelines for handling and storing the assembled battery, ensuring compliance with relevant safety standards.
By meticulously following the outlined steps for assembling a DIY battery, you can achieve a functional and reliable power source tailored to your specific energy storage needs. Precision in component arrangement, thorough testing, and adherence to safety protocols are integral to the successful assembly of homemade batteries, paving the way for the utilization of sustainable and self-generated power.
Testing and Troubleshooting the Battery
Upon completing the assembly of a DIY battery, thorough testing and troubleshooting are vital steps to ensure its functionality, safety, and reliability. Rigorous testing procedures and proactive troubleshooting measures help identify and address potential issues, ultimately validating the performance of the constructed power source. Here’s a comprehensive guide to testing and troubleshooting a DIY battery:
Initial Voltage and Capacity Assessment:
Begin by measuring the voltage and capacity of the assembled battery to verify its initial performance. Utilize a multimeter or appropriate testing equipment to obtain accurate voltage readings and assess the capacity relative to the specified ratings of the battery cells or electrochemical components.
Load Testing and Discharge Performance:
Conduct load testing to evaluate the battery’s discharge performance under controlled conditions. Apply a consistent load to the battery and monitor the voltage sag and discharge characteristics, ensuring that the battery can deliver the expected power output within the defined operating parameters.
BMS Calibration and Functionality (For Lithium-Based Batteries):
If the DIY battery incorporates a battery management system (BMS), calibrate and verify its functionality in managing cell balancing, overcharge protection, and temperature monitoring. Confirm that the BMS operates as intended, safeguarding the lithium cells and optimizing their performance.
Environmental and Safety Testing:
Subject the battery to environmental and safety testing, including temperature cycling, overcharge and over-discharge simulations, and impact resistance assessments. These tests help evaluate the battery’s resilience to diverse operating conditions and ensure compliance with safety standards.
Troubleshooting and Anomaly Detection:
If any irregularities or performance anomalies are observed during testing, systematically troubleshoot the battery to identify potential issues. This may involve inspecting interconnections, verifying insulation integrity, and diagnosing any deviations from expected performance parameters.
Reconfiguration and Iterative Testing:
If troubleshooting reveals areas for improvement, consider reconfiguring or adjusting the battery components and conduct iterative testing to validate the effectiveness of the modifications. This iterative approach helps refine the battery’s performance and address any identified shortcomings.
By diligently executing the testing and troubleshooting procedures outlined above, you can ascertain the functionality, safety, and reliability of the DIY battery. Thorough testing, proactive troubleshooting, and iterative refinement contribute to the validation and optimization of the constructed power source, ensuring its readiness for integration into diverse applications requiring sustainable and self-generated power.
Maintaining and Caring for the DIY Battery
After successfully creating and integrating a DIY battery into your power system, ongoing maintenance and attentive care are essential to preserve its performance, longevity, and safety. By implementing proactive maintenance practices and adhering to recommended care guidelines, you can optimize the functionality and reliability of the homemade power source. Here’s a comprehensive approach to maintaining and caring for a DIY battery:
Regular Performance Monitoring:
Establish a routine for monitoring the performance of the DIY battery, including periodic voltage measurements, capacity assessments, and operational checks. This proactive approach enables early detection of any deviations from expected performance parameters, facilitating timely intervention if necessary.
Temperature Management:
Maintain the battery within the recommended temperature range to optimize its performance and extend its lifespan. Implement thermal management measures, such as ventilation and insulation, to mitigate temperature extremes and ensure the battery operates within the ideal thermal conditions.
Preventive Maintenance Inspections:
Conduct regular visual inspections of the battery components, including interconnections, insulation integrity, and enclosure condition. Identify and address any signs of wear, corrosion, or damage, and perform preventive maintenance to uphold the structural and electrical integrity of the battery.
Balancing and Calibration (For Lithium-Based Batteries):
If the DIY battery incorporates lithium-based cells and a battery management system (BMS), periodically recalibrate the BMS and balance the cell voltages to maintain optimal cell performance and longevity. Adhere to the manufacturer’s recommendations for balancing and calibration procedures.
Storage and Disuse Considerations:
When storing or temporarily disusing the DIY battery, implement appropriate storage measures to preserve its capacity and prevent degradation. This may involve maintaining partial charge levels, ensuring proper ventilation, and safeguarding the battery against environmental factors during storage.
Safety Protocol Adherence:
Consistently adhere to safety protocols and guidelines for handling, servicing, and maintaining the DIY battery. Prioritize safety during maintenance activities, utilize appropriate personal protective equipment, and ensure compliance with relevant safety standards and regulations.
Documentation and Record-Keeping:
Maintain comprehensive documentation of maintenance activities, performance assessments, and any observed anomalies or corrective measures. This record-keeping facilitates traceability and provides valuable insights into the battery’s operational history and maintenance trends.
By conscientiously implementing the maintenance and care practices outlined above, you can uphold the performance, reliability, and safety of the DIY battery within your power system. Proactive maintenance, attentive care, and adherence to recommended guidelines contribute to the sustained functionality and longevity of the homemade power source, ensuring its continued contribution to your energy storage needs.