
Safety Precautions
When embarking on the journey of creating your own lithium ion battery, it is crucial to prioritize safety at every step of the process. Lithium ion batteries can be volatile if mishandled, so taking the necessary precautions is paramount to ensure a safe and successful DIY project.
Here are some essential safety measures to consider before diving into the construction of your DIY lithium ion battery:
- Work in a Well-Ventilated Area: Lithium ion batteries can release harmful fumes if damaged or overheated. It is vital to work in a well-ventilated space to minimize the risk of inhaling potentially hazardous gases.
- Use Protective Gear: Wear safety goggles, gloves, and a lab coat or apron to shield yourself from potential chemical exposure and burns during the battery assembly process.
- Keep Fire Safety Equipment Handy: Have a fire extinguisher rated for chemical fires within reach of your workspace. Additionally, a container of sand or a Class D fire extinguisher should be available to smother lithium fires, should they occur.
- Handle Cells with Care: Avoid damaging the outer casing of the lithium ion cells, as puncturing or denting them can lead to internal short circuits and thermal runaway. Always handle the cells gently and protect them from physical damage.
- Prevent Short Circuits: Keep conductive materials, such as metal tools or jewelry, away from the battery assembly area to prevent accidental short circuits. Additionally, use insulated tools when working with the battery components.
- Monitor the Temperature: Be mindful of the operating temperature range for lithium ion cells. Overheating can lead to thermal runaway, so it is crucial to work within the recommended temperature limits and avoid exposing the cells to excessive heat.
- Dispose of Waste Properly: Dispose of any damaged or defective cells in accordance with local regulations for hazardous waste disposal. Do not throw them in the regular trash.
By adhering to these safety precautions, you can minimize the risks associated with assembling a DIY lithium ion battery and ensure a secure working environment throughout the construction process.
Materials and Tools Needed
Before delving into the construction of your DIY lithium ion battery, it is essential to gather all the necessary materials and tools. Having the right components and equipment at your disposal will streamline the assembly process and contribute to the overall safety and quality of the battery pack.
Here’s a comprehensive list of the materials and tools you will need:
Materials:
- Lithium Ion Cells: Select high-quality lithium ion cells with the desired capacity and voltage rating for your specific application. Ensure that the cells are from a reputable manufacturer and are well-suited for the intended use.
- Battery Management System (BMS): Acquire a BMS to monitor and balance the individual cells within the battery pack, safeguarding against overcharging, over-discharging, and overcurrent conditions.
- Nickel Strip or Tabbing Wire: Nickel strips or tabbing wire are essential for connecting the lithium ion cells in series or parallel configurations. Opt for nickel strips of appropriate width and thickness to ensure efficient current flow and heat dissipation.
- Insulating Materials: Utilize insulating materials such as fish paper or Kapton tape to prevent electrical shorts and provide thermal insulation within the battery pack.
- Battery Enclosure: Choose a suitable enclosure or battery holder to house the assembled lithium ion cells securely. The enclosure should provide mechanical protection and electrical insulation for the battery pack.
- Electrical Insulation Board: An electrical insulation board, such as G10 FR4, serves as a sturdy base for mounting the cells and BMS while offering electrical insulation and mechanical support.
- Solder and Flux: High-quality solder and flux are essential for securely joining the nickel strips to the lithium ion cells and ensuring reliable electrical connections.
- Heat-Shrink Tubing: Heat-shrink tubing is used to insulate and protect the soldered connections, enhancing the overall safety and durability of the battery pack.
Tools:
- Soldering Iron and Soldering Station: A good-quality soldering iron with adjustable temperature settings is crucial for precise and efficient soldering of the battery connections.
- Spot Welder (Optional): If spot welding is preferred for connecting the cells, a spot welder designed for battery assembly can provide quick and reliable welds without excessive heat transfer to the cells.
- Wire Cutters and Strippers: High-quality wire cutters and strippers are essential for preparing the nickel strips, tabbing wire, and insulation materials with precision.
- Heat Gun or Hair Dryer: A heat gun or hair dryer is used to shrink the heat-shrink tubing, providing a snug and secure covering for the soldered connections.
- Multimeter: A multimeter is indispensable for verifying the voltage, continuity, and overall integrity of the battery pack during and after assembly.
- Insulation Displacement Cutter (IDC): An IDC tool simplifies the process of cutting and stripping the insulation from nickel strips, enhancing the efficiency of the assembly process.
By ensuring that you have all the required materials and tools on hand, you can proceed with confidence and efficiency in constructing your DIY lithium ion battery pack.
Choosing the Right Lithium Ion Cells
When embarking on the journey of creating your own lithium ion battery, selecting the appropriate lithium ion cells is a critical decision that significantly impacts the performance, safety, and longevity of the battery pack. With a myriad of options available in the market, it is essential to consider several key factors to ensure that the chosen cells align with your specific requirements and quality standards.
Here are the essential considerations for choosing the right lithium ion cells for your DIY battery project:
Capacity and Voltage:
Begin by determining the required capacity and voltage specifications for your application. The capacity, measured in ampere-hours (Ah), denotes the amount of charge the battery can store, while the voltage rating dictates the total voltage output of the battery pack. Select cells with a capacity and voltage that meet the energy needs of your project while adhering to the voltage limits of your equipment.
Quality and Authenticity:
Opt for lithium ion cells from reputable manufacturers or authorized distributors to ensure the authenticity and quality of the cells. Authentic cells are more likely to adhere to stringent quality control standards, reducing the risk of performance issues, premature failure, or safety hazards associated with counterfeit or substandard cells.
Chemistry and Form Factor:
Consider the specific chemistry and form factor of the lithium ion cells based on the requirements of your application. Common lithium ion chemistries include lithium cobalt oxide (LiCoO2), lithium iron phosphate (LiFePO4), and lithium manganese oxide (LiMn2O4), each offering distinct advantages in terms of energy density, cycle life, and safety. Additionally, assess the physical dimensions and shape of the cells to ensure compatibility with your intended battery pack configuration.
Temperature Tolerance and Safety Features:
Evaluate the temperature tolerance and built-in safety features of the lithium ion cells, particularly if the battery will be subjected to varying environmental conditions or high-demand scenarios. Cells designed to withstand a wide temperature range and equipped with safeguards against overcharging, over-discharging, and thermal runaway can enhance the overall reliability and safety of the battery pack.
Certifications and Compliance:
Verify that the selected lithium ion cells comply with relevant industry standards and certifications, such as UN38.3 for transportation safety and IEC 62133 for general safety requirements. Compliance with these standards signifies that the cells have undergone rigorous testing and meet the necessary safety and performance criteria for use in consumer electronics, electric vehicles, and other applications.
By carefully evaluating these factors and conducting thorough research, you can make an informed decision when choosing the right lithium ion cells for your DIY battery project, setting the stage for a successful and reliable battery pack.
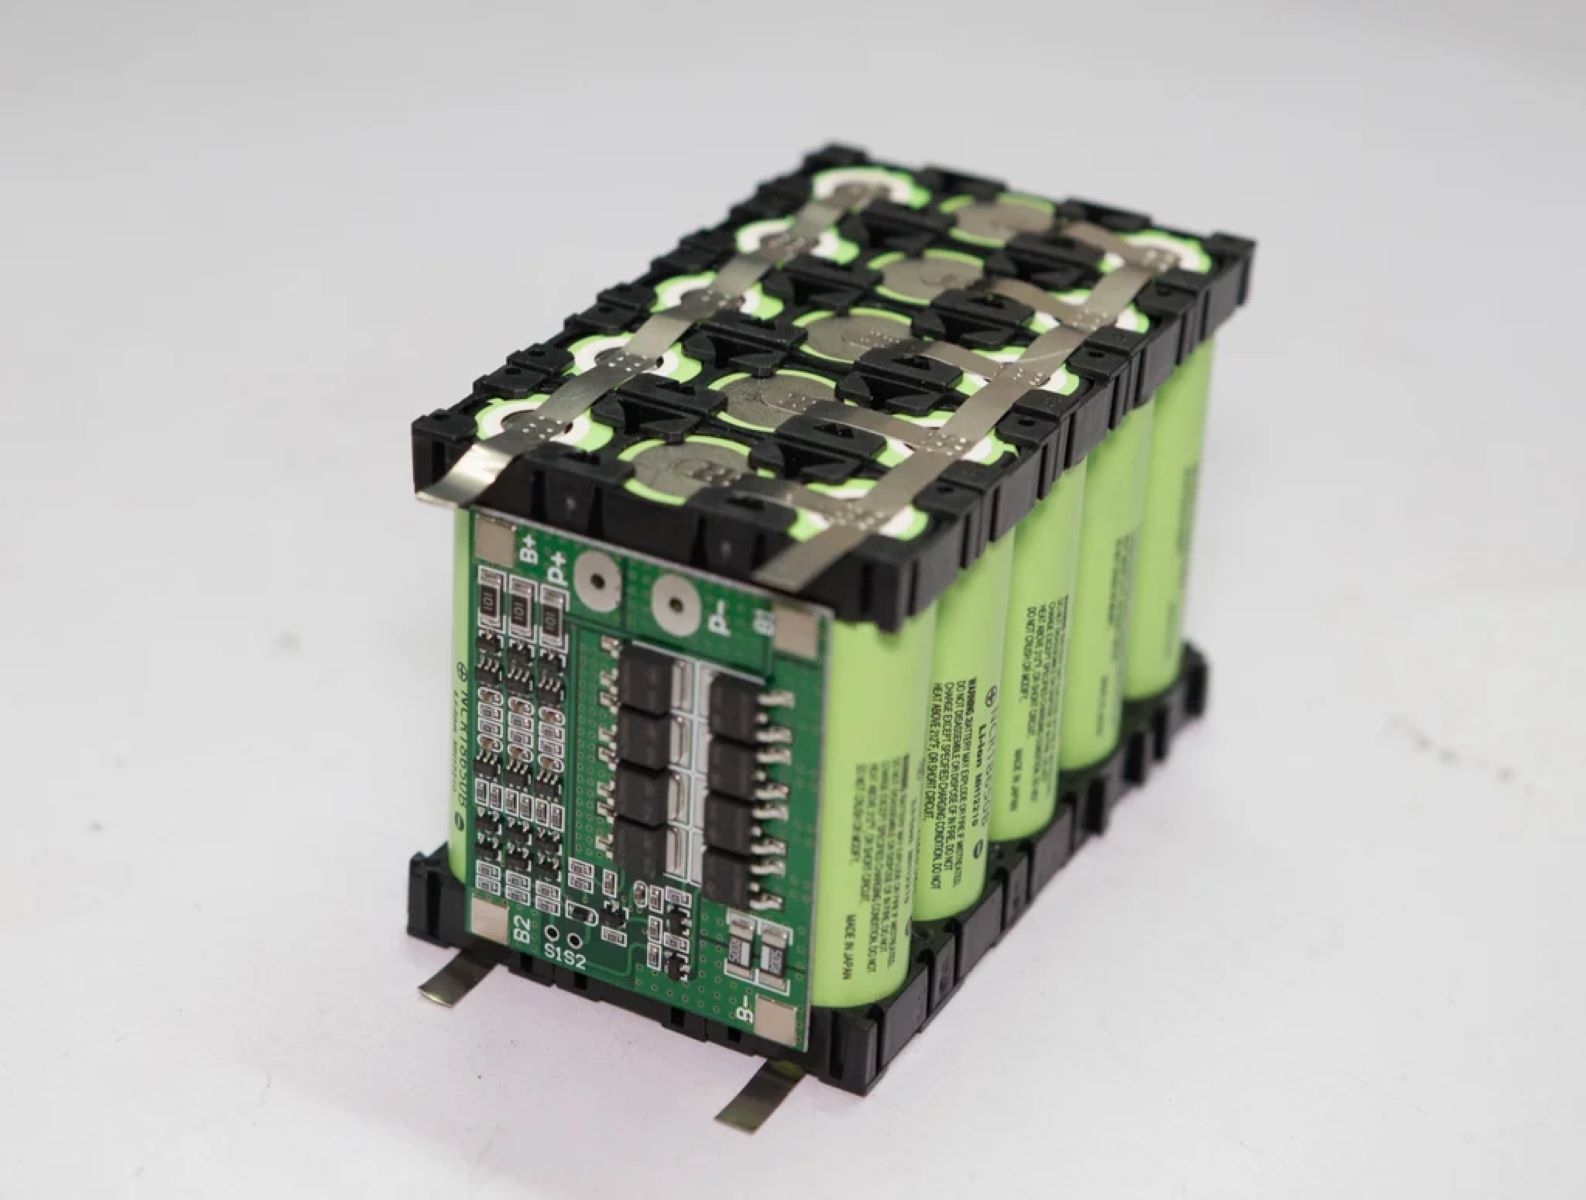
Building the Battery Pack
Assembling the battery pack is a pivotal phase in the construction of a DIY lithium ion battery. This process involves arranging the selected lithium ion cells in a series or parallel configuration to achieve the desired voltage and capacity while ensuring structural integrity and electrical connectivity.
Here’s a step-by-step guide to building the battery pack for your DIY lithium ion battery:
1. Design the Layout:
Plan the arrangement of the lithium ion cells within the battery pack, considering the desired voltage and capacity requirements. Determine whether a series, parallel, or combination (series-parallel) configuration best suits your application and design the layout accordingly.
2. Prepare the Insulating Base:
Cut an electrical insulation board, such as G10 FR4, to the appropriate size to serve as the base for mounting the lithium ion cells. Ensure that the board provides ample space for positioning the cells and accommodates the installation of the battery management system (BMS) and interconnecting nickel strips.
3. Position the Cells:
Place the lithium ion cells on the prepared insulation board according to the predetermined layout. Ensure that the cells are aligned uniformly and securely positioned to prevent movement or damage during handling and operation.
4. Connect the Cells:
Use nickel strips or tabbing wire to establish electrical connections between the individual lithium ion cells based on the designated series or parallel configuration. Exercise caution to achieve consistent and secure connections while minimizing the risk of short circuits or excessive heat generation.
5. Install the Battery Management System (BMS):
Mount the BMS on the insulation board, positioning it strategically to facilitate monitoring and balancing of the connected cells. Follow the manufacturer’s guidelines for proper placement and secure attachment of the BMS within the battery pack.
6. Insulate the Connections:
Apply insulating materials, such as fish paper or Kapton tape, to cover the exposed connections and ensure electrical insulation and mechanical protection. This step is crucial for preventing short circuits and enhancing the overall safety and reliability of the battery pack.
7. Secure the Assembly:
Once the cells, interconnections, and BMS are in place, affix the entire assembly securely within the chosen battery enclosure or holder. Ensure that the cells are immobilized and insulated from the enclosure to mitigate the risk of mechanical damage and electrical hazards.
By following these systematic steps and exercising precision and care, you can successfully build the battery pack for your DIY lithium ion battery, laying the foundation for a functional and dependable power source for your projects and devices.
Soldering the Cells
Soldering the lithium ion cells is a critical aspect of assembling a DIY battery pack, as it entails creating secure and reliable electrical connections between the cells and the interconnecting materials, such as nickel strips or tabbing wire. Proper soldering techniques are essential to ensure the integrity, safety, and performance of the battery pack.
Here’s a detailed guide to effectively soldering the lithium ion cells for your DIY battery project:
1. Prepare the Work Area:
Set up a well-ventilated and well-lit workspace, ensuring that all necessary tools and materials are within reach. Clear the work surface of any clutter and establish a stable platform for soldering the cells to minimize the risk of accidental movement or damage to the components.
2. Inspect the Cells:
Carefully examine each lithium ion cell to ensure that the outer casing is free from damage or contamination. Verify that the terminals are clean and free of any foreign substances that may hinder the soldering process or compromise the electrical connections.
3. Tinning the Connections:
Apply a small amount of flux to the areas of the cell terminals and nickel strips where the solder will be applied. Use a soldering iron to heat the terminals and nickel strips, then apply a small quantity of solder to tin the surfaces. Tinning helps facilitate the subsequent soldering process by promoting better adhesion and conductivity.
4. Positioning and Alignment:
Align the tinned nickel strips or tabbing wire with the terminals of the lithium ion cells according to the predetermined series or parallel configuration. Ensure that the connections are properly aligned and securely positioned to facilitate efficient heat transfer and solder flow.
5. Soldering Technique:
With the components in place, use the soldering iron to heat the junction of the cell terminal and nickel strip, allowing the solder to melt and form a secure bond. Exercise caution to avoid prolonged heating of the cells, as excessive heat can damage the internal components and compromise the integrity of the cells.
6. Visual Inspection:
After soldering each connection, visually inspect the solder joints to ensure that they are smooth, shiny, and free from any irregularities or cold solder joints. Properly soldered connections exhibit a uniform and continuous bond between the cell terminals and the interconnecting materials.
7. Insulation and Protection:
Upon completing the soldering process, insulate the soldered connections using heat-shrink tubing or insulating materials to safeguard against short circuits and physical damage. Apply heat to the tubing to securely encapsulate the soldered joints, providing electrical insulation and mechanical protection.
By adhering to these guidelines and exercising diligence and precision, you can effectively solder the lithium ion cells for your DIY battery pack, ensuring robust and reliable electrical connections while upholding the safety and integrity of the battery assembly.
Testing the Battery
Thorough testing of the DIY lithium ion battery is essential to validate its performance, safety, and compliance with the intended specifications. Proper testing procedures not only ensure the functionality of the battery pack but also serve as a critical quality assurance step before integrating the battery into practical applications.
Here’s a comprehensive approach to testing your DIY lithium ion battery:
1. Voltage Verification:
Utilize a multimeter to measure the voltage output of the assembled battery pack. Confirm that the total voltage aligns with the anticipated value based on the series or parallel configuration of the lithium ion cells. Additionally, verify that the individual cell voltages are balanced, indicating proper connection and BMS functionality.
2. Continuity and Isolation Check:
Conduct a continuity test to ensure that the electrical connections between the cells, interconnecting materials, and the battery management system (BMS) are secure and free from any open circuits or excessive resistance. Simultaneously, confirm that the cells and interconnections are effectively isolated from the battery enclosure or holder to prevent unintended short circuits.
3. Capacity and Discharge Testing:
Perform a capacity test to assess the actual energy storage capability of the battery pack. Discharge the battery at a controlled rate using a suitable load or electronic discharger while monitoring the voltage and current. Record the discharge curve to evaluate the capacity, internal resistance, and overall performance of the battery under realistic operating conditions.
4. Overcurrent and Overvoltage Protection:
Verify the effectiveness of the battery management system (BMS) in safeguarding the cells against overcurrent and overvoltage conditions. Intentionally subject the battery pack to controlled overcurrent and overvoltage scenarios to ensure that the BMS responds promptly to mitigate potential hazards and protect the cells from damage or excessive stress.
5. Thermal Stress Testing:
Expose the battery pack to varying temperature conditions within the recommended operating range to assess its thermal stability and performance. Monitor the temperature of the cells and BMS components during charging and discharging cycles to identify any abnormal heating or thermal runaway tendencies, ensuring the integrity and safety of the battery under diverse environmental conditions.
6. Safety Compliance and Transport Testing:
Validate that the DIY lithium ion battery complies with relevant safety standards and transportation regulations, such as UN38.3 for lithium cells and batteries. Ensure that the battery pack can withstand mechanical shock, vibration, and impact tests as required for safe transportation and usage in consumer electronics or other applications.
By meticulously conducting these comprehensive tests, you can gain valuable insights into the performance, safety, and reliability of your DIY lithium ion battery, enabling you to address any potential issues and confidently integrate the battery into your projects and devices.
Charging and Discharging the Battery
Effective management of the charging and discharging processes is crucial for maximizing the performance, longevity, and safety of your DIY lithium ion battery. Proper charging protocols and controlled discharging practices not only optimize the energy storage capabilities of the battery but also mitigate the risk of damage and ensure reliable operation over the battery’s lifecycle.
Here’s a detailed guide to charging and discharging your DIY lithium ion battery:
Charging the Battery:
Utilize a dedicated lithium ion battery charger that is compatible with the voltage and capacity specifications of your battery pack. Adhere to the following best practices for charging the battery:
- Constant Current (CC) Phase: During the initial stage of charging, the charger should deliver a constant current to the battery until it reaches a predetermined voltage per cell, typically 4.2 volts for most lithium ion chemistries.
- Constant Voltage (CV) Phase: Once the battery reaches the specified voltage, the charger transitions to a constant voltage mode, allowing the battery to absorb the remaining charge at a decreasing current until the charge current diminishes to a minimal level.
- Temperature Monitoring: Ensure that the charger incorporates temperature monitoring to prevent overheating during the charging process. Lithium ion batteries should not be charged at extreme temperatures to avoid thermal stress and potential safety hazards.
- Balancing the Cells: If your battery pack includes a battery management system (BMS), the charger should support balancing to equalize the charge levels of individual cells, promoting longevity and consistency in the battery pack.
Discharging the Battery:
Controlled discharging of the battery is essential for evaluating its capacity, performance, and operational characteristics. Follow these guidelines for safe and effective battery discharging:
- Discharge Rate Selection: Use a discharge load or electronic discharger capable of accommodating the anticipated discharge rate of the battery pack. Avoid discharging the battery at rates that exceed its specified maximum continuous discharge current.
- Monitoring Voltage and Capacity: Continuously monitor the voltage and capacity of the battery during the discharging process to assess its energy output and discharge curve. Recording this data provides insights into the actual capacity and performance of the battery under load.
- Over-Discharge Prevention: Implement safeguards to prevent over-discharging the battery, as excessive discharge can compromise the longevity and safety of lithium ion cells. Utilize a voltage cutoff mechanism or BMS functionality to halt the discharging process when the battery reaches the minimum safe voltage threshold.
By meticulously adhering to these charging and discharging practices, you can optimize the energy management and operational characteristics of your DIY lithium ion battery, ensuring reliable performance and longevity for your diverse projects and applications.
Maintaining Your DIY Lithium Ion Battery
Proper maintenance is essential for preserving the performance, safety, and longevity of your DIY lithium ion battery. By implementing routine maintenance practices, you can mitigate potential issues, optimize the battery’s lifespan, and ensure consistent reliability for your various applications.
Here are key maintenance guidelines to uphold the integrity of your DIY lithium ion battery:
1. Regular Capacity Checks:
Periodically assess the capacity of your battery pack through controlled discharging and capacity testing. Monitoring the battery’s energy storage capabilities allows you to detect any degradation and plan for potential replacements or adjustments as needed.
2. Temperature Control:
Monitor and maintain the operating temperature of the battery within the recommended range. Avoid exposing the battery to extreme heat or cold, as temperature fluctuations can impact performance and contribute to premature aging of the cells.
3. Voltage Balance Verification:
Verify the voltage balance of the individual cells within the battery pack, especially if a battery management system (BMS) with balancing functionality is integrated. Address any voltage differentials among the cells to ensure uniform energy distribution and prolonged cell lifespan.
4. Inspection of Physical Integrity:
Regularly inspect the physical condition of the battery pack, including the enclosure, terminals, and interconnecting materials. Ensure that the battery remains structurally sound and free from physical damage that may compromise its safety and performance.
5. BMS Functionality Testing:
Periodically test the functionality of the battery management system (BMS) by simulating overcharge, over-discharge, and overcurrent scenarios. Confirm that the BMS responds appropriately to safeguard the cells and mitigate potential safety hazards during abnormal operating conditions.
6. Safe Storage Practices:
When not in use, store the battery pack in a cool, dry environment away from direct sunlight and extreme temperatures. Implement proper storage protocols to maintain the battery’s capacity and prevent accelerated aging due to unfavorable storage conditions.
7. Firmware and Software Updates (If Applicable):
If your DIY battery pack incorporates a smart BMS with firmware or software, stay informed about updates and enhancements provided by the manufacturer. Implementing the latest firmware or software versions can enhance the functionality and safety features of the BMS.
By conscientiously integrating these maintenance practices into your battery care regimen, you can prolong the lifespan, optimize the performance, and uphold the safety of your DIY lithium ion battery, ensuring its continued reliability for your diverse projects and applications.