AE (Automatic Exposure)
AE, short for Automatic Exposure, is a crucial feature found in digital cameras that allows photographers to capture properly exposed images effortlessly. It involves the camera’s ability to automatically adjust the exposure settings based on the lighting conditions of the scene.
When shooting in Automatic mode or using semi-automatic modes like Aperture Priority or Shutter Priority, AE ensures that the camera selects the optimal combination of aperture, shutter speed, and ISO sensitivity to produce a well-balanced exposure.
The primary purpose of AE is to simplify the photography process for beginners and amateur photographers who may not have extensive knowledge of exposure settings. It eliminates the need for manual adjustments and enables users to focus on composition and creativity rather than technicalities.
How does AE work? The camera’s built-in light metering system measures the brightness of the scene and calculates the appropriate exposure settings. It takes into account factors like the available light, the subject’s reflectivity, and the desired depth of field. The camera uses algorithms to analyze the scene and adjust the aperture, shutter speed, and ISO accordingly.
The benefits of using AE in photography are numerous. Firstly, it saves time and effort by eliminating the need for manual exposure adjustments. This is particularly useful in situations where lighting conditions change rapidly, such as when photographing moving subjects or outdoor events.
AE also ensures consistent exposures across multiple shots, making it easier to create a series of images with a uniform tone and lighting. This is especially important in situations where continuous shooting or burst mode is required, such as sports or wildlife photography.
Moreover, AE allows photographers to focus on the creative aspects of image-making rather than technical details. It encourages experimentation and enables photographers to explore different compositions and perspectives without worrying about exposure settings.
There are different types of AE available in cameras, such as evaluative metering, center-weighted metering, and spot metering. These metering modes provide flexibility and control over how the camera measures and calculates exposure values based on different areas of the frame.
In addition to basic AE, many cameras also offer advanced features like AE Lock, AE bracketing, and AE compensation. AE Lock allows you to lock the exposure reading on a specific area of the frame, which is useful when the subject is off-center or when shooting in challenging lighting conditions.
AE bracketing is a technique where the camera automatically takes multiple shots at different exposure settings, ensuring that you capture a range of exposures from dark to light. This is particularly useful in situations with high contrast, such as landscape photography.
AE compensation allows you to manually adjust the exposure settings in increments, typically measured in stops, to override the camera’s automatic exposure calculations. This is useful in situations where you want to intentionally underexpose or overexpose an image for creative purposes.
What is AE?
AE stands for Automatic Exposure and is a fundamental feature found in digital cameras. It refers to the camera’s ability to automatically adjust exposure settings, including aperture, shutter speed, and ISO sensitivity, to achieve a properly exposed image.
Exposure is a crucial element in photography that determines the overall brightness and darkness of the image. Too much light can result in overexposure, washing out details, while too little light can lead to underexposure, resulting in a dark and muddy image.
AE simplifies the process of capturing well-exposed images by taking the guesswork out of exposure settings. It allows photographers, especially beginners and amateurs, to focus on composition and creativity rather than technicalities.
The camera’s built-in light metering system measures the brightness of the scene and calculates the optimal exposure settings. It analyzes various factors such as available light, subject reflectivity, and desired depth of field to determine the appropriate combination of aperture, shutter speed, and ISO.
AE works by constantly evaluating the scene’s lighting conditions and adjusting the exposure settings accordingly. In automatic shooting modes, the camera takes control of these settings, providing a hassle-free shooting experience for users.
One of the primary benefits of using AE is its ability to save time and effort. It eliminates the need for manual adjustments, particularly in situations where lighting conditions change rapidly. Photographers can concentrate on capturing the moment without worrying about adjusting exposure settings on the fly.
AE also ensures consistent exposures across multiple shots. This is especially useful in scenarios that require continuous shooting, such as sports or wildlife photography, where capturing a series of images with consistent lighting is important.
Moreover, AE encourages photographers to explore their creativity. By managing the technical aspects of exposure, photographers can focus on composition, finding unique angles, and telling compelling visual stories.
While AE provides automated exposure control, it is essential to understand its limitations. The camera’s light metering system relies on certain assumptions and averages. In tricky lighting situations or high contrast scenes, the automatic settings might not always achieve the desired results. This is where manual exposure controls like exposure compensation come into play.
How does AE work?
AE, or Automatic Exposure, is a sophisticated feature in digital cameras that allows them to automatically adjust exposure settings to achieve a properly exposed image. This feature is particularly useful for photographers who are not familiar with manual exposure control or need to capture images quickly.
The basic mechanism behind AE involves the camera’s built-in light metering system. The light meter measures the intensity of light in the scene and calculates the ideal combination of aperture, shutter speed, and ISO sensitivity to achieve a well-balanced exposure.
When you press the shutter button halfway, the camera’s light metering system activates and evaluates the light in the scene. It analyzes the brightness values across different areas of the frame, taking into account various factors such as available light, subject reflectivity, and desired depth of field.
The camera’s internal algorithms use this information to calculate the appropriate exposure settings. It aims to achieve a balance between capturing enough light to reveal details in shadows without overexposing the highlights.
In most cameras, there are different metering modes available, such as evaluative metering, center-weighted metering, and spot metering. These modes affect how the camera measures light and calculates exposure values based on specific areas of the frame.
Evaluative metering, also known as matrix metering, is the default mode in many cameras. It uses a complex algorithm that considers multiple areas of the frame and produces an average exposure value for the entire scene.
Center-weighted metering, on the other hand, places greater emphasis on the center of the frame. It calculates the exposure based on the brightness values in the central area, giving more importance to the subject at the center.
Spot metering provides the most precise metering as it measures the light from a small spot, typically around 1-5% of the frame. This mode is useful when you want to ensure correct exposure on a specific subject or area, rather than the entire scene.
Once the camera determines the optimal exposure settings, it adjusts the aperture, shutter speed, and ISO accordingly. The aperture controls the amount of light entering the camera through the lens, while the shutter speed determines how long the camera’s sensor is exposed to that light. The ISO sensitivity affects how the camera’s sensor records the incoming light.
By automatically adjusting these settings, AE simplifies the photography process and allows photographers to focus on composition and creativity. However, it’s important to note that AE is not infallible. In challenging lighting conditions or high contrast scenes, manual exposure control or additional techniques, such as exposure compensation or bracketing, may be necessary to achieve the desired result.
Benefits of using AE in photography
Automatic Exposure (AE) is a valuable feature in digital cameras that provides several benefits to photographers of all skill levels. Let’s explore some of the advantages of using AE in your photography:
Simplicity: One of the primary benefits of AE is its ability to simplify the photography process. It eliminates the need for manual adjustments of exposure settings, making it suitable for beginners or photographers who prefer a more automated approach. With AE, you can focus on capturing the moment and composing your shots without getting caught up in technical details.
Time-saving: AE saves you valuable time during shooting sessions. It automatically adjusts the exposure settings based on the scene’s lighting conditions, allowing for quicker and more efficient image capture. This is particularly useful when shooting in rapidly changing lighting scenarios or situations where you need to capture images quickly, such as in street photography or event coverage.
Consistency: AE ensures consistent exposures across multiple shots. When photographing a series of images, especially in situations that require continuous shooting or burst mode, AE helps maintain uniformity in lighting and exposure. This consistency is vital when creating a coherent visual story or organizing a set of images.
Flexibility: AE provides flexibility in adapting to different shooting conditions. It adjusts the exposure settings based on the available light, subject reflectivity, and desired depth of field. This feature enables you to capture well-exposed images in a range of lighting situations, from bright daylight to low-light environments, without having to manually adjust the settings each time.
Creative freedom: Using AE gives you the freedom to focus on the creative aspects of photography. By taking care of the technical exposure settings, AE allows you to concentrate on composition, framing, and exploring different angles and perspectives. This creative freedom encourages experimentation and the development of a unique photographic style.
Effortless exposure adjustments: While AE automatically determines the exposure settings, most cameras also offer exposure compensation. This feature allows you to fine-tune the exposure according to your creative vision by making slight adjustments to the automatically chosen settings. Exposure compensation is particularly useful when dealing with challenging lighting situations or when you want to intentionally overexpose or underexpose an image for artistic effect.
Accessibility: AE is an accessible feature that enables photographers of all levels to achieve well-exposed images. Regardless of your experience or technical knowledge, AE empowers you to capture photos with accurate exposure, even if you’re not familiar with manual exposure control. This accessibility is especially beneficial for beginners who are still learning the intricacies of photography.
Improved workflow: AE enhances your photography workflow by streamlining the image capture process. With AE, you can concentrate on capturing the decisive moment and let the camera handle the technical aspects of exposure. This leads to a smoother and more efficient shooting experience, allowing you to focus on other post-processing tasks or experimenting with different shots.
Incorporating AE into your photography workflow can provide significant benefits, from simplifying the process and saving time to offering creative freedom and improved consistency. By understanding and utilizing this feature effectively, you can enhance your ability to capture well-exposed images and focus on storytelling through your photography.
Different types of AE
Automatic Exposure (AE) comes in various types, each offering a different approach to calculating and adjusting exposure settings. These different types of AE allow photographers to have more control over how the camera measures light and determines the optimal exposure. Let’s explore some of the common types of AE:
Evaluative Metering: Evaluative metering, also known as matrix metering, is the default metering mode found in many cameras. It utilizes a complex algorithm that evaluates the brightness values across multiple areas of the frame. The camera analyzes the scene’s lighting conditions, subject distance, and other factors to calculate the best exposure settings. Evaluative metering provides a balanced exposure across the entire frame, making it suitable for a wide range of shooting scenarios.
Center-weighted Metering: Center-weighted metering places greater emphasis on the brightness values in the central area of the frame. It calculates the exposure based on the subject’s brightness and distance from the center of the frame. Center-weighted metering is useful when the main subject is positioned in the center but not necessarily in the middle, allowing the camera to expose for the central subject while considering the surrounding areas.
Spot Metering: Spot metering measures the light from a small spot in the frame, typically around 1-5% of the total area. This metering mode provides precise exposure readings from a specific area, allowing photographers to meter for a particular subject or region of interest. It is commonly used when there is a high contrast between the subject and the background or when capturing images with a specific exposure value for creative purposes.
Partial Metering: Partial metering is similar to spot metering but covers a larger portion of the frame, typically around 10-15%. It meters the light from the center of the frame and uses an average of the surrounding area. Partial metering is useful when there is a significant difference in brightness between the subject and the background but doesn’t require the precision of spot metering.
Center Spot Metering: Center spot metering is a variation of spot metering that relies on a precise spot in the center of the frame for metering. This type of metering is helpful when there is a specific subject or area that requires precise exposure calculations. Center spot metering can be beneficial in situations where there is high contrast or selective lighting, allowing the photographer to ensure accurate exposure for the critical area.
Highlight-weighted Metering: Highlight-weighted metering, available in some advanced camera models, prioritizes preserving highlight details in the image. This metering mode is designed to prevent overexposure in bright areas of the scene, ensuring that important details are not lost. It is commonly used in situations where maintaining highlight details is crucial, such as in high-contrast scenes or when shooting backlit subjects.
Understanding the different types of AE and their application can significantly enhance your exposure control. By selecting the appropriate metering mode based on the shooting scenario and your desired outcome, you can have more control over the final exposure of your images, ensuring accurate and well-balanced results.
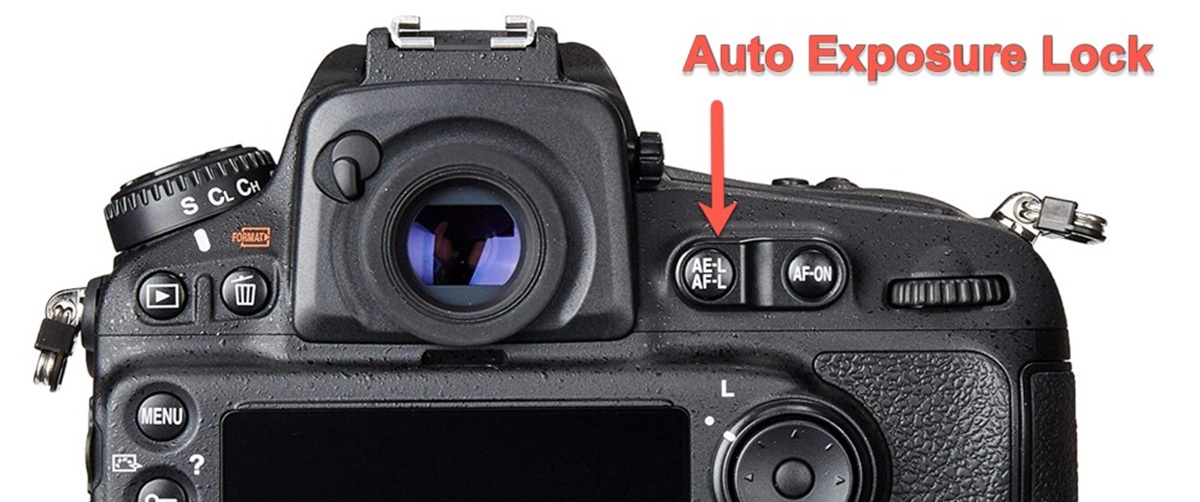
AE Lock
AE Lock, or Automatic Exposure Lock, is a useful feature found in many digital cameras that allows you to lock the exposure settings for a specific area of the frame. It provides increased control and flexibility when dealing with complex lighting conditions or when your subject is off-center.
When using AE Lock, you can aim the camera at a particular area and press the AE Lock button or half-press the shutter button to lock in the current exposure settings. Once locked, the camera will maintain those settings, even if you recompose the shot or change the framing.
This feature is particularly beneficial when working with high-contrast scenes, where you want to ensure the correct exposure for a specific part of the image. For example, in a backlit situation, you can use AE Lock to meter for the subject’s face rather than the overall scene, preventing the camera from overexposing due to the bright background.
AE Lock allows you to separate the metering and focusing functions of your camera. While most cameras link the exposure settings to the focus point, using AE Lock enables you to meter for the subject independently from where the camera is focusing. This helps ensure accurate exposure for the most important element of your composition.
Additionally, AE Lock is handy when your subject is not positioned in the center of the frame. Instead of compromising the exposure for the subject by relying on evaluative metering or other metering modes, you can use AE Lock to meter for the subject and then recompose the shot while maintaining the desired exposure settings.
It’s essential to note that AE Lock, depending on your camera model, can be set to lock the exposure for a single shot or to remain locked until you unlock it manually. The latter option is especially useful when shooting a series of images with consistent exposure, such as in a studio setup or for documentation purposes.
It’s worth familiarizing yourself with the location and function of the AE Lock button on your camera. While the button’s placement may vary across camera models, it is typically labeled with an AE-L or * symbol. By understanding how to engage and disengage AE Lock quickly, you can make efficient use of this valuable feature in various shooting situations.
Overall, AE Lock is a powerful tool that gives you greater control over exposure in challenging lighting conditions and when dealing with off-center subjects. By utilizing this feature effectively, you can ensure accurate and consistent exposure for your images, resulting in well-balanced and compelling photographs.
AE Bracketing
AE bracketing, or Automatic Exposure bracketing, is a beneficial feature found in many digital cameras that allows you to capture a series of images with different exposure settings. It is particularly useful in high-contrast scenes or situations where you want to ensure optimal exposure across a range of lighting conditions.
When using AE bracketing, the camera automatically takes multiple shots in quick succession, each with a slightly different exposure. The exposure variations are typically achieved by adjusting the shutter speed, but in some cameras, the aperture or ISO may also be altered depending on the settings.
The number of shots and the exposure increment can often be customized in the camera’s settings. It is common for cameras to offer options such as 3, 5, or 7 shots with exposure increments of 1/3 or 1/2 stops.
By capturing a bracketed series of images, you obtain a range of exposures from underexposed to overexposed shots. This technique ensures that at least one of the images has the correct exposure for your desired result, whether it’s preserving highlight details or recovering shadow details.
AE bracketing is beneficial in situations with high dynamic range, where there are significant differences in brightness between the brightest and darkest areas of the scene. This could include landscape photography with bright skies and dark foregrounds, or architectural photography with bright indoor and outdoor areas.
One common use of AE bracketing is to create High Dynamic Range (HDR) images. HDR involves merging multiple bracketed exposures in post-processing to create a final image that captures a wide range of tones and details. This technique can produce striking images with incredible detail and balanced exposure throughout the scene.
Another use of AE bracketing is to choose the ideal exposure manually from the bracketed series. By previewing the different shots on the camera’s LCD monitor, you can select the image that preserves the desired highlight and shadow details while providing the overall look you want to achieve.
It’s important to ensure that your camera is set to continuous shooting mode when using AE bracketing so that the series of shots are captured rapidly. This minimizes the chance of subject movement or changes in the scene between shots, ensuring consistent composition across the bracketed exposures.
AE bracketing is a valuable technique that enhances your control over exposure in challenging lighting situations. It allows you to capture multiple exposures quickly and easily, providing a range of options to choose from when editing your images. Whether you merge them into an HDR image or manually select the best exposure, AE bracketing can be a powerful tool to ensure optimal exposure in your photography.
AE Compensation
AE compensation, or Automatic Exposure compensation, is a valuable feature found in digital cameras that allows you to adjust the exposure settings manually, overriding the camera’s automatic exposure calculations. It gives you increased control over the brightness of your images and enables you to achieve the desired exposure for your specific creative vision.
While Automatic Exposure (AE) typically calculates the exposure based on the camera’s internal algorithms and metering system, AE compensation allows you to intentionally underexpose or overexpose the image by a certain amount, usually measured in stops.
Using AE compensation is particularly useful in situations where the camera’s default exposure may not accurately represent your intended result. For example, in high contrast scenes, the camera may try to balance the exposure, resulting in either blown-out highlights or underexposed shadows. By using AE compensation, you can adjust the exposure to preserve detail in the highlights or shadows, depending on your creative preference.
The AE compensation setting is usually represented by a scale ranging from -3 to +3 stops, with 0 being the default exposure value. A positive value, such as +1 or +2, increases the exposure, making the image brighter, while a negative value, such as -1 or -2, decreases the exposure, making the image darker.
It’s important to note that AE compensation is a relative adjustment applied to the camera’s automatic exposure calculation. For example, if the camera’s metering suggests an exposure value of 1/125s at f/8, applying a +1 AE compensation will result in the camera choosing a faster shutter speed or wider aperture to brighten the image.
AE compensation is especially useful in challenging lighting conditions or situations where the subject’s brightness varies significantly. For instance, when photographing a backlit subject, the camera may struggle to properly expose the subject’s face, resulting in an underexposed image overall. By applying positive AE compensation, you can ensure that the subject is correctly exposed, even if it means slightly overexposing the background.
Conversely, you may want to intentionally underexpose a scene for creative purposes. This technique is often employed in low-key photography or to create a moody, dramatic effect. By applying negative AE compensation, you can darken the image and enhance contrast.
It’s important to review the histogram and review the images to confirm the desired exposure level when using AE compensation. The histogram provides a visual representation of the distribution of tones in the image and can help you determine if the resulting exposure matches your creative vision.
AE compensation is an essential tool that empowers you to take control of the exposure, ensuring that your images accurately reflect your vision. It allows you to override the camera’s automatic exposure calculations and customize the exposure settings to achieve the desired outcome, whether it’s preserving highlight details, enhancing shadows, or creating a specific mood.
Understanding AE modes (Program AE, Aperture Priority AE, Shutter Priority AE, Manual AE)
Automatic Exposure (AE) modes provide photographers with different levels of control over the exposure settings, allowing them to achieve their desired creative outcomes. Let’s explore the four primary AE modes found in digital cameras:
Program AE: Program AE mode is a semi-automatic mode that offers a balance between convenience and control. In this mode, the camera selects the optimal combination of aperture and shutter speed for a given scene, based on its internal algorithms and metering system. While the camera determines the exposure settings, you still have the flexibility to adjust other parameters such as ISO, exposure compensation, and white balance. Program AE is ideal for situations where you want the camera to handle the exposure calculations while retaining additional control over other settings.
Aperture Priority AE: Aperture Priority AE mode, often denoted as “A” or “Av,” allows you to set the desired aperture while the camera automatically adjusts the shutter speed for proper exposure. This mode is useful when you want to have control over depth of field, determining how much of the scene is in focus. You can select a wide aperture (small f-number) for shallow depth of field, ideal for portraits or artistic shots, or a narrow aperture (large f-number) for a greater depth of field, suitable for landscapes or group shots. Aperture Priority AE provides creative flexibility while ensuring proper exposure according to the selected aperture.
Shutter Priority AE: Shutter Priority AE mode, often denoted as “S” or “Tv,” allows you to set the desired shutter speed while the camera adjusts the aperture for proper exposure. This mode is beneficial when you want control over the motion in your images. A fast shutter speed freezes action, ideal for capturing sports or fast-moving subjects, while a slow shutter speed can create motion blur, useful for long-exposure photography or capturing the sense of motion. Shutter Priority AE allows you to prioritize the desired effect while maintaining correct exposure through automatic aperture adjustments.
Manual AE: Manual AE mode, often denoted as “M,” offers full control over both aperture and shutter speed settings. In this mode, the photographer manually sets the desired values based on their creative vision and the lighting conditions. Manual AE provides maximum control over exposure, allowing for precise adjustments. It is ideal for photographers who have a good understanding of exposure and wish to have complete control over the final image. However, it requires careful monitoring of the camera’s metering indicators or external light meters to ensure proper exposure.
Understanding and selecting the appropriate AE mode depends on the desired level of control and the specific creative vision you want to achieve. Program AE offers convenience with some flexibility, while Aperture Priority AE and Shutter Priority AE provide more control over depth of field and shutter speed, respectively. Manual AE gives complete control over exposure but requires a deeper understanding of exposure settings. Familiarizing yourself with these AE modes allows you to tailor your camera settings to capture the images exactly as you envision them.
Tips for Using AE Effectively
Automatic Exposure (AE) is a powerful feature that simplifies the exposure control process in photography. To make the most of AE and achieve optimal results, here are some valuable tips to consider:
Understanding your camera’s metering modes: Different cameras offer various metering modes such as evaluative, center-weighted, and spot metering. Familiarize yourself with these options to select the most suitable metering mode based on the shooting situation and your desired outcome. Experimenting with different metering modes allows you to have more control over how the camera measures light and calculates exposure.
Using exposure compensation: Utilize the exposure compensation feature to fine-tune the exposure settings in situations where the camera’s automatic exposure calculation may not accurately represent your creative vision. Adjust the exposure compensation dial to make the image brighter (+) or darker (-), and review the results on the camera’s LCD screen or histogram to ensure the desired exposure value.
Monitoring the histogram: Keep an eye on the histogram, a graphical representation of the image’s tonal distribution, while reviewing your shots. The histogram helps you evaluate the exposure by showing the distribution of highlights, shadows, and mid-tones. Aim for a balanced histogram that avoids clipping in the extreme ends, indicating loss of detail in highlights or shadows.
Using AE Lock effectively: Master the AE Lock feature to ensure accurate exposure on specific areas or subjects. By locking the exposure settings, you can compose your shot or recompose without the camera automatically adjusting the exposure. This is particularly useful when dealing with challenging lighting conditions or off-center subjects.
Bracketing exposures: Consider using AE bracketing to capture a series of images with different exposure settings. This technique is helpful in high-contrast scenes or situations where you want to ensure optimal exposure across a range of lighting conditions. It provides you with a variety of exposures to choose from during post-processing or when creating an HDR image.
Refining exposure through trial and error: AE is a powerful tool, but it may not always provide the exact exposure value you envision. Don’t hesitate to experiment and adjust the exposure settings manually to find the perfect balance. Review the results on your camera’s LCD screen and make necessary tweaks until you achieve the desired exposure.
Understanding exposure compensation and metering in specific lighting situations: Certain lighting conditions, such as backlit scenes or scenes with extreme contrast, can challenge AE. In these situations, understanding exposure compensation and metering modes becomes crucial. Consider using exposure compensation to adjust for backlit subjects or choose a metering mode that prioritizes the desired areas of the scene.
Regularly reviewing and adjusting camera settings: Lighting conditions can change quickly, so regularly review and adjust your camera settings, including ISO, aperture, and exposure compensation, to adapt to the changing environment. Stay attentive to these settings to ensure properly exposed images as you move from one scene to another.
By following these tips, you can effectively use the AE feature in your camera and enhance your control over exposure settings. Understanding your camera’s capabilities, employing exposure compensation judiciously, and refining exposure through experimentation will help you capture properly exposed images that align with your creative vision.
Examples of AE in Action
Automatic Exposure (AE) plays a crucial role in achieving well-exposed images across a wide range of scenarios. Here are some examples of AE in action:
Landscape Photography: AE is particularly useful in landscape photography, where you often encounter scenes with diverse lighting conditions. For instance, when photographing a sunset, AE intelligently adjusts the exposure settings to capture the rich colors and details in the sky without underexposing the foreground. This allows you to capture stunning landscapes with accurate and vibrant colors throughout the frame.
Indoor Events: AE excels in indoor event photography, such as concerts or weddings, where lighting conditions can vary significantly. In these situations, AE automatically adjusts the exposure settings to ensure well-lit images, preserving the ambiance and detail in low-light environments. It eliminates the need for constant manual adjustments and allows you to focus on capturing the crucial moments without worrying about exposure.
Portrait Photography: AE is invaluable in portrait photography, where achieving accurate skin tones and balanced lighting is essential. Whether shooting in natural light or using artificial lighting, AE helps maintain consistent exposure across different skin tones, wardrobe colors, and lighting conditions. It ensures that your subjects are properly exposed, allowing you to capture flattering and well-balanced portraits.
Street Photography: AE is ideal for street photography, where situations can change rapidly and capturing the decisive moment is key. AE saves valuable time by automatically adjusting exposure settings, allowing you to react quickly to fleeting moments. It ensures that your images are well-exposed, even in unpredictable lighting scenarios, enabling you to capture the energy and essence of the street with ease.
Macro Photography: AE is beneficial in macro photography, where achieving precise exposure is crucial to capture the intricate details of small subjects. The camera’s automatic exposure calculations, coupled with AE compensation if necessary, help maintain accurate exposure for subjects with varying textures, colors, and reflectivity. This allows you to capture stunning close-up images with intricate details and beautiful tonal rendering.
These examples illustrate how AE simplifies the exposure control process, allowing you to focus on composition, creativity, and capturing decisive moments. By leveraging AE effectively, you can achieve well-exposed images across a wide range of photography genres, capturing the beauty and essence of the scenes you encounter.