
Prerequisites for Creating a New Virtual Machine
Before you begin creating a new virtual machine with VMware Fusion, there are a few essential prerequisites that you need to meet. Ensuring that you have these requirements in place will help you to have a smooth and successful virtual machine creation process. Here are the key prerequisites to consider:
- Operating System Compatibility: Ensure that your Mac is running a compatible operating system version for VMware Fusion. Check the official VMware documentation for the list of supported operating systems.
- System Requirements: Verify that your Mac meets the minimum system requirements for VMware Fusion. This includes having a compatible processor, sufficient RAM, and available disk space.
- Download and Install VMware Fusion: Download the latest version of VMware Fusion from the official VMware website. Follow the installation instructions provided and ensure that the installation is successful.
- Virtual Machine Software: Gather the necessary ISO or installation media for the operating system you plan to install on the virtual machine. This could be an installation DVD or a downloadable ISO file.
- Product Key or License: If you are installing a licensed operating system, make sure you have the product key or license documentation readily available.
By meeting these prerequisites, you can ensure that you have the necessary tools and resources to create a new virtual machine. Checking and addressing these requirements ahead of time will save you from potential compatibility issues or disruption during the virtual machine creation process. Once you have verified that all prerequisites are in place, you can move on to the next step of installing VMware Fusion and creating your new virtual machine.
Steps to Install VMware Fusion
Installing VMware Fusion on your Mac is a straightforward process. Follow these steps to ensure a successful installation:
- Download the VMware Fusion Installer: Visit the official VMware website and download the VMware Fusion installer file.
- Open the Installer File: Locate the downloaded installer file on your Mac and double-click on it to start the installation process.
- Agree to the Terms and Conditions: Read through the VMware Fusion license agreement and click the “Agree” button if you agree to the terms.
- Choose Installation Location: Select the destination where you want to install VMware Fusion. The default location is usually in the “Applications” folder, but you can choose a different location if desired.
- Authenticate and Begin Installation: Enter your macOS administrator username and password when prompted to authenticate the installation process. Click the “Install” button to start the installation.
- Wait for the Installation: Allow the installation process to complete. This may take a few minutes depending on your Mac’s performance.
- Launch VMware Fusion: Once the installation is finished, click the “Finish” button and VMware Fusion will launch automatically.
- Enter License Key (Optional): If you have a VMware Fusion license key, you can enter it during the initial setup process. Otherwise, you can choose to start with the 30-day trial version.
After successfully installing VMware Fusion, you will be ready to create and manage virtual machines on your Mac. Proceed to launching VMware Fusion and creating a new virtual machine to get started with your virtualization journey.
Launching VMware Fusion and Creating a New Virtual Machine
Once you have successfully installed VMware Fusion on your Mac, it’s time to launch the application and create your first virtual machine. Follow these steps to get started:
- Open VMware Fusion: Locate the VMware Fusion application in your Applications folder or click on its icon in the Launchpad to launch the program.
- Select “New.” In the VMware Fusion menu, click on “File” and select “New” to begin the virtual machine creation process.
- Choose the Installation Method: VMware Fusion provides different options for installing guest operating systems. You can choose to install from disc or disc image, migrate an existing PC, or download a virtual machine from the VMware website. Select the installation method that suits your needs and follow the on-screen instructions.
- Select the Operating System: Depending on the installation method you chose, VMware Fusion will prompt you to select the operating system you want to install on the virtual machine. Choose the appropriate operating system from the list provided.
- Configure the Virtual Machine: Customize the virtual machine settings such as the virtual machine name, location, processor and memory allocation, network settings, and more. Adjust these settings according to your needs and click “Continue.”
- Allocate Storage: Specify the amount of storage you want to allocate for the virtual machine. You can either choose a fixed size or use the default dynamic allocation. Click “Continue” to proceed.
- Install the Operating System: If you are installing from disc or disc image, insert the installation media. Follow the on-screen instructions to install the operating system on the virtual machine.
- Finish the Setup: Once the operating system installation is complete, VMware Fusion will finalize the setup. You can then customize additional settings such as display preferences, shared folders, and external devices integration.
- Start Your Virtual Machine: With the virtual machine successfully created, you can now start it by clicking the “Power On” button. Your virtual machine will boot up, and you can start using it as if it were a physical computer.
Congratulations! You have now launched VMware Fusion and created your first virtual machine. From here, you can further customize your virtual machine settings, install applications, and explore the many features and functionalities that VMware Fusion offers.
Selecting the Operating System for the Virtual Machine
When creating a new virtual machine with VMware Fusion, one of the critical steps is selecting the operating system (OS) that you want to install on the virtual machine. The choice of operating system will determine the compatibility, functionality, and performance of your virtual machine. Here’s how you can select the operating system:
- Launch VMware Fusion: Open the VMware Fusion application on your Mac.
- Create a New Virtual Machine: Click on “File” and select “New” from the VMware Fusion menu to start the virtual machine creation process.
- Choose the Installation Method: VMware Fusion provides various options for installing the guest operating system. You can install from a disc or disc image, migrate an existing PC, or download a virtual machine from the VMware website. Select the desired installation method.
- Select the Operating System: After choosing the installation method, you will be prompted to select the operating system you want to install on the virtual machine. VMware Fusion offers a wide range of supported operating systems, including various versions of Windows, macOS, Linux, and more. Choose the specific operating system you intend to use.
- Enter the Operating System Details: In some cases, VMware Fusion may require additional information about the operating system, such as the edition, version, or product key. Provide the necessary details as requested.
- Confirm the Selection: Double-check the selected operating system and its details to ensure accuracy. If everything is correct, proceed to the next step.
- Continue the Virtual Machine Creation Process: After selecting the operating system, you can now proceed with configuring other settings for the virtual machine, such as hardware specifications, network settings, storage allocation, and more. Customize these settings according to your requirements.
- Complete the Setup: Once you have finished configuring the virtual machine settings, follow the remaining steps to complete the setup process. This includes allocating storage, installing the operating system, and customizing additional preferences for the virtual machine.
By carefully selecting the operating system for your virtual machine, you can ensure compatibility, stability, and optimal performance. Whether you need to run Windows applications, test software on different operating systems, or develop applications specific to a particular platform, VMware Fusion offers a wide range of options to fulfill your virtualization needs.
Configuring the Virtual Machine’s Hardware Settings
After selecting the operating system for your virtual machine in VMware Fusion, the next step is to configure the hardware settings. Adjusting the virtual machine’s hardware specifications is important to ensure optimal performance and compatibility. Here’s how you can configure the virtual machine’s hardware settings:
- Launch VMware Fusion: Open VMware Fusion on your Mac and select the virtual machine you want to configure from the library.
- Access Virtual Machine Settings: In the VMware Fusion menu, go to “Virtual Machine” and select “Settings.” Alternatively, you can right-click on the virtual machine in the library and choose “Settings” from the context menu.
- Customize Hardware Specifications: In the “Virtual Machine Settings” window, you will find different tabs representing different hardware components, such as Processors, Memory, Hard Disk, Network Adapter, Display, and more. Click on each tab to customize the corresponding hardware component.
- Processors: In the Processors tab, you can adjust the number of virtual processors assigned to the virtual machine. Consider the requirements of the operating system and applications you will be running on the virtual machine to determine the appropriate number of processors.
- Memory: In the Memory tab, you can allocate the amount of RAM to be used by the virtual machine. Allocating sufficient memory is crucial for smooth performance. Consider the requirements of the operating system and applications to determine the appropriate memory allocation.
- Hard Disk: In the Hard Disk tab, you can manage the virtual hard disk attached to the virtual machine. You can resize, add or remove hard disks, and manage the disk’s storage settings.
- Network Adapter: In the Network Adapter tab, you can configure the network connectivity for the virtual machine. You can choose between bridged, NAT, or host-only network modes based on your networking needs.
- Display: In the Display tab, you can customize the virtual machine’s display settings, such as screen resolution, color depth, and multiple monitor support.
- Other Hardware Components: Explore the other tabs in the “Virtual Machine Settings” window to configure additional hardware components, such as USB devices, CD/DVD drives, sound cards, and more.
- Apply Changes and Save Settings: After customizing the hardware settings, click “OK” or “Apply” to save the changes and close the “Virtual Machine Settings” window.
By properly configuring the virtual machine’s hardware settings, you can optimize its performance, allocate resources efficiently, and meet the specific requirements of your desired operating system and applications. Take the time to ensure that the hardware specifications are set appropriately for your virtual machine to achieve the desired results.
Allocating Storage for the Virtual Machine
When creating a virtual machine in VMware Fusion, allocating storage is a crucial step to ensure smooth operation and provide sufficient space for the virtual machine’s files and operating system. Here’s how you can allocate storage for your virtual machine:
- Access Virtual Machine Settings: Launch VMware Fusion and select the virtual machine for which you want to allocate storage.
- Open Storage Settings: In the VMware Fusion menu, go to “Virtual Machine” and select “Settings.” Alternatively, right-click on the virtual machine in the library and choose “Settings” from the context menu.
- Configure Virtual Hard Disk: In the “Virtual Machine Settings” window, go to the “Hard Disk” tab. Here, you can manage the virtual hard disk of the virtual machine.
- Add a New Hard Disk: If you haven’t allocated any storage yet or want to add additional storage, click on “Add Device” and select “Hard Disk.”
- Choose Storage Type: VMware Fusion offers two types of virtual disk storage options – “Create a new virtual disk” or “Use an existing virtual disk.” Select the option that suits your needs.
- Allocate Storage Space: If you choose to create a new virtual disk, specify the disk capacity by entering the desired size in gigabytes (GB). Consider the requirements of your operating system and applications to determine the appropriate storage allocation.
- Storage Location: Choose the location where the virtual disk files will be stored. The default location is typically in the same folder as the virtual machine, but you can select a different location if desired.
- Configure Disk Formatting: Select the disk format option – “Split into multiple files” or “Store as a single file.” Splitting into multiple files allows for more flexibility, while storing as a single file provides better performance.
- Apply Changes and Save Settings: After configuring the storage settings, click “OK” or “Apply” to save the changes and close the “Virtual Machine Settings” window.
By properly allocating storage for your virtual machine, you can ensure that it has enough space to operate smoothly and accommodate the files and applications within the virtual environment. Be mindful of the storage requirements of your operating system and any applications you plan to install to allocate an appropriate amount of storage.
Installing the Operating System on the Virtual Machine
Once you have created a virtual machine in VMware Fusion and allocated the necessary storage, the next step is to install the operating system on the virtual machine. Follow these steps to install the operating system:
- Launch VMware Fusion: Open the VMware Fusion application on your Mac.
- Select the Virtual Machine: Choose the virtual machine on which you want to install the operating system from the library or the virtual machine menu.
- Power On the Virtual Machine: Click on the “Power On” button to start the virtual machine. It will boot up and begin the installation process.
- Insert the Installation Media: If you have a physical installation disc, insert it into the CD/DVD drive of your Mac. Alternatively, if you have an ISO file, click on “Virtual Machine” in the VMware Fusion menu, select “CD/DVD,” and then “Choose Disk or Disk Image.” Browse and select the ISO file.
- Begin the Installation: Once the virtual machine has booted from the installation media, follow the prompts to begin the installation of the operating system. The specific steps may vary depending on the operating system you are installing.
- Configure the Installation: During the installation process, you will be prompted to provide information such as language preferences, keyboard layout, and user settings. Follow the on-screen instructions to configure these settings.
- Complete the Installation: After providing the necessary information, the operating system installation will continue. Wait for the installation to complete, and restart the virtual machine if prompted to do so.
- Customize Additional Settings: Once the operating system is installed and the virtual machine reboots, you may need to customize additional settings such as time zone, network configuration, and user accounts.
- Update and Install Drivers: After the initial installation, it is recommended to update the operating system and install any necessary drivers or software updates. This will ensure the virtual machine is up to date and functioning optimally.
By following these steps, you can successfully install the operating system on your virtual machine created in VMware Fusion. Whether you’re setting up a Windows, macOS, Linux, or any other supported operating system, this process allows you to leverage the benefits of virtualization and run multiple operating systems within your Mac environment.
Customizing the Settings and Preferences of the Virtual Machine
After installing the operating system on your virtual machine in VMware Fusion, it’s time to customize the settings and preferences to optimize your virtual machine experience. Here’s how you can customize the settings and preferences:
- Open VMware Fusion: Launch the VMware Fusion application on your Mac.
- Select the Virtual Machine: Choose the virtual machine you want to customize from the library or virtual machine menu.
- Access Virtual Machine Settings: In the VMware Fusion menu, click on “Virtual Machine” and select “Settings.” Alternatively, right-click on the virtual machine in the library and choose “Settings” from the context menu.
- Customize General Settings: In the “Virtual Machine Settings” window, you will find different tabs representing various settings. Start with the “General” tab to configure options such as the virtual machine name, location, and power-on behavior.
- Manage Hardware Settings: Navigate through the other tabs, such as Processors, Memory, Hard Disk, Network Adapter, and Display, to further customize and fine-tune the hardware settings of the virtual machine as per your requirements.
- Set Up Shared Folders: In the “Sharing” tab, you can specify the folders on your Mac that you want to share with the virtual machine. This allows for easy file transfer and sharing between the host and guest operating systems.
- Configure Network Settings: In the “Network Adapter” tab, you can manage the virtual machine’s network settings. Choose the appropriate network mode, such as bridged, NAT, or host-only, to suit your network requirements.
- Customize Display Preferences: In the “Display” tab, you can adjust the display settings of the virtual machine, such as screen resolution, color depth, and multiple monitor support.
- Explore Additional Settings: Depending on your specific needs, you can also explore other tabs to customize settings such as sound, USB devices, external devices, and more.
- Apply Changes and Save Settings: After customizing the settings, click “OK” or “Apply” to save the changes and close the “Virtual Machine Settings” window.
By customizing the settings and preferences of the virtual machine, you can optimize performance, enhance usability, and tailor the virtual machine to meet your specific requirements. Take the time to review and adjust these settings based on your needs to create a virtual environment that suits your workflow and preferences.
Troubleshooting Common Issues During Virtual Machine Creation
While creating a virtual machine in VMware Fusion, you may encounter some common issues that can potentially disrupt the process. Understanding these issues and their solutions will help you overcome any challenges and successfully create your virtual machine. Here are some troubleshooting tips for common issues:
- Incompatible Hardware: Ensure that your Mac meets the minimum hardware requirements for VMware Fusion. Verify that your processor, RAM, and available disk space meet the recommended specifications.
- Unsupported Operating System: Check the VMware Fusion documentation to confirm that your desired guest operating system is compatible with the version of VMware Fusion you are using. Consider upgrading to the latest version if necessary.
- Incorrect Installation Media: Check that you have the correct installation media or ISO file for the operating system you intend to install on the virtual machine. If the installation media is damaged or corrupt, obtain a new copy.
- Insufficient Storage: Make sure you allocate enough storage space for the virtual machine. If you run into storage limitations, consider increasing the allocated disk space or freeing up disk space on your Mac.
- Network Connectivity Issues: If the virtual machine is unable to connect to the network, check the network settings in VMware Fusion. Ensure that the correct network mode is selected (bridged, NAT, or host-only) based on your network requirements.
- Installation Freezing or Hanging: If the virtual machine’s installation process freezes or hangs, restart the virtual machine and try the installation again. If the issue persists, check the installation media for any errors or try reinstalling VMware Fusion.
- Operating System Not Booting: If the installed operating system does not boot, ensure that the virtual machine settings have been configured correctly. Double-check the boot order, disk configuration, and BIOS settings in the virtual machine’s settings.
- Performance Issues: If you experience slow performance or lag within the virtual machine, ensure that your Mac has sufficient resources allocated to VMware Fusion. Consider adjusting the settings such as processor cores, memory allocation, and display settings to optimize performance.
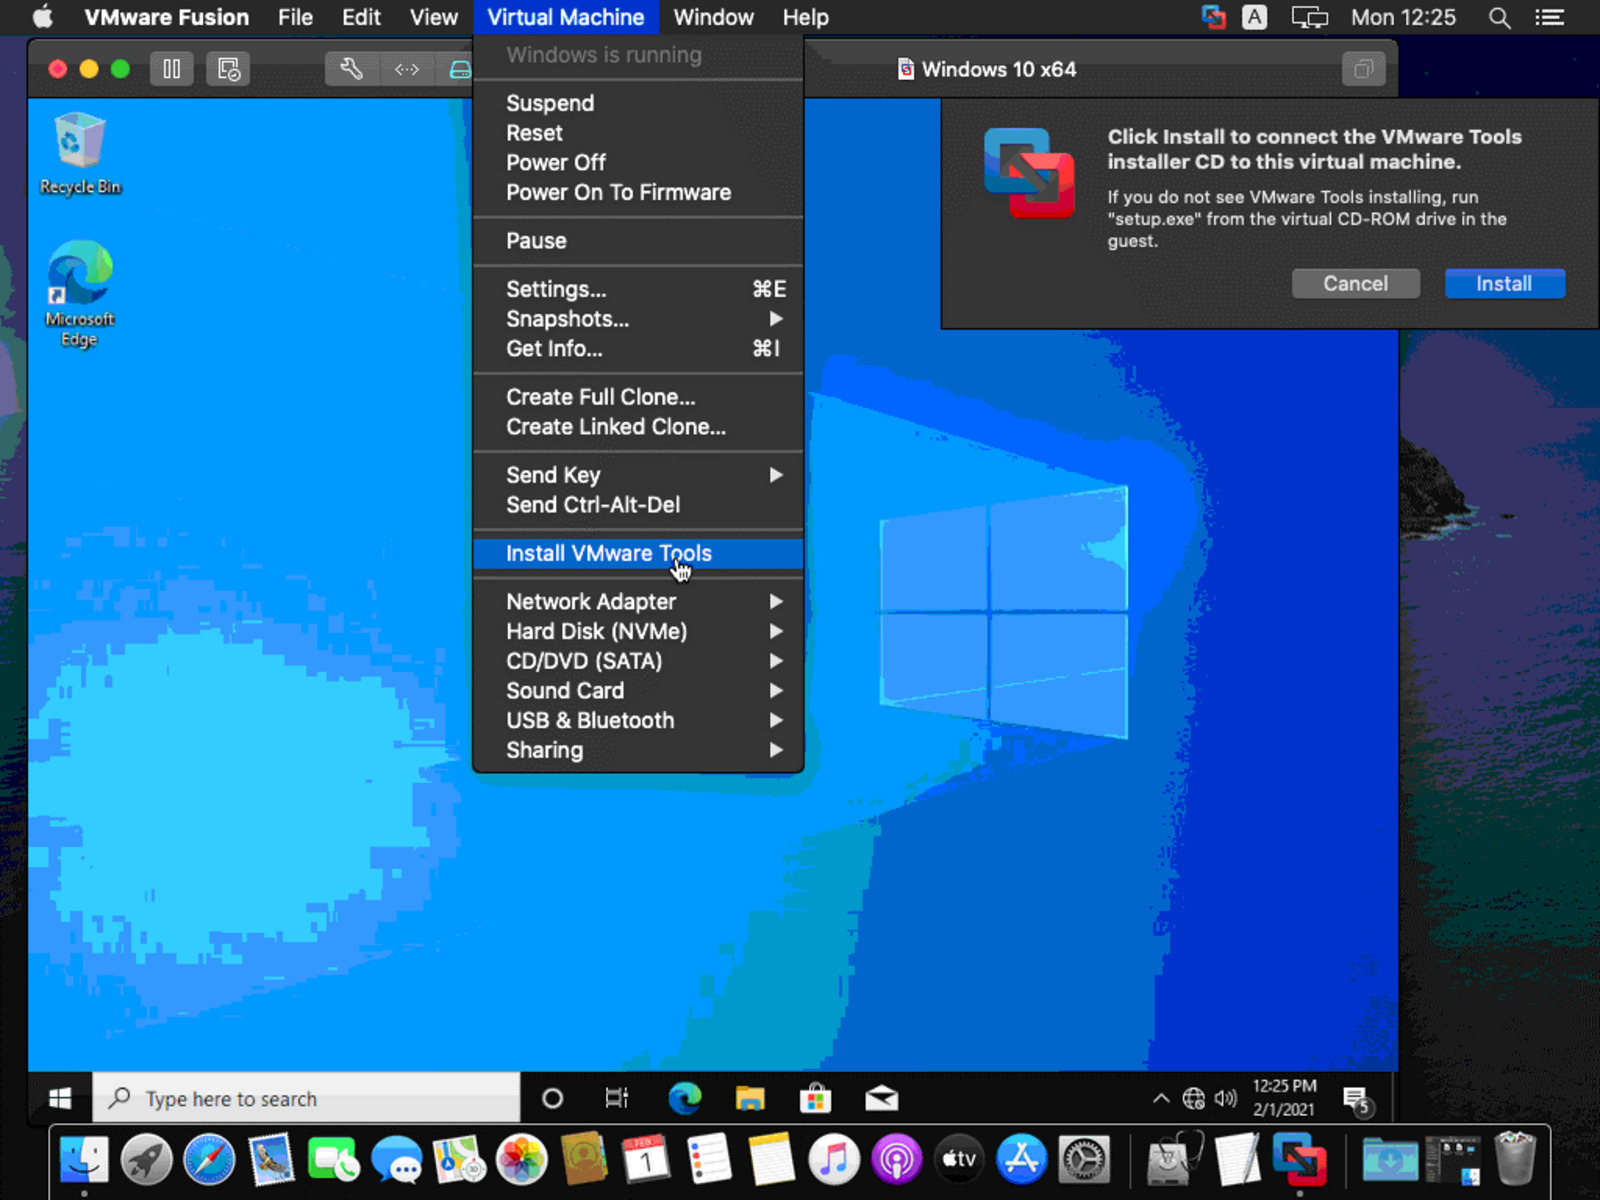
- Guest Additions Not Installed: Install the VMware Tools or Guest Additions within the virtual machine to enhance its performance and enable seamless integration between the host and virtual machine.
- Error Messages: Pay attention to any error messages or prompts that appear during the virtual machine creation process. Take note of the error message and consult the VMware Fusion documentation or search online for possible solutions.
By troubleshooting these common issues, you can overcome obstacles that may arise during the virtual machine creation process. Refer to VMware Fusion’s documentation, community forums, or contact VMware support for additional guidance when encountering persistent or unique issues.
Tips for Optimizing the Performance of Your Virtual Machine
A well-optimized virtual machine can provide a seamless and efficient computing experience. To ensure that your virtual machine is running at its best performance, consider the following tips:
- Allocate Sufficient Resources: Assign enough RAM, CPU cores, and disk space to the virtual machine to meet the requirements of the operating system and applications running within it.
- Keep Your Mac Updated: Regularly update your macOS to the latest version and install the latest software updates for VMware Fusion. Keeping your system updated ensures compatibility and can improve performance.
- Optimize Virtual Machine Settings: Fine-tune the virtual machine settings based on your specific needs. Adjust the display settings, network configuration, and hardware allocation to optimize performance for your workload.
- Enable Nested Virtualization: If your virtual machine requires running other virtual machines within it, enable nested virtualization in the virtual machine settings to allow for optimal performance.
- Install VMware Tools or Guest Additions: Install the VMware Tools or Guest Additions within the virtual machine. These tools provide essential drivers and utilities for better performance and seamless integration between the host and guest systems.
- Use Solid-State Drive (SSD) Storage: If possible, store your virtual machines on an SSD for improved read and write speeds. SSDs can significantly enhance the performance of disk-intensive operations.
- Minimize Background Processes: Close unnecessary programs and processes on both your Mac and virtual machine to free up system resources and optimize performance.
- Manage Snapshot Usage: Snapshots can consume a significant amount of disk space and impact performance. Use snapshots sparingly and delete unnecessary snapshots to maintain optimal performance.
- Monitor CPU and Memory Usage: Keep an eye on the CPU and memory usage within the virtual machine. If resource utilization is consistently high, consider adjusting the allocation or upgrading your hardware if possible.
- Avoid Overloading the Host System: Be mindful of running resource-intensive applications simultaneously on both your Mac and virtual machine. This can strain the system resources and impact the overall performance of both environments.
By implementing these tips, you can optimize the performance of your virtual machine and ensure a smooth and efficient computing experience. Experiment with different settings and configurations to find the best balance for your specific needs and workload.
Managing and Accessing Your Virtual Machine through VMware Fusion
Once you have created a virtual machine in VMware Fusion, it’s important to know how to effectively manage and access it. VMware Fusion provides various features and functionalities to enhance your virtual machine experience. Here’s how you can manage and access your virtual machine:
- Power On and Shut Down: Use the Power On button within VMware Fusion to start your virtual machine. Similarly, shut down the virtual machine by selecting the Power Off option from the virtual machine menu.
- Pause and Resume: Pause the virtual machine when you need to temporarily stop its operations without shutting it down. Resume the virtual machine to continue working from where you left off.
- Take Snapshots: VMware Fusion allows you to take snapshots of your virtual machine at any point in time. Snapshots capture the virtual machine’s state, enabling you to revert back to that point if needed.
- Manage Virtual Hardware: If you need to make changes to the virtual machine’s hardware settings, such as adding or removing devices, accessing the virtual machine settings through VMware Fusion allows you to make these adjustments easily.
- Install Applications: Install applications within the virtual machine just as you would on a physical computer. This allows you to use the virtual machine for specific tasks or run applications that are not compatible with your host operating system.
- Monitor Performance: Keep an eye on the virtual machine’s performance by using the performance monitoring tools provided by VMware Fusion. This allows you to identify and address any performance issues that may arise.
- Manage Storage: If you need to allocate more storage or add additional virtual hard disks, you can manage the storage for your virtual machine through the virtual machine settings in VMware Fusion.
- Access Shared Folders: Utilize shared folders to easily transfer files between your Mac and the virtual machine. Any files saved to a shared folder on your Mac can be accessed from within the virtual machine.
- Integration with Mac Apps: VMware Fusion offers seamless integration with your Mac. You can configure options to allow drag and drop functionality, copy and paste text, and share clipboard content between your Mac and virtual machine.
- Manage Multiple Virtual Machines: If you have multiple virtual machines, VMware Fusion provides a convenient library feature to help manage and organize them. Easily switch between different virtual machines without the need to close and reopen the application.
By utilizing the management and accessibility features available in VMware Fusion, you can effectively control and maximize the capabilities of your virtual machine. Whether it’s adjusting hardware settings, installing applications, or utilizing shared folders, VMware Fusion empowers you to have a seamless and efficient virtualization experience.