
What is HDMI?
High-Definition Multimedia Interface (HDMI) is a cutting-edge technology that revolutionizes the way we connect audio/video devices such as televisions, set-top boxes, Blu-ray players, and gaming consoles. HDMI carries both high-definition video and audio signals through a single cable, eliminating the need for multiple cables and simplifying the setup process. This digital connection ensures superior picture and sound quality, providing an immersive entertainment experience.
Unlike older analog connections, such as composite or component cables, HDMI delivers uncompressed, pure digital signals. This means that there is no loss of quality or degradation during transmission, resulting in crystal-clear images and high-fidelity sound. HDMI also supports the latest high-definition video formats, including 4K Ultra HD, HDR (High Dynamic Range), and 3D, allowing you to enjoy content in stunning detail and vibrant colors.
One of the major advantages of HDMI is its compatibility with both audio and video signals. With just one cable, you can transmit both stereo and multi-channel audio formats, such as Dolby Digital and DTS, directly to your home theater system. This ensures an immersive audio experience that complements the high-definition visuals, making you feel like you’re part of the action.
HDMI cables are available in different versions, each designated by a number (e.g., HDMI 1.4, HDMI 2.0). These versions offer different features and capabilities, such as increased bandwidth for higher video resolutions and support for advanced audio formats. It’s important to select the appropriate HDMI cable version based on your specific needs and the capabilities of your devices.
Furthermore, HDMI is a universal standard supported by the majority of modern audio/video equipment. Whether you have a new HDTV, a game console, a Blu-ray player, or any other HDMI-enabled device, you can easily connect them using HDMI cables. This versatility makes HDMI the go-to connection option for enthusiasts and professionals alike, ensuring seamless integration and compatibility.
In summary, HDMI is a state-of-the-art technology that simplifies and enhances the way we connect and enjoy our audio/video devices. It provides superior picture and sound quality, supports the latest high-definition formats, and eliminates the hassle of using multiple cables. Whether you’re a home theater enthusiast or a casual viewer, HDMI is the key to unlocking an immersive and enjoyable entertainment experience.
Benefits of Using HDMI
Using HDMI for your audio/video connections offers a multitude of benefits that enhance your viewing and listening experience. Let’s dive into some of the key advantages of using HDMI.
1. High-Quality Video and Audio: HDMI delivers uncompressed, digital signals, ensuring pristine video and audio quality. You can enjoy stunning visuals with resolutions up to 4K Ultra HD, HDR (High Dynamic Range) for enhanced contrast and color, and immersive surround sound audio formats like Dolby Atmos.
2. Simplicity and Convenience: With HDMI, you only need one cable to connect your devices, eliminating the clutter of multiple cables. This streamlined setup makes it easy to connect your HDTV to various sources like Blu-ray players, game consoles, and set-top boxes.
3. Plug and Play: HDMI is a plug-and-play technology, meaning you don’t need to configure any settings or install additional software. Simply connect your devices with HDMI cables, and they will automatically recognize and communicate with each other.
4. Compatibility: HDMI is a widely adopted standard, ensuring compatibility across a broad range of audio/video devices. Whether you have the latest HDTV or an older model, chances are it will have HDMI inputs, allowing you to connect and enjoy your devices seamlessly.
5. Audio Return Channel (ARC): HDMI cables with ARC support enable bidirectional audio transmission between your TV and other devices, such as soundbars or AV receivers. This eliminates the need for additional audio cables and simplifies your audio setup.
6. Consumer Electronics Control (CEC): HDMI devices often come with CEC functionality, which enables you to control multiple devices using a single remote. For example, you can power on/off your TV and adjust the volume of your soundbar or home theater system, all with one remote control.
7. Future-Proof Technology: HDMI continues to evolve and improve with each new version. Newer versions offer increased bandwidth to support higher video resolutions, advanced color spaces, and improved audio formats. Choosing HDMI ensures that your devices are ready for the latest advancements in audio/video technology.
In summary, HDMI provides superior audio and visual quality, simplifies your setup, offers broad compatibility, and comes with additional features like ARC and CEC. By connecting your audio/video devices using HDMI cables, you can elevate your entertainment experience to new heights. Say goodbye to tangled cables and subpar connections – HDMI is your ticket to a seamless and immersive audio/video experience.
Choosing the Right HDMI Cable
When it comes to selecting an HDMI cable, it’s important to consider a few key factors to ensure optimal performance and compatibility with your devices. Here are some things to keep in mind when choosing the right HDMI cable.
1. HDMI Version: HDMI cables come in different versions, such as HDMI 1.4, HDMI 2.0, and HDMI 2.1. The version you choose should be based on the capabilities of your devices. If you have a 4K Ultra HD TV or plan to upgrade to one in the future, make sure to select an HDMI cable that supports the appropriate version for 4K content.
2. Bandwidth: Higher bandwidth cables are capable of carrying more data, which is essential for transmitting high-resolution video and audio signals. If you’re planning to watch 4K content or use advanced features like HDR or 3D, opt for a high-speed HDMI cable that provides sufficient bandwidth for these applications.
3. Cable Length: Consider the distance between your devices and choose an HDMI cable that is long enough to reach without unnecessary strain or tension. Keep in mind that longer cables can potentially introduce signal degradation, so it’s recommended to use a shorter cable if possible.
4. Build Quality: Look for HDMI cables that are well-built and durable. Cables with gold-plated connectors and a sturdy construction help ensure a reliable connection and longevity. Additionally, consider cables with shielding to minimize electromagnetic interference and improve signal integrity.
5. Price: While it’s tempting to choose the cheapest HDMI cable available, keep in mind that quality does matter. Investing in a high-quality cable can result in better performance and longevity. That being said, there is no need to overspend on ultra-expensive cables unless you have specific professional requirements.
6. Brand Reputation: Opt for HDMI cables from reputable brands with a proven track record in manufacturing high-quality audio/video products. Well-known brands often provide warranties and customer support to ensure customer satisfaction.
7. Certifications and Standards: Look for HDMI cables that are certified by HDMI Licensing LLC. These certified cables undergo rigorous testing to ensure compliance with HDMI standards and deliver reliable performance.
Remember, while there are variations in HDMI cable pricing, there is generally no significant difference in performance between expensive and reasonably priced cables as long as they meet the necessary specifications. Avoid falling for marketing gimmicks that promise exaggerated benefits associated with pricey cables.
By carefully considering the version, bandwidth, build quality, cable length, price, brand reputation, and certifications, you can select the right HDMI cable that meets your specific needs and provides a reliable and high-performance audio/video connection.
Connecting the HDMI Cable to Your HDTV
Connecting your HDMI cable to your HDTV is a straightforward process that requires minimal effort. Follow these steps to ensure a successful connection:
1. Identify HDMI Ports: Locate the HDMI input ports on your HDTV. They are usually labeled “HDMI” or have an HDMI icon next to them. HDTVs typically have multiple HDMI ports, so choose an available one for your connection.
2. Power Off all Devices: Before making any connections, ensure that your HDTV and other devices, such as set-top boxes or gaming consoles, are turned off. This will prevent any potential damage to the devices during the connection process.
3. Connect the HDMI Cable: Take one end of the HDMI cable and insert it into the HDMI output port on your set-top box or other video source device. Ensure that the cable is securely connected.
4. Connect the Other End: Now, insert the other end of the HDMI cable into one of the HDMI input ports on your HDTV. Make sure to insert it fully until it clicks into place, ensuring a secure connection.
5. Select the HDMI Input: Using the remote control of your HDTV, change the input source to the HDMI port that you connected the cable to. This can usually be done by pressing the “Input” or “Source” button and selecting the appropriate HDMI input.
6. Power On and Configure Devices: Turn on your HDTV and the connected set-top box or other devices. Your HDTV should detect the HDMI connection and display the content from the connected device. If not, check the connections and ensure that all devices are properly powered on.
7. Adjust Display Settings: Once the HDMI connection is established, navigate to the settings menu on your HDTV or the connected device to adjust the display settings. This may include selecting the appropriate display resolution, aspect ratio, or color profile for optimal viewing.
8. Test and Enjoy: Finally, play a video or check the input source on your HDTV to confirm that everything is working correctly. You should now be able to enjoy high-definition video and immersive audio through your HDTV.
Remember to keep the HDMI cable and connectors clean and dust-free to maintain a reliable connection. If you experience any issues, such as loss of signal or audio/video problems, try reseating the HDMI cable or using a different HDMI port on your HDTV.
By following these simple steps, you can successfully connect your HDMI cable to your HDTV and unlock the full potential of high-definition audio and video. Enjoy a seamless and immersive entertainment experience right in the comfort of your own home.
Connecting the HDMI Cable to Your Set-Top Box
Connecting your HDMI cable to your set-top box allows you to enjoy high-quality audio and video content on your HDTV. Follow these simple steps to connect the HDMI cable to your set-top box:
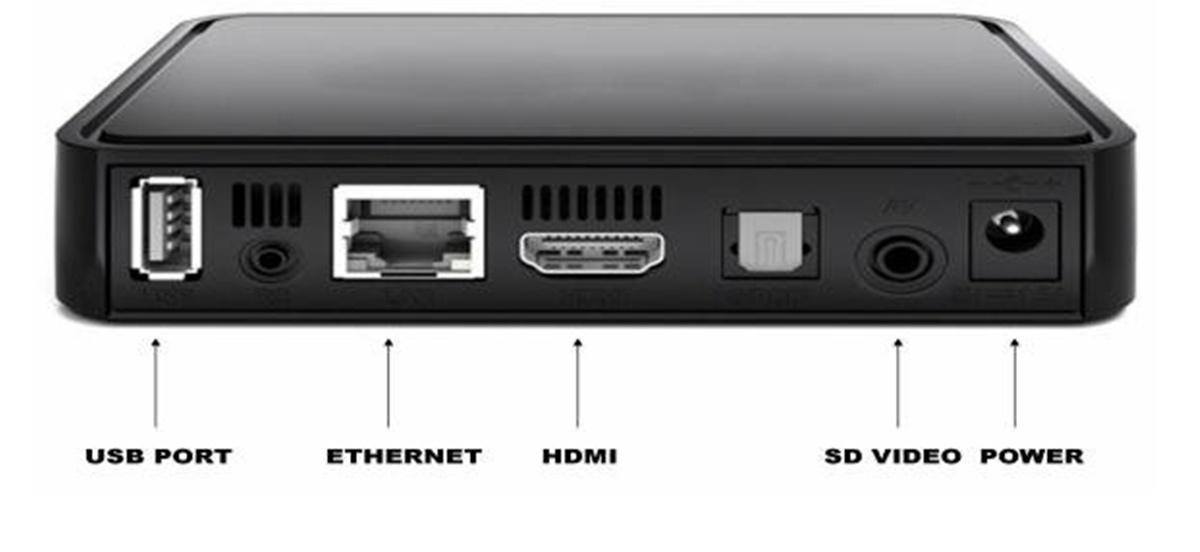
1. Identify HDMI Output: Locate the HDMI output port on your set-top box. It is usually labeled “HDMI” or has an HDMI icon next to it. This is where you will connect one end of the HDMI cable.
2. Power Off your Set-Top Box: Before making any connections, ensure that your set-top box is turned off. This will prevent any potential damage to the devices during the connection process.
3. Connect the HDMI Cable: Take one end of the HDMI cable and insert it into the HDMI output port on your set-top box. Make sure the cable is securely connected.
4. Identify HDMI Input on your HDTV: On your HDTV, locate the HDMI input port where you want to connect the set-top box. These ports are usually labeled “HDMI” or have an HDMI icon next to them. Take note of the HDMI input number or label.
5. Connect the Other End of the HDMI Cable: Take the other end of the HDMI cable and insert it into the HDMI input port on your HDTV that corresponds to the set-top box. Insert it fully until it clicks into place, ensuring a secure connection.
6. Select the HDMI Input: Using the remote control of your HDTV, change the input source to the HDMI port that you connected the set-top box to. This can usually be done by pressing the “Input” or “Source” button and selecting the appropriate HDMI input.
7. Power On your Set-Top Box: Turn on your set-top box and wait for it to boot up. Your HDTV should detect the HDMI connection and display the content from the set-top box. If not, check the connections and ensure that both the set-top box and the HDTV are properly powered on.
8. Configure Set-Top Box: Follow the on-screen instructions on your set-top box to complete the initial setup, including selecting your language, connecting to Wi-Fi or cable network, and scanning for channels if necessary.
9. Test and Enjoy: Finally, test the connection by navigating through the set-top box menus or selecting a channel. You should see and hear the content on your HDTV. Adjust the volume and picture settings on your HDTV as desired for the best viewing experience.
If you encounter any issues with the HDMI connection, try reseating the HDMI cable on both the set-top box and the HDTV. Additionally, ensure that the HDMI cable is not damaged or frayed.
By following these steps, you can easily connect the HDMI cable to your set-top box and enjoy a wide range of audio and video content on your HDTV. Get ready for an immersive entertainment experience right in your living room!
Setting Up Your HDTV for HDMI Connection
Setting up your HDTV for an HDMI connection is a crucial step to ensure optimal performance and to take full advantage of the exceptional audio and video quality HDMI offers. Follow these steps to properly configure your HDTV for HDMI connection:
1. Power On your HDTV: Ensure your HDTV is powered on and ready for setup.
2. Navigate to the Settings Menu: Using your HDTV remote, locate the menu or settings button and press it to access the settings menu.
3. Select the Input Source: In the settings menu, locate the input source option. This may be labeled as “Input,” “Source,” or something similar. Select the option that corresponds to the HDMI input where you connected the HDMI cable.
4. Enable HDMI Control (CEC): Many HDTVs have a HDMI Control (CEC) option that allows communication between your HDTV and connected devices. Enable this feature in your settings menu to enable convenient control of multiple devices using a single remote.
5. Configure Audio Settings: In the settings menu, locate the audio settings option. Ensure that the audio output is set to HDMI or HDMI ARC (Audio Return Channel) to ensure that audio is transmitted through the HDMI cable to your audio device.
6. Adjust Picture Settings: Navigate to the picture settings in the menu and adjust them to your preference. This may include options such as brightness, contrast, color saturation, and sharpness. Experiment with these settings to achieve the best visuals for your viewing experience.
7. Set Display Resolution: In the settings menu, locate the display or video settings option. Set the display resolution to match the capabilities of your HDTV and content source. If you have a 4K Ultra HD TV, ensure that the resolution is set to 3840×2160 for optimal 4K content playback.
8. Enable HDR (High Dynamic Range): If your HDTV supports HDR, enable this feature in the settings menu. HDR enhances the contrast and range of colors, providing a more immersive and lifelike viewing experience.
9. Save and Exit: Once you have made the necessary adjustments and configurations, navigate to the option to save your settings and exit the menu.
10. Test HDMI Connection: Playback a sample video or try accessing content from your connected device to verify that the HDMI connection is working correctly. Check both the audio and video quality, and make further adjustments if necessary.
If you experience any issues with the HDMI connection, double-check the HDMI cable connections and ensure that all devices are properly powered on. Additionally, refer to the user manual of your HDTV for specific instructions on HDMI setup and troubleshooting.
By following these steps, you can properly set up your HDTV for HDMI connection, allowing you to enjoy stunning visuals and immersive audio. Take the time to fine-tune the settings to your preference, and get ready to experience your favorite movies, TV shows, and games like never before.
Troubleshooting HDMI Connection Issues
While HDMI technology offers a seamless audio and video connection experience, occasional issues may arise that disrupt the connection. Here are some troubleshooting steps to resolve common HDMI connection issues:
1. Check Cable Connections: Ensure that both ends of the HDMI cable are securely connected to the respective HDMI ports on your HDTV and the connected device. Sometimes, loose connections can cause intermittent or no signal at all.
2. Try Different HDMI Ports: If you have multiple HDMI ports on your HDTV, try connecting the cable to a different port. It’s possible that a particular port is not functioning properly, and using a different one can solve the issue.
3. Restart Connected Devices: Power off both your HDTV and the device connected via HDMI. Unplug the power cords from both devices, wait for a few seconds, and then plug them back in. This can reset the devices and resolve any temporary issues.
4. Test with Another HDMI Cable: If possible, try using a different HDMI cable to eliminate the possibility of a faulty cable. It’s not uncommon for cables to become damaged over time or during handling, which can result in signal loss or other issues.
5. Enable HDMI Control (CEC): If your HDTV and connected devices support HDMI Control (CEC), ensure that it is enabled in both the TV and the device settings. This allows for convenient control of multiple devices using a single remote.
6. Verify HDMI Version Compatibility: Ensure that the HDMI version supported by both your HDTV and the connected device is compatible. Incompatibilities between different HDMI versions can lead to connection issues or limited functionality.
7. Update Firmware or Drivers: Check for firmware updates for both your HDTV and the connected device. Manufacturers often release updates that address compatibility issues and improve overall HDMI performance.
8. Check HDMI Settings: Verify that the HDMI settings on your HDTV and the connected device are properly configured. Ensure that the audio output is set to HDMI, the display resolution matches your HDTV’s capabilities, and any advanced features like HDR are enabled if applicable.
9. Reset HDTV to Factory Settings: If none of the above steps work, you can try resetting your HDTV to its factory settings. This will revert all settings back to their default values and may resolve any lingering HDMI connection issues. Refer to the user manual of your HDTV for instructions on how to perform a factory reset.
10. Consult Professional Support: If you have exhausted all troubleshooting steps and the HDMI connection issue persists, it may be best to contact the manufacturer’s support or seek assistance from a professional technician. They can provide more specific guidance and help diagnose and resolve the issue.
By following these troubleshooting steps, you can often resolve HDMI connection issues and restore a seamless audio and video experience. Remember to be patient and methodical in your troubleshooting approach, and don’t hesitate to seek professional help if needed.