
Step 1: Charge Your Selfie Stick
Before embarking on your selfie adventure, it’s crucial to ensure that your selfie stick is adequately charged. Most selfie sticks come with a built-in rechargeable battery, so it’s essential to power it up before use. Here’s a step-by-step guide to charging your selfie stick:
- Locate the Charging Port: Depending on the model of your selfie stick, the charging port may be concealed beneath a small cover or located at the base of the handle. Take a moment to familiarize yourself with the design of your selfie stick to pinpoint the charging port.
- Connect the Charging Cable: Once you’ve located the charging port, use the provided USB cable to connect your selfie stick to a power source. This could be a USB port on your computer, a wall adapter, or a portable power bank. Ensure that the cable is securely plugged in to initiate the charging process.
- Monitor the Charging Indicator: Many selfie sticks are equipped with a small LED indicator light near the charging port. This light typically changes color or blinks to signify the charging status. Refer to the user manual to understand the specific indications for your selfie stick.
- Allow Sufficient Charging Time: Depending on the remaining battery level, it may take anywhere from 1 to 3 hours to fully charge your selfie stick. It’s advisable to let it charge uninterrupted to ensure optimal performance during your photo sessions.
- Unplug and Prepare for Use: Once the charging indicator confirms that the selfie stick is fully charged, disconnect the charging cable and prepare to embark on your photography escapades. Your selfie stick is now ready to be paired with your smartphone for capturing picture-perfect moments.
By following these simple steps to charge your selfie stick, you can ensure that it’s powered up and ready to capture your favorite memories. With the battery fully charged, you’re all set to elevate your selfie game and effortlessly capture stunning photos from unique perspectives.
Step 2: Turn on Your Selfie Stick
Once your selfie stick is fully charged, the next step is to power it on and prepare it for pairing with your smartphone. Turning on your selfie stick is a straightforward process, but it’s essential to follow the specific instructions for your model. Here’s a simple guide to help you get started:
- Locate the Power Button: Depending on the design of your selfie stick, the power button may be positioned on the handle or integrated into the base. Take a moment to identify the power button to ensure a smooth activation process.
- Press and Hold the Power Button: To turn on your selfie stick, press and hold the power button for a few seconds until you see a visible indicator light or hear a sound indicating that the device is powered on. Refer to the user manual for any specific instructions related to the power-up process.
- Confirm Power Status: Once the selfie stick is powered on, look for visual or audible cues that signify its operational status. This could be a steady LED light, a blinking indicator, or a sound prompt, depending on the design of your selfie stick.
- Prepare for Pairing: With your selfie stick powered on, it’s now ready to be paired with your smartphone via Bluetooth. Keep the device within the recommended range for Bluetooth connectivity to ensure a seamless pairing process.
By following these steps to power on your selfie stick, you’re one step closer to capturing memorable moments with ease. With the device activated and ready for pairing, you’re poised to unleash your creativity and capture stunning selfies and group photos in various settings.
Step 3: Enable Bluetooth on Your Phone
Before you can connect your selfie stick to your smartphone, it’s essential to ensure that Bluetooth is enabled on your device. Bluetooth technology allows for seamless wireless communication between your phone and the selfie stick, enabling you to remotely capture photos with ease. Here’s a simple guide to enabling Bluetooth on your smartphone:
- Access the Settings Menu: Depending on your smartphone’s operating system, navigate to the settings menu, typically represented by a gear icon. This menu allows you to customize various aspects of your phone’s functionality, including wireless connectivity options.
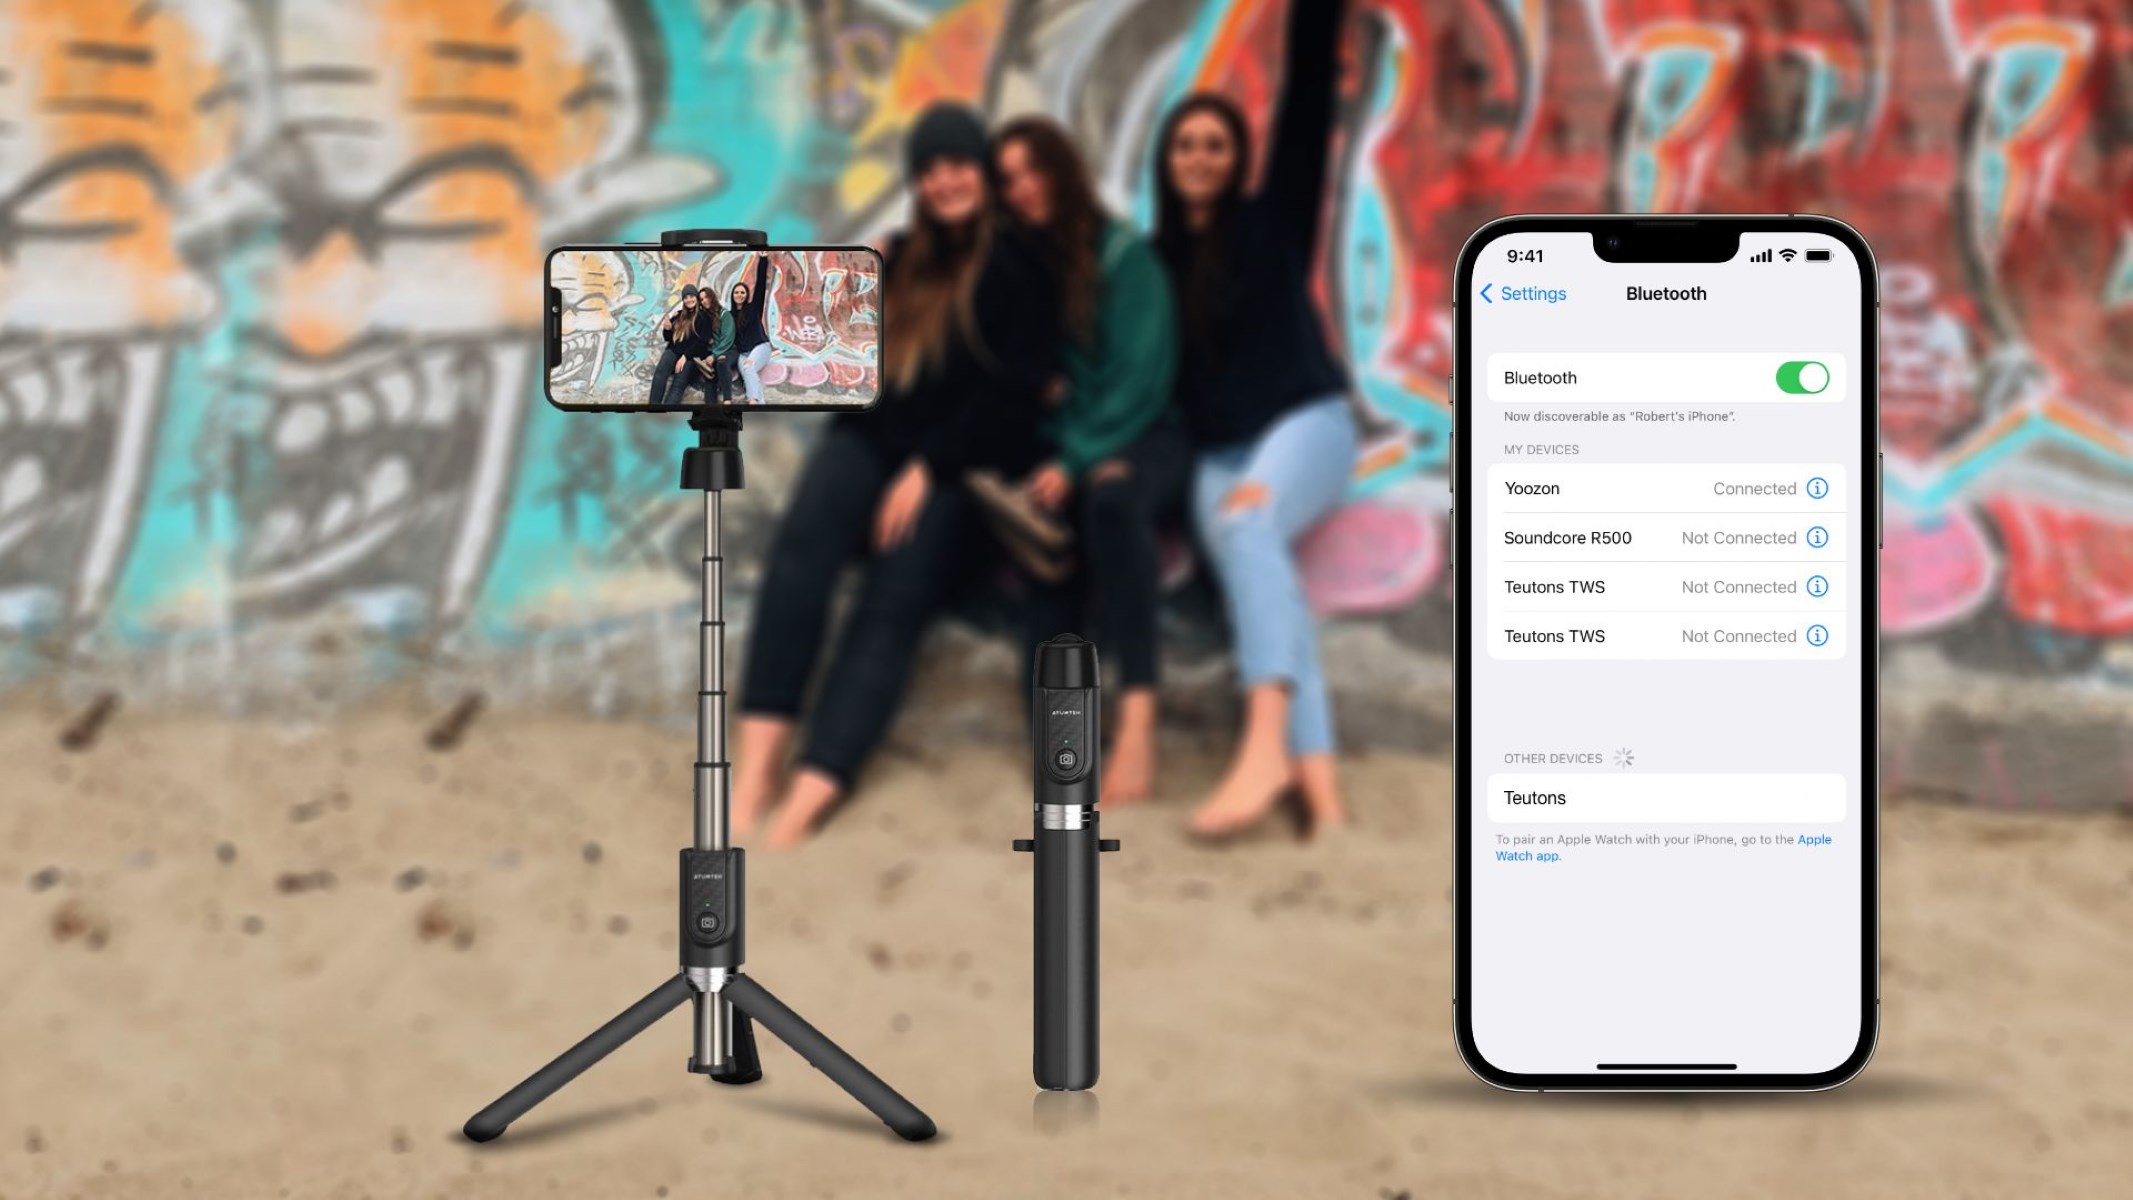
- Locate and Select Bluetooth: Within the settings menu, locate the option for Bluetooth connectivity. It’s often represented by the Bluetooth symbol and may be found under the “Connections,” “Wireless & Networks,” or a similar category, depending on your device’s interface.
- Toggle Bluetooth On: Once you’ve accessed the Bluetooth settings, toggle the switch or button to enable Bluetooth functionality on your smartphone. When Bluetooth is turned on, your phone is ready to discover and connect to nearby Bluetooth devices, including your selfie stick.
- Wait for Bluetooth Activation: After enabling Bluetooth, your smartphone will actively scan for nearby Bluetooth devices. This process allows your phone to detect and display available devices, including your selfie stick, in the list of available connections.
- Keep Bluetooth Active: It’s important to keep Bluetooth enabled on your smartphone throughout the pairing and photo-capturing process. This ensures continuous communication between your phone and the selfie stick, allowing for seamless control and photo capture.
By following these steps to enable Bluetooth on your smartphone, you’re setting the stage for effortless connectivity with your selfie stick. With Bluetooth activated, you’re ready to pair your phone with the selfie stick and unleash the full potential of remote photography, capturing stunning moments with ease.
Step 4: Pair Your Selfie Stick with Your Phone
Now that your smartphone’s Bluetooth is enabled, it’s time to pair it with your selfie stick. This seamless pairing process allows your phone to communicate wirelessly with the selfie stick, enabling you to capture photos remotely with ease. Here’s a step-by-step guide to pairing your selfie stick with your phone:
- Activate Pairing Mode on the Selfie Stick: Depending on the model of your selfie stick, there may be a specific button or sequence to activate pairing mode. Refer to the user manual to understand the precise steps for initiating the pairing process. This typically involves pressing and holding a designated button until the indicator light flashes or changes to indicate pairing mode.
- Access Bluetooth Settings on Your Phone: Open the Bluetooth settings on your smartphone to begin the pairing process. Your phone will scan for nearby Bluetooth devices, including the selfie stick, which should appear in the list of available connections.
- Select the Selfie Stick: Within the list of available Bluetooth devices, locate and select the entry that corresponds to your selfie stick. This initiates the pairing process, establishing a secure wireless connection between your phone and the selfie stick.
- Confirm Pairing on the Selfie Stick: Once you’ve selected the selfie stick on your phone, the pairing process will prompt the selfie stick to confirm the connection. This may be indicated by a sound or visual cue on the selfie stick, signaling that the pairing is successful.
- Verify Connected Status: After the successful pairing, your phone will display a confirmation message, indicating that the selfie stick is now connected and ready for use. This ensures that your phone and the selfie stick are in sync, allowing for seamless remote photo capture.
By following these steps to pair your selfie stick with your phone, you’ve established a wireless connection that empowers you to capture stunning photos with ease. With the devices successfully paired, you’re ready to harness the full potential of your selfie stick and elevate your photography experience to new heights.
Step 5: Open Your Camera App
With your selfie stick successfully paired with your phone, it’s time to prepare for capturing memorable moments by opening your camera app. Whether you’re using the native camera app or a third-party photography application, accessing the camera interface sets the stage for effortless photo capture. Here’s a simple guide to opening your camera app and preparing for stunning shots:
- Locate the Camera App Icon: Navigate to your phone’s home screen or app drawer to locate the camera app icon. It’s typically represented by a simple camera symbol and is easily recognizable among your installed applications.
- Tap the Camera App Icon: Once you’ve located the camera app icon, tap on it to launch the camera interface. This action opens the camera app, allowing you to access various photography modes, settings, and controls.
- Position the Camera for Capture: With the camera app open, ensure that your phone is securely mounted on the selfie stick and positioned for the desired photo composition. Adjust the angle and orientation to frame your shot precisely before initiating the capture.
- Explore Camera Features: Familiarize yourself with the features and settings available within the camera app. This may include adjusting exposure, selecting photo or video mode, enabling filters, or accessing additional shooting options based on your preferences and creative vision.
- Ready to Capture: Once you’ve set up the camera app and positioned your phone on the selfie stick, you’re now ready to capture stunning photos or videos. Utilize the remote shutter button on the selfie stick to initiate the capture without physically touching your phone, ensuring stable and shake-free shots.
By following these steps to open your camera app and prepare for photo capture, you’re equipped to unleash your creativity and immortalize memorable moments with ease. With the camera app at your fingertips and the selfie stick in position, you’re ready to embark on a photography journey filled with captivating shots and cherished memories.
Step 6: Extend Your Selfie Stick and Take a Photo
As you prepare to capture stunning photos, extending your selfie stick to the desired length and mastering the art of remote photo capture are essential steps in achieving picture-perfect results. Here’s a detailed guide to extending your selfie stick and effortlessly capturing photos:
- Securely Extend the Selfie Stick: Grasp the handle of the selfie stick and extend it to your preferred length, ensuring that each section locks securely in place. Most selfie sticks feature telescopic extensions that allow for versatile positioning, enabling you to capture wide-angle shots or elevate the perspective for unique compositions.
- Adjust the Angle and Orientation: Once the selfie stick is extended, fine-tune the angle and orientation of your phone to frame the perfect shot. Whether you’re capturing a group selfie, a scenic landscape, or a dynamic action shot, adjusting the position of the selfie stick allows you to achieve the desired composition with ease.
- Utilize the Remote Shutter Button: With your phone securely mounted on the selfie stick, utilize the remote shutter button to capture photos effortlessly. The remote button allows you to initiate the photo capture without physically touching your phone, ensuring stability and minimizing the risk of camera shake for crisp, clear images.
- Experiment with Perspectives: Embrace the versatility of the extended selfie stick to experiment with unique perspectives and compositions. Whether you’re capturing overhead shots, wide-angle group photos, or dynamic action sequences, the extended selfie stick empowers you to unleash your creativity and elevate your photography game.
- Review and Refine: After capturing a series of photos, take a moment to review and refine your shots within the camera app. This allows you to assess the composition, adjust settings if necessary, and ensure that you’ve captured the desired moments with precision and artistry.
By following these steps to extend your selfie stick and capture photos with finesse, you’re ready to embark on a photography journey filled with creativity and visual storytelling. With the extended selfie stick as your tool for capturing stunning images, you’re poised to immortalize cherished moments and elevate your photography to new heights.
Step 7: Adjust the Angle and Distance
Mastering the art of adjusting the angle and distance of your extended selfie stick is key to capturing captivating and well-composed photos. Whether you’re aiming for the perfect group shot or a breathtaking panoramic view, understanding how to optimize the angle and distance enhances the visual impact of your photographs. Here’s a comprehensive guide to adjusting the angle and distance for impeccable photo compositions:
- Fine-Tune the Angle: With your phone securely mounted on the extended selfie stick, carefully adjust the angle to frame the desired composition. Whether it’s a casual selfie, a scenic landscape, or a group photo, the angle plays a pivotal role in capturing the essence of the moment.
- Consider the Background: Pay attention to the background and surroundings as you adjust the angle. Positioning the camera to include captivating backgrounds or unique elements can add depth and visual interest to your photos, enhancing the overall storytelling aspect of your compositions.
- Optimize the Distance: Experiment with the distance of the extended selfie stick to achieve the perfect framing for your photos. Whether you’re aiming for close-up portraits or expansive wide-angle shots, adjusting the distance allows you to control the perspective and visual impact of your compositions.
- Embrace Versatility: Leverage the flexibility of the extended selfie stick to explore diverse angles and distances, allowing you to capture a wide range of compositions with finesse. Embracing versatility empowers you to unleash your creativity and capture visually compelling photos in various settings and scenarios.
- Ensure Stability and Balance: As you adjust the angle and distance, prioritize stability and balance to achieve steady and well-composed shots. Maintaining a firm grip on the selfie stick and making gradual adjustments ensures that your photos are sharp, clear, and visually engaging.
By following these steps to adjust the angle and distance of your extended selfie stick, you’re equipped to create captivating compositions that resonate with visual impact and storytelling prowess. With a keen eye for framing and a mastery of distance optimization, you’re poised to elevate your photography to new heights and capture moments with artistry and precision.
Step 8: Use the Remote Shutter Button
Utilizing the remote shutter button on your selfie stick is a game-changer when it comes to capturing photos with ease and precision. This convenient feature allows you to initiate photo capture remotely, eliminating the need to physically touch your phone and ensuring stable and shake-free shots. Here’s a comprehensive guide to using the remote shutter button for seamless photo capture:
- Locate the Remote Shutter Button: Familiarize yourself with the location of the remote shutter button on your selfie stick. It’s typically positioned on the handle within easy reach of your thumb, allowing for effortless and intuitive operation.
- Position Your Shot: Once your phone is securely mounted on the extended selfie stick, position your shot and frame the composition to your liking. Whether it’s a group photo, a scenic landscape, or a dynamic action shot, ensure that the camera is aligned for the perfect capture.
- Initiate the Capture: With the composition set, press the remote shutter button to initiate the photo capture. The remote button seamlessly triggers the camera on your phone, allowing you to capture the moment with precision and control, all without physically touching your device.
- Experiment with Timing: Explore the timing and rhythm of using the remote shutter button to capture dynamic and expressive shots. Whether it’s timed group photos, candid moments, or creative action sequences, the remote button empowers you to experiment with photo capture in diverse scenarios.
- Minimize Camera Shake: The remote shutter button minimizes the risk of camera shake, ensuring that your photos are sharp, clear, and visually compelling. By initiating the capture without physically touching your phone, you maintain stability and precision, resulting in professional-quality images.
By following these steps to use the remote shutter button on your selfie stick, you’re equipped to capture stunning photos with ease and finesse. With the convenience of remote operation and the ability to control photo capture from a distance, you’re poised to immortalize cherished moments and elevate your photography to new levels of creativity and artistry.