
Why It’s Important to Clean Your iPhone’s Top Speaker
Regular maintenance of your iPhone is crucial to ensure its longevity and optimal performance. This includes cleaning the top speaker, which often accumulates dust, debris, and other particles that can compromise the sound quality and overall functionality of your device. Neglecting to clean the speaker may lead to muffled audio, distorted sound, or even complete speaker failure. By taking the time to clean your iPhone’s top speaker, you can prevent these issues and continue enjoying clear, crisp sound during calls, music playback, and other audio activities.
Furthermore, maintaining a clean top speaker can contribute to a more hygienic and pleasant user experience. Over time, the accumulation of dirt and grime on the speaker grill can harbor bacteria and germs, which may come into contact with your ears during phone calls. Regular cleaning not only improves the audio quality but also promotes a healthier and more sanitary interaction with your device.
Additionally, a clean top speaker enhances the aesthetic appeal of your iPhone. Dust and dirt can detract from the overall sleekness and elegance of the device, whereas a well-maintained speaker grill contributes to a polished and professional appearance. Whether for personal enjoyment or professional use, a clean top speaker reflects your attention to detail and care for your technology.
Ultimately, cleaning your iPhone’s top speaker is a simple yet effective way to preserve its functionality, hygiene, and visual appeal. By incorporating this maintenance task into your regular device care routine, you can ensure that your iPhone continues to deliver exceptional audio performance and a pristine user experience.
Tools You Will Need
Before you embark on cleaning the top speaker of your iPhone, it’s essential to gather the necessary tools to ensure a thorough and safe cleaning process. Here’s what you’ll need:
- Cotton Swabs: These are instrumental in reaching the small crevices of the speaker grill and effectively removing dirt and debris without causing damage.
- Isopropyl Alcohol: A high-purity alcohol solution, typically 90% or higher, is ideal for its fast evaporation and ability to break down and dissolve grime and oils on the speaker grill.
- Microfiber Cloth: This lint-free cloth is perfect for wiping down the exterior of your iPhone after cleaning the speaker, ensuring a pristine finish without leaving behind any fibers or residue.
- Compressed Air: Using a can of compressed air allows you to dislodge any stubborn particles from the speaker grill before proceeding with the cleaning process.
By having these tools at your disposal, you can effectively and safely clean your iPhone’s top speaker, maintaining its performance and appearance without risking damage to the device.
Step 1: Power Off Your iPhone
Before initiating the cleaning process for your iPhone’s top speaker, it is imperative to power off the device. This precautionary measure ensures your safety and prevents any potential damage to the phone or the speaker itself. Here’s how to power off your iPhone:
- Press and Hold the Side Button: On newer iPhone models, such as the iPhone X and later, press and hold the side button along with one of the volume buttons until the “slide to power off” slider appears on the screen.
- Slide to Power Off: Once the slider appears, swipe it from left to right to power off your iPhone. Wait for the device to shut down completely before proceeding to the next step.
- For Older Models: On older iPhone models without a side button, press and hold the top button until the “slide to power off” slider appears, then follow the same process to turn off the device.
By powering off your iPhone, you minimize the risk of electrical mishaps and ensure that the cleaning process can be carried out safely and effectively. This simple yet crucial step sets the stage for the subsequent cleaning procedures, allowing you to maintain your iPhone’s top speaker with confidence and precision.
Step 2: Prepare a Cleaning Solution
Creating a suitable cleaning solution is essential for effectively removing dirt and grime from your iPhone’s top speaker. Here’s how you can prepare a safe and efficient cleaning solution:
- Gather Isopropyl Alcohol: Isopropyl alcohol, also known as rubbing alcohol, is a commonly recommended cleaning agent for electronic devices due to its fast evaporation and ability to dissolve oils and grime without leaving residue.
- Dilution: If you are using pure isopropyl alcohol with a concentration of 90% or higher, it is advisable to dilute it with an equal amount of water to reduce its potency and minimize the risk of any adverse effects on the device’s components.
- Mixing the Solution: Combine the isopropyl alcohol and water in a small container, such as a clean, shallow dish or a small cup, ensuring that the solution is well-mixed before proceeding to the next step.
By preparing a cleaning solution with isopropyl alcohol and water, you can effectively and safely clean the top speaker of your iPhone, removing accumulated dirt and grime without causing damage to the device. This meticulous preparation sets the stage for the subsequent steps in the cleaning process, ensuring that your iPhone’s top speaker receives the care it deserves.
Step 3: Dampen a Cotton Swab with the Cleaning Solution
With the cleaning solution prepared, the next step involves applying it to a cotton swab to facilitate the meticulous cleaning of your iPhone’s top speaker. Here’s how to dampen a cotton swab with the cleaning solution:
- Select a High-Quality Cotton Swab: Choose a soft, high-quality cotton swab that is free from loose fibers or rough edges, as these can potentially cause damage to the speaker grill.
- Dip the Cotton Swab: Carefully dip one end of the cotton swab into the prepared cleaning solution, ensuring that it absorbs an appropriate amount without becoming oversaturated.
- Wring Out Excess Solution: Gently squeeze the dampened end of the cotton swab to remove any excess cleaning solution, ensuring that it remains damp but not dripping.
By dampening a cotton swab with the cleaning solution, you equip yourself with a precise tool for targeting and removing dirt and grime from the speaker grill of your iPhone. This meticulous approach ensures that the cleaning process is thorough and effective, allowing you to maintain the optimal performance and appearance of your device’s top speaker.
Step 4: Gently Clean the Speaker Grill
Once you have prepared the cleaning solution and dampened a cotton swab, it’s time to delicately clean the speaker grill of your iPhone. Follow these steps to ensure a thorough and gentle cleaning process:
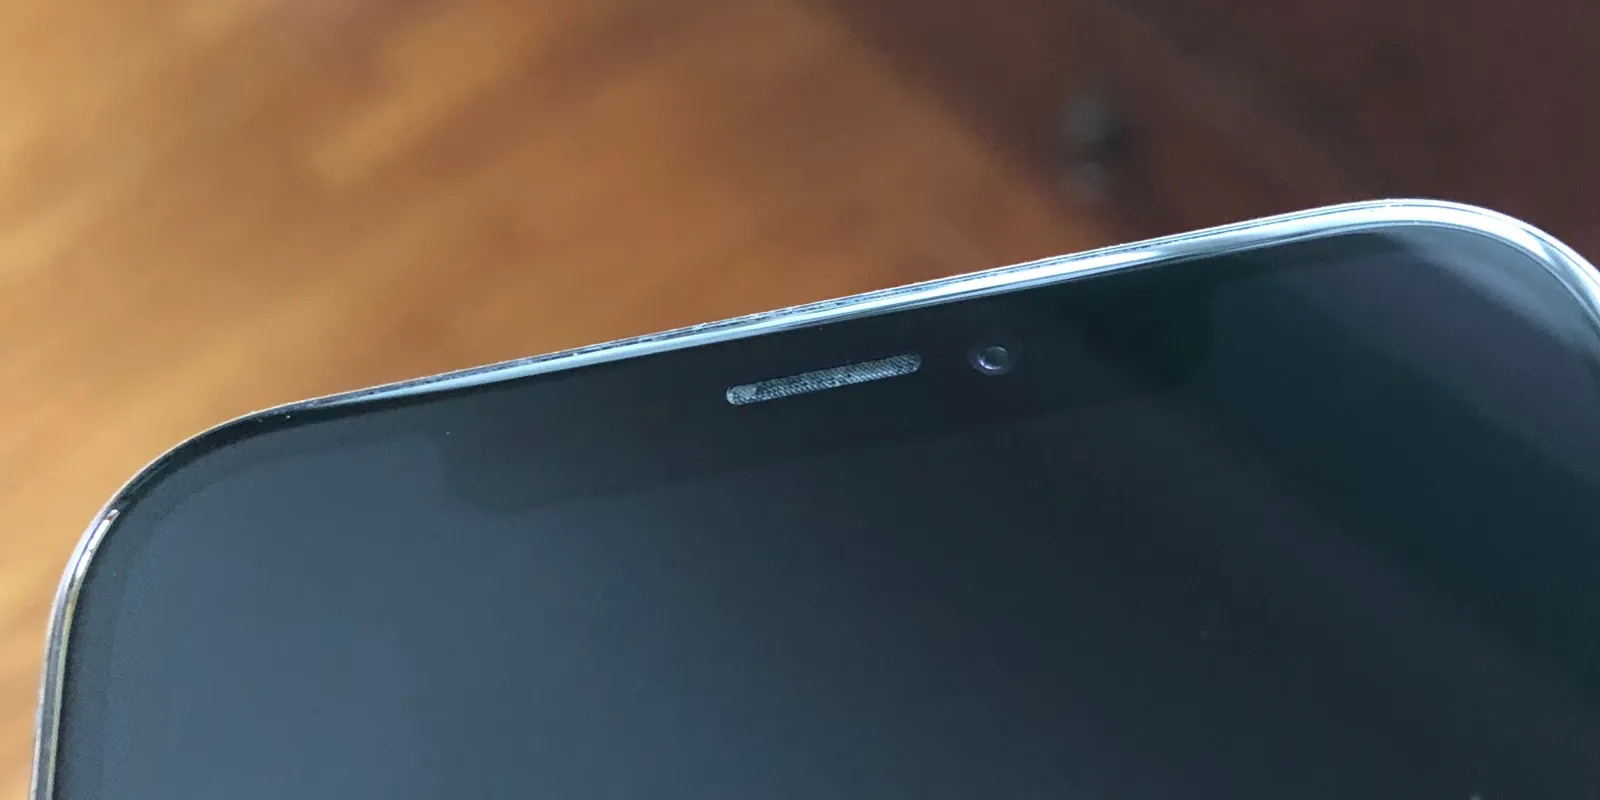
- Identify the Speaker Grill: Locate the top speaker grill on your iPhone, typically situated at the top edge of the device, and visually inspect it for any visible dirt or debris.
- Gently Swab the Grill: Using the dampened end of the cotton swab, lightly and carefully swab the speaker grill, applying gentle pressure to dislodge and remove any accumulated dirt or grime. Ensure that the swab reaches into the small crevices of the grill for comprehensive cleaning.
- Repeat as Needed: If the speaker grill exhibits persistent dirt or residue, continue swabbing with the damp cotton swab, periodically re-dampening it with the cleaning solution as necessary, until the grill is clean and free of debris.
By gently cleaning the speaker grill of your iPhone, you effectively remove accumulated dirt and grime, restoring the clarity and functionality of the top speaker. This meticulous approach ensures that your device continues to deliver exceptional audio performance, free from obstructions or impediments caused by dirt or debris.
Step 5: Let It Dry
After delicately cleaning the speaker grill of your iPhone, it’s crucial to allow the area to thoroughly dry before powering on the device. Follow these steps to ensure that the speaker grill dries effectively:
- Air Drying: Once the cleaning process is complete, refrain from using the iPhone’s speaker immediately. Instead, allow the dampened areas to air dry naturally, ensuring that any residual moisture evaporates completely.
- Patience is Key: Exercise patience during the drying process, as rushing to power on the device prematurely may result in potential damage or compromise the effectiveness of the cleaning process.
- Visual Inspection: After a reasonable amount of time has passed, visually inspect the speaker grill to ensure that it appears dry and free of any remaining moisture or cleaning solution.
By allowing the speaker grill to thoroughly dry, you safeguard the integrity of the device and the effectiveness of the cleaning process. This essential step ensures that your iPhone’s top speaker is ready to deliver pristine audio performance without any residual moisture or potential damage.
Step 6: Power On Your iPhone and Test the Speaker
Once the speaker grill has been thoroughly cleaned and allowed to dry, it’s time to power on your iPhone and test the speaker to ensure that it is functioning optimally. Follow these steps to complete the cleaning process and verify the speaker’s performance:
- Power On Your iPhone: Press and hold the side or top button of your iPhone, depending on the model, until the Apple logo appears on the screen, indicating that the device is powering on.
- Play Audio: Access a piece of audio content, such as a music track or a video, and play it through the speaker to assess its clarity and volume. Alternatively, make a test call to ensure that the speaker functions as expected during voice calls.
- Observe the Sound Quality: Pay attention to the sound quality emanating from the speaker, listening for any improvements in clarity and volume compared to before the cleaning process. Note any changes in sound that may indicate a successful cleaning outcome.
By powering on your iPhone and testing the speaker, you can confirm that the cleaning process has effectively restored the speaker’s performance. This final step ensures that your device continues to deliver exceptional audio quality, free from the impediments of dirt and grime that may have accumulated on the speaker grill.