
Signs of a Failing iPhone 10 Battery
The iPhone 10, known for its sleek design and advanced features, relies heavily on its battery to power its impressive capabilities. Over time, the battery in an iPhone 10 may begin to exhibit signs of deterioration, impacting the overall performance of the device. Recognizing these signs is crucial for determining when a battery replacement is necessary. Here are some common indicators of a failing iPhone 10 battery:
-
Rapid Battery Drain: If you find yourself charging your iPhone 10 more frequently than usual or notice a significant decrease in battery life, it could be a sign that the battery is reaching the end of its lifespan. A noticeable decline in battery performance may indicate the need for a replacement.
-
Slow Charging: When the iPhone 10 battery takes an unusually long time to charge, even with the original charger and cable, it could be a sign of a deteriorating battery. This slow charging process may disrupt your daily usage and signal the need for a new battery.
-
Overheating: A failing iPhone 10 battery may cause the device to become excessively warm during regular use or while charging. If you notice that your iPhone 10 is heating up more than usual, it's essential to consider the possibility of a battery issue.
-
Random Shutdowns: As the iPhone 10 battery deteriorates, the device may unexpectedly shut down, especially when performing tasks that require higher power consumption. If your iPhone 10 frequently powers off without warning, it's a clear indication that the battery may need attention.
-
Inconsistent Battery Percentage: A failing battery may lead to erratic behavior in the battery percentage display. You might observe sudden drops in battery percentage or instances where the percentage jumps back and forth unexpectedly, indicating a potential issue with the battery's capacity.
-
Diminished Performance: When the iPhone 10 experiences sluggishness, freezes, or unresponsiveness, especially when running demanding applications or multitasking, it could be attributed to a deteriorating battery unable to sustain the required power levels.
Recognizing these signs of a failing iPhone 10 battery is crucial for maintaining the optimal performance of your device. If you encounter any of these indicators, it's advisable to consider a battery replacement to restore your iPhone 10 to its full potential.
Tools and Materials Needed for Battery Replacement
When embarking on the journey of replacing the battery in your iPhone 10, it's essential to have the right tools and materials at your disposal. This process requires precision and care, and having the appropriate equipment ensures a smooth and successful battery replacement. Here's a comprehensive list of the tools and materials you'll need:
Tools:
-
Pentalobe Screwdriver: The iPhone 10 is secured with special pentalobe screws, so having a pentalobe screwdriver is crucial for accessing the internal components of the device.
-
Phillips Screwdriver: In addition to the pentalobe screwdriver, a Phillips screwdriver is necessary for removing certain components during the battery replacement process.
-
Plastic Spudger: A plastic spudger is a non-conductive tool that aids in prying apart components without causing damage. It's essential for safely disconnecting cables and removing adhesive strips.
-
Tweezers: Precision tweezers are useful for handling small components and screws with accuracy, especially when working within the confined spaces of the iPhone 10.
-
Suction Handle: A suction handle or suction cup is vital for lifting the display assembly without damaging the delicate internal components.
-
Opening Picks: These thin, flexible tools are designed to slide between the display and the frame, allowing for the safe separation of the adhesive securing the display.
-
Adhesive Strips: Replacement adhesive strips are necessary for resealing the iPhone 10 after the battery replacement. These strips ensure a secure and proper fit of the display assembly.
Materials:
-
Replacement Battery: Acquiring a high-quality replacement battery specifically designed for the iPhone 10 is paramount. It's essential to ensure that the replacement battery meets the necessary specifications and safety standards.
-
Cleaning Wipes: Utilizing cleaning wipes or a soft, lint-free cloth is crucial for maintaining a clean work environment and ensuring that the internal components remain free from debris and contaminants.
-
Isopropyl Alcohol: Isopropyl alcohol is an effective solvent for cleaning and removing any residual adhesive or dirt from the internal surfaces of the iPhone 10 during the battery replacement process.
-
Safety Equipment: It's important to prioritize safety by using appropriate protective gear such as anti-static wrist straps and safety glasses to prevent accidental damage and ensure personal safety during the procedure.
By ensuring that you have the necessary tools and materials, you can confidently proceed with the battery replacement process, knowing that you are equipped to handle the intricate components of the iPhone 10 with precision and care. This comprehensive list empowers you to undertake the battery replacement with confidence, ultimately restoring the optimal performance and longevity of your iPhone 10.
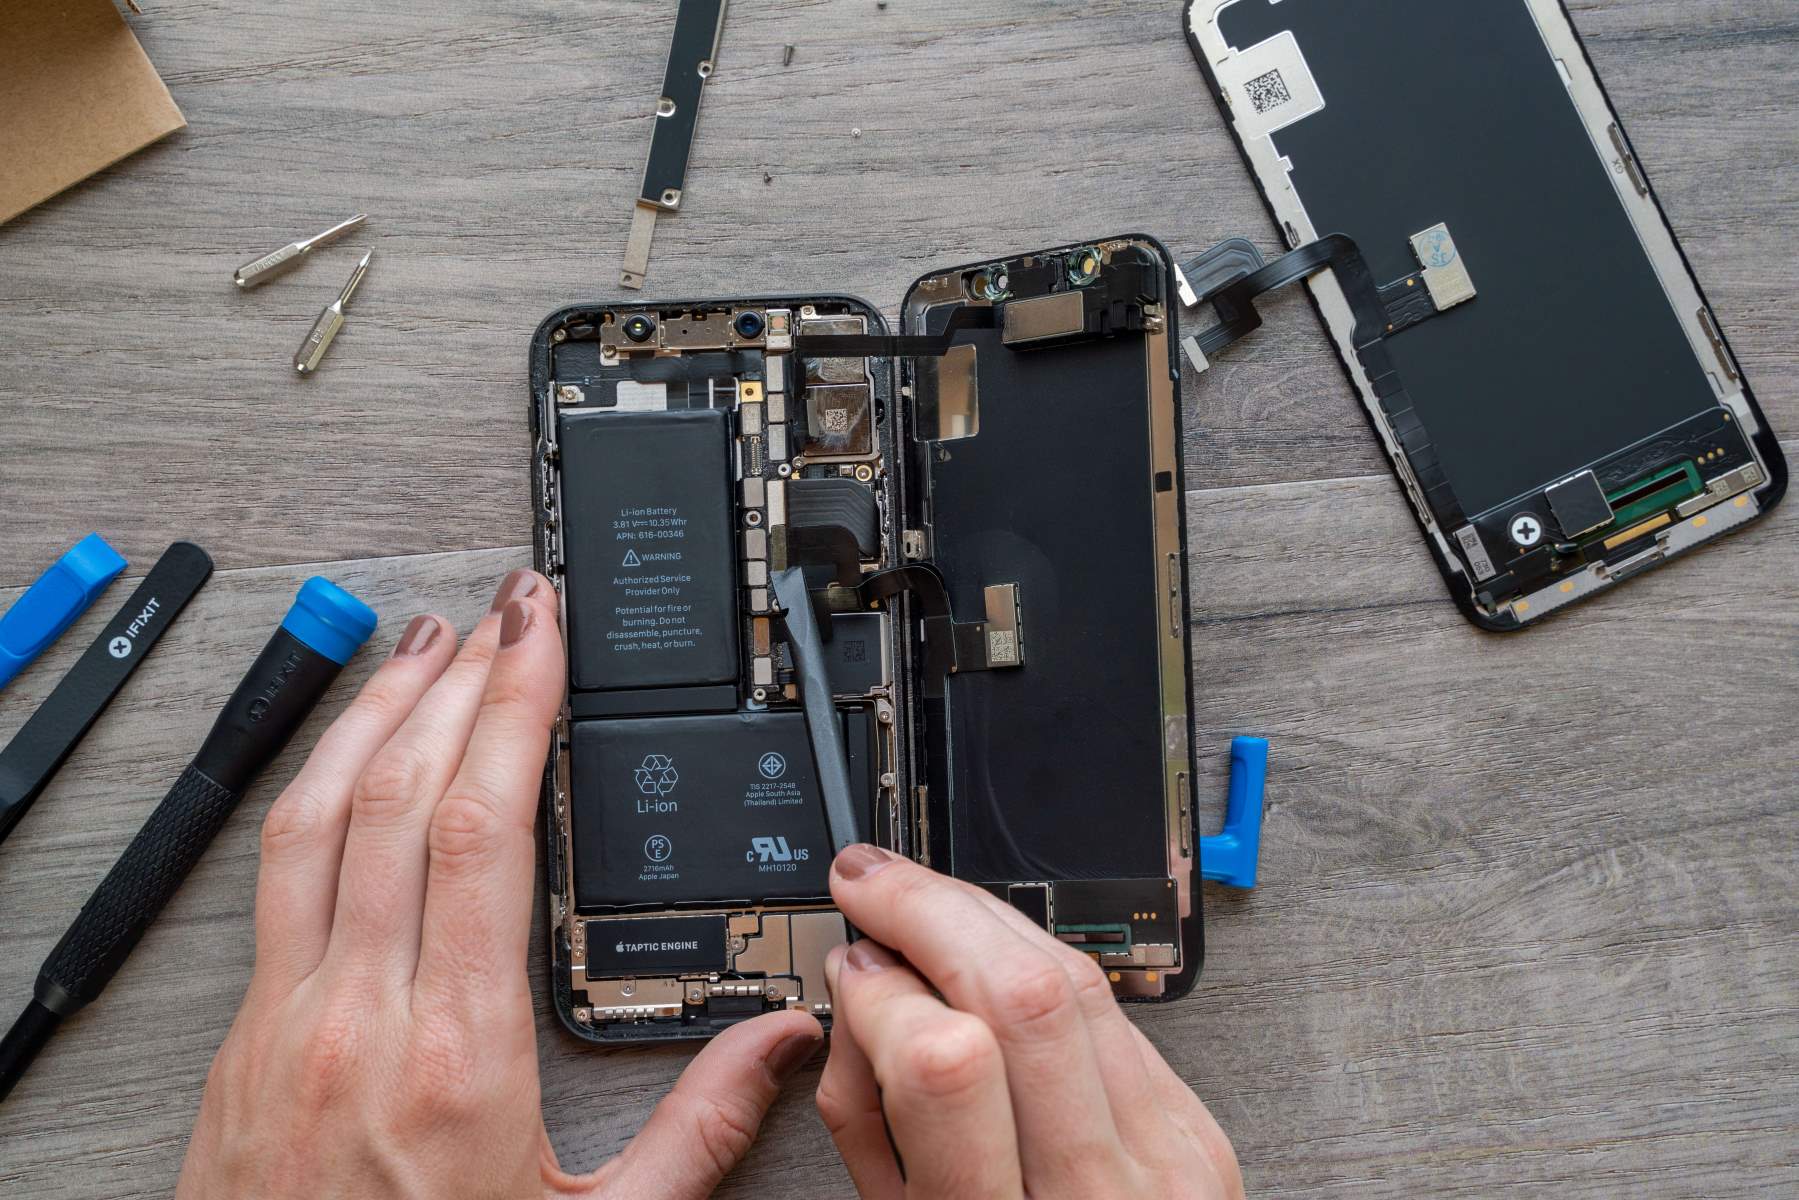
Step-by-Step Guide to Removing the Old Battery
Before initiating the process of removing the old battery from your iPhone 10, it's crucial to ensure that you have a clean and organized workspace, free from any potential hazards. Additionally, it's highly recommended to power off your iPhone 10 before proceeding with the battery removal to prevent any electrical mishaps. Once these precautions are in place, you can begin the step-by-step process of safely removing the old battery from your iPhone 10.
-
Prepare the Necessary Tools: Gather the essential tools, including a pentalobe screwdriver, Phillips screwdriver, plastic spudger, tweezers, suction handle, and opening picks. These tools will facilitate the careful disassembly of the iPhone 10 and ensure that the battery removal process is executed with precision.
-
Remove the Pentalobe Screws: Using the pentalobe screwdriver, carefully remove the two screws located at the bottom of the iPhone 10, securing the display assembly. These specialized screws require the appropriate tool for extraction.
-
Lift the Display: Employ the suction handle or suction cup to lift the display assembly slightly. Subsequently, insert an opening pick or plastic spudger to create a small gap between the display and the frame. Exercise caution and apply gentle pressure to avoid damaging the delicate components.
-
Detach the Display: With the aid of the opening picks, carefully separate the adhesive securing the display to the frame. Take your time and ensure that the display is loosened gradually, allowing access to the internal components without causing any undue stress on the display cables.
-
Access the Battery Connector: Once the display is partially detached, locate the battery connector and shield. Utilize the Phillips screwdriver to remove the screws securing the connector shield, and then carefully disconnect the battery connector from the logic board using the plastic spudger.
-
Release the Adhesive Strips: The iPhone 10 battery is secured with adhesive strips. Gently pull the tabs of the adhesive strips, ensuring a slow and steady motion to prevent any tearing. Exercise patience during this step, as the adhesive strips require careful handling to avoid any damage to the battery or surrounding components.
-
Lift and Remove the Battery: With the adhesive strips released, carefully lift the old battery from its position within the iPhone 10. Exercise caution to avoid bending or puncturing the battery during removal, as lithium-ion batteries require careful handling to prevent any potential hazards.
By meticulously following these step-by-step instructions, you can safely and effectively remove the old battery from your iPhone 10, paving the way for the installation of a new, high-performance battery. This meticulous process ensures that the delicate internal components of the iPhone 10 are handled with precision and care, setting the stage for a successful battery replacement endeavor.
Installing the New Battery in Your iPhone 10
With the old battery successfully removed from your iPhone 10, the next crucial step is the installation of a new, high-quality battery to restore the device's power and longevity. This meticulous process requires precision and care to ensure that the new battery is seamlessly integrated, allowing your iPhone 10 to operate at its optimal capacity. Here's a detailed guide to installing the new battery in your iPhone 10:
-
Prepare the Replacement Battery: Before proceeding with the installation, carefully inspect the replacement battery to ensure it meets the necessary specifications and safety standards for the iPhone 10. Verify that the battery capacity and dimensions align with the original specifications to guarantee compatibility and optimal performance.
-
Position the New Battery: Gently place the new battery into the designated compartment within the iPhone 10, ensuring that it aligns correctly with the housing. Exercise caution to avoid applying excessive force or causing any damage to the battery or surrounding components during the positioning process.
-
Reattach the Adhesive Strips: The new battery may require adhesive strips to secure it in place within the iPhone 10. Carefully apply the adhesive strips to the battery, ensuring a firm and secure attachment to prevent any movement or displacement during usage. Take your time to align the adhesive strips accurately, maintaining a consistent and stable positioning of the new battery.
-
Connect the Battery Connector: Locate the battery connector on the logic board and carefully reconnect it, ensuring a secure and snug fit. Exercise precision to align the connector properly, minimizing the risk of any connectivity issues that may affect the performance of the new battery.
-
Secure the Connector Shield: Utilize the Phillips screwdriver to reattach the screws securing the battery connector shield. Ensure that the shield is firmly in place, providing additional protection and stability for the battery connector within the iPhone 10.
-
Lower the Display Assembly: With the new battery securely installed, carefully lower the display assembly back into position, aligning it with the frame. Apply gentle pressure to ensure that the display sits flush with the iPhone 10, preparing it for reattachment.
-
Reattach the Display: Align the display assembly with the frame and gently press along the edges to secure the adhesive. Once the display is in place, reinsert and tighten the pentalobe screws at the bottom of the iPhone 10, effectively sealing the device.
By meticulously following these steps, you can successfully install a new battery in your iPhone 10, revitalizing its power and performance. This meticulous process ensures that the new battery is seamlessly integrated, allowing your iPhone 10 to operate at its optimal capacity.
Testing the New Battery and Troubleshooting Common Issues
Once the new battery is installed in your iPhone 10, it's essential to conduct thorough testing to ensure that it functions optimally. Testing the new battery involves assessing its performance and addressing any potential issues that may arise during the initial stages of usage. Additionally, being equipped with troubleshooting techniques allows you to effectively resolve common issues, ensuring that your iPhone 10 operates seamlessly with the new battery.
Testing the New Battery
-
Initial Power-Up: Power on your iPhone 10 and observe the startup process. The device should boot up smoothly without any unusual delays or disruptions, indicating that the new battery is functioning correctly.
-
Battery Percentage: Monitor the battery percentage as the device powers up and remains in use. The percentage should reflect a full charge and remain stable during regular usage, indicating that the new battery accurately maintains its charge capacity.
-
Charging Performance: Connect your iPhone 10 to the charger and observe the charging process. The new battery should charge efficiently, reaching full capacity within a reasonable timeframe. If the charging process is notably faster or slower than expected, it may indicate an issue with the new battery or the charging system.
-
Battery Drain: Utilize your iPhone 10 for various tasks, such as browsing, streaming media, and using applications. Monitor the battery drain rate to ensure that it aligns with expected usage patterns. A significant deviation in battery drain may indicate an underlying issue with the new battery.
Troubleshooting Common Issues
-
Abnormal Battery Drain: If you notice unusually rapid battery drain with the new battery, consider closing background applications and performing a soft reset. Additionally, check for any software updates that may address battery-related issues.
-
Charging Problems: If the new battery exhibits erratic charging behavior, inspect the charging port for debris or damage. Try using a different charger and cable to rule out potential issues with the charging accessories.
-
Inaccurate Battery Percentage: In the event of erratic battery percentage readings, recalibrate the battery by fully discharging it and then fully charging it without interruptions. This process can help the device recalibrate its battery monitoring system.
-
Overheating Concerns: Should the iPhone 10 experience excessive heat with the new battery, ensure that it is not exposed to high ambient temperatures or direct sunlight during usage. If overheating persists, consider seeking professional assistance to assess the battery and internal components for any anomalies.
By meticulously testing the new battery and employing effective troubleshooting techniques, you can ensure that your iPhone 10 operates seamlessly with the replacement battery, allowing you to enjoy sustained performance and extended usage without encountering common battery-related issues.