
Choosing the Right Quick Release Plate
Choosing the Right Quick Release Plate
When it comes to enhancing the flexibility and convenience of your photography equipment, selecting the right quick release plate is paramount. These plates come in various sizes and styles, so it’s essential to choose one that perfectly complements your camera and monopod. Here’s a step-by-step guide to help you make an informed decision:
1. Determine the Compatibility
Before purchasing a quick release plate, it’s crucial to ensure that it is compatible with both your camera and monopod. Check the specifications provided by the manufacturer to verify the compatibility of the plate with your specific camera model and the mounting system of your monopod.
2. Consider the Size and Weight
Take into account the size and weight of your camera and lens setup. A heavier camera and lens combination will require a sturdier and more robust quick release plate to ensure a secure attachment. Additionally, the size of the plate should be proportional to the dimensions of your camera, providing ample support without adding unnecessary bulk.
3. Evaluate the Mounting Mechanism
Quick release plates are available in various mounting styles, including Arca-Swiss, Manfrotto, and proprietary systems designed by specific manufacturers. Assess the mounting mechanism of your monopod and choose a compatible quick release plate that seamlessly integrates with the existing system to facilitate quick and effortless attachment and detachment.
4. Assess the Material and Durability
Consider the material composition of the quick release plate. Opt for high-quality materials such as aluminum or magnesium alloy, which offer a balance of durability and lightweight construction. The durability of the plate is crucial to ensure long-term reliability and stability during use.
5. Read User Reviews and Recommendations
Prior to making a purchase, take the time to read user reviews and seek recommendations from fellow photographers. Their firsthand experiences can provide valuable insights into the performance, reliability, and compatibility of different quick release plates, aiding you in making an informed decision.
By carefully considering these factors, you can confidently select a quick release plate that seamlessly integrates with your camera and monopod, enhancing the efficiency and convenience of your photography setup.
Attaching the Quick Release Plate to Your Camera
Attaching the Quick Release Plate to Your Camera
Once you have chosen the appropriate quick release plate for your camera and monopod, the next step is to securely attach the plate to your camera. This process ensures a swift transition between handheld and monopod-mounted shooting, offering unparalleled flexibility in various photography scenarios. Follow these steps to seamlessly attach the quick release plate to your camera:
1. Prepare Your Camera
Start by removing any existing mounting plates or brackets from the bottom of your camera. This provides a clean and unobstructed surface for attaching the new quick release plate.
2. Align the Plate
Position the quick release plate at the bottom of your camera, ensuring that the mounting screw aligns with the camera’s tripod socket. The plate should sit flush against the camera’s base, with the mounting screw centered within the tripod socket to maintain stability.
3. Secure the Plate
Using a compatible screwdriver or coin, tighten the mounting screw on the quick release plate to securely fasten it to the camera. Ensure that the plate is firmly attached, minimizing any potential movement or slippage during use.
4. Verify the Alignment
Double-check the alignment of the quick release plate to confirm that it is centered and securely fastened to the camera. This step is crucial in maintaining the balance and stability of the camera when mounted on the monopod.
5. Test the Connection
Gently apply pressure to the attached quick release plate to ensure that it remains firmly in place. Verify that there is no wobbling or shifting of the plate, as a secure connection is essential for stable and reliable performance.
By following these steps, you can seamlessly attach the quick release plate to your camera, paving the way for effortless mounting onto your monopod. This streamlined process empowers you to swiftly transition between handheld and monopod-supported shooting, expanding the creative possibilities of your photography endeavors.
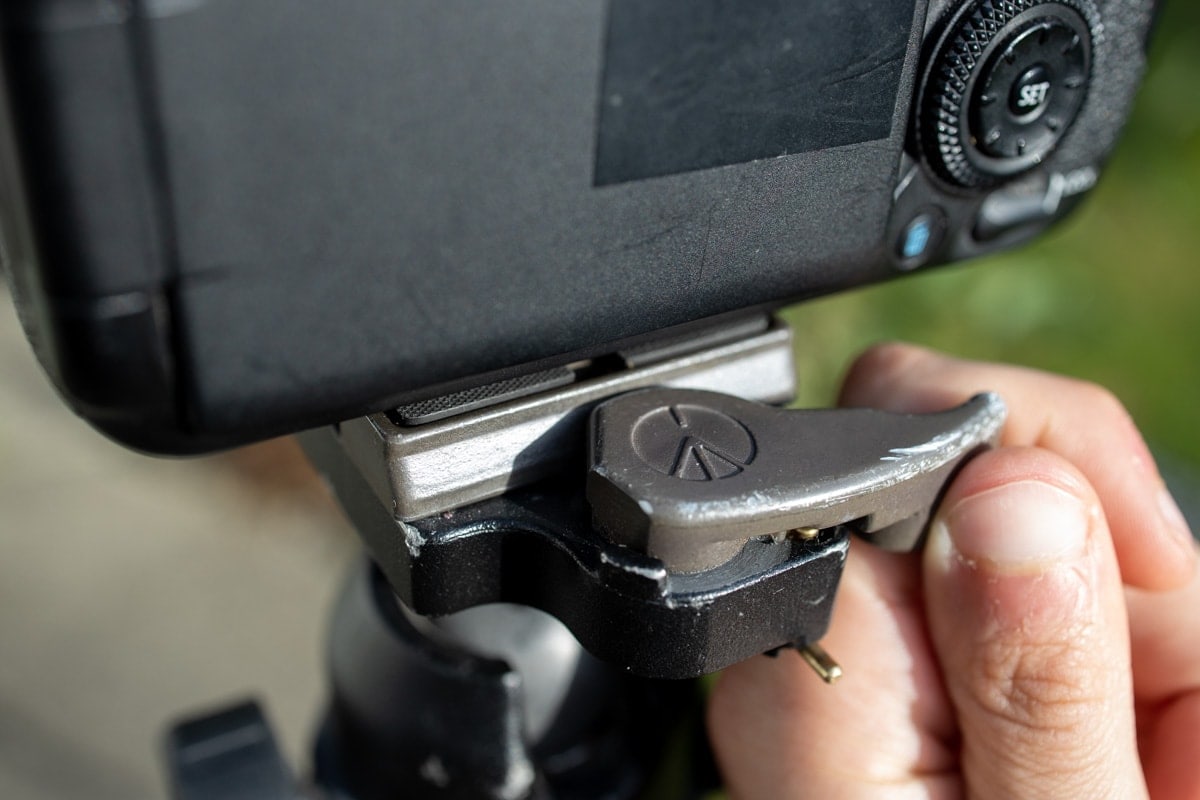
Mounting the Quick Release Plate to Your Monopod
With the quick release plate securely attached to your camera, the next step is to mount it onto your monopod. This process streamlines the transition from handheld to monopod-assisted photography, offering stability and flexibility in various shooting scenarios. Here’s a step-by-step guide to mounting the quick release plate to your monopod:
1. Prepare the Monopod
Ensure that your monopod is fully extended to its desired height and that the mounting platform is clear of any debris or obstructions. This provides a stable foundation for attaching the quick release plate.
2. Locate the Mounting Platform
Identify the mounting platform on your monopod where the quick release plate will be attached. This area is typically located at the top of the monopod, featuring a threaded socket or a compatible mounting mechanism that aligns with the quick release plate.
3. Align the Plate with the Monopod
Position the quick release plate over the mounting platform on the monopod, ensuring that the plate’s mounting mechanism aligns with the corresponding feature on the monopod. This alignment facilitates a seamless connection, enabling quick and secure attachment.
4. Secure the Attachment
Once the quick release plate is aligned with the mounting platform, engage the locking mechanism or fastening knob on the monopod to secure the attachment. Ensure that the plate is firmly affixed to the monopod, minimizing any potential movement or instability.
5. Verify the Stability
Gently test the stability of the mounted camera by applying slight pressure and ensuring that the connection remains secure. Confirm that the quick release plate is firmly attached to the monopod, providing a stable platform for your camera during use.
By following these steps, you can effortlessly mount the quick release plate-equipped camera onto your monopod, unlocking the potential for stable and versatile photography. This seamless process empowers you to explore new perspectives and capture stunning images with enhanced stability and control.
Testing the Secure Attachment
After mounting the quick release plate-equipped camera onto your monopod, it’s crucial to assess the secure attachment to ensure optimal stability and reliability during photography sessions. Testing the secure attachment provides peace of mind and confirms that your equipment is poised to deliver exceptional performance. Here’s a step-by-step approach to testing the secure attachment:
1. Stability Assessment
Begin by evaluating the stability of the mounted camera on the monopod. Gently maneuver the monopod to gauge the firmness of the attachment, ensuring that the camera remains steady and well-balanced. This assessment is essential for verifying the initial security of the connection.
2. Tilting and Panning
Perform controlled tilting and panning movements with the monopod to simulate typical adjustments made during photography. Verify that the quick release plate maintains a secure grip on the monopod, allowing smooth movements without any slippage or instability.
3. Stress Testing
Apply gentle pressure to the camera in various directions to simulate real-world scenarios, such as sudden movements or changes in shooting angles. This stress testing helps confirm that the quick release plate and mounting system can withstand unexpected forces, ensuring the safety of your equipment.
4. Vibration and Impact Resilience
If applicable, subject the mounted camera to mild vibrations or carefully simulate minor impacts to assess the resilience of the secure attachment. This step is particularly important for outdoor and dynamic shooting environments where the equipment may be exposed to external forces.
5. Repeat Verification
Revisit the stability assessment and other tests to reaffirm the secure attachment, ensuring that the connection remains steadfast even after repeated movements and stress testing. This step provides a comprehensive validation of the attachment’s reliability.
By meticulously testing the secure attachment of the quick release plate-equipped camera on your monopod, you can instill confidence in the stability and dependability of your photography setup. This proactive approach enhances the safety and performance of your equipment, allowing you to focus on capturing exceptional images with peace of mind.
Removing the Quick Release Plate from Your Monopod
Upon completing your photography session or when transitioning back to handheld shooting, removing the quick release plate from your monopod is a straightforward yet essential process. This step ensures the seamless disconnection of your camera from the monopod, allowing for effortless mobility and flexibility. Here’s a step-by-step guide to removing the quick release plate from your monopod:
1. Secure Your Equipment
Prior to removing the quick release plate, ensure that your camera is powered off and securely held to prevent accidental drops or damage. This precautionary measure safeguards your equipment during the disconnection process.
2. Release the Locking Mechanism
Locate the locking mechanism or release knob on your monopod that secures the quick release plate in place. Depending on the design, this may involve turning a knob, pressing a release button, or engaging a lever to disengage the attachment.
3. Disengage the Plate
Once the locking mechanism is released, carefully lift the quick release plate-equipped camera away from the monopod’s mounting platform. Exercise caution to prevent any sudden movements that may compromise the stability of the equipment during disconnection.
4. Inspect the Attachment Area
After removing the quick release plate, take a moment to inspect the mounting platform on the monopod. Ensure that it is free of debris or any residual material that could hinder the secure attachment of the plate during future use.
5. Store the Plate Securely
Upon removal, store the quick release plate in a designated location within your camera bag or equipment case. This ensures that the plate remains protected and readily accessible for future use with your monopod or other compatible accessories.
By following these steps, you can effortlessly remove the quick release plate from your monopod, facilitating a smooth transition between monopod-assisted and handheld photography. This process empowers you to adapt to changing shooting conditions with ease, enhancing the versatility and convenience of your photography endeavors.