
Benefits of Adding Music to Your Movie Maker Video
Adding music to your Movie Maker video can greatly enhance the overall viewing experience and convey emotions that words alone cannot. Music has the power to engage and captivate your audience, making your video more memorable and impactful. Here are some key benefits of incorporating music into your Movie Maker videos:
- Setting the mood: The right music can instantly set the tone and atmosphere of your video. Whether you want to create an upbeat, energetic vibe or a somber, heartfelt ambiance, music can help establish the desired mood and evoke specific emotions in your viewers.
- Enhancing storytelling: Music has the ability to enhance the narrative of your video. By choosing the appropriate soundtrack, you can add depth and dimension to your storytelling, making it more engaging and captivating for your audience. The music can complement the visuals, dialogue, and overall theme of your video, creating a cohesive and immersive experience.
- Increasing viewer retention: Adding music to your Movie Maker video can help hold your viewers’ attention and increase their engagement. The right musical accompaniment can help maintain a steady pace and flow, keeping your audience hooked from start to finish. This can lead to higher viewer retention rates and a greater chance of your video being shared with others.
- Adding professionalism: Incorporating music into your video can give it a polished and professional touch. It shows that you have put thought and effort into creating a well-crafted piece of content. Additionally, music can help create a sense of cohesion and unity throughout the video, making it more visually and audibly appealing.
- Elevating the emotional impact: Music has the power to evoke strong emotions in viewers. By carefully selecting the right music for your video, you can amplify the emotional impact of certain scenes or moments. Whether it’s a heartwarming montage, an uplifting message, or a suspenseful sequence, music can heighten the emotional connection between your video and its audience.
Ultimately, adding music to your Movie Maker video can elevate its quality and effectiveness. It helps create a more immersive experience for your viewers, enhances storytelling, and increases viewer engagement. By carefully selecting and incorporating the right music, you can create a memorable and impactful video that resonates with your audience.
Choosing the Right Music for Your Video
Choosing the right music for your Movie Maker video is crucial as it sets the tone and enhances the overall mood and message you want to convey. Here are some key factors to consider when selecting music:
- Understand your video’s purpose and target audience: Before choosing music, it’s essential to have a clear understanding of the purpose of your video and who your target audience is. Is it a heartfelt wedding video, an energetic sports montage, or perhaps a corporate presentation? Knowing the purpose and target audience will help you select music that aligns with their preferences and enhances the intended message.
- Consider the rhythm and pacing: Pay attention to the rhythm and tempo of the music and how it aligns with the visuals and pacing of your video. If your video has dynamic and fast-paced shots, you might want to choose an upbeat and energetic soundtrack to match. Conversely, if your video has slow and emotional moments, a more soothing and gentle melody could be fitting.
- Match the music to the mood and emotions: The music you choose should reflect the desired mood and emotions of your video. If you want to evoke feelings of joy and celebration, opt for cheerful and uplifting melodies. For more dramatic or suspenseful videos, consider using music with tension-building elements and impactful crescendos. The goal is to create an emotional connection between the visuals and the music.
- Consider the genre and style: Make sure the genre and style of the music align with the overall theme and genre of your video. For example, a romantic video could benefit from soft and melodic instrumental tracks or gentle acoustic ballads. A corporate video might call for more contemporary, upbeat, and motivational tracks.
- Avoid copyright infringement: It is important to respect copyright laws when using music for your video. Avoid using copyrighted songs without proper licensing or permission. Instead, opt for royalty-free music or use music from platforms that offer a wide range of licensed tracks specifically for video creators.
By carefully considering these factors and taking the time to select the right music for your Movie Maker video, you can enhance the overall impact and effectiveness of your video. The music should complement the visuals, engage your target audience, and elicit the desired emotions, ultimately creating a cohesive and memorable viewing experience.
Licensing Options for Using Music in Your Videos
When using music in your Movie Maker videos, it’s important to consider the licensing options to ensure you are using the music legally and avoiding any copyright violations. Here are some common licensing options to explore:
- Creative Commons licenses: Creative Commons licenses offer a range of permissions that allow creators to share their work while specifying how it can be used. Some Creative Commons licenses allow for commercial use, while others may have certain restrictions. Websites like Creative Commons and platforms like YouTube provide filters to search for Creative Commons-licensed music.
- Royalty-free music: Royalty-free music is a popular licensing option for many video creators. Royalty-free music libraries offer pre-licensed tracks that can be used in videos without the need to pay royalties for each use. These libraries typically require a one-time fee or a subscription to access and use their music catalogs.
- Stock music libraries: Stock music libraries offer a wide range of music tracks specifically created for use in videos, films, and multimedia projects. These libraries usually require a license fee for the use of their music. Some popular stock music libraries include AudioJungle, Epidemic Sound, and PremiumBeat.
- Public domain music: Public domain music refers to music that is not protected by copyright and can be freely used in any project without restrictions. These are typically old tracks where the copyright has expired, or the artists have voluntarily released the music into the public domain. Websites like Musopen and Open Music Archive offer collections of public domain music.
- Custom-created music: If you have specific requirements or preferences for the music in your video, you can choose to have custom music created. Hiring a composer or musician to create original music tailored to your video can give you a unique and personalized soundtrack. However, keep in mind that this option can be more expensive and time-consuming.
It is essential to review the licensing terms and conditions of each option and ensure compliance with copyright laws. Reading and understanding the licensing agreements will help you determine the permitted uses, restrictions, and any attribution requirements for the music you choose.
By selecting the appropriate licensing option for your Movie Maker video, you can confidently use music in your videos while respecting the rights of the artists and composers. This ensures a legal and ethical approach to incorporating music into your videos.
Finding Royalty-Free Music for Your Movie Maker Video
When creating a video in Movie Maker, it’s essential to find royalty-free music that you can legally use to enhance your project. Here are some effective methods for finding royalty-free music:
- Royalty-free music websites: There are numerous websites dedicated to offering royalty-free music for video projects. Platforms like AudioJungle, Epidemic Sound, and PremiumBeat provide extensive libraries of high-quality music tracks in various genres. These websites often allow you to preview and download the tracks for a fee or through a subscription plan.
- Creative Commons platforms: Websites like SoundCloud, Jamendo, and Bandcamp have a vast collection of music uploaded by independent artists. Some of these artists choose to license their work with Creative Commons licenses, allowing you to use their music for free or with certain attribution requirements. Use the search filters on these platforms to find Creative Commons-licensed music suitable for your Movie Maker video.
- YouTube Audio Library: YouTube offers an extensive library of free music that you can use in your videos. The YouTube Audio Library provides a wide range of music tracks across various genres, all available for use in your video projects. You can access the library directly from the YouTube Studio dashboard and easily download the selected tracks.
- Free music libraries: Some websites specialize in providing free, royalty-free music for video projects. Websites like Bensound, Incompetech, and Free Music Archive offer curated collections of music that are available for use in both personal and commercial videos. These websites typically require attribution to the artist or composer for the music used.
- Composer websites and social media: Many composers and musicians have their own websites or social media platforms where they share their original compositions. Exploring these platforms allows you to discover unique and original music that can be used in your Movie Maker video. Reach out to the composer or musician to inquire about licensing their music for your specific project.
Remember to review the licensing terms and conditions of each source to ensure compliance with copyright and attribution requirements. Take the time to listen to the music tracks and consider how well they align with the mood, theme, and pacing of your Movie Maker video.
By utilizing the various resources available, you can easily find high-quality royalty-free music that will enhance your Movie Maker video without any legal complications.
How to Import Music into Movie Maker
Importing music into Movie Maker is a straightforward process that allows you to add the perfect soundtrack to your video. Follow these steps to import music into Movie Maker:
- Open Movie Maker: Launch the Movie Maker software on your computer. If you don’t have it installed, you can download it from the official Microsoft website or from the Microsoft Store.
- Create a new project: Click on the “New Project” button to start a new project. Give your project a name and choose a location on your computer where you want to save it.
- Import the video files: Click on the “Import Media” button on the top left corner of the window. Browse your computer to locate and select the video files you want to include in your project. You can select multiple files at once by holding down the Ctrl key while selecting the files, or by selecting a folder containing the videos.
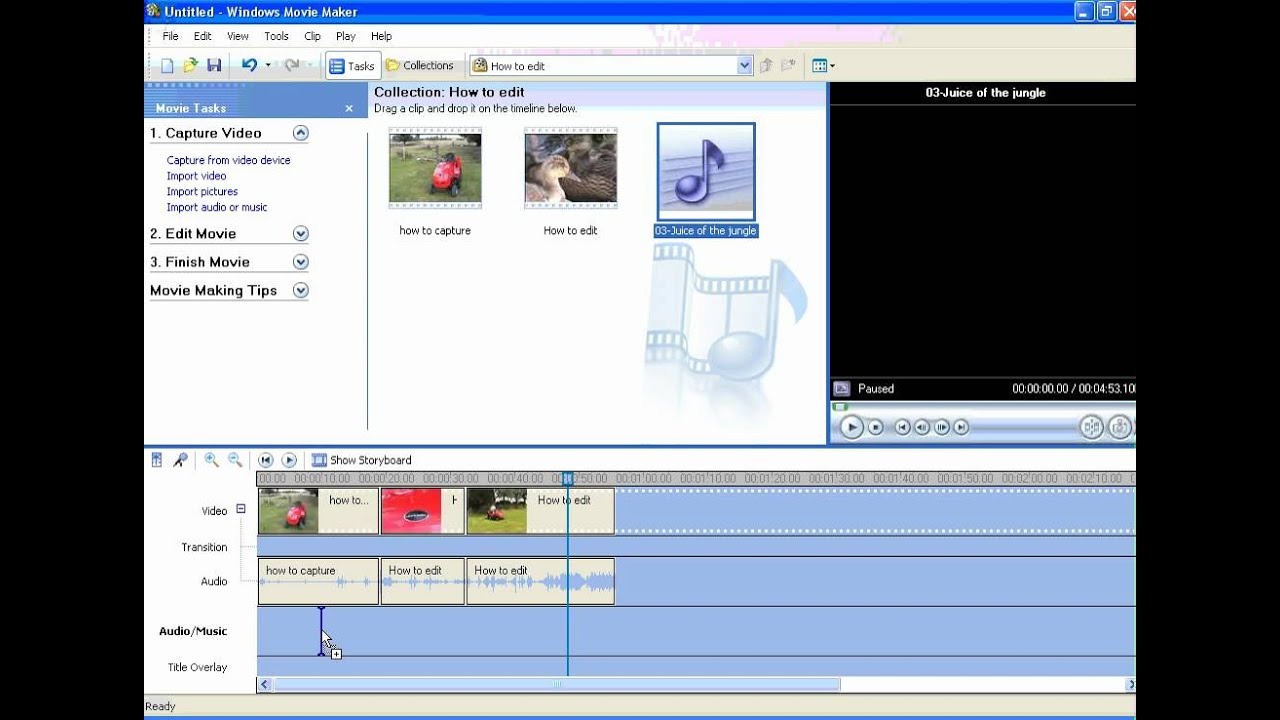
- Add the music: To import the music file, click on the “Home” tab at the top of the Movie Maker window. Then, click on the “Add Music” button. A file browser will appear, allowing you to navigate to the location where your music file is saved. Select the music file and click on the “Open” button to import it into your project.
- Adjust the music placement: Movie Maker will add the music file to the audio track automatically. To adjust the placement of the music, click and drag the music file on the audio track to align it with the desired portion of your video. You can use the Zoom slider at the bottom of the window to scale the timeline and make precise adjustments.
- Configure music settings: To adjust the volume of the music, right-click on it in the audio track and select “Volume.” A volume slider will appear, allowing you to increase or decrease the volume as needed. You can also right-click on the music file and select “Trim” to adjust its duration if necessary.
- Preview and make further edits: Play your video preview to ensure the music is synchronized with your video clips. If needed, make additional adjustments to the music placement, volume, or duration until you are satisfied with the result.
- Save and export your video: Once you have imported and edited your music, it’s time to save and export your video. Click on the “File” tab at the top left corner of the window and select “Save project” to save your progress. Then, click on the “File” tab again and choose “Save movie” or “Export” to save your video in the desired format and quality.
By following these steps, you can easily import music into Movie Maker and customize it to fit perfectly with your video project.
Adjusting the Volume and Duration of the Music
Once you have imported music into your Movie Maker project, you may need to make adjustments to the volume and duration of the music to ensure it aligns perfectly with your video. Here’s how you can adjust the volume and duration of the music:
- Volume Adjustment: To adjust the volume of the music, right-click on the music file in the audio track of Movie Maker. Select “Volume” from the options. A volume slider will appear that allows you to increase or decrease the volume of the music. Drag the slider left or right to achieve the desired volume level. Listen to the music along with your video clips to ensure the sound is balanced and doesn’t overpower the other audio elements.
- Duration Adjustment: If you need to edit the duration of the music, right-click on the music file in the audio track and select “Trim.” This will open a trim window where you can adjust the start and end points of the music. Drag the sliders at either end to trim the music file to the desired duration. Alternatively, you can manually input the start and end times in the designated fields. Preview the video to make sure the music aligns with the desired sections of your video clips.
- Fading in and out: To create a smooth transition when the music starts or ends, you can add fade-in and fade-out effects. Right-click on the music file in the audio track and select “Fade in” or “Fade out.” These effects gradually increase or decrease the volume of the music. Adjust the duration of the fade-in and fade-out effects by dragging the sliders on the audio track. This will ensure a seamless transition between the music and other audio elements in your video.
- Multiple music tracks: If you want to add multiple tracks of music to your video, simply import the additional music files into your Movie Maker project. Drag and drop the music files onto the audio track, placing them in the desired order and adjusting the volume and duration for each track individually. This allows you to layer different music tracks and create a more dynamic and engaging audio experience in your video.
By adjusting the volume and duration of the music in Movie Maker, you can ensure that it fits seamlessly with your video and enhances the overall impact of your project. Take the time to fine-tune the music to achieve the desired effect and create a cohesive audiovisual experience.
Syncing Music with Your Video Clips
Syncing the music with your video clips is a crucial step in creating a cohesive and engaging audiovisual experience in Movie Maker. Properly syncing the music will enhance the overall impact and emotional connection of your video. Here are steps to help you sync the music with your video clips:
- Preview your video clips: Familiarize yourself with the content and timing of your video clips. Identify the key moments that you want to accentuate or synchronize with specific parts of the music.
- Mark the cue points: Listen to the music and mark the specific cue points that align with the desired moments in your video clips. These cue points could be beats, lyrics, or any other significant part of the music that corresponds well with the visuals.
- Align the music with the cue points: Move the music file in the audio track to align it with the identified cue points in your video clips. Drag and drop the music file to the appropriate position on the timeline. Carefully adjust the placement to ensure that the cue points in the music match the intended moments in your video.
- Fine-tune the synchronization: Play the video preview and carefully observe how well the music syncs with your video clips. Make any necessary adjustments by moving the music file forward or backward on the timeline. Zoom in on the timeline to make precise adjustments for more accurate synchronization.
- Use visual cues: Utilize visual cues within Movie Maker, such as waveforms or audio waveforms, to help you align and synchronize the music more accurately with the visuals. These visual representations of the audio can assist in identifying the exact timing of the music in relation to your video clips.
- Make adjustments for transitions: Pay attention to the transitions between video clips. Ensure that the music flows smoothly from one clip to another by adjusting the timing of the music file accordingly. You may need to fade in or fade out the music at the appropriate points to create a seamless transition between the video clips.
- Check for overall timing: Once you have synchronized the music with individual video clips, play the entire video preview to ensure that the overall timing and pacing are coherent. Make any necessary adjustments to maintain a consistent and impactful rhythm throughout your video.
By carefully syncing the music with your video clips in Movie Maker, you can create a more immersive and engaging experience for your viewers. Take the time to make precise adjustments and pay attention to the finer details to achieve the desired synchronization and enhance the overall impact of your video.
Adding Multiple Tracks of Music to Your Video
In Movie Maker, you have the flexibility to add multiple tracks of music to your video, allowing you to create a layered and dynamic audio experience. Adding multiple tracks of music can add depth, emotion, and variety to your video. Here’s how you can incorporate multiple tracks of music in Movie Maker:
- Import and arrange your video clips: Start by importing and arranging your video clips on the timeline in Movie Maker. Ensure that your video clips are organized in the desired order and properly trimmed for the desired duration.
- Import the first music track: Import the first music track by following the steps mentioned earlier in the “How to Import Music into Movie Maker” section. Drag and drop the music file onto the audio track below the video clips.
- Adjust the volume and duration: Adjust the volume of the first music track to your desired level. You can do this by right-clicking on the music file in the audio track and selecting “Volume.” Drag the volume slider to increase or decrease the volume as needed. If necessary, trim the duration of the music track using the “Trim” option to match the length of your video clips.
- Add additional music tracks: To add another music track, repeat the process of importing and adjusting volume and duration for each additional track. Import the second music track by dragging and dropping it onto a new audio track below the first one. Repeat this process for any additional tracks you want to include.
- Adjust individual track volume: Once you have multiple music tracks, you can adjust the volume of each track individually to achieve the desired balance. Right-click on each music track in the audio track and select “Volume.” Use the volume slider to increase or decrease the volume of each track to find the right mix.
- Ensure smooth transitions: Pay attention to the transitions between music tracks to create seamless blends. You can fade out one track while fading in the next to create smooth transitions. Right-click on the end of the first music track and select “Fade out.” Right-click on the beginning of the next music track and choose “Fade in.” Adjust the duration of the fades to ensure the transition is smooth.
- Sync with video clips: Sync the multiple music tracks with the corresponding sections of your video clips. Drag and align each music track on the timeline to match specific moments or scenes in your video. Take into account the mood, emotions, and pace of the video clips when arranging the music tracks.
By adding multiple tracks of music to your video in Movie Maker, you can create a more immersive and engaging audio experience. Experiment with different combinations and arrangements to find the perfect blend of music that complements your video clips and enhances the overall impact of your project.
Mixing Background Music and Sound Effects
Incorporating both background music and sound effects into your video can add depth and richness to the audio experience in Movie Maker. By carefully mixing these elements, you can create a more immersive and engaging video. Here’s how you can mix background music and sound effects in Movie Maker:
- Import your video clips: Begin by importing your video clips into Movie Maker and arranging them on the timeline as desired. Ensure that your video clips are trimmed and organized appropriately before moving forward.
- Import your background music: Import the background music file by following the steps mentioned earlier in the “How to Import Music into Movie Maker” section. Drag and drop the music file onto the audio track beneath your video clips.
- Adjust the volume of the background music: Right-click on the background music file in the audio track and select “Volume.” Use the volume slider to increase or decrease the volume of the background music to achieve the desired level. Make sure it doesn’t overpower the other audio elements or drown out any dialogue or narration in the video.
- Import your sound effects: Import the sound effect files into Movie Maker by locating them on your computer and dragging them onto a separate audio track. Create a new audio track if necessary. Sound effect files can include things like footsteps, door creaks, explosions, or any other audio that enhances specific moments or actions in your video.
- Adjust the volume of the sound effects: Right-click on each sound effect file in the audio track and select “Volume.” Adjust the volume of each sound effect to blend well with the background music and video clips. Make sure they are audible and contribute to the desired effect without overpowering the overall audio mix.
- Sync sound effects with the corresponding visuals: Arrange the sound effects on the timeline to match specific moments or actions in your video. Pay attention to the timing, and align the sound effects with the corresponding visuals for seamless synchronization. This will create a more immersive experience for your viewers.
- Adjust individual track volumes: Fine-tune the volume levels of the background music and sound effects after syncing them with the video clips. Ensure that none of the audio elements are too soft or too loud, affecting the overall balance. Make adjustments by right-clicking on each audio file and choosing “Volume” to modify the levels accordingly.
- Preview and fine-tune the mix: Play the video preview to listen to the mix of background music and sound effects. Make necessary adjustments to the volume levels and timings if required. Continuously fine-tune the mix until you achieve the desired audio blend that enhances the overall impact of your video.
By effectively mixing background music and sound effects in Movie Maker, you can create a more immersive and engaging audiovisual experience. Strive for a balanced mix that amplifies the mood, emotions, and actions of your video, allowing your viewers to fully immerse themselves in the content.
Using Transitions and Effects to Enhance the Music in Your Video
Transitions and effects can play a significant role in enhancing the music in your Movie Maker video. They add visual flair and help synchronize the visuals with the rhythm and mood of the music. Here’s how you can use transitions and effects to elevate the impact of the music in your video:
- Select the appropriate transitions: Movie Maker offers a variety of transitions that can be applied between video clips. Choose transitions that align with the style and mood of your video, and the tempo of the music. Use smooth transitions like cross dissolve or fade to create a seamless flow between the clips. More dynamic transitions, such as zoom or slide, can be used for energetic or impactful parts of the music.
- Apply the transitions strategically: Once you have selected the transitions, drag and drop them between the video clips on the timeline. Ensure that the transitions complement the music and enhance the overall visual experience. Consider aligning the transitions with significant beats or changes in the music to create a visually engaging flow.
- Sync effects with the music: Movie Maker provides various effects that can be applied to video clips, images, or even text overlays. Experiment with effects like blurring, color grading, or slow-motion to visually accentuate the mood and rhythm of the music. Apply these effects to specific clips or sections that correspond to the dynamics or emotional peaks in the music.
- Use visualizers: Movie Maker offers built-in visualizers that are synchronized with the music. These visualizers create visual representations of the audio, such as waveform bars or pulsating shapes, providing an engaging visual element that matches the music’s rhythm. Apply visualizers to specific sections of the music to enhance the viewing experience and highlight key moments.
- Time effects to the music: Adjust the timing and duration of transitions and effects to align with the music. Aim to create a seamless connection between the audio and visual elements. For example, time a transition to coincide with a beat drop or use an effect to emphasize a crescendo in the music. This synchronization helps reinforce the impact and emotional connection between the music and visuals.
- Experiment with overlays and titles: Consider adding text overlays or titles that are timed with the music. Use these elements to display lyrics, quotes, or key messages that align with the music’s theme. Place these overlays strategically in the video to coincide with the corresponding lyrics or impactful moments in the music.
- Preview and fine-tune: After applying transitions, effects, and overlays, preview your video to assess how well they align with the music. Make any necessary adjustments to the timing, duration, or positioning to ensure a seamless and visually captivating integration of the music and the visual elements.
By using transitions, effects, and visualizers strategically in Movie Maker, you can enhance the impact of the music in your video. These visual elements will not only captivate your viewers but also reinforce the emotions and message conveyed by the music, resulting in a more immersive and engaging viewing experience.
Exporting Your Movie Maker Video with the Music
Once you have completed the editing process in Movie Maker and synchronized the music with your video, it’s time to export your final video with the incorporated music. Here’s how you can export your Movie Maker video:
- Preview your video: Before exporting, play the video preview in Movie Maker to ensure that the music, visuals, and any added effects are synchronized and aligned as desired. Make any necessary adjustments if you notice any issues or inconsistencies.
- Choose the export settings: Click on the “File” tab at the top left corner of the Movie Maker window. From the drop-down menu, select “Save movie” or “Export” (the specific option may vary depending on your version of Movie Maker). This will open the export settings window.
- Select the video format: In the export settings window, choose the desired video format for your exported video. Movie Maker offers various options, including common formats like MP4, WMV, and AVI. Consider where you plan to use or share your video to determine the appropriate format.
- Adjust the quality settings: Depending on your preferences, you can adjust the quality settings for the exported video. You may have options like resolution, bitrate, and frame rate. Higher quality settings generally result in better visual clarity, but keep in mind that larger file sizes may be produced.
- Include music and audio: Ensure that the option to include music and audio in the exported video is selected. This ensures that the synchronized music is incorporated into the final video. Check any additional options related to audio or music to ensure proper export settings.
- Choose the export location: Specify the location on your computer where you want to save the exported video. Select a folder that you can easily access and remember. Provide a name for the exported video file to distinguish it from your project files.
- Export the video: Once you have adjusted all the export settings and chosen the export location, click on the “Save” or “Export” button to initiate the export process. Movie Maker will start rendering and exporting your video with the synchronized music.
- Monitor the exporting process: Monitor the progress of the export as Movie Maker renders and creates the final video file. The time it takes will depend on the length and complexity of your video. Be patient and allow the process to complete without interruption.
- Inspect the exported video: Once the export is complete, navigate to the chosen export location and open the exported video file with a media player. Verify that the music is properly synchronized with the video and that the overall quality meets your expectations.
By following these steps, you can successfully export your Movie Maker video with the incorporated music. Now you are ready to share your video with others, upload it to social media, or showcase it on your preferred platform.