
Why You Should Add Family Members to Your Facebook Profile
Facebook is not just a platform for connecting with friends and sharing updates; it is also a great way to stay connected with your family members. Adding your family members to your Facebook profile comes with several benefits and can greatly enhance your online social experience. Here are a few compelling reasons why you should consider adding your family members to your Facebook profile:
- Strengthen Family Bonds: By adding your family members on Facebook, you can strengthen your family bonds and keep in touch with relatives who live far away. You can share photos, videos, and updates, and engage in conversations with your loved ones, no matter where they are located.
- Stay Updated: Adding family members to your Facebook profile allows you to keep up with their lives. You can stay informed about important life events, such as birthdays, anniversaries, graduations, and more. It enables you to celebrate these milestones with your family members, even if you are unable to physically be there.
- Share Family Memories: Facebook provides a platform to preserve and reminisce over family memories. By adding family members to your profile, you can privately share old family photos, videos, and stories. This creates a virtual family album where everyone can contribute and relive cherished moments.
- Support System: Adding family members on Facebook can create a supportive network. In times of need or celebration, you can count on your family members for emotional support and encouragement. Whether it’s through likes, comments, or private messages, your family can provide a sense of belonging and encouragement in your online activities.
- Bridge the Generation Gap: Facebook can help bridge the gap between generations within your family. It provides a platform for younger and older family members to interact, share experiences, and learn from one another. This can lead to a deeper understanding and appreciation of different perspectives within the family.
Adding your family members to your Facebook profile can bring you closer to your loved ones, no matter the distance. It fosters a sense of community and allows you to create a digital family hub where you can connect, support, and celebrate together. So why not take the step to add your family members to your Facebook profile today?
How to Add Family Members to Your Facebook Profile
Adding your family members to your Facebook profile is a simple and straightforward process. Here is a step-by-step guide on how to do it:
- Step 1: Go to Your Facebook Profile
- Step 2: Click on “About” Section
- Step 3: Scroll Down to “Family and Relationships”
- Step 4: Click on “Add a Family Member”
- Step 5: Choose the Relationship and Enter the Name of Your Family Member
- Step 6: Adjust Privacy Settings for Each Family Member
- Step 7: Save Your Changes
Log in to your Facebook account and navigate to your profile page. You can do this by clicking on your name or profile picture on the top right corner of the Facebook website.
On your profile page, look for the “About” tab. It is located below your profile picture. Click on it to open your profile’s details and sections.
Scroll down the “About” page until you find the “Family and Relationships” section. It is usually located after the “Work and Education” section.
In the “Family and Relationships” section, you will see an option to “Add a Family Member.” Click on it to initiate the process of adding a family member to your profile.
Once you click on “Add a Family Member,” a dialog box will appear. Select the relationship type from the given options, such as “Mother,” “Father,” “Sibling,” etc. Then enter the name of the family member you wish to add.
After entering the name of your family member, you can choose the privacy settings for that individual. You can select from options like “Public,” “Friends,” “Friends Except,” or “Only Me.” This allows you to control who can see your connection to that family member.
Once you have entered the name and adjusted the privacy settings, click on the “Save” or “Add” button to add the family member to your Facebook profile. The changes will be saved, and the family member will now be visible on your profile.
Now that you know the steps, adding family members to your Facebook profile is a breeze. You can repeat these steps to add multiple family members and expand your digital family network. Make sure to keep the privacy settings in mind and select the appropriate options for each family member you add. Start connecting with your family today and enjoy a more enriched social experience on Facebook!
Step 1: Go to Your Facebook Profile
In order to add family members to your Facebook profile, you first need to access your profile page. This can be done by following these simple steps:
- Open the Facebook Website: Launch your preferred web browser and go to the official Facebook website at www.facebook.com.
- Log into Your Account: If you are not already logged in, enter your login credentials (email address or phone number and password) in the provided fields. Click on the “Log In” button to access your account.
- Go to Your Profile: Once you have successfully logged in, you will be redirected to your Facebook News Feed. To reach your profile page, click on your name or profile picture in the top right corner of the Facebook webpage. This will take you to your personal profile.
Alternatively, you can directly access your Facebook profile by entering “www.facebook.com/yourusername” in the address bar of your web browser, replacing “yourusername” with your actual Facebook username (if you have set one up).
Upon reaching your profile page, you will be able to see your profile picture, cover photo, and various tabs and sections related to your personal information and activity on Facebook.
It’s important to note that if you are using the Facebook mobile app, the process may differ slightly. In the app, you can tap on the profile icon, usually located at the bottom menu, to access your profile page. The overall concept remains the same, regardless of whether you are accessing Facebook on a computer or a mobile device.
Now that you have successfully reached your Facebook profile, you can proceed to the next step of adding family members to your profile and strengthening your online familial connections.
Step 2: Click on “About” Section
Once you have accessed your Facebook profile, the next step to add family members is to navigate to the “About” section. The “About” section contains various details and sections that allow you to showcase your personal information and interests on your profile. To do this, follow the instructions below:
- Look for the “About” Tab: On your profile page, you will notice a series of tabs located below your profile picture and cover photo. One of these tabs is labeled “About.” Click on this tab to proceed.
- Explore Your “About” Page: After clicking on the “About” tab, you will be directed to a new page displaying different sections related to your personal information. These sections include details such as your work and education, places you’ve lived, contact information, and more.
- Locate “Family and Relationships” Section: As you scroll down the “About” page, you will come across the “Family and Relationships” section. This section allows you to share information about your family members and relationships on Facebook.
The “Family and Relationships” section provides the option to add and display the names and relationships of your family members on your profile. Adding family members not only helps you stay connected with loved ones but also adds a personal touch to your profile, allowing others to get a glimpse of your family connections.
It’s important to note that the arrangement and design of the “About” section may vary slightly depending on the version of Facebook you are using (desktop or mobile) and any recent updates to the platform. Regardless of these minor differences, the “About” section can typically be found in a prominent location on your profile page and serves as a central hub for managing and sharing your personal information.
Once you have located the “Family and Relationships” section within the “About” page, you are ready to proceed to the next step of adding your family members to your Facebook profile.
Step 3: Scroll Down to “Family and Relationships”
After clicking on the “About” tab on your Facebook profile page, the next step to add family members is to scroll down until you reach the “Family and Relationships” section. This section allows you to showcase and share information about your family connections with others. Here’s how to locate it:
- Scroll Down the “About” Page: On the “About” page, you will find a variety of sections displaying your personal information, such as work and education, contact details, and more. Continue scrolling down until you come across the “Family and Relationships” section.
- Identify the “Family and Relationships” Section: As you scroll down, you will notice different sections with labels indicating their content. Look for the section labeled “Family and Relationships.” This is where you can add and manage information about your family members on your Facebook profile.
- Explore the “Family and Relationships” Section: Once you have located the “Family and Relationships” section, take a moment to familiarize yourself with its features. You will find options to add family members, define their relationships to you, and customize privacy settings for each individual.
The “Family and Relationships” section allows you to create a virtual representation of your family tree on your Facebook profile. By adding your family members and their relationships to you, you can showcase your familial connections and enhance your profile with personal touches.
It’s worth noting that the arrangement and design of the “Family and Relationships” section may slightly differ depending on the version of Facebook you are using (desktop or mobile) and any recent updates to the platform. However, regardless of these minor variations, you can usually find the “Family and Relationships” section by scrolling down the “About” page on your Facebook profile.
Once you have successfully navigated to the “Family and Relationships” section, you can proceed to the next step of actually adding your family members to your Facebook profile and strengthening your online family network.
Step 4: Click on “Add a Family Member”
Now that you have located the “Family and Relationships” section on the “About” page of your Facebook profile, the next step is to click on “Add a Family Member.” This option allows you to add your family members and showcase your familial connections on your profile. Follow these steps:
- Find the “Family and Relationships” Section: Scroll down the “About” page of your Facebook profile until you reach the “Family and Relationships” section. This is the area where you can manage and display information about your family members.
- Click on “Add a Family Member”: Within the “Family and Relationships” section, you will notice an option that says “Add a Family Member.” Click on this option to begin the process of adding a family member to your Facebook profile.
By clicking on “Add a Family Member,” a dialog box will appear where you can enter the necessary information about your family member. This includes their name and their relationship to you. You will also have the option to customize the privacy settings for each family member individually.
It’s important to note that while you can add various family members, it’s essential to only add those with whom you have a close and meaningful relationship. Adding too many distant relatives may clutter your profile and dilute the significance of showcasing your immediate family connections.
Once you have clicked on “Add a Family Member” in the “Family and Relationships” section of your Facebook profile, you are now ready to move on to the next step of specifying the relationship and entering the name of the family member you wish to add.
Step 5: Choose the Relationship and Enter the Name of Your Family Member
After clicking on “Add a Family Member” in the “Family and Relationships” section of your Facebook profile, you will be prompted to choose the relationship type and enter the name of the family member you want to add. Follow these steps to complete this stage:
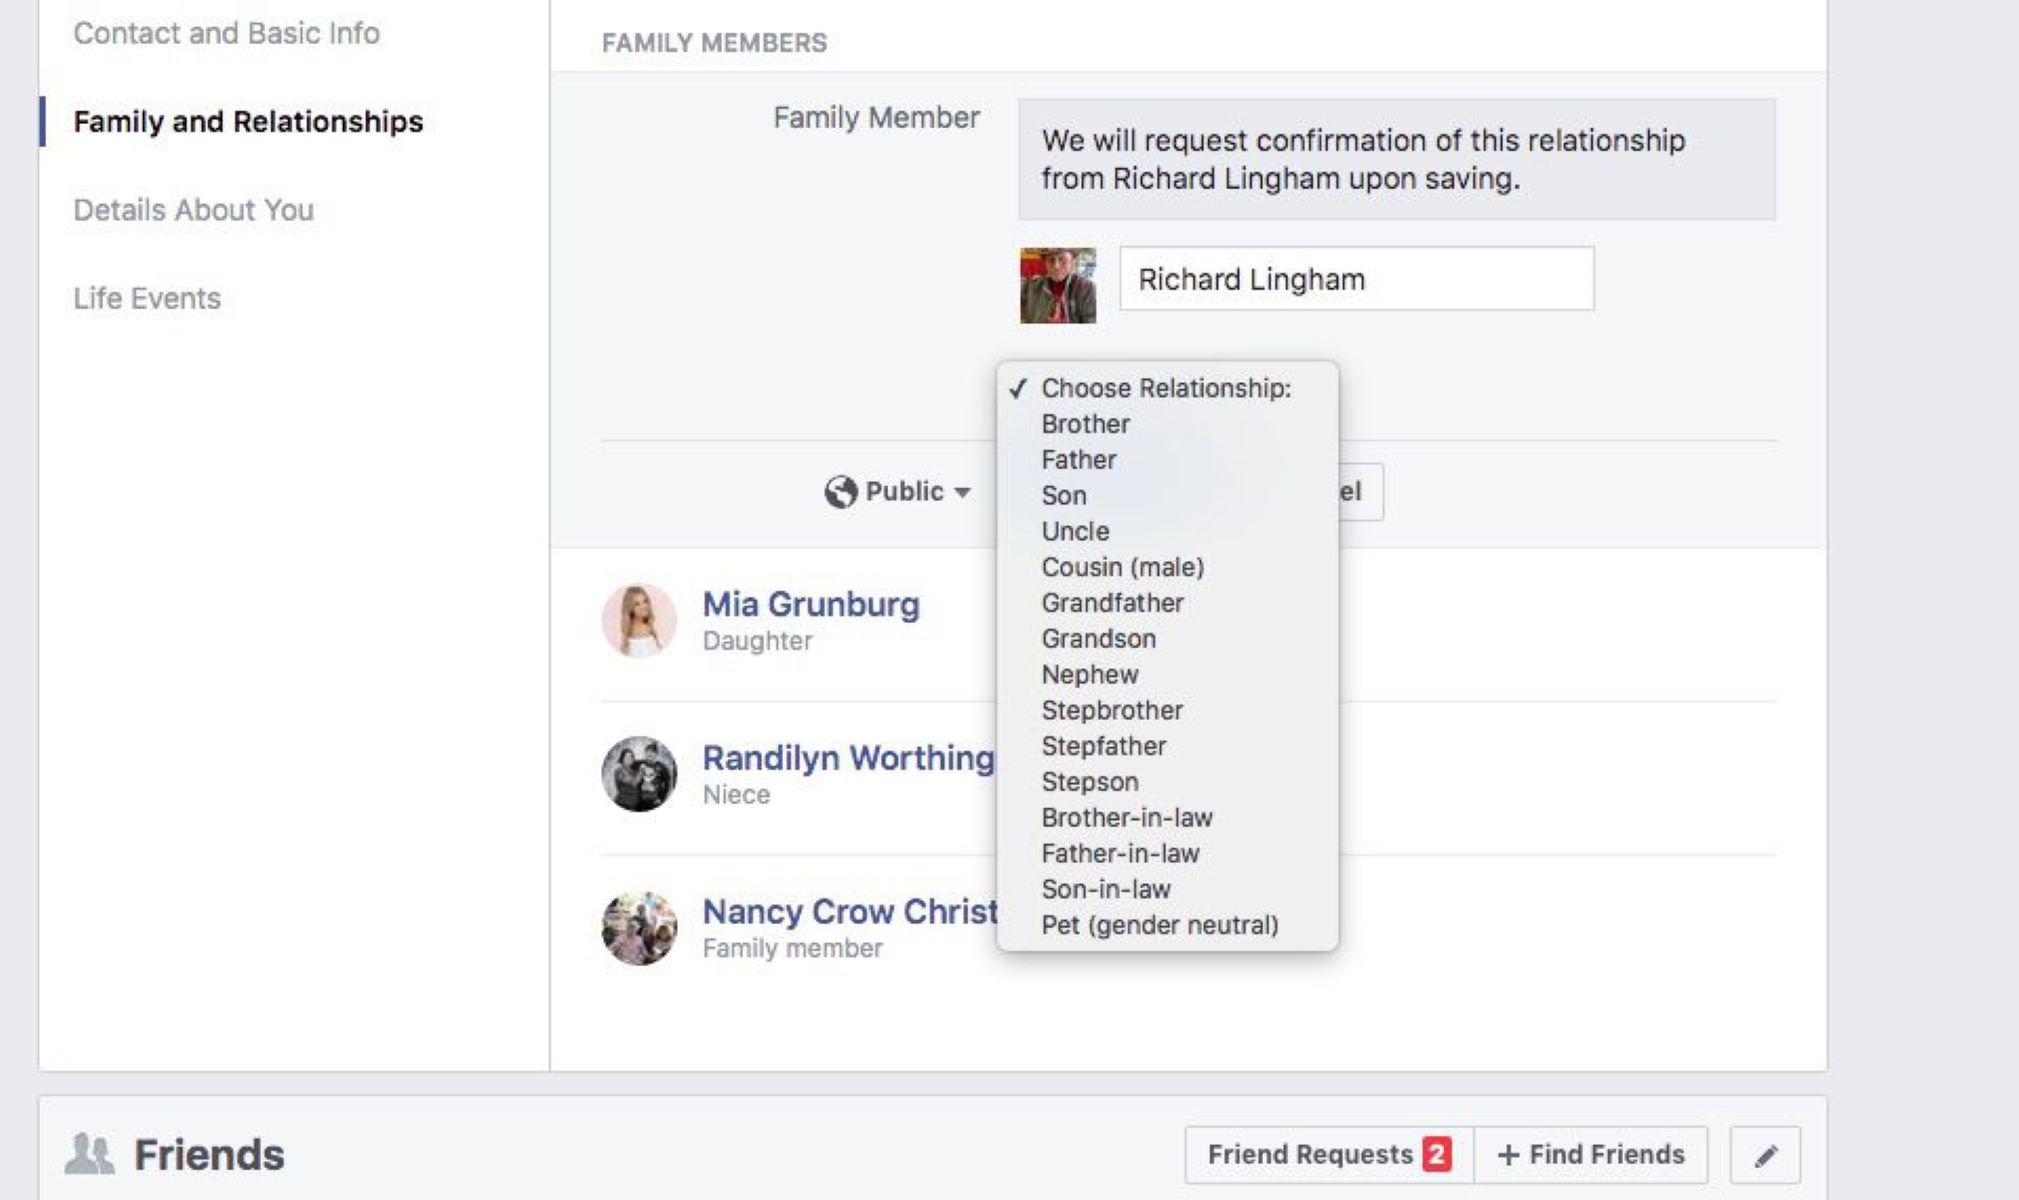
- Select the Relationship Type: In the dialog box that appears after clicking “Add a Family Member,” you will see a drop-down menu or a list of relationship types. Choose the appropriate relationship that best describes your connection to the family member you are adding. Typical relationship options include “Mother,” “Father,” “Sibling,” “Spouse,” and more.
- Enter the Name of Your Family Member: Once you have selected the relationship type, you will find a field to enter the name of your family member. Type in the full name of the family member you want to add to your Facebook profile. Make sure to double-check the spelling of their name to ensure accuracy.
By specifying the relationship and entering the name of your family member, you are providing the essential details that will help Facebook identify and display your familial connections correctly on your profile.
It’s worth noting that Facebook’s algorithm may suggest certain family members based on your existing connections and the information shared by your family members on their profiles. To add a suggested family member, simply click on their name from the list of suggestions, and their information will automatically be filled in the respective fields.
Remember that it’s important to respect the privacy and consent of your family members before adding them to your Facebook profile. Make sure to have open communication with them and obtain their permission before including their information on your profile.
Once you have chosen the relationship type and entered the name of your family member, you can proceed to the next step of adjusting the privacy settings for each family member you add, ensuring that you have complete control over who can view your family connections on Facebook.
Step 6: Adjust Privacy Settings for Each Family Member
After specifying the relationship and entering the name of your family member in the previous step, the next crucial step is to adjust the privacy settings for each family member you add to your Facebook profile. This allows you to control who can see the connection between you and your family members. Follow these steps to adjust the privacy settings:
- Customize Privacy Settings: After entering the name of your family member, you will see an option to customize the privacy settings for that individual. Click on the privacy settings dropdown menu or button next to the family member’s name.
- Choose Privacy Option: You will be presented with various privacy options to choose from, such as “Public,” “Friends,” “Friends Except,” or “Only Me.” Select the privacy option that you are comfortable with, taking into consideration the level of privacy you want for that specific family member’s information.
- Repeat for Other Family Members: If you are adding multiple family members, repeat the process of adjusting the privacy settings for each individual. You can set different privacy settings for each family member, depending on your preferences and their comfort levels regarding their information being displayed on your profile.
By customizing the privacy settings for your family members, you can ensure that the information you share about them is visible only to the desired audience. This allows you to maintain a level of privacy and control over who can see your connections and the information associated with your family members on Facebook.
It’s important to consider the preferences and privacy concerns of each family member before adjusting the privacy settings. Some family members might be comfortable with more public visibility, while others may prefer a more restricted audience, such as friends or close family members only.
Take the time to have a conversation with your family members about their comfort level regarding privacy settings and respect their wishes. Open communication and mutual agreement on privacy settings will help maintain a harmonious online presence for everyone involved.
Once you have adjusted the privacy settings for your family members, you can proceed to the final step of saving your changes to officially add them to your Facebook profile.
Step 7: Save Your Changes
After specifying the relationship, entering the name of your family member, and adjusting the privacy settings for each individual, it’s time to save your changes and officially add your family members to your Facebook profile. Follow these simple steps:
- Review Your Changes: Before saving your changes, take a moment to review the information you have entered and the privacy settings you have customized for each family member. Double-check for any errors or inaccuracies.
- Click on the “Save” or “Add” Button: Once you are satisfied with the information and privacy settings, click on the “Save” or “Add” button at the bottom of the dialog box. This will save your changes and add the family members to your Facebook profile.
Upon saving your changes, you will be directed back to your Facebook profile page, where you can now view your family members listed in the “Family and Relationships” section. Their names and relationship types will be displayed, providing a visual representation of your familial connections.
From this point forward, your family members will be visible to the audience you have selected based on their privacy settings. They will be able to view the connection with you on your profile, and you will be able to engage with them through various Facebook features such as posts, comments, and private messages.
If you decide to make any changes to the information or privacy settings of your family members in the future, you can do so by following the same steps discussed earlier. Simply locate the “Family and Relationships” section on your profile’s “About” page and make the necessary adjustments.
Remember to periodically review the information and privacy settings of your family members on your Facebook profile to ensure they are up-to-date and reflect any changes in your relationships or preferences.
By saving your changes, you have successfully added your family members to your Facebook profile, fostering a stronger online connection and sharing your familial bonds with others on the platform.
Tips for Adding Family Members on Facebook
When adding family members on Facebook, it’s important to consider a few tips to ensure a positive and meaningful experience for both you and your loved ones. Here are some helpful suggestions to keep in mind:
- Only Add Close Family Members: When adding family members to your Facebook profile, focus on adding those with whom you have a close relationship. Adding distant relatives or acquaintances may clutter your profile and diminish the significance of showcasing immediate family connections.
- Consider the Privacy Settings of Your Family Members: Each family member has different preferences regarding their online presence and privacy. Before adding them to your Facebook profile, have an open and respectful conversation about their comfort level with sharing information and adjust the privacy settings accordingly.
- Keep Your Family Members Updated on Your Facebook Activity: Communicate with your family members about your Facebook activity and any relevant updates. Share important posts or events with them directly or encourage them to follow your profile to stay informed about your life.
By following these tips, you can ensure that the process of adding family members on Facebook is seamless and enjoyable for everyone involved. It allows you to maintain meaningful connections, share important updates, and create a virtual family hub on the platform.
Remember that adding family members on Facebook is an opportunity to strengthen relationships and nurture your familial bonds. It provides a platform for engaging in conversations, sharing memories, and offering support, no matter the physical distance between you.
Take advantage of this unique feature of Facebook to create a digital space where your family can come together, celebrate milestones, and support one another through life’s ups and downs.
With these tips in mind, you can make the most of adding family members on Facebook and create a more fulfilling online experience for both you and your loved ones.
Tip 1: Only Add Family Members You Have a Close Relationship With
When it comes to adding family members on Facebook, it’s important to be selective and only add those with whom you have a close and meaningful relationship. While Facebook offers the option to connect with a wide range of individuals, including extended family members, acquaintances, and distant relatives, it’s best to prioritize adding immediate family members and those you have a strong connection with. Here’s why:
- Maintain a Focused Profile: Adding family members you have a close relationship with helps to keep your Facebook profile more focused and centered around the people who matter most in your life. It enables you to highlight the significant and meaningful connections within your family while minimizing clutter and unnecessary noise on your profile.
- Promote Genuine Interactions: By adding family members you have a close relationship with, you create a space for genuine interactions and meaningful engagement. These are the people you can truly connect with, share personal updates, and engage in conversations that matter. Building a smaller, more intimate network of family connections on Facebook ensures a more authentic and fulfilling online experience for everyone involved.
- Respect Privacy Boundaries: Adding only close family members allows you to respect the privacy boundaries of those you care about. Some family members may have specific preferences about their online presence, and they may not feel comfortable having their personal information or activities shared with a broader audience. By being selective in whom you add, you can ensure that you are mindful of their privacy concerns and maintain a sense of trust and respect within the family.
- Enhance Family Bonding: By focusing on adding family members you have a close relationship with, you can enhance the bonds within your family through Facebook. This platform provides an opportunity to stay connected, share important updates, and support one another, even when physical distance separates you. Creating a smaller, more intimate family network on Facebook allows for a more meaningful and heartfelt connection, strengthening your relationships and fostering a sense of unity.
Remember, the goal of adding family members on Facebook is to foster meaningful connections and create a digital space where you can share and celebrate with those who hold a special place in your life. By adding family members you have a close relationship with, you create a more focused, authentic, and fulfilling online environment for yourself and your loved ones.
Consider the depth of your relationships and prioritize adding those family members who play an important role in your life. By doing so, you can make the most of your Facebook interactions, deepen your family bonds, and create lasting memories together.
Tip 2: Consider the Privacy Settings of Your Family Members
When adding family members to your Facebook profile, it is crucial to consider the privacy settings of each individual. Respecting their privacy preferences and ensuring they feel comfortable with the level of visibility is essential for maintaining trust and a positive online experience. Here are some reasons why considering the privacy settings of your family members is important:
- Individual Privacy Preferences: Each family member may have different comfort levels when it comes to sharing personal information on social media. Some may prefer to keep their profiles private, visible only to close friends and family, while others may be more open to sharing with a broader audience. It is important to have open and honest conversations with your family members about their privacy preferences and respect their choices.
- Respect Boundaries: Respecting the privacy settings of your family members demonstrates your respect for their boundaries. By allowing them to have control over who can see their connection to you on Facebook, you are honoring their preferences and ensuring they feel comfortable with the level of exposure their personal information receives.
- Protecting Personal Information: Adjusting privacy settings for your family members can help protect their personal information from falling into the wrong hands. By limiting the visibility of their connection to you, you reduce the risk of potential misuse of their information by unauthorized individuals.
- Maintaining Trust: Considering the privacy settings of your family members helps maintain trust within your family network. By respecting their privacy preferences and allowing them to control their online visibility, you demonstrate your commitment to their privacy and build a sense of trust in your digital interactions.
To ensure that you are considerate of your family members’ privacy, take the time to communicate with each individual before adding them to your Facebook profile. Discuss their comfort levels and preferences regarding the visibility of their connection with you. This open dialogue will help you determine the appropriate privacy settings for each family member.
Keep in mind that privacy settings on Facebook may change over time, so it is important to regularly review and update them to align with the preferences of your family members. Stay vigilant and respectful of their privacy concerns, ensuring a positive and secure online experience for everyone involved.
By considering the privacy settings of your family members, you foster an environment of trust, respect, and consent within your digital family network. This enhances the overall online experience and strengthens the bonds between you and your loved ones on Facebook.
Tip 3: Keep Your Family Members Updated on Your Facebook Activity
When adding family members to your Facebook profile, it’s important to keep them updated on your Facebook activity. Sharing updates, important posts, and significant life events with your family members can help strengthen your connections and ensure that everyone feels involved and connected. Here’s why it’s beneficial to keep your family members informed:
- Maintain Strong Family Bonds: By keeping your family members updated on your Facebook activity, you foster stronger family bonds. Sharing updates about your life allows them to feel connected and involved in your day-to-day experiences, even if you are physically apart. It helps create a sense of unity and closeness within your family, no matter the distance.
- Celebrate Milestones: Facebook provides a platform to celebrate important milestones in your life. Whether it’s a birthday, graduation, marriage, new job, or any other significant event, by sharing these milestones with your family members on Facebook, you allow them to take part in your joy and celebrations.
- Stay Connected Across Distances: Social media, like Facebook, bridges the gap created by physical distance. By keeping your family members updated on your Facebook activity, you can maintain a level of closeness and connection, regardless of geographical separation. Your posts, photos, and updates provide them with glimpses of your life and allow them to stay connected with you.
- Offer Support and Encouragement: Facebook serves as a platform for not only sharing good times but also seeking support during challenging periods. By keeping your family members updated on your Facebook activity, you give them the opportunity to offer support and encouragement when needed. They can provide a virtual shoulder to lean on, offer words of advice, or simply lend an empathetic ear.
- Create Shared Memories: Sharing your Facebook activity with your family members allows you to create shared memories. Your posts, photos, and shared experiences become digital memories that you can look back on together and reminisce about in the future. These shared memories strengthen your family connections and create a sense of shared history.
To keep your family members updated, consider posting regularly on Facebook, sharing important life events, and engaging in conversations through comments and messages. You can also tag your family members in relevant posts, photos, or videos to ensure they don’t miss out on any updates you share.
Remember to be mindful of privacy settings and respectful of each family member’s preferences. Some family members may prefer to receive updates privately or in a more restricted audience setting. Always seek permission and consent before tagging or mentioning family members to ensure everyone’s comfort and privacy.
By keeping your family members updated on your Facebook activity, you create a stronger sense of connection, involvement, and support within your family. It allows you to share and bond over meaningful experiences and ensures that your online interactions are inclusive and engaging for everyone involved.
Frequently Asked Questions about Adding Family Members on Facebook
Adding family members to your Facebook profile can sometimes raise questions or concerns. To help address any doubts you may have, here are answers to some frequently asked questions:
- FAQ 1: Can I Add Extended Family Members?
- FAQ 2: Can I Remove Family Members from my Facebook Profile?
- FAQ 3: Will My Family Members Be Notified When I Add Them?
Yes, you can add extended family members to your Facebook profile. While it’s common to focus on immediate family members like parents, siblings, and children, you can also add grandparents, aunts, uncles, cousins, and other relatives. However, it’s important to consider the strength of your relationship and privacy preferences before adding extended family members to your profile.
Yes, you have the ability to remove family members from your Facebook profile. To do this, go to your profile, click on “About,” scroll down to the “Family and Relationships” section, locate the family member you want to remove, and click on the “X” button or the “Remove” option next to their name. Keep in mind that removing a family member will also remove their visibility as a connection on your profile.
No, Facebook does not send notifications to family members when they are added to your profile. However, the addition of family members will be visible on your profile for those who can see your connections. If you want to personally notify your family members, you can send them a message or inform them outside of Facebook.
These frequently asked questions cover some common concerns regarding adding family members on Facebook. It’s important to note that Facebook’s features and policies may change over time, so it’s always a good idea to consult the official Facebook Help Center or support resources for the most up-to-date information and guidance.
Remember, adding family members on Facebook is a personal choice, and it’s important to respect the privacy and preferences of each family member. Prioritize maintaining strong and meaningful connections in your online family network, and adjust your settings and interactions accordingly to create a positive and inclusive digital space.
FAQ 1: Can I Add Extended Family Members?
Yes, you have the option to add extended family members to your Facebook profile. While it is common to focus on immediate family members like parents, siblings, and children, Facebook allows you to expand your family network by adding grandparents, aunts, uncles, cousins, and other relatives. Here are a few things to consider when adding extended family members:
- Relationship Strength: Before adding extended family members, consider the strength of your relationship with each individual. Facebook is a platform for connecting with those who are significant in your life, so it is best to prioritize adding family members with whom you have a close and meaningful relationship.
- Privacy Preferences: Keep in mind that each family member may have different privacy preferences and comfort levels when it comes to social media. Before adding extended family members to your Facebook profile, have a conversation with them about their preferences regarding online visibility. Respect their choices and adjust the privacy settings accordingly to ensure everyone feels comfortable and included.
- Profile Purpose: Consider the purpose of your Facebook profile and how you want to present your online identity. If you primarily use Facebook to connect with immediate family members, you may choose to keep your profile limited to close relatives. On the other hand, if you want to establish connections with a broader range of family members, adding extended family members can help create a more comprehensive family network on your profile.
Adding extended family members on Facebook can be a great way to expand your online connections and maintain a sense of family unity. It allows you to stay connected with relatives who may be geographically distant and share important updates, milestones, and memories with a wider circle of family members.
However, it’s important to evaluate each individual relationship and privacy preferences before adding extended family members. By being selective and considering these factors, you can ensure that your Facebook profile reflects your close family relationships while still embracing the unique connections within your extended family network.
FAQ 2: Can I Remove Family Members from my Facebook Profile?
Yes, you have the ability to remove family members from your Facebook profile. If you want to remove a family member from your profile, follow these steps:
- Go to Your Profile: Log in to your Facebook account and navigate to your profile page.
- Click on “About”: On your profile page, locate the “About” tab and click on it to access your profile details.
- Scroll down to “Family and Relationships”: Scroll down the “About” page until you find the “Family and Relationships” section.
- Locate the Family Member: Within the “Family and Relationships” section, locate the family member you want to remove.
- Remove the Family Member: Next to the family member’s name, you will see an “X” button or a “Remove” option. Click on it to initiate the removal process.
Removing a family member from your Facebook profile will also remove their visibility as a connection on your profile. However, it’s important to note that removing a family member from your profile does not sever the actual familial relationship—it only removes the public display of the connection on Facebook.
Before removing a family member, consider the reasons behind your decision. It’s possible that the family member may have changed their privacy settings or deactivated their account, leading to their visibility being removed from your profile. If this is the case, you may want to reach out to them and ensure that it aligns with their intentions.
Additionally, it’s important to approach the removal process respectfully and considerate of potential implications. If there are any concerns or issues within the family, it may be best to address them through open communication rather than solely relying on removing a family member from your Facebook profile.
Remember, the decision to remove a family member from your Facebook profile is a personal one, and it’s important to consider the impact on your online relationships and family dynamics. Take the time to evaluate the situation and approach the removal process with care and sensitivity.
FAQ 3: Will My Family Members Be Notified When I Add Them?
No, Facebook does not send notifications to family members when they are added to your Facebook profile. The addition of family members to your profile is not accompanied by any automatic notification or alert.
When you add a family member to your Facebook profile, the visibility of this connection is usually displayed on your profile page under the “Family and Relationships” section. It serves as a representation of your familial connections and allows others to see your relationship with that specific family member.
While Facebook does not notify family members when they are added, it’s a good practice to personally inform them outside of the platform. You may want to reach out through a private message or have a conversation with them to let them know that you have added them to your profile.
By personally notifying your family members, you ensure that they are aware of the inclusion and have the opportunity to engage with your profile accordingly. It also allows for open communication and ensures that you are respectful of their online boundaries and privacy preferences.
If you are concerned about the visibility of your family connections on your profile, you can customize the privacy settings for each family member individually. This enables you to control who can see the connection between you and your family members, providing you with more control over your online family network.
Remember, the addition of family members on Facebook is about fostering connections and representing meaningful relationships. While there are no automatic notifications, it’s important to engage in open dialogue and ensure that your family members are aware of their inclusion on your profile.
Always respect the privacy and consent of your family members, and be mindful of their preferences regarding online visibility and connection displays on Facebook.