
What are Ranunculus?
Ranunculus, commonly known as buttercups, are beautiful flowering plants that belong to the Ranunculaceae family. They are native to the cooler regions of the Northern Hemisphere, including Europe, Asia, and North America. Ranunculus plants are prized for their vibrant and showy flowers, which come in a wide range of colors, including red, pink, orange, yellow, and white. With their delicate petals and intricate shapes, they add a touch of elegance to any garden or floral arrangement.
These herbaceous perennials are known for their distinctive cup-shaped flowers, which resemble the petals of a rose or a peony. The flowers consist of numerous layers of thin petals arranged in a spiral pattern, creating a stunning visual impact. The foliage of ranunculus plants is typically glossy and toothed, providing an attractive backdrop to the colorful blooms.
Ranunculus plants are known for their ability to thrive in cool climates and are often cultivated as spring or fall-blooming flowers. They prefer full sun to partial shade and well-drained soil. However, with proper care and attention, they can also be grown in containers or raised beds.
These flowers are not only visually appealing but also attract pollinators such as bees and butterflies to the garden, making them a valuable addition for supporting local ecosystems. Additionally, ranunculus flowers can be cut and used in floral arrangements, making them popular among florists and home gardeners alike.
It is important to note that while ranunculus can be stunning and rewarding to grow, they are toxic if ingested, so they should be kept away from children and pets. It is advisable to wear gloves when handling these plants, as their sap can also cause skin irritation.
Whether used in a garden, displayed in a vase, or used in various floral arrangements, ranunculus flowers bring joy and beauty to any setting. With their vibrant colors and intricate blooms, they are sure to impress anyone who comes across them.
Understanding the Growing Conditions for Ranunculus
In order to successfully grow ranunculus, it is important to understand their specific growing conditions. By providing the right environment, you can ensure healthy growth and abundant blooms. Here are the key factors to consider:
1. Sunlight: Ranunculus plants thrive in full sun to partial shade. They require at least 6 hours of direct sunlight each day to promote strong growth and vibrant flowers.
2. Temperature: Ranunculus prefer cooler temperatures between 50°F to 65°F (10°C to 18°C). They tend to struggle in hot and humid climates, so it is best to grow them in regions with mild or moderate temperatures.
3. Soil: Well-drained soil is essential for the successful cultivation of ranunculus. They prefer soil that is rich in organic matter and has a pH level of 6 to 7. If your soil is heavy or clay-like, consider adding compost or well-rotted manure to improve drainage.
4. Watering: While ranunculus plants require regular watering, it is crucial not to overwater them. They prefer moist soil, but prolonged exposure to wet conditions can lead to root rot. Water the plants deeply once a week or whenever the top inch of soil feels dry.
5. Fertilization: Ranunculus benefit from regular fertilization to promote healthy growth and abundant blooms. Apply a balanced, slow-release fertilizer or a liquid fertilizer diluted to half strength every 4 to 6 weeks during the growing season.
6. Mulching: Applying a layer of organic mulch around the base of ranunculus plants helps to conserve moisture, suppress weed growth, and regulate soil temperature. Use materials such as straw, shredded leaves, or compost, and maintain a layer of mulch about 2 inches thick.
7. Air Circulation: Good air circulation is important to prevent fungal diseases, which can be a concern for ranunculus. Ensure that plants are not overcrowded, and maintain adequate spacing between them to promote airflow.
By understanding and providing the optimal growing conditions for ranunculus, you can ensure that these beautiful flowers thrive and bring color and joy to your garden.
Choosing the Right Time to Plant Ranunculus
Choosing the correct time to plant ranunculus bulbs is crucial for the successful growth and blooming of these beautiful flowers. The timing can vary depending on your region and climate, but there are generally two main planting seasons for ranunculus: spring and fall.
Planting Ranunculus in Spring: In regions with mild winters, planting ranunculus bulbs in spring is the most common approach. Ideally, you should aim to plant the bulbs after the last frost date in your area when the soil has warmed up and is workable. This is typically around early to mid-spring. By planting in spring, you give the bulbs the opportunity to establish their root systems and bloom during the summer months.
Planting Ranunculus in Fall: If you live in an area with harsh winters and freezing temperatures, fall planting is recommended. Planting ranunculus bulbs in the fall allows them to undergo a period of dormancy during the cold months and emerge in the spring once the soil begins to thaw. Aim to plant the bulbs 6 to 8 weeks before the first frost date in your region, usually in late summer or early fall. This gives the bulbs enough time to establish roots before winter sets in. Fall-planted ranunculus generally bloom earlier in the spring than their spring-planted counterparts.
When selecting ranunculus bulbs for planting, choose healthy and firm bulbs without any signs of rot or damage. You can typically find ranunculus bulbs at local nurseries, garden centers, or online retailers. Consider the size of the bulbs as well; larger bulbs often produce larger and more robust flowers.
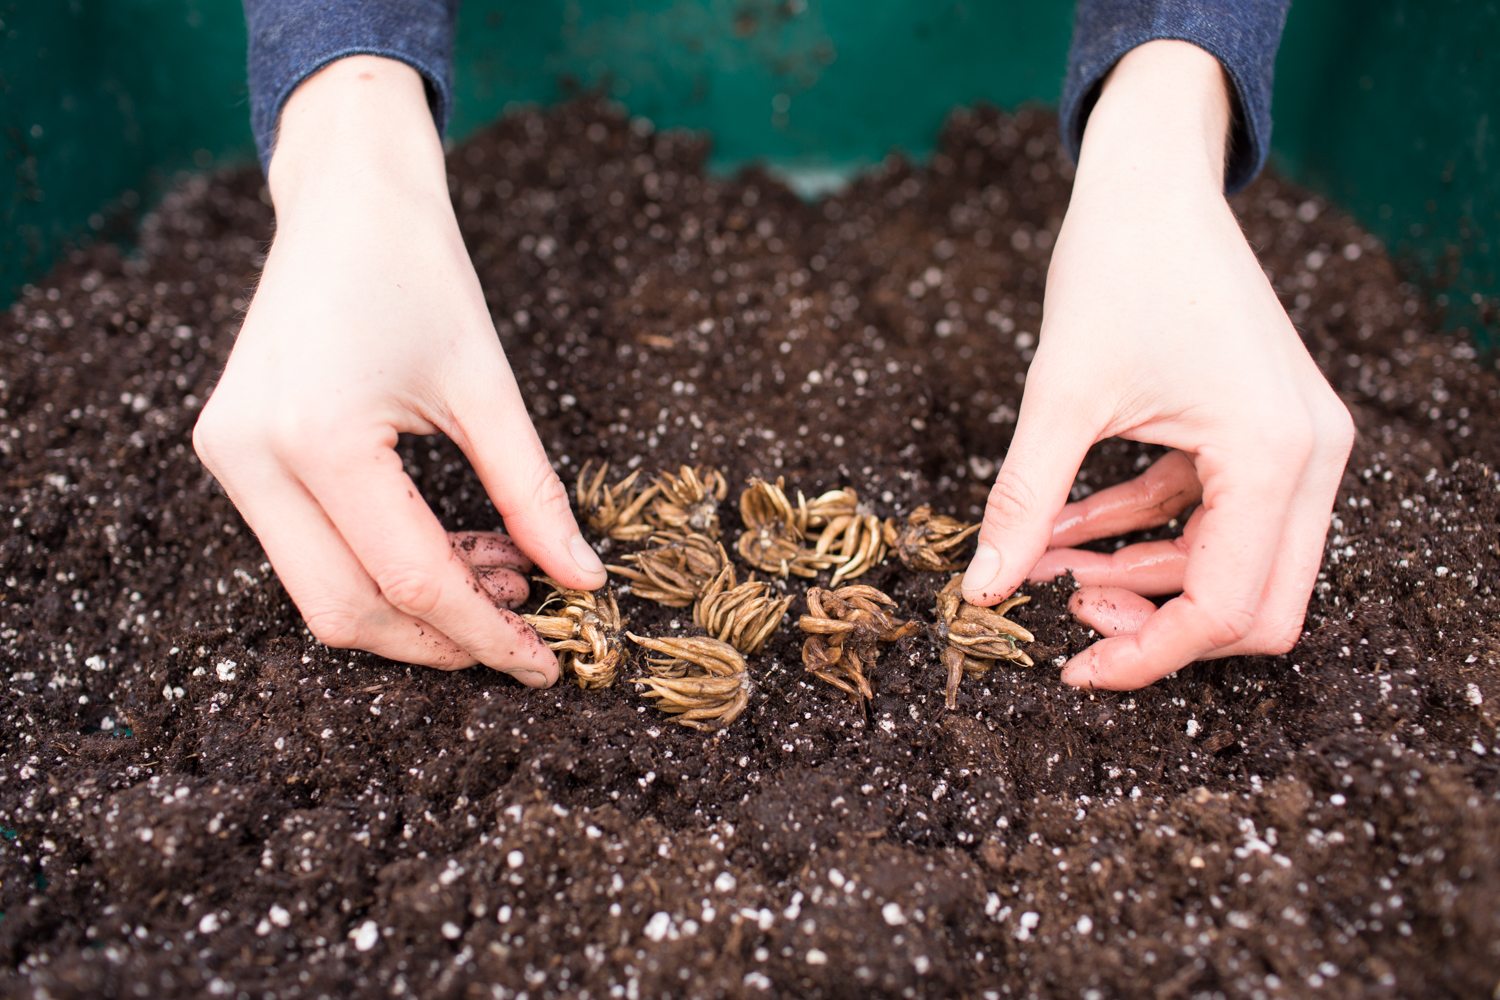
It is important to note that ranunculus bulbs should be planted with the “claws” or the pointy ends facing downwards. This allows for proper root development and ensures that the growing shoot emerges from the correct position.
By choosing the right time to plant ranunculus bulbs and following proper planting techniques, you can set the stage for a successful growing season and enjoy the vibrant and elegant blooms of these stunning flowers.
Planting Ranunculus in Spring
Spring is an ideal time to plant ranunculus bulbs in regions with mild winters. By planting in spring, you provide the bulbs with optimal conditions for establishment and growth. Here are the steps to follow when planting ranunculus in spring:
1. Choose a Suitable Location: Select a location that receives full sun to partial shade. Ranunculus prefer bright light but can benefit from some shade during the hottest part of the day, especially in warmer regions.
2. Prepare the Soil: Prepare the planting area by loosening the soil to a depth of 6-8 inches (15-20 cm). Remove any weeds or debris and amend the soil with organic matter such as compost or well-rotted manure to improve drainage and fertility.
3. Soak the Bulbs: Before planting, soak the ranunculus bulbs in water for a few hours. This will help hydrate the bulbs and initiate the sprouting process.
4. Planting Depth: Dig small holes or trenches that are 2-3 inches (5-8 cm) deep. Place the ranunculus bulbs with the “claws” or pointed ends facing down, and space them about 4-6 inches (10-15 cm) apart. Cover the bulbs with soil, gently firming it around them.
5. Watering: After planting, water the area thoroughly. Aim for moist soil throughout the growing season, but be cautious of overwatering. Allow the soil to dry slightly between waterings to avoid root rot.
6. Mulching: Apply a layer of organic mulch, such as straw or shredded leaves, around the base of the plants. Mulching helps conserve moisture, suppress weed growth, and regulate soil temperature.
7. Maintenance: As the ranunculus plants grow, provide regular care by watering when necessary, fertilizing with a balanced slow-release fertilizer, and removing any weeds that may appear. Monitor the plants for signs of pests or diseases and take appropriate measures if needed.
Ranunculus plants generally take about 60-90 days to bloom after planting. Once they start blooming, you can enjoy their stunning, colorful flowers throughout the spring and into early summer.
By following these steps, you can successfully plant ranunculus bulbs in spring and create a beautiful display of these elegant flowers in your garden.
Planting Ranunculus in Fall
For regions with harsh winters and freezing temperatures, fall planting is the preferred method for growing ranunculus. Planting ranunculus bulbs in the fall allows them to undergo a period of dormancy during winter and emerge in the spring. Here are the steps to follow when planting ranunculus in the fall:
1. Timing: Plan to plant ranunculus bulbs about 6 to 8 weeks before the first expected frost date in your region. This gives the bulbs enough time to establish roots before the cold weather sets in. In most regions, this falls in late summer or early fall.
2. Site Selection: Choose a location that receives full sun or partial shade. Ensure that the soil has good drainage to prevent the bulbs from sitting in waterlogged conditions, which can lead to rot.
3. Soil Preparation: Prepare the soil by loosening it to a depth of 6-8 inches (15-20 cm). Remove any weeds or debris and amend the soil with organic matter, such as compost or well-rotted manure, to improve its structure and fertility.
4. Planting Depth: Dig small holes or trenches that are 2-3 inches (5-8 cm) deep. Place the ranunculus bulbs with the “claws” or pointed ends facing down, and space them about 4-6 inches (10-15 cm) apart. Cover the bulbs with soil, gently firming it around them.
5. Watering: After planting, water the area thoroughly. This will help settle the soil and promote root establishment. Keep the soil consistently moist, but avoid overwatering, as excess moisture can cause bulb rot. Monitor the moisture levels and adjust watering accordingly.
6. Mulching: Apply a layer of organic mulch, such as straw or shredded leaves, around the planted bulbs. Mulching helps insulate the soil, retain moisture, and suppress weed growth. Keep the mulch a few inches away from the ranunculus stems to prevent moisture-related issues.
7. Winter Protection: In areas with severe winters, provide additional protection to the planted bulbs. Consider using a layer of straw or protective coverings like frost blankets to shield the bulbs from extreme cold temperatures.
8. Spring Growth: As the weather starts to warm in spring, the ranunculus bulbs will naturally break dormancy and send up shoots. Remove any winter mulch and continue to provide regular care, including watering and fertilization, to support healthy growth and flowering.
By planting ranunculus bulbs in the fall and providing proper care, you can look forward to a beautiful display of vibrant blooms in the following spring.
Preparing the Soil for Ranunculus
Preparing the soil properly is essential for the successful growth and development of ranunculus plants. By providing a well-prepared planting bed, you can ensure that the soil is fertile, well-draining, and rich in nutrients. Here are the steps to prepare the soil for ranunculus:
1. Clear the Area: Start by removing any weeds, rocks, or debris from the planting area. This will create a clean and clear space for the ranunculus bulbs to be planted.
2. Test the Soil: It’s a good practice to test the soil pH and nutrient levels to determine its current condition. Ranunculus plants prefer slightly acidic to neutral soil, with a pH range of 6 to 7. If necessary, amend the soil to adjust the pH level. You can also consult with a local gardening expert or cooperative extension service for specific soil recommendations.
3. Improve Drainage: Ranunculus bulbs require well-draining soil to prevent waterlogged conditions, which can lead to rot. If your soil is heavy or poorly draining, you can improve the drainage by incorporating organic matter such as compost or well-rotted manure. This will help loosen the soil, improve its structure, and enhance drainage capabilities.
4. Enhance Fertility: Ranunculus plants benefit from fertile soil that is rich in nutrients. Prior to planting, add organic matter, such as compost or aged manure, to the soil. This will increase the soil’s fertility and provide essential nutrients for the growing plants. Work the organic matter into the top 6 to 8 inches (15 to 20 cm) of soil for optimal results.
5. Address Nutrient Deficiencies: Depending on the soil test results, you may need to address specific nutrient deficiencies in the soil. Use a balanced fertilizer or organic amendments to provide the necessary nutrients like nitrogen, phosphorus, and potassium. Follow the recommended application rates and incorporate the amendments into the soil before planting.
6. Break Up Clumps: If the soil has clumps or is compacted, use a garden fork or a tiller to break it up. This will create a loose and friable texture, allowing the ranunculus roots to penetrate easily and establish themselves in the soil.
7. Level the Surface: Rake the soil to level the surface. This will ensure uniform planting depth and help with water distribution. It is particularly important for the ranunculus bulbs to be planted at the correct depth for successful growth.
By properly preparing the soil for ranunculus, you set the foundation for healthy plant growth and vibrant blooms. Taking the time to enhance the soil’s drainage, fertility, and structure will provide optimal conditions for these beautiful flowers to thrive.
Steps to Planting Ranunculus Bulbs Correctly
Properly planting ranunculus bulbs is crucial to ensure their successful growth and blooming. Following the correct planting technique will help establish healthy roots and promote vigorous flower production. Here are the steps to plant ranunculus bulbs correctly:
1. Choose Healthy Bulbs: Select firm and healthy ranunculus bulbs from a reputable source. Look for bulbs that are free from damage, mold, or signs of disease.
2. Select the Planting Location: Choose a well-drained area that receives full sun to partial shade. Ranunculus prefer bright light, but some shade during the hottest part of the day is beneficial, especially in warmer regions.
3. Prepare the Soil: Loosen the soil to a depth of about 6-8 inches (15-20 cm), removing any weeds and rocks. Amend the soil with organic matter, such as compost or well-rotted manure, to improve drainage and fertility.
4. Planting Depth: Dig holes or trenches that are 2-3 inches (5-8 cm) deep. Place the ranunculus bulbs with the “claws” or pointed ends facing down, and space them 4-6 inches (10-15 cm) apart.
5. Filling in the Holes: Cover the bulbs with soil, gently firming it around them. Ensure that the bulbs are covered to the recommended planting depth, as planting too shallow or too deep can affect their performance.
6. Watering: After planting, thoroughly water the area to settle the soil and initiate root growth. Provide regular watering throughout the growing season, keeping the soil slightly moist but avoiding overwatering that may lead to rot.
7. Mulching: Apply a layer of organic mulch, such as straw or shredded leaves, to conserve moisture, suppress weed growth, and regulate soil temperature. Keep the mulch a few inches away from the ranunculus stems to prevent rot or pest issues.
8. Maintenance: Monitor the plants for any signs of pests or diseases, and take appropriate measures if needed. Apply a balanced slow-release fertilizer or a liquid fertilizer diluted to half strength every 4 to 6 weeks to promote healthy growth.
9. Support if Necessary: If your ranunculus plants are prone to flopping over, provide support with stakes or grow-through plant supports early in the growing season to prevent damage.
10. Harvesting and Storing: When the ranunculus flowers reach their peak bloom, you can cut them for use in floral arrangements. After the blooming season, allow the foliage to yellow and wither naturally before lifting the bulbs and storing them in a cool, dry place for the next planting season.
By following these steps, you can ensure that your ranunculus bulbs are planted correctly, establishing strong roots and providing a stunning display of colorful blooms.
Caring for Ranunculus after Planting
Proper care is essential to ensure the health and vitality of ranunculus plants after they have been planted. By providing the right care and attention, you can encourage vigorous growth and abundant blooms. Here are the key steps to care for ranunculus after planting:
1. Watering: Adequate watering is crucial for the successful growth of ranunculus. Water the plants deeply, ensuring that the soil is evenly moist, but not waterlogged. Check the moisture levels regularly and adjust watering frequency based on weather conditions and the moisture needs of the plants.
2. Mulching: Applying a layer of organic mulch around the base of the plants can help conserve moisture, suppress weed growth, and regulate soil temperature. Ensure that the mulch is a few inches away from the stems to prevent moisture-related issues.
3. Fertilization: Ranunculus plants benefit from regular fertilization to promote healthy growth and abundant blooms. Apply a balanced, slow-release fertilizer or a liquid fertilizer diluted to half strength every 4 to 6 weeks during the growing season. Follow the package instructions for the appropriate application rate.
4. Deadheading: Remove spent flowers by deadheading regularly. This encourages the plant to put its energy into producing more flowers rather than setting seeds. Simply pinch off the faded blossoms or cut the entire stem back to the base.
5. Pest Control: Monitor the plants for any signs of pests, such as aphids or snails. If necessary, use organic insecticides or other pest control methods to keep these unwanted visitors at bay. Regularly inspect the plants to catch any pest problems early on before they escalate.
6. Disease Management: Keep an eye out for common diseases such as powdery mildew or root rot. These can be prevented by ensuring adequate airflow around the plants and avoiding overwatering. If signs of disease appear, treat them promptly with appropriate fungicides or other disease control methods.
7. Support for Tall Varieties: Some ranunculus varieties can grow tall and may require support to prevent bending or flopping. Stake the plants or use grow-through plant supports to keep them upright. Install the support structures early in the growing season to prevent damage to the plants.
8. Monitoring and Maintenance: Regularly inspect the plants for any signs of stress, nutrient deficiencies, or other issues. Remove any yellowing or damaged foliage to keep the plants looking tidy. Stay vigilant to catch any problems early and take appropriate action as needed.
By providing proper care, attention, and maintenance, you can ensure the healthy growth and long-lasting beauty of your ranunculus plants.
Dealing with Common Issues in Growing Ranunculus
While ranunculus plants are generally resilient, they can be susceptible to certain issues that can hinder their growth and flowering. By being aware of these common problems and taking proactive measures, you can ensure the health and success of your ranunculus plants. Here are some common issues you may encounter when growing ranunculus, along with tips on how to deal with them:
1. Fusarium Wilt: Fusarium wilt is a fungal disease that affects ranunculus plants, causing wilting, yellowing, and stunted growth. To prevent this disease, ensure proper soil drainage and avoid overwatering. Remove and destroy infected plants, and avoid planting ranunculus in the same area for several years.
2. Aphid Infestation: Aphids are small, sap-sucking insects that can feed on the tender new growth of ranunculus plants, causing distorted leaves and stunted growth. Control aphids by spraying the affected plants with a strong stream of water or using insecticidal soap or organic insecticides labeled for aphids.
3. Powdery Mildew: Powdery mildew is a fungal disease characterized by a white, powdery coating on the leaves of ranunculus plants. Improve air circulation around the plants by spacing them properly and removing any affected leaves. Treat powdery mildew with fungicidal sprays or organic fungicides specifically formulated for this disease.
4. Root Rot: Overwatering and poorly draining soil can lead to root rot in ranunculus plants. Ensure proper drainage by amending the soil with organic matter and avoiding excessive watering. If root rot is detected, remove and dispose of infected plants, and adjust your watering practices accordingly.
5. Floppy Stems: Some ranunculus varieties may have tall or weak stems that can flop over under the weight of the flowers. Use stakes or grow-through plant supports to provide support and prevent bending or flopping. Install the supports early in the growing season to protect the plants as they grow.
6. Nutrient Deficiencies: Ranunculus plants may experience nutrient deficiencies, such as yellowing leaves or poor growth, if they lack essential nutrients. Monitor the plants for any signs of deficiencies and address them by applying a balanced fertilizer or organic amendments as needed.
7. Pests: Apart from aphids, ranunculus plants can also attract other pests like slugs or snails. Handpick these pests from the plants or use organic pest control methods, such as iron phosphate-based slug baits or copper barriers, to protect your ranunculus plants from damage.
8. Environmental Stress: Extreme heat, frost, or fluctuations in temperature can stress ranunculus plants. Provide shade during hot summer afternoons and protect the plants from frost with frost blankets or row covers. Maintain consistent watering and care routines to minimize stress on the plants.
By identifying and promptly addressing these common issues, you can maintain healthy ranunculus plants and ensure their ability to produce beautiful, vibrant blooms.
Harvesting and Storing Ranunculus Bulbs
Once the blooming season of ranunculus comes to an end, it’s time to properly harvest and store the bulbs for future planting. Proper harvesting and storage techniques ensure the longevity and health of the bulbs. Here are the steps to harvest and store ranunculus bulbs:
1. Timing: Wait until the foliage of the ranunculus plants has turned yellow and withered. This indicates that the bulbs have finished their growth cycle and are ready for harvesting. Typically, this occurs in late spring or early summer, depending on your specific growing zone.
2. Digging: Gently dig around the bulbs with a garden fork or shovel, taking care not to damage them. Start digging beyond the outer edges of the plant to avoid accidentally cutting or breaking the bulbs.
3. Bulb Removal: Once the bulbs are exposed, lift them carefully from the soil. Use your hands to gently shake off any excess dirt or debris, being careful not to damage the bulb’s delicate parts.
4. Bulb Inspection: Inspect each bulb thoroughly to ensure they are healthy and free from any signs of disease or damage. Discard any bulbs that appear soft, mushy, or discolored as they may not be suitable for storage or future planting.
5. Bulb Separation: Separate the individual bulbs from each other, taking care to avoid any damage or bruising. Ranunculus bulbs tend to produce smaller bulbs, known as cormels, that can be separated and replanted for future growth.
6. Drying: Allow the harvested bulbs to dry in a well-ventilated, shaded area for about a week. This drying period helps to harden the outer skin and reduce the risk of rot during storage.
7. Storage: Once dry, store the ranunculus bulbs in a cool, dry, and dark location. Avoid places with excessive moisture or temperature fluctuations. You can store them in paper bags, mesh bags, or ventilated containers that allow for airflow.
8. Check Periodically: Periodically check the stored bulbs throughout the storage period. Discard any bulbs that show signs of rot, mold, or shriveling. Ensure good ventilation and adjust storage conditions if necessary.
9. Preparing for Planting: Before replanting the stored bulbs, it’s a good practice to soak them in water overnight to rehydrate them. This encourages the bulbs to emerge from dormancy and promotes strong growth in the next planting season.
By following these steps, you can harvest and store ranunculus bulbs properly, ensuring their health and readiness for planting in the next growing season.