
Benefits of Elderberry
Elderberry, also known as Sambucus, is a versatile plant that offers numerous health benefits. Whether consumed as a tasty juice, made into a syrup, or used in various herbal remedies, elderberries provide a rich source of vitamins, minerals, and antioxidants. Let’s explore some of the incredible benefits of incorporating elderberries into your diet.
1. Immune System Support: Elderberries are renowned for their immune-boosting properties. Packed with antioxidants, they help protect the body’s cells from damage caused by free radicals, reducing the risk of chronic diseases and enhancing overall health. Additionally, elderberries contain high levels of vitamin C, which can strengthen the immune system and promote quicker healing.
2. Cold and Flu Relief: Elderberry is widely recognized for its ability to alleviate symptoms of the common cold and flu. Both the berries and the flowers of the elderberry plant have anti-inflammatory and antiviral properties that can reduce the duration and severity of these illnesses. Consuming elderberry syrup or tea can help soothe a sore throat, relieve congestion, and alleviate coughing.
3. Heart Health: Regular consumption of elderberries has been linked to improved cardiovascular health. The presence of flavonoids helps reduce the risk of heart disease by lowering bad cholesterol levels and improving artery function. These powerful antioxidants also promote healthy blood flow, reducing the risk of heart attacks and strokes.
4. Digestive Health: Elderberries have long been used to support digestive health. The abundance of dietary fiber in elderberries aids in regulating bowel movements and preventing constipation. They also contain anthocyanins, which possess anti-inflammatory properties that can alleviate digestive discomfort and promote a healthy gut.
5. Healthy Skin: Elderberry has been used topically for centuries to treat various skin conditions. Its anti-inflammatory and antioxidant properties can reduce redness, swelling, and signs of aging. Elderberry extract is often found in skincare products due to its ability to nourish and rejuvenate the skin, leaving it looking youthful and radiant.
6. Anticancer Potential: Some studies suggest that elderberries may have anticancer properties. The high antioxidant content helps inhibit the growth and spread of cancer cells, reducing the risk of certain types of cancer. However, more research is needed to fully understand the effect of elderberries on cancer prevention and treatment.
7. Weight Management: Elderberries are low in calories but rich in nutrients, making them a great addition to a balanced diet. The high fiber content helps promote feelings of fullness and prevent overeating. Additionally, the antioxidants in elderberries can potentially boost metabolism and aid in weight management.
Incorporating elderberries into your diet can provide a wide range of health benefits. However, it is important to consult with a healthcare professional before using elderberry supplements or starting any new dietary regimen, especially if you have any existing health conditions or are taking medications.
Climate and Soil Requirements
Elderberry plants have specific climate and soil requirements to thrive and produce a bountiful harvest. Understanding these requirements is crucial for successful elderberry cultivation. Let’s take a look at the ideal climate and soil conditions for growing elderberries.
Climate: Elderberries are hardy plants that can tolerate a range of climates. However, they prefer temperate regions with cool to mild summers and cold winters. They thrive in USDA hardiness zones 3 to 8, where temperatures range from -40°F (-40°C) to 20°F (-7°C) in winter and around 70°F (21°C) in summer.
Sunlight: Elderberry plants require full sun exposure to thrive. They should receive at least 6 hours of direct sunlight each day. Planting in a location with southern or western exposure will ensure the plants receive optimal sunlight for healthy growth and fruit production.
Soil: Elderberries prefer well-draining soil with a slightly acidic to neutral pH level. The ideal pH range for elderberry plants is between 5.5 and 6.5. The soil should have good organic matter content and be rich in nutrients. Sandy loam or loamy soils are well-suited for elderberry cultivation.
Moisture: While elderberries can tolerate a variety of moisture conditions, they prefer moist but not waterlogged soil. Adequate drainage is essential to prevent root rot. Ensure the soil is consistently moist but not overly saturated. Mulching around the base of the plants can help retain moisture and regulate soil temperature.
Frost: Elderberry plants require a period of dormancy during the winter months. They are tolerant of frost and cold temperatures but may require protection from extreme cold if grown in regions with harsh winters. Applying a layer of mulch around the base of the plants can help insulate the roots and protect them from frost damage.
Wind: Elderberry plants can withstand moderately windy conditions, but strong winds can damage their delicate branches and flowers. Planting elderberries in a location that provides some protection from strong winds, such as near a fence or with natural windbreaks, can help prevent damage.
Altitude: Elderberries can be grown at various altitudes, but they tend to perform best at lower to moderate elevations. Higher altitudes may have colder temperatures and shorter growing seasons, which can affect fruit production.
Choosing the Right Variety
When it comes to growing elderberries, selecting the right variety is crucial for success. There are several different elderberry cultivars available, each with its own unique characteristics and requirements. Consider the following factors when choosing the right variety for your garden or farm.
1. Native vs. Cultivated: There are two primary types of elderberries: native and cultivated. Native elderberries, such as Sambucus canadensis, are typically found in the wild and are well-suited to the local ecosystem. Cultivated elderberries, on the other hand, have been bred specifically for improved yield, disease resistance, and fruit quality. Consider whether you want a native variety or a cultivated one based on your preferences and goals.
2. Fruit Characteristics: Different elderberry varieties can have varying fruit sizes, flavors, and colors. Some varieties offer larger berries, which can be beneficial for those interested in commercial production or making jams and jellies. Others have sweeter or more tangy flavors. Consider your intended use for the berries and choose a variety that aligns with your preferences.
3. Pollination: Elderberries are primarily self-fertile, meaning they can produce fruit with their own pollen. However, cross-pollination between different varieties can enhance fruit set and yield. If you have space, consider planting multiple elderberry varieties to encourage cross-pollination and increase your harvest.
4. Disease Resistance: Some elderberry varieties exhibit better resistance to common diseases, such as powdery mildew or leaf spot. When selecting a variety, consider its disease resistance traits to reduce the likelihood of plant damage and crop loss. Consulting with local agricultural extension offices or nurseries can help you identify disease-resistant varieties suitable for your region.
5. Growth Habit: Elderberry varieties can have different growth habits, including upright, spreading, or compact. Consider the available space in your garden or farm and choose a variety that fits well within the designated area. Upright varieties may require staking for support, while spreading types can be beneficial for hedgerow or boundary plantings.
6. Ripening Time: Elderberries typically ripen in late summer to early fall, but different varieties may have varying ripening times. Selecting varieties with different ripening periods can extend your harvest season and provide a continuous supply of fresh berries. This can be especially advantageous for those interested in selling or preserving the fruit.
7. Local Adaptation: Consider choosing elderberry varieties that are known to perform well in your specific climate and growing conditions. Varieties that have been successfully grown by local farmers or recommended by experienced growers in your region are more likely to thrive and produce abundant crops.
By considering these factors, you can choose the right elderberry variety that suits your needs and ensures a successful and rewarding growing experience. It’s always advisable to consult with local experts and nurseries for guidance on the best elderberry varieties for your specific location.
Planting Elderberry from Seeds
While elderberry plants are typically propagated through cuttings, it is also possible to grow them from seeds. However, it’s important to note that elderberry seeds can be challenging to germinate and may have a lower success rate compared to other propagation methods. If you’re up for the challenge, here’s a step-by-step guide on planting elderberry from seeds.
1. Seed Collection: Start by collecting ripe elderberries from a mature plant. Gently crush the berries to separate the seeds from the pulp. Rinse the seeds with water to remove any remaining pulp and let them air dry on a paper towel for a few days.
2. Seed Stratification: Elderberry seeds require a period of stratification to break dormancy and promote germination. Place the seeds in a zip-lock bag with a moist paper towel or sphagnum moss. Seal the bag and refrigerate it for about 2 to 3 months. This cold stratification mimics the natural winter conditions that elderberry seeds need for germination.
3. Soil Preparation: Prepare a seed tray or small pots with a well-draining seed-starting mix. Alternatively, you can sow the seeds directly in the prepared garden bed. Make sure the soil is loose and fertile, with good organic matter content.
4. Sowing the Seeds: Place the stratified elderberry seeds on the soil surface, gently pressing them into the soil. Lightly cover the seeds with a thin layer of the seed-starting mix, about ¼ inch deep. If using pots or trays, sow multiple seeds in each container, as not all seeds may successfully germinate.
5. Watering: Keep the soil consistently moist but not waterlogged. Water the seeds gently to avoid dislodging them or causing waterlogging. Using a spray bottle or misting the soil surface can help maintain the appropriate moisture level without oversaturating the soil.
6. Germination: Place the seed tray or pots in a warm location with indirect sunlight. Elderberry seeds typically take anywhere from 2 to 3 weeks to germinate, although it can sometimes take longer. Be patient and continue to provide adequate moisture and gentle indirect light.
7. Transplanting: Once the seedlings have developed 2-3 sets of true leaves, they can be transplanted into larger pots or directly into the garden bed. Choose a location that provides full sun exposure and adequate spacing between plants, as elderberries can grow into large, bushy shrubs.
8. Care and Maintenance: Water the seedlings regularly and ensure they receive at least 6 hours of direct sunlight each day. As they grow, consider providing support for the branches as they can become top-heavy. Regularly weed around the seedlings to minimize competition for nutrients and water.
It’s worth noting that elderberries grown from seeds may show variability in traits and slower initial growth compared to plants propagated from cuttings. However, if you have the patience and willingness to experiment, planting elderberry from seeds can be a rewarding experience.
Planting Elderberry from Cuttings
One of the most common and successful methods of propagating elderberry plants is through cuttings. This method allows you to create new identical plants from a parent plant, ensuring favorable traits and a higher success rate. Here is a step-by-step guide on planting elderberry from cuttings.
1. Selecting the Cuttings: Choose healthy, disease-free stems from an established elderberry plant during late winter or early spring, when the plant is dormant. Look for semi-hardwood or hardwood cuttings that are about 8-12 inches long and have multiple growth nodes. Make sure to use sharp, clean pruning shears to avoid damaging the stem.
2. Preparing the Cuttings: Trim the selected cuttings just below a leaf node at the base and remove any leaves from the lower nodes, leaving a few leaves at the tip. This will help the cutting direct energy toward root development. If desired, you can dip the bottom end of the cutting in a rooting hormone powder to enhance root formation.
3. Preparing the Planting Medium: Prepare a well-draining rooting medium, such as a mix of sand and peat moss or a commercial seed-starting mix. Fill a pot or seed tray with the prepared medium, leaving about an inch of space from the top to allow for watering.
4. Planting the Cuttings: Make a small hole in the planting medium using a pencil or your finger. Insert the bottom end of the cutting into the hole, making sure at least two nodes are below the soil surface. Gently firm the soil around the cutting to provide stability.
5. Watering: Water the cuttings thoroughly after planting, ensuring the soil is evenly moist but not waterlogged. Mist the cuttings regularly to maintain high humidity around them, which can promote root development. Keep the soil consistently moist throughout the rooting process.
6. Providing Ideal Conditions: Place the potted cuttings in a warm location with indirect sunlight. It is important to maintain a temperature between 70-75°F (21-24°C) to promote root growth. If necessary, you can cover the cuttings with a clear plastic bag or use a propagation tray with a plastic cover to create a mini greenhouse effect.
7. Rooting and Transplanting: Over the course of several weeks, the cuttings will start developing roots. You can check for root growth by gently tugging the cutting and feeling for resistance. Once the roots are formed, usually after 8-10 weeks, the cuttings are ready to be transplanted into larger pots or directly into the garden bed.
8. Care and Maintenance: Provide the transplanted elderberry cuttings with full sun exposure, regular watering, and well-draining soil. Space the plants according to the specific variety’s recommended spacing requirements. Maintain weed-free surroundings to minimize competition for nutrients and water.
Planting elderberry from cuttings is an effective method to propagate new plants and ensure consistent traits from the parent plant. With proper care and attention, your elderberry cuttings will develop into healthy, productive plants that will provide you with an abundance of delicious berries.
Best Time to Plant Elderberry
Choosing the right time to plant elderberry is crucial for ensuring optimal growth and a successful harvest. The timing of planting can vary depending on your climate and the specific variety of elderberry you are growing. Here are some guidelines to help you determine the best time to plant elderberry.
1. Dormant Season Planting: It is generally recommended to plant elderberry during the dormant season, which is in late winter or early spring before the plant begins to bud. This allows the plant to establish its root system before the active growing season.
2. Climate Considerations: The timing of planting also depends on your climate zone. In regions with cold winters, it’s best to plant elderberry in early spring after the threat of frost has passed. In milder climates, you may have more flexibility and can consider planting in late winter or early fall, ensuring the plants have enough time to establish before extreme temperatures.
3. Soil Temperature: Elderberry plants prefer to be planted when the soil temperature reaches around 50°F (10°C) or higher. This allows the roots to develop and grow efficiently. Use a soil thermometer to monitor the temperature and ensure it is suitable for planting.
4. Stem Cuttings vs. Bare Root: The timing of planting may also vary depending on whether you are using stem cuttings or bare-root plants. Stem cuttings are typically planted during the dormant season, while bare-root plants are often available for planting in late winter or early spring.
5. Variety-Specific Recommendations: Different elderberry varieties may have specific planting recommendations based on their growth habits and local climate adaptability. It’s a good idea to consult with local nurseries, gardening experts, or agricultural extension offices for variety-specific planting guidelines in your area.
6. Avoiding Extreme Weather Conditions: It’s important to avoid planting elderberry during times of extreme weather conditions. Planting during a heatwave or prolonged drought can stress the plants, while planting during excessively wet or waterlogged conditions can lead to root rot. Aim for a period of stable weather and moderate soil moisture for optimal planting conditions.
7. Availability of Resources: Consider the availability of resources such as soil amendments, mulch, and garden tools when deciding the best time to plant elderberry. Ensuring you have everything you need beforehand will enable you to prepare the planting site effectively and optimize the growing conditions.
Remember to provide adequate care and maintenance to the newly planted elderberry, including regular watering, weed control, and protection from pests and diseases. With proper timing and care, your elderberry plants will establish well and reward you with a bountiful harvest in the seasons to come.
Preparing the Soil
Preparing the soil is a crucial step in successfully growing elderberry plants. Good soil preparation creates an optimal environment for root development, nutrient uptake, and overall plant health. Here are the steps to follow when preparing the soil for planting elderberry.
1. Soil Testing: Before planting elderberry, it’s recommended to conduct a soil test to determine its pH level and nutrient composition. This will help you understand any deficiencies or imbalances in the soil and allow you to make necessary adjustments. Soil testing kits are available at gardening centers or through local agricultural extension offices.
2. Clearing the Area: Start by clearing the area of any existing vegetation or weeds. Remove any debris, rocks, or root fragments that may interfere with the root development of the elderberry plants. Rake the soil to create a level and clean planting bed.
3. Soil Amendments: Based on the soil test results, you may need to amend the soil to create the ideal growing conditions for elderberry. Elderberries prefer slightly acidic to neutral soil with a pH level between 5.5 and 6.5. If the pH is too high, you can lower it by adding elemental sulfur or organic matter, such as compost or well-rotted manure. Conversely, if the pH is too low, you can raise it by incorporating lime into the soil.
4. Organic Matter: Incorporating organic matter into the soil is beneficial for improving its structure, enhancing water-holding capacity, and promoting nutrient availability. Add well-rotted compost, leaf mold, or aged manure to the soil and work it in to a depth of about 8-10 inches. This will also help improve drainage in heavy clay soils.
5. Soil Fertility: Elderberries thrive in nutrient-rich soil. Before planting, it’s essential to ensure the soil has adequate fertility. Consider adding balanced organic fertilizer or specific nutrients based on soil test recommendations. Work the fertilizer into the soil according to the package instructions, taking care not to apply too close to the base of the plants.
6. Mulching: Apply a layer of organic mulch around the base of the elderberry plants after planting. This helps retain soil moisture, suppress weed growth, and regulate soil temperature. Use wood chips, straw, or shredded leaves as mulch, and spread it evenly around the plants, avoiding direct contact with the stems.
7. Soil Moisture: Before planting elderberry, ensure the soil is adequately moist but not waterlogged. Elderberries prefer consistently moist soil but can suffer from root rot if the soil is excessively wet. Monitor the soil moisture regularly and adjust watering accordingly during the establishment period.
8. Soil Aeration: If the soil in the planting area is compacted, consider aerating it to improve root penetration and oxygen exchange. Use a garden fork or a mechanical aerator to create small holes in the soil, allowing for better water infiltration and nutrient absorption.
By following these steps and investing time and effort into soil preparation, you will provide the foundation for healthy and vigorous elderberry plants. The nutrient-rich and well-draining soil will support strong root development and contribute to abundant fruit production in the future.
Steps for Planting Elderberry
Planting elderberry involves a few key steps to ensure successful establishment and healthy growth of the plants. By following these steps, you can give your elderberry plants the best start possible:
1. Site Selection: Choose a planting site that provides full sun exposure for at least 6 hours a day. Elderberries thrive in well-drained soil with a slightly acidic to neutral pH level (around 5.5 to 6.5). Select a location with adequate space for the mature size of the elderberry plants, as they can grow into large shrubs.
2. Plant Acquisition: Purchase elderberry plants from a reputable nursery or propagate them from cuttings. Ensure that the plants are healthy, disease-free, and have a well-developed root system. Bare-root plants should be kept moist prior to planting, while potted plants should be handled carefully to avoid damaging their roots.
3. Digging the Planting Hole: Dig a hole that is about twice the width and depth of the root ball or container. This will provide ample space for the roots to extend and establish in the soil. Loosen the soil at the bottom of the hole to encourage better root penetration.
4. Planting: Place the elderberry plant in the center of the hole, ensuring it is positioned at the same depth it was previously growing. Backfill the hole with the loosened soil, gently firming it around the roots to eliminate air pockets. Avoid compacting the soil too firmly, as this can hinder root growth.
5. Watering: Immediately after planting, water the elderberry thoroughly to settle the soil and provide moisture for the newly planted roots. Keep the soil moist, but not waterlogged, especially during the first few weeks of establishment. Monitor the moisture levels regularly and water as needed, especially during dry periods.
6. Mulching: Apply a layer of organic mulch around the base of the elderberry plant, leaving some space around the stem. This helps retain soil moisture, suppress weed growth, and regulate soil temperature. Wood chips, straw, or shredded leaves are commonly used as mulch materials.
7. Staking (if necessary): If your elderberry plant is young or has a slender stem, it may benefit from staking for support. Place a sturdy stake next to the plant and gently tie the stem to it using soft plant ties or twine. This will protect the plant from strong winds or heavy fruit loads.
8. Pruning: While not necessary immediately after planting, regular pruning plays a crucial role in maintaining the health and shape of elderberry plants. Prune in late winter or early spring to remove dead or weak branches, promote airflow, and shape the plant for optimal growth and fruit production.
9. Continued Care: Monitor the health and growth of your elderberry plants throughout the growing season. Maintain consistent moisture levels in the soil, provide regular fertilization as needed, and address any pest or disease issues promptly. Regularly weed around the plants to minimize competition for nutrients and water.
By following these steps and providing proper care and maintenance, you can set your elderberry plants up for success. With time and patience, you’ll be rewarded with a thriving elderberry garden and an abundant harvest of delicious berries.
Watering and Caring for Elderberry Plants
Proper watering and care are essential for the healthy growth and abundant harvest of elderberry plants. By providing adequate moisture, nutrients, and maintenance, you can ensure the vitality and productivity of your elderberry garden. Here are some important tips for watering and caring for elderberry plants:
Watering:
Elderberry plants require regular watering, especially during dry spells. Consider the following guidelines for watering:
1. Deep Watering: Water deeply, ensuring the moisture penetrates the root zone. Apply water directly to the soil at the base of the plants rather than overhead irrigation. This helps prevent foliar diseases and encourages deep root development.
2. Consistent Moisture: Keep the soil consistently moist, but avoid overwatering, as waterlogged soil can lead to root rot. Regularly monitor soil moisture levels and adjust watering accordingly, especially during periods of extreme heat or drought.
3. Mulching: Apply a layer of organic mulch around the base of the plants, leaving a space around the stem. Mulch helps retain soil moisture, suppress weed growth, and regulate soil temperature, reducing the need for frequent watering. Replace the mulch as needed to maintain a thickness of 2-4 inches.
4. Rainwater Utilization: Take advantage of natural rainfall as much as possible. If your region receives regular rainfall, adjust your watering schedule accordingly. However, be cautious during prolonged wet periods, as excessive moisture can lead to root issues.
5. Drip Irrigation: Consider installing a drip irrigation system for efficient watering. Drip irrigation delivers water directly to the root zone, minimizing water loss through evaporation and reducing the risk of foliage diseases. Set the system to provide slow, deep watering sessions.
Care and Maintenance:
To ensure the health and vitality of your elderberry plants, follow these care guidelines:
1. Fertilization: Elderberry plants benefit from regular fertilization to promote growth and productivity. Apply a balanced organic fertilizer in early spring and repeat the application every year. Follow the recommended application rates and instructions on the fertilizer packaging.
2. Pruning: Prune elderberry plants in late winter or early spring when they are dormant. Remove dead or diseased branches, as well as any weak or crossing branches. Open up the center of the plant to improve airflow and sunlight penetration. Pruning stimulates new growth and helps maintain a manageable plant size.
3. Weed Control: Regularly remove weeds from around the base of the elderberry plants. Weeds compete for nutrients, water, and sunlight, which can hinder the growth and development of the elderberries. Mulching around the plants can help suppress weed growth and reduce the need for frequent weeding.
4. Pest and Disease Management: Monitor your elderberry plants regularly for common pests such as aphids, spider mites, or borers. If necessary, apply organic insecticidal soap or a natural pest control method. Be vigilant for signs of diseases like powdery mildew or leaf spot, and promptly address any issues through proper sanitation or targeted treatments.
5. Supportive Structures: Elderberry plants can become top-heavy, especially when laden with fruit. Consider providing support structures such as stakes or trellises to prevent the plants from bending or breaking under their weight. Use soft plant ties or twine to secure the branches without causing damage.
6. Harvesting: Monitor the berries as they ripen, and harvest them when they are fully colored and firm. Handle the berries gently to avoid bruising. Remove the entire cluster or individual berries from the stems, depending on your preferred method. Freshly harvested elderberries can be consumed, used in culinary preparations, or preserved for future use.
By following these watering and care guidelines, you’ll provide the necessary support and nourishment for your elderberry plants, fostering their health and productivity. With proper maintenance and attention, you’ll be rewarded with a successful harvest of delicious and nutritious elderberries.
Pruning Elderberry Plants
Pruning is an integral part of caring for elderberry plants to promote healthier growth, maintain shape, and maximize fruit production. By properly pruning your elderberry plants, you can help them thrive and ensure a bountiful harvest. Here are some essential tips for pruning elderberry plants:
1. Timing: Prune elderberry plants during late winter or early spring while they are still dormant. This is the best time to prune as it allows the plants to recover and put energy into new growth during the upcoming growing season.
2. Remove Dead or Damaged Wood: Begin by inspecting the elderberry plant for any dead, diseased, or damaged wood. Using clean and sharp pruning shears, prune these branches all the way back to the base or to a healthy outward-facing bud or branch.
3. Remove Weak or Crossing Branches: Look for any thin or weak branches that may obstruct the overall structure of the plant. Also, identify any branches that are crossing or rubbing against each other. Remove these branches completely to prevent future issues and enhance airflow and sunlight penetration.
4. Maintain a Central Leader: Elderberries naturally have an upright growth habit. To encourage this form, identify one central leader or main stem that will become the dominant trunk. Trim back any competing side branches and suckers, allowing the central leader to grow straight and tall.
5. Thin Out Excessive Growth: If your elderberry has an abundance of closely spaced branches or crowded growth, thin it out. Remove some of the branches selectively, starting with the weaker or inward-growing ones. This reduces competition for nutrients, light, and air circulation, promoting healthier growth.
6. Cut Back Older Stems: Elderberries produce the best fruit on younger wood. To encourage the production of new, more productive branches, consider cutting back some of the older stems to the ground or to a few inches above the ground. This will stimulate the growth of vigorous new shoots.
7. Remove Suckers: Elderberries are prone to producing suckers, which are shoots that emerge from the base of the plant. These can drain energy and nutrients from the main plant and lead to overcrowding. Remove any suckers that are arising from the base, cutting them as close to the ground as possible.
8. Sanitize Tools: Throughout the pruning process, ensure that your pruning tools are clean and sharp. This helps prevent the spread of diseases and ensures clean cuts. Disinfect your tools with a household disinfectant or rubbing alcohol between cuts and when moving from one plant to another.
9. Proper Disposal: Dispose of pruned branches and debris properly. Remove them from the garden area to prevent the spread of pests and diseases. You can either compost the trimmings if disease-free or dispose of them in green waste bins.
10. Ongoing Maintenance: Regularly monitor your elderberry plants throughout the growing season for any additional pruning needs. Remove any dead or diseased wood as you notice it. Perform light pruning if necessary to maintain shape or manage growth. Remember to always follow proper pruning techniques and guidelines.
By following proper pruning practices, you can shape your elderberry plants, maintain their health and vigor, and encourage abundant fruit production. Pruning is an essential part of caring for elderberries and plays a significant role in the overall success of your plant’s growth and productivity.
Common Pests and Diseases of Elderberry
Just like any other plant, elderberries are susceptible to certain pests and diseases. Being aware of common issues can help you identify and address them promptly, ensuring the health and productivity of your elderberry plants. Here are some of the most common pests and diseases that can affect elderberry:
Pests:
1. Aphids: Aphids are small, soft-bodied insects that feed on the sap of plants. They can cause curling or yellowing of leaves and leave behind a sticky residue known as honeydew. Regularly inspect your plants for aphid infestations and use insecticidal soap or neem oil to control their population.
2. Spider Mites: Spider mites are tiny arachnids that feed on leaves, causing speckled discoloration. They are generally more prevalent in dry and dusty conditions. Regularly misting the leaves and using insecticidal soap helps control spider mite infestations.
3. Elderberry Borers: Elderberry borers are the larval stage of a beetle that burrows into the stems of elderberry plants. These borers weaken the stems, causing wilted or dying branches. Prune and dispose of infected branches, and apply an insecticide if necessary.
4. Japanese Beetles: Japanese beetles are metallic green beetles that feed on the leaves of elderberry plants. They can quickly skeletonize leaves if left unchecked. Hand-pick and dispose of adult beetles, or use a recommended insecticide according to the label instructions.
Diseases:
1. Powdery Mildew: Powdery mildew appears as a white or grayish powdery coating on elderberry leaves, stems, and flowers. It is a fungal disease that thrives in warm and humid conditions. To control powdery mildew, ensure proper air circulation, and apply fungicides labeled for powdery mildew if necessary.
2. Leaf Spot: Leaf spot diseases cause dark, irregular spots on elderberry leaves, which gradually expand and can lead to leaf defoliation. Improve air circulation by pruning crowded branches and remove infected leaves to prevent the spread of the disease. Applying a fungicide can help manage severe leaf spot infections.
3. Phytophthora Root Rot: Phytophthora root rot is a fungal disease that affects the roots of elderberry plants, causing root decay. Infected plants show stunted growth, yellowing leaves, and wilting. Ensure proper soil drainage, avoid overwatering, and apply fungicides labeled for root rot if necessary.
4. Verticillium Wilt: Verticillium wilt is a soil-borne fungal disease that causes wilting, yellowing, and eventually death of elderberry plants. Infected plants cannot be cured, so prevention is key. Practice crop rotation, as the disease can persist in the soil, and choose resistant varieties if available.
5. Cane Cankers: Cane cankers are sunken and discolored areas that appear on elderberry canes. They are caused by fungal or bacterial pathogens and can lead to branch dieback. Prune and dispose of affected canes, and apply a copper-based fungicide to manage the spread of the disease.
Prompt identification and intervention are crucial in managing pests and diseases. Regularly monitor your elderberry plants for signs of infestations or diseases. By implementing appropriate cultural practices, such as proper sanitation, maintaining healthy plants, and using organic or chemical controls when needed, you can help protect your elderberries from the detrimental effects of pests and diseases.
Harvesting Elderberries
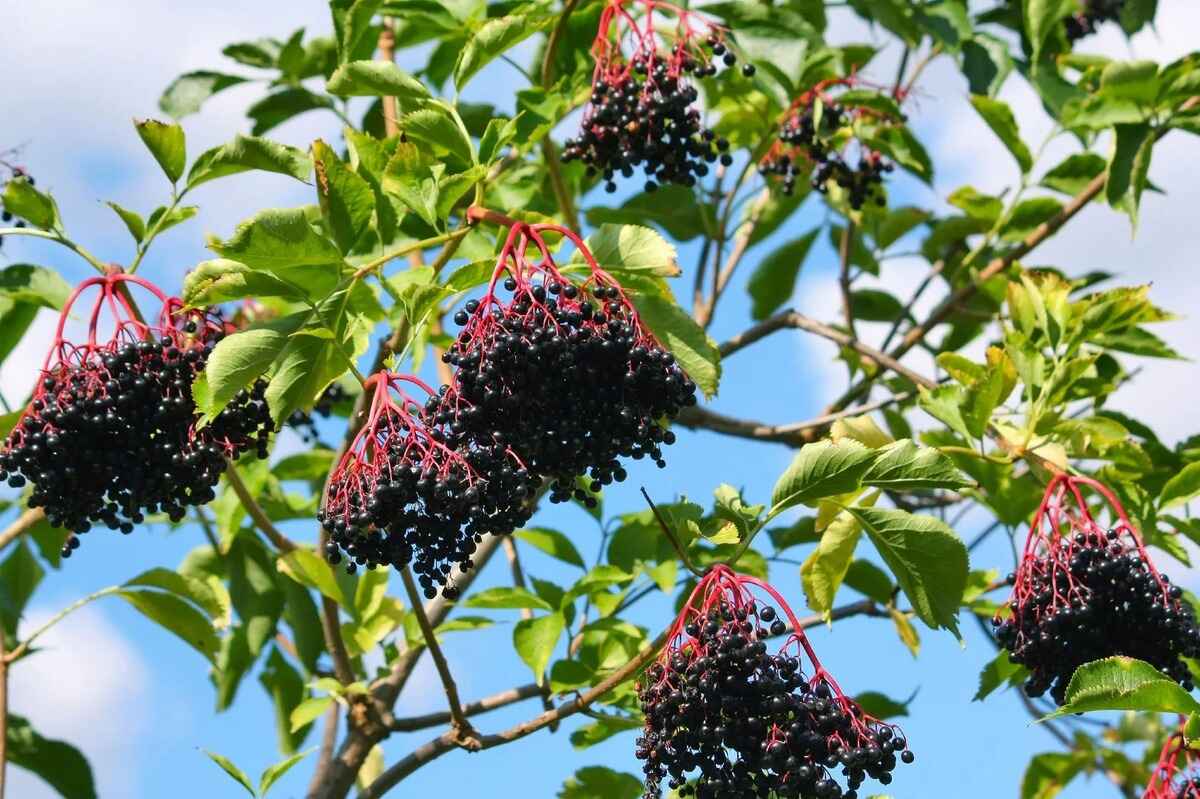
Harvesting elderberries at the right time is crucial to ensure optimal flavor and nutritional content. Elderberries are typically harvested when they are fully ripe, plump, and have reached their characteristic deep purple or black color. Here are some important tips for harvesting elderberries:
1. Timing: Elderberries are harvested in late summer to early fall, usually between July and September, depending on the specific variety and climate. Monitor your elderberry plants closely and look for signs of fully ripened berries to determine the best time for harvest.
2. Color: Harvest elderberries when they have turned from green or red to a dark purple or black color. The berries should be uniformly colored and free from green or unripe patches. If you notice any green or red fruit on the clusters, leave them on the plant to ripen fully before harvesting.
3. Firmness: Gently touch the elderberry clusters to assess their firmness. Ripe berries should be plump and firm, indicating they are fully mature and ready for harvest. Avoid picking berries that are overly soft or mushy, as they may be overripe or beginning to spoil.
4. Taste Test: Consider doing a taste test before harvesting a large quantity of elderberries. Sample a few berries, and ensure they have a sweet, flavorful taste. If the berries taste tart, they may need more time to ripen fully. It’s important to note that elderberries become sweeter as they fully mature.
5. Cluster Harvesting: Instead of harvesting individual berries, it is common to harvest entire clusters or umbels of elderberries. Use garden shears or hand pruners to carefully cut the entire cluster at the base of the stem. This method allows for easier handling and processing of the harvested berries.
6. Gentle Handling: Handle the harvested elderberry clusters with care to avoid bruising or damaging the berries. Elderberries have delicate skins that can easily burst or become crushed. Place them gently into containers or baskets while harvesting to preserve their quality.
7. Efficient Harvesting: Strip the berries from the clusters using a gentle pulling motion or run your fingers along the cluster to remove the ripe berries. Avoid excessive handling or squeezing, as this can bruise the fruits and cause damage.
8. Storage: Once harvested, promptly refrigerate the elderberries to help preserve their freshness. Place them in a breathable container or a perforated plastic bag to allow some airflow while preventing moisture buildup. Use or process the berries within a few days to maintain their quality.
9. Preserving: Elderberries can be used in a variety of culinary creations, including jams, jellies, syrups, pies, and wines. If you’re not using the harvested berries right away, consider freezing them for longer-term storage. Remove any stems, wash and drain the berries, then spread them in a single layer on a baking sheet and freeze. Once frozen, transfer the berries to airtight containers or freezer bags for future use.
Harvesting elderberries at the peak of ripeness ensures their optimal flavor and nutritional value. Enjoy the satisfaction of harvesting your own homegrown elderberries and savor the delicious taste as you incorporate them into your favorite recipes and culinary creations.