
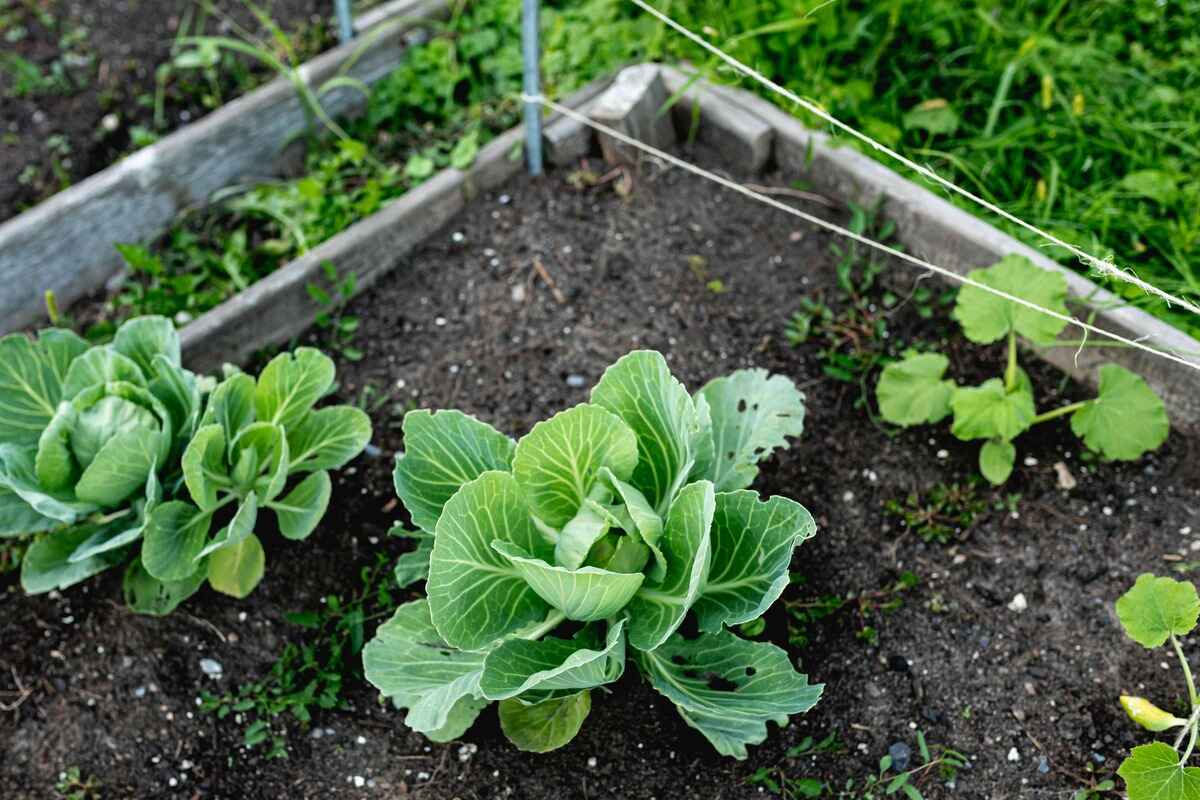
Choosing the Right Time to Plant Cabbage
Planting cabbage at the right time is crucial for successful growth and a bountiful harvest. Cabbage is a cool-season vegetable that thrives in mild temperatures, so it’s important to choose the appropriate time to plant based on your climate and local growing conditions.
A general rule of thumb when it comes to planting cabbage is to aim for a time when the soil temperature is consistently between 45°F (7°C) and 75°F (24°C). This typically translates to planting in the early spring or fall, depending on your location.
When planting cabbage in the spring, you’ll want to wait until the soil is workable and has warmed up a bit. Planting too early when the soil is still cold and wet can lead to poor germination and stunted growth. Keep in mind that cabbage plants can tolerate a light frost, so planting a few weeks before the last frost date in your area is often a safe bet.
Alternatively, you can opt to plant cabbage in the fall. This allows the plants to mature during the cooler temperatures of the autumn season, which can result in sweeter and more flavorful heads. Fall planting is especially advantageous in regions with hot summers, as cabbage tends to bolt and become more prone to pests and diseases in excessively warm conditions.
For those living in mild-winter climates, planting cabbage in the winter can be a viable option. This requires selecting cabbage varieties that are specifically bred for winter production and can withstand colder temperatures. With proper care and protection, winter-grown cabbage can provide a fresh harvest during the colder months.
Factors to consider when determining the ideal planting time for cabbage include the average frost dates in your area, the duration of the growing season, and the specific cabbage variety you wish to plant. Consulting a local gardening expert or checking with your nearest agricultural extension office can provide valuable insights into the best planting times for your specific location.
Remember, choosing the right time to plant cabbage is just the first step. To maximize your chances of success, it’s essential to prepare the soil adequately, start seeds indoors if necessary, and provide ongoing care and maintenance throughout the growing season. By taking these steps, you’ll be well on your way to enjoying a hearty harvest of fresh and delicious cabbage.
Determining the Planting Zone for Cabbage
When it comes to growing cabbage, understanding your planting zone is essential for ensuring optimal growth and yield. Planting zones, also known as hardiness zones, are geographical regions that are classified based on their average minimum winter temperatures. By determining your planting zone, you can make informed decisions about when and what to plant in your area.
The United States Department of Agriculture (USDA) has developed a plant hardiness zone map that divides the country into different zones. This map provides a rough guide to help gardeners determine which plants are likely to thrive in their specific region based on the average low temperatures.
To determine your planting zone, you can use the USDA Plant Hardiness Zone Map available online. Simply enter your zip code or search for your location on the map, and it will provide you with the corresponding zone. Each zone is labeled with a number and letter combination, such as Zone 5b or Zone 9a, which represents specific temperature ranges.
When it comes to cabbage, it generally grows well in zones 3 to 9. So, depending on your zone, you can determine the ideal planting time and variety selection for your cabbage crop.
It’s important to note that the planting zone map is a valuable starting point but should not be the only factor considered when planning your garden. Microclimates, which are localized variations in climate within a larger zone, can impact the success of certain plants. Factors like altitude, proximity to large bodies of water, and the presence of urban heat islands can create microclimates that differ from the larger zone designation.
To account for these variations, it’s helpful to research and speak with local gardeners, agricultural extension offices, or gardening communities in your area. They can provide valuable insights into the specific conditions you can expect and offer suggestions for cabbage varieties that have performed well in your local microclimate.
Planting Cabbage in the Spring
Spring is a great time to plant cabbage as the temperatures start to rise and the soil begins to warm up. Knowing the proper techniques and timing for spring planting will help you achieve a successful and productive cabbage crop.
Before planting, it’s important to ensure that the soil is workable and has reached a temperature of at least 45°F (7°C). Cabbage plants prefer well-draining soil enriched with organic matter. Therefore, it’s a good idea to amend the soil with compost or well-rotted manure a few weeks prior to planting to improve its fertility and structure.
Start by selecting healthy young cabbage transplants from a reputable nursery or grow them from seeds indoors. If starting seeds indoors, sow them 4 to 6 weeks before the last expected frost date. Cabbage seeds germinate best at temperatures between 70°F (21°C) and 75°F (24°C). Once the seedlings have developed several true leaves and the threat of frost has passed, they can be transplanted into the garden.
When setting out transplants, space them about 12 to 24 inches (30 to 60 cm) apart, depending on the cabbage variety. Dig a hole large enough to accommodate the root ball of the seedlings and set them in, making sure to plant them at the same depth they were growing previously.
After planting, water the seedlings thoroughly to help them establish their roots. Cabbage plants require consistent moisture to grow well, so it’s essential to provide them with about 1 inch (2.5 cm) of water per week. However, be cautious not to overwater, as poorly drained soil can lead to root rot.
Throughout the spring growing season, it’s important to monitor and manage pests and diseases that can affect cabbage plants. Common pests include cabbage worms, aphids, and slugs, while diseases like clubroot and black rot can also pose a threat. Utilizing organic pest control methods and practicing crop rotation can help minimize these issues.
Lastly, consider protecting your cabbage plants from extreme weather fluctuations. Spring can bring sudden temperature drops, strong winds, and late frosts, all of which can harm young plants. Use protective covers, such as row covers or cloches, to shield the plants from these conditions.
By following these guidelines, you can ensure that your cabbage plants get off to a healthy start in the spring. With proper care and attention, you’ll soon be enjoying a delicious harvest of crisp and nutritious cabbage heads.
Planting Cabbage in the Fall
Planting cabbage in the fall can be a rewarding experience, as the cooler temperatures of this season can lead to sweeter, more flavorful cabbage heads. Fall planting also allows you to extend the growing season and enjoy a fresh harvest even as the weather starts to cool down.
When deciding to plant cabbage in the fall, timing is crucial. You’ll want to aim for a period in which the cabbage plants have enough time to mature before the first frost hits. Ideally, start planting about 6 to 8 weeks before the average first frost date in your area.
Before planting, prepare your garden by removing any debris and weeds. Cultivate the soil to a depth of 8 to 12 inches (20 to 30 cm), ensuring it’s well-draining and enriched with organic matter. Adding compost or well-rotted manure will help provide the necessary nutrients for healthy growth.
Select cabbage varieties that are well-suited for fall planting. Look for ones that have shorter maturation periods and are more tolerant to cool temperatures. These varieties tend to have good disease resistance and are less likely to bolt or become bitter.
To plant the cabbage transplants, dig holes that are slightly larger than the root ball of the seedlings. Space the plants about 12 to 18 inches (30 to 45 cm) apart, allowing room for their growth. Set the transplants in the holes, making sure to plant them at the same depth they were growing in the nursery container or seedling tray.
Once the transplants are in the ground, water them thoroughly to help settle the soil and promote root establishment. Provide regular watering throughout the fall season, making sure to keep the soil consistently moist but not waterlogged.
While fall planting reduces the risk of certain pests and diseases that thrive in the warmer months, you still need to be vigilant. Inspect your cabbage plants regularly for any signs of aphids, cabbage worms, or other common pests. Utilize organic pest control methods, such as handpicking or using insecticidal soaps, to keep these pests at bay.
Keep in mind that fall-planted cabbage may require additional protection as the temperatures drop further. Consider using row covers, low tunnels, or other forms of season extenders to shield the plants from frost and cold winds.
With proper care and maintenance, your fall-planted cabbage should mature and provide you with a delicious harvest before winter arrives. Enjoy the sweet and flavorful heads in your favorite recipes or store them for later use. Fall gardening can be a wonderful way to extend your growing season and savor fresh vegetables well into the cooler months.
Planting Cabbage in the Winter
While cabbage is traditionally considered a cool-season crop, it is possible to grow it in the winter with the right preparation and care. Winter planting allows you to enjoy fresh cabbage during the colder months when other crops may not be as abundant.
Before planting cabbage in the winter, it is important to choose cabbage varieties that are specifically adapted for winter production. These varieties are more cold-tolerant and can withstand the freezing temperatures that winter brings. Look for varieties that have a shorter maturity period and a higher resistance to cold conditions.
In regions with mild winters, where the ground does not freeze, you can directly sow cabbage seeds in the garden. Prepare the soil by removing any weeds and loosening it with a garden fork or tiller. Create shallow furrows about ¼ to ½ inch (0.6 to 1.3 cm) deep and sow the seeds, spacing them according to the instructions on the seed packet.
Once the seeds are sown, lightly cover them with soil or compost, ensuring that they are not buried too deep. Water gently to keep the soil moist but avoid overwatering, as excess moisture can lead to rotting. In mild winter climates, cover the newly planted seeds with a layer of mulch to provide some insulation and protection from the cold.
In areas with harsher winter conditions, where the ground is likely to freeze, you may consider starting cabbage seeds indoors. Sow the seeds in trays or pots filled with seed-starting mix about 6 to 8 weeks before the anticipated planting date. Place the trays in a warm and well-lit area or under grow lights to encourage germination and seedling growth.
Transplant the seedlings into the garden once they have developed several true leaves and the threat of severe frost has passed. Choose a sunny location with well-drained soil for planting. Dig holes large enough to accommodate the root ball of each seedling and gently place them in the holes, firming the soil around the base.
Water the transplants thoroughly after planting to ensure good root establishment, and continue to provide regular watering throughout the winter season. While winter rainfall may help with moisture, supplementing with irrigation during drier periods is essential.
In colder regions, where temperatures regularly drop below freezing, it may be necessary to protect the cabbage plants from extreme cold. Consider using row covers, cloches, or cold frames to provide insulation and shield the plants from freezing temperatures and harsh winds.
With proper care and protection, winter-planted cabbage can thrive and provide a fresh harvest during the colder months. Be sure to monitor the plants for any signs of pests or diseases and take appropriate measures to mitigate any issues. Winter gardening can be a rewarding experience, allowing you to enjoy homegrown cabbage even when the weather is chilly outside.
Factors to Consider when Planting Cabbage
When it comes to planting cabbage, there are several key factors to consider to ensure successful growth and a productive harvest. Understanding and addressing these factors will help you create the optimal conditions for your cabbage plants to thrive.
1. Temperature: Cabbage is a cool-season crop that prefers mild temperatures. Planting when the soil temperature is consistently between 45°F (7°C) and 75°F (24°C) is ideal. Avoid extreme heat or cold, as it can affect the growth and quality of the cabbage heads.
2. Cabbage variety: There are various cabbage varieties available, each with its own characteristics and growth requirements. Consider factors such as maturity time, size of the heads, and resistance to pests and diseases when selecting the cabbage variety that suits your needs and growing conditions.
3. Growing season: The length of your growing season, which is the time between the last spring frost and first fall frost, plays a role in determining the best time to plant cabbage. Ensure that your chosen cabbage variety has enough time to mature and produce heads before the end of the growing season.
4. Soil conditions: Cabbage thrives in well-drained soil rich in organic matter. Prior to planting, prepare the soil by removing weeds and incorporating compost or well-rotted manure. The soil pH should be slightly acidic, between 6.0 and 6.8, to provide optimal growing conditions for cabbage plants.
5. Sunlight: Cabbage requires a sufficient amount of sunlight to grow and develop. Choose a location in your garden that receives full sun, which is typically around 6 to 8 hours of direct sunlight per day. Adequate sunlight promotes strong growth and helps prevent diseases.
6. Watering: Cabbage plants require consistent moisture to thrive, but overwatering can lead to root rot. Water the plants deeply, providing about 1 inch (2.5 cm) of water per week, and ensure that the soil stays evenly moist throughout the growing season. Mulching can help retain moisture and suppress weed growth.
7. Pest and disease management: Cabbage can be susceptible to various pests like aphids, cabbage worms, and flea beetles, as well as diseases like clubroot and black rot. Implement organic pest control methods such as companion planting, crop rotation, and regular inspection to identify and address issues before they become severe.
8. Succession planting: To extend your cabbage harvest and avoid a glut of cabbage heads all at once, consider practicing succession planting. This involves planting a new batch of cabbage transplants every few weeks to ensure a continuous supply of fresh cabbage throughout the growing season.
By considering these factors and taking appropriate action, you can set your cabbage plants up for success. From selecting the right variety to providing optimal growing conditions and managing pests, a well-planned approach will increase your chances of a bountiful and healthy cabbage harvest.
Preparing the Soil for Planting Cabbage
Properly preparing the soil before planting cabbage is crucial for setting the stage for healthy growth and a successful harvest. By taking the time to prepare the soil adequately, you can provide the optimal conditions for your cabbage plants to thrive.
1. Clear the area: Start by removing any weeds or vegetation from the planting area. Weeds can compete with cabbage plants for nutrients and water, so it’s important to clear the space thoroughly before planting.
2. Loosen the soil: Cabbage plants thrive in well-draining soil with good aeration. Use a garden fork or tiller to loosen the soil to a depth of 8 to 12 inches (20 to 30 cm). Breaking up any compacted soil allows the roots of the cabbage plants to penetrate easily and access essential nutrients.
3. Amend the soil: Cabbage plants prefer soil that is rich in organic matter. Before planting, incorporate compost, well-rotted manure, or other organic materials into the soil. This helps improve soil fertility, moisture retention, and overall soil structure. Aim for about 2 to 4 inches (5 to 10 cm) of organic matter mixed evenly into the top few inches of soil.
4. Check soil pH: Cabbage plants prefer a slightly acidic soil pH, ideally between 6.0 and 6.8. Test the soil pH using a soil testing kit or by sending a sample to a local agricultural extension office. Adjust the pH if necessary by adding lime to raise the pH or sulfur to lower the pH, based on the recommendations provided by the soil test results.
5. Remove rocks and debris: Clear the planting area of any rocks, large debris, or roots that may impede the growth of the cabbage plants. Smooth and level the soil surface to create an even bed for planting.
6. Apply a balanced fertilizer: Prior to planting, it can be beneficial to apply a balanced fertilizer rich in nitrogen, phosphorus, and potassium. Follow the manufacturer’s instructions for the appropriate application rate. This provides the cabbage plants with essential nutrients that promote healthy growth.
7. Consider cover crops or green manure: If you have the time and resources, consider incorporating cover crops or green manure into the soil before planting cabbage. These plants help enrich the soil by fixing nitrogen and adding organic matter when they are incorporated back into the soil.
By thoroughly preparing the soil for planting cabbage, you create a favorable environment for the roots to establish themselves and enable the plants to develop strong and healthy heads. Taking these steps helps ensure that your cabbage plants have access to the nutrients and growing conditions they need to thrive and produce a bountiful harvest.
Starting Cabbage Seeds Indoors
Starting cabbage seeds indoors is an excellent way to get a head start on the growing season and ensure robust and healthy plants. By providing the right conditions for seed germination and early growth, you can produce strong seedlings ready for transplanting into the garden.
1. Timing: Start cabbage seeds indoors about 4 to 6 weeks before the last expected frost date in your area. This allows the seedlings enough time to grow and develop before being transplanted into the garden. Consult a local gardening resource or use a frost date calculator to determine the ideal sowing date.
2. Containers: Use seed trays, peat pots, or other small containers to sow the cabbage seeds. Ensure that the containers have adequate drainage holes to prevent waterlogging. This allows excess moisture to drain away and prevents the risk of seedling damping-off disease.
3. Potting mix: Fill the containers with a high-quality seed-starting or potting mix. These mixes are designed to provide good aeration and moisture retention for optimal seed germination. Avoid using garden soil, as it may contain pathogens and not provide the necessary seedling support.
4. Sowing: Sow the cabbage seeds about ¼ to ½ inch (0.6 to 1.3 cm) deep in the potting mix. Space the seeds according to the recommended spacing on the seed packet, typically about 1 inch (2.5 cm) apart. Gently tamp down the soil after sowing to ensure good soil-to-seed contact.
5. Moisture and temperature: Keep the soil consistently moist but not waterlogged. Use a spray bottle or misting nozzle to provide a light misting of water, as watering from above can displace the seeds. Maintain a consistent temperature of around 70°F (21°C) for optimal germination. A heating mat or a warm location in the house can help to maintain the ideal temperature.
6. Light: Cabbage seeds require light to germinate, but they do not need direct sunlight initially. Place the containers in a well-lit area, such as near a window, or use grow lights to provide adequate light intensity for seedling growth. Once the seedlings emerge, provide 12 to 14 hours of bright light daily.
7. Thinning: Once the seedlings have developed their first set of true leaves, thin them out if they are overcrowded. Remove weaker seedlings, leaving only the strongest and healthiest ones. This allows the remaining seedlings to have enough space and resources for optimal growth.
8. Hardening off: About a week or two before transplanting, gradually acclimate the seedlings to outdoor conditions. Start by placing them in a sheltered location for a few hours each day, gradually increasing the exposure to sunlight and outdoor temperatures. This process, known as hardening off, prepares the seedlings for the transition to the garden.
By starting cabbage seeds indoors, you can extend the growing season and give your plants a head start in achieving strong growth. With proper care, attention to moisture, temperature, and light, your cabbage seedlings will be ready to thrive when transplanted into the garden.
Transplanting Cabbage Seedlings
Transplanting cabbage seedlings from indoor containers to the garden is a crucial step in the growing process. It’s important to handle the delicate seedlings with care and provide them with optimal conditions to ensure successful establishment and growth in the garden.
1. Timing: Wait until the threat of frost has passed and the soil has warmed up to at least 45°F (7°C) before transplanting cabbage seedlings. This usually occurs a few weeks after the last expected frost date in your area. Cabbage plants can tolerate a light frost, but planting them too early when the soil is still cold and wet can hinder growth.
2. Preparation: Before transplanting, prepare the garden by clearing the area of weeds and debris. Ensure that the soil is well-drained and enriched with organic matter. Dig holes that are slightly larger than the root ball of the seedlings and space them according to the recommended spacing for the specific cabbage variety.
3. Transplanting: Gently remove the cabbage seedlings from their containers, being careful not to damage the delicate roots. Use your fingers or a small tool to lift the seedlings from the bottom of the container. Hold the seedling by the leaves to avoid putting too much pressure on the stem. Place each seedling into its respective hole, making sure to plant them at the same depth they were growing previously. Firmly press the soil around the base of each seedling to ensure good soil-to-root contact.
4. Watering: After transplanting, water the seedlings thoroughly to help settle the soil around the roots. This provides the seedlings with the moisture they need to establish themselves in their new location. Water gently to avoid dislodging the seedlings or compacting the soil.
5. Mulching: Consider applying a layer of organic mulch around the base of the seedlings to help retain moisture, suppress weed growth, and regulate soil temperature. Straw, hay, or grass clippings can be used as mulch, applied to a depth of 2 to 3 inches (5 to 7.5 cm). Keep the mulch a few inches away from the seedlings’ stems to prevent rot.
6. Protection: Provide temporary shade or protection from harsh sunlight and strong winds for the newly transplanted seedlings. Use shade cloth, row covers, or plant them in an area that receives partial shade during the hottest part of the day. Gradually remove the protective coverings once the seedlings have acclimatized to their new environment.
7. Maintenance: Monitor the transplanted cabbage seedlings regularly for any signs of stress, pests, or diseases. Keep the soil consistently moist but not waterlogged, providing about 1 inch (2.5 cm) of water per week. Prune off any damaged or yellowing leaves to promote healthy growth.
By following these transplanting guidelines, you can give your cabbage seedlings the best possible start in the garden. Ensuring a smooth transition from indoor containers to the garden bed allows the plants to establish themselves quickly and thrive, ultimately leading to a bountiful harvest of delicious cabbage heads.
Directly Sowing Cabbage Seeds in the Garden
Directly sowing cabbage seeds in the garden is a straightforward and cost-effective method of growing cabbage. By following a few simple steps, you can successfully sow cabbage seeds directly into the garden soil and enjoy a plentiful harvest of fresh and nutritious cabbage heads.
1. Timing: Choose the appropriate time to sow cabbage seeds. Cabbage is a cool-season crop that prefers mild temperatures. Begin sowing seeds in early spring when the soil has thawed and temperatures consistently reach at least 45°F (7°C) or above.
2. Soil preparation: Prepare the garden bed by removing weeds, rocks, and debris. Loosen the soil to a depth of 8 to 12 inches (20 to 30 cm) using a garden fork or tiller. Incorporate compost or well-rotted manure to improve soil fertility and drainage.
3. Sowing seeds: Create shallow furrows in the soil, approximately ¼ to ½ inch (0.6 to 1.3 cm) deep. Space the furrows according to the recommended spacing for the specific cabbage variety. Sow the cabbage seeds along the furrows, following the recommended spacing between the seeds.
4. Covering and watering: Cover the seeds with a thin layer of soil or compost to protect them and promote germination. Gently water the area using a misting nozzle or a gentle spray to ensure that the soil remains moist. Avoid overwatering, as this may cause the seeds to dislodge or rot.
5. Thinning: Once the seedlings have emerged and have grown their first set of true leaves, thin them out to provide adequate space for each plant to grow. Remove the weaker seedlings, leaving the strongest and healthiest ones spaced according to the recommended spacing for the particular cabbage variety.
6. Care and maintenance: Cabbage plants require consistent moisture to thrive, especially during the early stages of growth. Water the plants regularly, providing about 1 inch (2.5 cm) of water per week. Mulching the soil around the plants can help retain moisture and suppress weed growth.
7. Pest and disease management: Keep an eye out for common cabbage pests such as aphids, cabbage worms, and slugs. Utilize organic pest control methods, like handpicking or using insecticidal soaps, to manage these pests. Regularly inspect the plants for any signs of diseases such as clubroot or black rot. Remove and dispose of infected plants to prevent the spread of disease.
8. Harvesting: Monitor the cabbage plants as they grow and develop. The time to harvest cabbage heads varies depending on the variety, usually ranging from 70 to 100 days from sowing. Harvest the cabbage heads when they feel firm and have reached the desired size. Cut the heads from the plant just above the soil line.
By directly sowing cabbage seeds in the garden, you can enjoy a rewarding and cost-effective way of growing this nutritious vegetable. By following proper planting techniques and providing the necessary care, you’ll soon be rewarded with a delicious harvest of homegrown cabbage.
Caring for Cabbage Plants
Cabbage plants require proper care throughout their growing season to ensure healthy growth and a bountiful harvest. By providing consistent attention, you can help your cabbage plants thrive and produce delicious heads that are perfect for a variety of culinary uses.
1. Watering: Cabbage plants need regular watering to maintain consistent soil moisture. Aim to provide about 1 inch (2.5 cm) of water per week, either through rainfall or supplemental irrigation. Water deeply, allowing the water to penetrate the soil to a depth of at least 6 inches (15 cm). Avoid overwatering, which can lead to root rot, and ensure good drainage to prevent waterlogged soil.
2. Fertilization: Cabbage is a heavy feeder and requires regular fertilization to support its growth. Apply a balanced fertilizer, high in nitrogen, phosphorus, and potassium, every 3 to 4 weeks during the growing season. Follow the package instructions for application rates and ensure even distribution around the base of the plants. Alternatively, use organic fertilizers such as compost or well-rotted manure to provide the necessary nutrients.
3. Weed control: Keep the area around the cabbage plants free from weeds. Weeds compete for nutrients, water, and light and can hinder the growth of your cabbage plants. Regularly inspect the planting area and remove any weeds that emerge. Mulching can also help suppress weed growth, retain soil moisture, and regulate soil temperature.
4. Pest management: Cabbage plants are susceptible to various pests, including cabbage worms, aphids, slugs, and flea beetles. Inspect the plants regularly for signs of infestation, such as chewed leaves or curled foliage. Implement organic pest control methods, such as handpicking, using insecticidal soaps, or applying natural repellents, to manage these pests and prevent damage.
5. Disease prevention: Cabbage plants can be vulnerable to diseases like clubroot, black rot, and powdery mildew. To prevent the spread of diseases, practice crop rotation, avoid overwatering, provide adequate spacing between plants for airflow, and promptly remove and dispose of any infected or diseased plants. Additionally, ensure good sanitation practices, such as cleaning gardening tools and equipment between uses.
6. Support: Some cabbage varieties, especially those with larger heads, may benefit from additional support as they grow to prevent them from toppling over. Stake or tie the outer leaves together gently to provide stability and maintain an upright position. This support can prevent head damage and maintain proper airflow around the plant.
7. Harvesting: Harvest cabbage heads when they have reached the desired size and firmness. Carefully cut the heads from the plant just above the soil line using a sharp knife. Leave any outer leaves intact to protect the inner head. Harvesting at the right time ensures the best flavor and texture of the cabbage heads.
By implementing these care practices, you can ensure the health and productivity of your cabbage plants. Regular watering, fertilization, pest and disease management, and timely harvesting will enable you to enjoy a plentiful harvest of fresh and flavorful cabbage throughout the growing season.
Harvesting Cabbage
Harvesting cabbage at the right time is crucial to ensure the best flavor, texture, and nutritional value. When the cabbage heads have reached their optimum size and are firm and dense, it’s time to carefully harvest them for consumption or storage.
1. Timing: The timing of cabbage harvest largely depends on the specific variety, as each has different maturation periods. Typically, cabbage heads are ready for harvest around 70 to 100 days after planting. However, you can visually assess their readiness by checking if the heads feel firm and solid when gently squeezed.
2. Head size: Harvest cabbage heads when they have reached the desired size. This varies depending on personal preference and the purpose of the harvest. For small or baby cabbage heads, harvest them when they are about 3 to 4 inches (7.6 to 10 cm) in diameter. For larger heads, wait until they reach around 6 to 8 inches (15 to 20 cm) in diameter.
3. Appearance: Inspect the cabbage heads for their appearance before harvesting. They should have a round or conical shape and exhibit tight, dense leaves. Avoid harvesting heads that show signs of splitting, discoloration, or disease, as these may indicate poor quality or compromised flavor.
4. Harvesting technique: When the cabbage heads are ready for harvest, use a sharp knife or garden shears to cut them from the plant. Make a clean, diagonal cut just above the soil line, ensuring that the outer leaves remain intact. Cutting at an angle helps water drain off the cut stem and reduces the risk of rot.
5. Removing outer leaves: After harvesting the main cabbage head, you may notice that there are outer leaves that appear yellowed or damaged. These leaves can be removed, but be sure to leave a few healthy outer leaves intact to protect the head during storage or transportation. Outer leaves can be used for composting or discarded.
6. Storage: Cabbage can be stored for an extended period if stored properly. To prolong its freshness, remove any loose or damaged leaves and store the cabbage heads in a cool and dry place, such as a root cellar or refrigerator. Placing them in a perforated plastic bag or wrapping them in damp paper towels can help retain moisture and prevent wilting.
7. Using harvested cabbage: Harvested cabbage can be enjoyed in various ways. Its crisp leaves are suitable for raw consumption in salads or slaws. Cabbage can also be cooked by sautéing, stir-frying, roasting, steaming, or braising. Additionally, cabbage can be fermented to make delicious sauerkraut or kimchi for long-term storage and probiotic-rich benefits.
By harvesting cabbage at the right time and handling it with care, you can enjoy fresh and flavorful cabbage in your meals. Whether consumed immediately or stored for later use, properly harvested cabbage will add a nutritious and versatile vegetable to your culinary endeavors.