
Benefits of Planting Brassicas
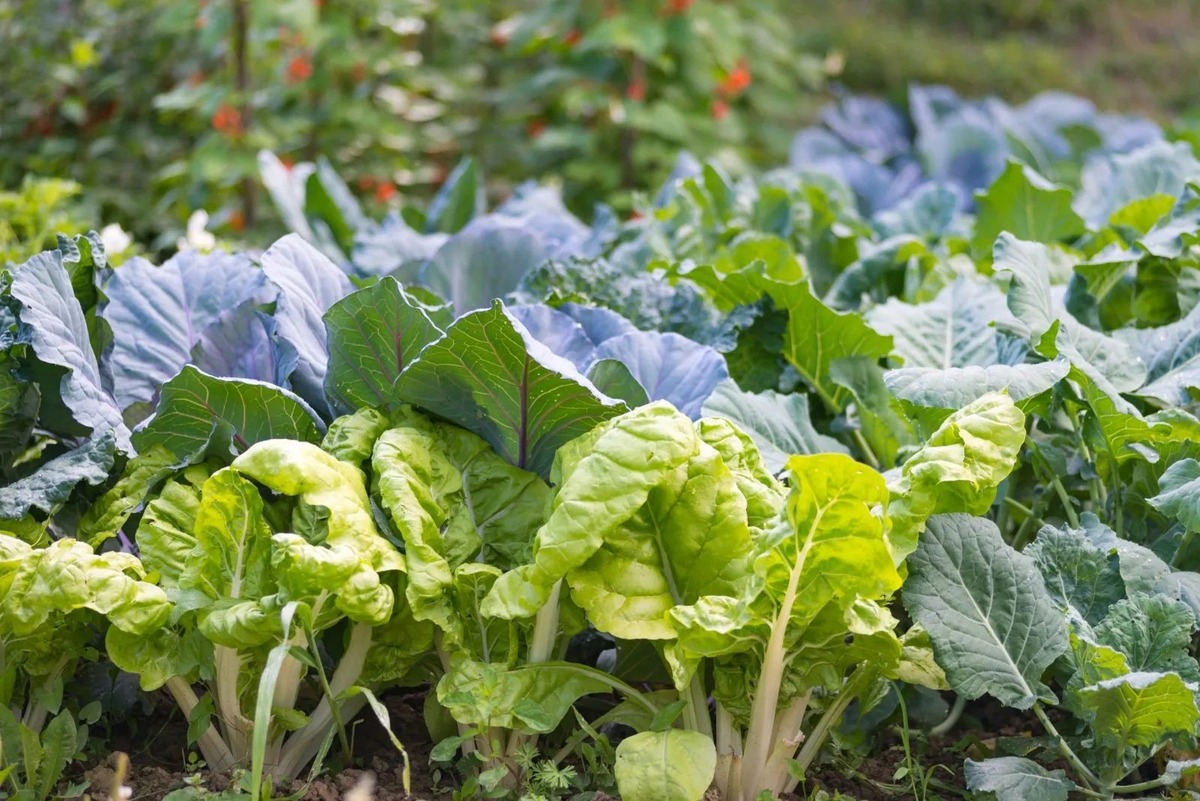
When it comes to gardening, there are few vegetables as versatile and rewarding as brassicas. These leafy green vegetables, which include cabbage, broccoli, kale, and Brussels sprouts, offer a range of health benefits and culinary possibilities. If you’re considering adding brassicas to your garden, here are some of the benefits you can expect:
Nutritional Powerhouses: Brassicas are packed with essential vitamins and minerals that contribute to overall health and well-being. They are a rich source of vitamin C, vitamin K, and folate, which are crucial for supporting the immune system and promoting healthy cell function. Additionally, brassicas are high in fiber, low in calories, and contain powerful antioxidants that can help combat inflammation in the body.
Disease Prevention: The compounds found in brassicas have been linked to a reduced risk of chronic diseases such as heart disease, certain types of cancer, and diabetes. The glucosinolates in brassicas, in particular, have been found to have anti-cancer properties and may help inhibit the growth of tumor cells.
Soil Improvement: Brassicas are known for their ability to improve soil health. They have deep root systems that help break up compacted soil and increase its drainage capacity. Furthermore, brassicas are known as bioaccumulators, meaning they absorb nutrients from the soil and make them more accessible to other plants. By rotating brassicas with other crops, you can naturally enrich your soil and improve its fertility.
Crop Rotation: Brassicas are excellent crops for rotation purposes. By alternating brassicas with other plant families, you can help disrupt pest and disease cycles, reduce the depletion of specific soil nutrients, and promote overall garden health. Crop rotation also helps maintain a balanced ecosystem and reduces the need for synthetic fertilizers and pesticides.
Varied Culinary Uses: Brassicas offer a wide range of culinary possibilities. From stir-fries and salads to soups and stews, these versatile vegetables can be used in numerous hearty and flavorful dishes. They add texture, color, and a unique taste to any meal. Moreover, the different varieties of brassicas, such as broccoli and cauliflower, allow for endless experimentation in the kitchen.
Economic Value: Growing your own brassicas can save you money in the long run. These vegetables are often expensive to buy at the grocery store, but by planting them in your garden, you can enjoy a bountiful harvest without breaking the bank. Additionally, by preserving and storing excess brassicas, you can enjoy their benefits even when they are out of season.
With all these benefits in mind, it’s easy to see why planting brassicas is a smart choice for any gardener. Whether you’re a seasoned green thumb or just starting out, growing brassicas can be a rewarding and fulfilling experience. So, roll up your sleeves, prepare your garden beds, and get ready to enjoy the nutritious and delicious rewards that brassicas have to offer.
Factors to Consider When Planting Brassicas
Planting brassicas requires careful consideration of various factors to ensure a successful and thriving garden. Whether you are a novice gardener or have years of experience, here are some key factors to keep in mind when planning to grow brassicas:
Climate: Brassicas thrive in cool weather and are generally frost tolerant. However, different varieties have specific temperature requirements for optimal growth. Consider your local climate and choose brassicas that are well-suited to the temperatures in your area. Additionally, pay attention to the length of your growing season, as some brassicas require a longer growing season to fully mature.
Sunlight: Brassicas require ample sunlight to grow and produce healthy, robust crops. Ensure that your garden location receives at least six hours of direct sunlight each day. If your garden is shaded, consider planting brassicas in containers or raised beds that can be moved to sunnier areas if needed.
Soil Quality: Brassicas prefer well-draining soil that is rich in organic matter. Before planting, test your soil’s pH levels and make necessary adjustments to achieve a range of 6.0 to 7.5, which is optimal for brassica growth. Additionally, amend your soil with compost or aged manure to boost fertility and promote healthy plant development.
Spacing: Proper spacing is crucial for the healthy growth of brassicas. Adequate spacing allows for proper airflow and reduces the risk of diseases. Pay attention to the recommended spacing for the specific brassica varieties you are planting. Generally, spacing between plants should be around 12 to 24 inches apart, depending on the type of brassica.
Companion Planting: Consider companion planting to optimize the growth of your brassicas. Plants such as onions, garlic, and herbs like thyme and rosemary can help repel pests that are often attracted to brassicas. Avoid planting brassicas near other cruciferous vegetables to prevent cross-contamination of diseases and pests.
Pest and Disease Control: Brassicas are susceptible to certain pests and diseases, such as cabbage worms, aphids, and clubroot. Implement preventive measures such as using row covers, regular inspection, and organic pest control methods to protect your plants. Crop rotation with non-brassica plants every few years can also help reduce pest and disease pressure.
Watering and Irrigation: Proper watering is essential for healthy brassica growth. They require consistent moisture, especially during hot, dry periods. Water deeply and evenly, making sure to avoid overhead watering whenever possible. Mulching around the plants can help retain moisture and regulate soil temperature.
By considering these factors, you can ensure a successful brassica garden and maximize your harvest. Take the time to plan accordingly, consider your specific growing conditions, and implement the necessary measures to create an optimal environment for your brassicas to thrive.
Understanding the Growing Season for Brassicas
When it comes to growing brassicas, understanding the appropriate growing season is key to ensuring a successful harvest. Brassicas have specific temperature requirements that affect their growth and development. Here’s what you need to know about the growing season for brassicas:
Cool Season Vegetables: Brassicas, including cabbage, cauliflower, broccoli, kale, and Brussels sprouts, are cool-season vegetables. They thrive in temperatures ranging from 45°F to 75°F (7°C to 24°C). These crops prefer cooler temperatures and perform best when planted in early spring for a spring harvest or in late summer for a fall harvest.
Spring Planting: If you’re planning to grow brassicas in the spring, start planting them as soon as the soil can be worked. This is typically when the soil temperature reaches around 45°F (7°C), which occurs a few weeks before the last expected frost date. Early spring planting allows the brassicas to mature before the heat of summer, ensuring high-quality produce.
Fall Planting: Fall planting is another option for growing brassicas. Plant them about 6-8 weeks before the first expected frost date in your area. This will give the brassicas enough time to establish themselves before the cold temperatures arrive. Fall-planted brassicas thrive in cool weather and often produce sweeter and crisper crops due to the cold weather exposure.
Protection from Extremes: Brassicas can tolerate some frost, but prolonged exposure to extreme cold temperatures can harm the plants. If you expect a hard freeze, consider using row covers or other protective measures to shield your brassicas from damage. Additionally, provide them with ample moisture during periods of drought or excessive heat to prevent stress and bolting.
Succession Planting: To enjoy a continuous harvest of brassicas throughout the growing season, practice succession planting. Instead of planting all your brassicas at once, stagger the plantings by a few weeks. This ensures a steady supply of fresh produce and extends the harvest period.
Regional Variations: Keep in mind that the growing season for brassicas may vary depending on your region and specific climatic conditions. Different varieties of brassicas also have varying maturation times. Research local planting guidelines and consult with experienced gardeners or your local agricultural extension office for specific recommendations.
Understanding the growing season for brassicas is essential for successful cultivation. By planting at the appropriate times, providing proper care, and protecting against extreme weather conditions, you can enjoy a bountiful harvest of nutritious and delicious brassicas throughout the year.
Recommended Planting Dates for Different Types of Brassicas
When planning to grow brassicas, it’s essential to know the optimal planting dates for each specific variety. The recommended planting dates may vary depending on your location and the specific climate conditions. Here are some general guidelines for planting different types of brassicas:
Cabbage: Cabbage is a popular brassica that can be planted in both the spring and fall. For spring planting, start seeds indoors 6-8 weeks before the last expected frost date, and transplant outdoors when seedlings are around 4-6 weeks old. For fall planting, sow seeds directly in the garden about 6-8 weeks before the first expected frost date.
Broccoli: Broccoli is another versatile brassica that can be grown in the spring and fall. Start broccoli seeds indoors 6-8 weeks before the last expected frost date and transplant when seedlings are 4-6 weeks old. For fall planting, sow seeds directly in the garden about 6-8 weeks before the first expected frost date.
Cauliflower: Cauliflower has similar planting requirements to broccoli. Start seeds indoors 6-8 weeks before the last expected frost date, and transplant when seedlings are 4-6 weeks old. For fall planting, sow seeds directly in the garden about 6-8 weeks before the first expected frost date.
Kale: Kale is a cold-tolerant brassica that can be planted in early spring or late summer for a fall harvest. Kale seeds can be directly sown in the garden a few weeks before the last expected frost date in the spring. For fall planting, sow seeds about 6-8 weeks before the first expected frost date.
Brussels Sprouts: Brussels sprouts are typically grown for a fall harvest. Start seeds indoors 12-14 weeks before the first expected frost date. Transplant seedlings in the garden about 2-3 weeks before the last expected frost date in the spring. Brussels sprouts require a long growing season, so plan accordingly.
Chinese Cabbage: Chinese cabbage, such as bok choy, can be planted in both the spring and fall. Start seeds indoors 4-6 weeks before the last expected frost date and transplant when seedlings are around 3-4 weeks old. For fall planting, sow seeds directly in the garden about 6-8 weeks before the first expected frost date.
Collard Greens: Collard greens are heat-tolerant brassicas that can be planted in the spring and fall. Sow seeds directly in the garden a few weeks before the last expected frost date in the spring. For fall planting, sow seeds about 6-8 weeks before the first expected frost date.
Romanesco: Romanesco is an intriguing brassica known for its unique appearance. It can be planted in both the spring and fall. Start seeds indoors 4-6 weeks before the last expected frost date and transplant when seedlings are around 3-4 weeks old. For fall planting, sow seeds directly in the garden about 6-8 weeks before the first expected frost date.
Remember to adjust the planting dates based on your specific location and climate. Refer to the specific seed packets or consult with local gardening resources for more accurate planting guidelines. With proper timing and care, you can enjoy a bountiful harvest of various brassicas throughout the growing season.
Factors That Affect Planting Dates for Brassicas
When determining the ideal planting dates for brassicas, several factors come into play. These factors can vary depending on your geographical location, climate, and specific growing conditions. Understanding these factors is crucial for successful brassica cultivation. Here are some key factors that affect the planting dates for brassicas:
Climate and Temperature: Brassicas are cool-season vegetables that thrive in cooler temperatures. The specific climate of your region plays a significant role in determining the ideal planting dates. Brassicas prefer temperatures between 45°F and 75°F (7°C and 24°C) for optimal growth. Consider your area’s average frost dates and choose planting dates that allow the plants to mature before the onset of extreme heat or cold.
Frost Tolerance: While brassicas can tolerate some cold and frost, each type of brassica has different levels of frost tolerance. Some varieties, like kale and Brussels sprouts, are more cold-tolerant and can withstand lower temperatures. Others, such as cabbage and cauliflower, have lower frost tolerance. Planting earlier in the season or utilizing protective measures, such as row covers, can help protect the plants from frost and extend the growing season.
Length of Growing Season: Brassicas have varying maturation times, and the length of your growing season will determine which varieties you can successfully grow. Long-season brassicas, like Brussels sprouts, may require a longer growing season to reach maturity. Consider the average length of your growing season and choose varieties that can be grown within that timeframe. Alternatively, you can start seeds indoors or utilize transplants to gain a head start.
Soil Temperature: Brassicas prefer to be planted in soil that has reached a certain temperature range. Cold soil can slow down their growth and lead to poor establishment. Before planting, ensure that your soil has reached the recommended temperature range, usually above 45°F (7°C). Using a soil thermometer can help you accurately gauge the soil temperature and determine the appropriate planting time.
Local Microclimates: Microclimates are small areas within a region that have unique climate characteristics. Factors like elevation, proximity to water, and local landscape features can influence temperature and weather patterns. Be aware of any microclimates in your garden or surrounding area, as they can impact your brassica planting dates. Monitor temperature fluctuations and adjust your planting schedules accordingly to maximize growth and yield.
Weather Patterns: Unpredictable weather patterns can affect planting dates for brassicas. Unexpected late frosts, prolonged heatwaves, or heavy rainfall can disrupt your planting plans. Stay updated on local weather forecasts and be prepared to adjust your planting dates if necessary. Having a contingency plan and being flexible with your schedule can help you navigate any weather challenges that may arise.
Garden Management Practices: Your overall garden management practices, such as crop rotation, plant spacing, and soil fertility, can also influence the timing of planting brassicas. Crop rotation helps prevent the buildup of specific pest and disease populations, while proper plant spacing ensures good airflow and reduces the likelihood of disease. Implementing these practices in your garden plan can impact when brassicas are planted to maintain a healthy and productive garden ecosystem.
Consider these factors as you determine the optimal planting dates for brassicas in your garden. By taking into account your local climate, soil conditions, and other influencing factors, you can maximize your chances of growing healthy and abundant brassica crops.
How to Prepare the Soil for Planting Brassicas
The key to successful growth and development of brassicas lies in preparing the soil properly before planting. The following steps will guide you on how to prepare the soil for planting brassicas:
1. Clear the area: Start by clearing the designated area of any weeds, grass, or debris. Remove any large rocks or stones that may hinder root growth or interfere with soil preparation.
2. Test the soil: Perform a soil test to determine the nutrient levels and pH of your soil. Brassicas prefer a slightly acidic to neutral pH range of 6.0 to 7.5. Based on the results of the soil test, you may need to make adjustments to the pH by adding amendments such as lime (to raise pH) or sulfur (to lower pH).
3. Amend the soil: Improve the soil’s fertility and structure by incorporating organic matter. Add well-rotted compost, aged manure, or other organic materials to enrich the soil. These additions enhance drainage, promote nutrient availability, and improve moisture retention.
4. Break up compacted soil: Brassicas thrive in loose, well-drained soil. Use a garden fork or tiller to break up any compacted soil and improve aeration. This ensures that the roots can penetrate easily and absorb necessary nutrients.
5. Remove stones and debris: Take the time to remove any residual stones, twigs, or other debris that may be present in the soil. These impediments can hinder plant growth and interfere with root development.
6. Incorporate organic fertilizers: If necessary, add organic-based fertilizers to provide additional nutrients for the brassicas. Choose a well-balanced fertilizer or one specifically formulated for brassicas, and follow the manufacturer’s instructions for application rates.
7. Rake and level the soil: Use a garden rake to smooth the soil surface and create a level bed for planting. This helps promote even water distribution and ensures uniform germination and growth of the brassica plants.
8. Mulch the soil: Apply a layer of organic mulch, such as straw or wood chips, around the newly prepared soil. Mulching helps suppress weeds, conserve soil moisture, and regulate soil temperature. Keep the mulch a few inches away from the base of the brassica plants to prevent rot and discourage pests.
9. Allow the soil to settle: It’s beneficial to allow the prepared soil to settle for a few days before planting. This helps the organic matter integrate with the soil, allows any remaining clumps to break down, and creates a more hospitable environment for the brassica plants.
By following these steps and properly preparing the soil, you provide your brassicas with the best foundation for growth and development. The improved soil quality will support the plants throughout their lifecycle, ensuring healthy and vigorous brassica crops.
Tips for Planting Brassicas
Planting brassicas requires careful attention to detail to ensure successful growth and a bountiful harvest. Here are some helpful tips to consider when planting brassicas:
1. Choose healthy seedlings or seeds: Whether you’re starting from seeds or purchasing seedlings, select healthy and disease-free options. Look for vigorous seedlings with strong stems and vibrant leaves. Check the seed packets or labels for recommended planting instructions.
2. Harden off seedlings: If you’ve started your brassica seedlings indoors, gradually expose them to outdoor conditions before transplanting. This process, known as hardening off, helps acclimate the seedlings to the new environment and reduces transplant shock.
3. Prepare the planting holes or rows: Dig planting holes or create rows that match the recommended spacing for your brassica variety. Ensure that the holes or rows are deep enough to accommodate the root system and provide sufficient room for growth.
4. Plant at the correct depth: When transplanting seedlings or sowing seeds, plant at the appropriate depth. Follow the instructions on the seed packet or plant seedlings slightly deeper than they were in their nursery containers. This promotes root development and stability.
5. Water thoroughly after planting: Immediately after planting, water the brassica seedlings or seeds thoroughly. This helps settle the soil, ensures good root-to-soil contact, and initiates the establishment process. Use a gentle stream of water to avoid dislodging or damaging the plants.
6. Provide adequate spacing: Follow the recommended spacing guidelines for your brassica variety to allow proper airflow and prevent crowding. Adequate spacing reduces the risk of diseases and promotes healthy growth. Thinning may be necessary if you’ve sown seeds too densely.
7. Use organic mulch: Apply a layer of organic mulch around the brassica plants to suppress weeds, conserve soil moisture, and regulate temperature. Organic mulch, such as straw or wood chips, also helps in preventing soil-borne diseases and maintaining soil structure.
8. Implement pest control measures: Brassicas are prone to various pests, including cabbage worms, aphids, and flea beetles. Monitor your plants regularly for signs of infestation and implement organic pest control methods, such as using row covers, insecticidal soaps, or natural predators.
9. Water consistently: Brassicas require consistent moisture throughout the growing season. Water deeply and regularly, especially during dry periods. Avoid overhead watering to minimize the risk of fungal diseases. Mulching can help retain soil moisture and reduce evaporation.
10. Provide support for tall varieties: Some brassicas, like Brussels sprouts and tall varieties of cabbage, may require additional support. Use stakes or cages to prevent the plants from toppling over due to wind or their weight. Secure the plants early in the growth process to avoid damaging the roots.
11. Monitor for diseases and nutrient deficiencies: Keep a close eye on your brassica plants for any signs of diseases, such as clubroot or powdery mildew, as well as nutrient deficiencies. Early detection allows for timely intervention and helps maintain plant health.
12. Practice crop rotation: Rotate your brassicas with other plant families each year to prevent the buildup of pest and disease populations. This helps maintain the overall health of your garden and reduces the need for chemical interventions.
By following these tips, you can ensure a successful brassica planting and set the stage for a thriving garden. With proper care and attention, you’ll be rewarded with a delicious and nutritious harvest of brassicas.
Common Mistakes to Avoid When Planting Brassicas
Planting brassicas can be a rewarding experience, but it’s important to be aware of common mistakes that can hinder their growth and reduce your yield. By avoiding these pitfalls, you can increase your chances of a successful brassica harvest. Here are some common mistakes to avoid when planting brassicas:
1. Improper timing: Planting brassicas too early or too late in the season can lead to poor growth and lower yields. Be mindful of your region’s climate and the specific requirements of each brassica variety. Refer to seed packets or consult local gardening resources for the recommended planting dates.
2. Overcrowding: Planting brassicas too closely together can result in overcrowding and competition for resources. It restricts airflow and increases the risk of diseases. Follow the recommended spacing guidelines for each brassica type to ensure adequate room for growth and proper development.
3. Neglecting soil preparation: Failing to properly prepare the soil before planting can negatively impact brassica growth. Brassicas prefer well-draining, fertile soil with a slightly acidic to neutral pH. Amend the soil with organic matter and ensure proper drainage to create an optimal environment for brassica growth.
4. Poor watering practices: Brassicas require consistent and adequate moisture throughout the growing season. Overwatering or underwatering can lead to stunted growth, nutrient deficiencies, and susceptibility to diseases. Water deeply and regularly, while also allowing the soil to dry slightly between waterings.
5. Neglecting pest and disease control: Brassicas are prone to various pests and diseases, such as cabbage worms, aphids, and clubroot. Failing to monitor and control these issues can result in damaged plants and reduced yields. Implement preventive measures, such as using row covers, practicing crop rotation, and using organic pest control methods.
6. Not providing adequate support: Certain brassica varieties, like Brussels sprouts, may require additional support as they grow taller. Failure to provide support can cause the plants to topple over under their own weight or in strong winds. Use stakes, cages, or trellises to provide necessary support and prevent damage.
7. Ignoring nutrient deficiencies: Brassicas require proper nutrient levels for healthy growth. Neglecting nutrient deficiencies can result in poor plant development and reduced yields. Regularly monitor your plants for signs of deficiencies, such as yellowing leaves, and address any issues with appropriate fertilizers or soil amendments.
8. Lack of crop rotation: Planting brassicas in the same location year after year can lead to the buildup of pests and diseases specific to this plant family. Implementing crop rotation helps break pest cycles, prevents soil nutrient depletion, and maintains overall garden health. Avoid planting brassicas in the same spot for consecutive seasons.
9. Overreliance on chemical controls: Relying solely on chemical pesticides and fertilizers can be detrimental to the environment and beneficial insects. Seek organic and natural alternatives whenever possible to protect your brassicas and maintain a healthy garden ecosystem.
10. Neglecting regular maintenance: Brassicas require ongoing attention throughout the growing season. Neglecting routine tasks such as regular watering, weeding, and monitoring for pests and diseases can result in reduced yields and plant health. Dedicate time to regularly care for your brassicas to ensure their success.
By avoiding these common mistakes, you can set the stage for healthy and productive brassica plants. Be diligent in your preparations, provide proper care, and take swift action when needed to enjoy a bountiful harvest of these nutritious and delicious vegetables.
How to Care for Brassicas After Planting
Caring for brassicas after planting is crucial to ensure their healthy growth and achieve a bountiful harvest. While brassicas are relatively resilient, they still require consistent attention and proper care. Here are some essential tips for caring for your brassicas after planting:
1. Water consistently: Brassicas need regular and even moisture levels to thrive. Water deeply and consistently, ensuring the soil remains moist but not waterlogged. Avoid overhead watering if possible to prevent the development of fungal diseases. Mulching around the plants can help regulate soil moisture and reduce evaporation.
2. Monitor for pests and diseases: Regularly inspect your brassicas for signs of pests, such as cabbage worms, aphids, or flea beetles. Meanwhile, be attentive to any signs of diseases like powdery mildew or clubroot. Early detection allows for prompt intervention and helps prevent the spread of pests and diseases throughout the garden.
3. Implement organic pest control measures: Use organic pest control methods to manage pests without the use of harmful chemicals. Options include handpicking pests, introducing beneficial insects, and using organic-approved insecticides when necessary. Regularly monitor your plants to catch and address pest issues early on.
4. Provide adequate support for tall varieties: Some brassica varieties, such as Brussels sprouts or tall cabbage varieties, may require additional support as they grow. Stake or cage the plants early in their growth to prevent them from toppling over due to their height or strong winds. Regularly check the supports and adjust them as needed.
5. Weed regularly: Keep the area around your brassicas free from weeds. Weeds compete with the plants for nutrients, water, and sunlight. Regularly remove weeds by hand or use mulching to suppress their growth and preserve soil moisture. Be cautious when weeding to avoid damaging the shallow root systems of brassica plants.
6. Monitor nutrient levels: Brassicas are nutrient-hungry plants, and it’s important to monitor and maintain proper nutrient levels. Apply organic fertilizers or organic-approved amendments as needed to ensure the plants have access to essential nutrients. Regularly check for signs of nutrient deficiencies, such as yellowing leaves, and address them promptly.
7. Practice crop rotation: Rotate your brassicas with other plant families each year to reduce the risk of pests and diseases that are specific to the brassica family. Crop rotation helps break pest cycles and maintain the overall health of your garden. Avoid planting brassicas in the same area for consecutive seasons.
8. Thin seedlings if necessary: If you have sown brassica seeds densely, thin the seedlings to the appropriate spacing once they have developed several sets of true leaves. Thin out the weaker seedlings, allowing adequate room for the remaining plants to develop properly.
9. Maintain good garden hygiene: Cleanliness and good garden hygiene are essential to prevent the spread of diseases and pests. Remove and dispose of any diseased or infested plant material promptly. Clean your tools after each use to avoid contamination. By practicing good garden hygiene, you can minimize the risk of problems affecting your brassicas.
10. Harvest at the right time: Harvest your brassicas at the appropriate stage of maturity for the specific variety. Each brassica type has its optimal harvest time, which can range from when the heads are firm and compact for cabbage and cauliflower to when the sprouts are firm and bright green for Brussels sprouts. Harvesting at the right time ensures peak flavor and quality.
By following these care tips, you can maintain the health and vigor of your brassicas, setting the stage for a successful harvest of these nutritious and delicious vegetables.
Harvesting and Storing Brassicas
Knowing when and how to harvest and store your brassicas is crucial to ensure that you enjoy the best flavor and quality. Here are some guidelines to help you harvest and store your brassicas effectively:
Harvesting:
– Cabbage: Harvest cabbage heads when they feel firm and solid to the touch. Cut the heads off at the base, leaving a few outer leaves intact to help protect the heart.
– Broccoli: Harvest broccoli heads when the florets are tightly closed and dark green. Cut the main head with a sharp knife, leaving a few inches of stem attached.
– Cauliflower: Harvest cauliflower heads when they are fully developed and the curds are compact and firm. Cut the heads off, leaving a portion of the outer leaves intact.
– Brussels Sprouts: Harvest Brussels sprouts by picking the sprouts from the bottom of the stalk as they reach the desired size. Break or cut them off, starting from the lowest sprouts and moving upward.
– Kale: Harvest kale leaves by cutting them off individually or by cutting the entire plant at the base. Pick the young, tender leaves for the best flavor.
– Other Brassicas: Harvest other brassica varieties, such as collard greens or Chinese cabbage, by picking the leaves individually or cutting off the entire plant at the base. Harvest when the leaves are young and tender for optimal taste.
Storing:
– Remove damaged leaves before storing. Remove any leaves that show signs of rot, pests, or diseases.
– Trim excess stem length. Trim the stems to a few inches to reduce moisture loss and save space in storage.
– Store brassicas unwashed. Washing can lead to increased moisture in the storage area, which promotes decay. Store brassicas in a cool, dry place such as a root cellar, basement, or refrigerator.
– Wrap tightly in plastic or store in perforated bags. Brassicas can lose moisture quickly. To prevent wilting, wrap them tightly in plastic wrap or store them in perforated plastic bags to maintain humidity while allowing airflow.
– Check regularly for spoilage. Regularly inspect your stored brassicas for any signs of spoilage, such as mold or soft spots. Remove any damaged specimens promptly to prevent further deterioration.
– Consume quickly or freeze. Freshly harvested brassicas are best consumed within a week or two for optimal flavor and quality. Alternatively, you can blanch and freeze them for longer storage. This preserves their nutritional value and flavor for several months.
By harvesting at the right time and correctly storing your brassicas, you can savor the fresh taste and nutritional benefits of these garden favorites long after the growing season has ended.